The Replay is a weekly newsletter for dev and engineering leaders.
Delivered once a week, it's your curated guide to the most important conversations around frontend dev, emerging AI tools, and the state of modern software.
Supabase is an open source Firebase alternative. This is a bold title, because Firebase is intended as a complete solution, with various features like authentication, file storage, serverless functions, SDK, and much more.

Even though Firebase has tons of features, Supabase may be more useful because it uses open source technology. Supabase gives you the flexibility to host on your local machine, in a cloud service provider, or even as a Docker container. This means it’s restriction free, so there’s no vendor locking.
Supabase uses PostgreSQL under the hood for the database and listens to real-time changes through several tools that they build.
Currently, Supabase only supports features like databases, authentication, and storage. They also have serverless functions, although these are still in the development stage.
Supabase stands out for the following reasons:
There are, however, several downsides to using Supabase. They include:
Supabase provides open source object storage that can hold any file type with high scalability baked in. It provides a convenient API that allows for custom policies and permissions.
Some features like CDN integration and auto transformation and optimization (resizing and compressing your media) will be available soon. With the addition of these features, Supabase storage will be a strong competitor to Firebase storage.
Every Supabase project comes with built in authentication, authorization, and user management without requiring any other tools.
Supabase provides a simple API to integrate third party authentication service providers like Google, Apple, Twitter, Facebook, Github, Azure, Gitlab, and Bitbucket. It also supports enterprise logins like SAML.
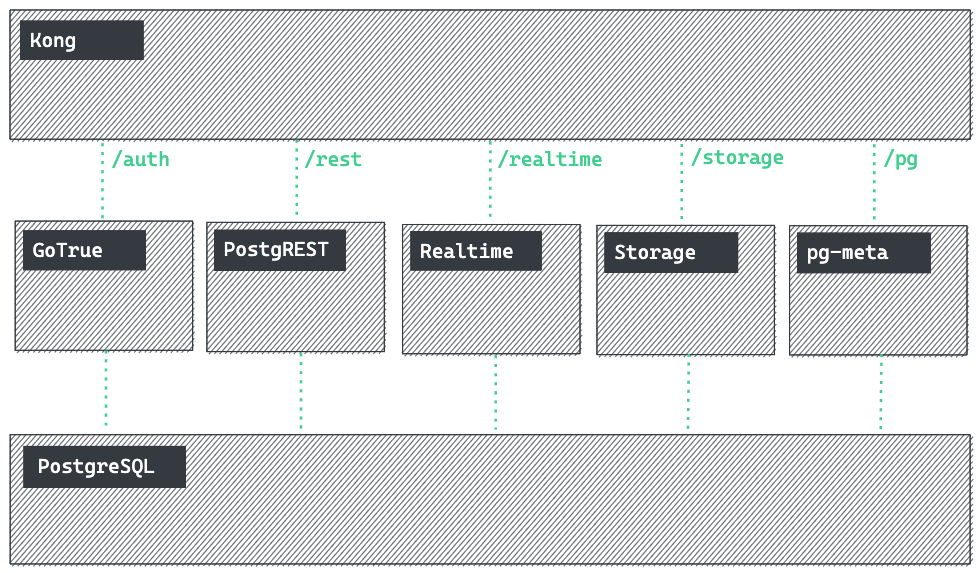
Supabase uses several tools with PostgreSQL to give real-time updates. They are as follows:

Through the above architecture diagram, you can see how Supabase enables real-time data with PostgreSQL.
In this section, let’s see how we can create a database in Supabase and enable real-time updates to it.
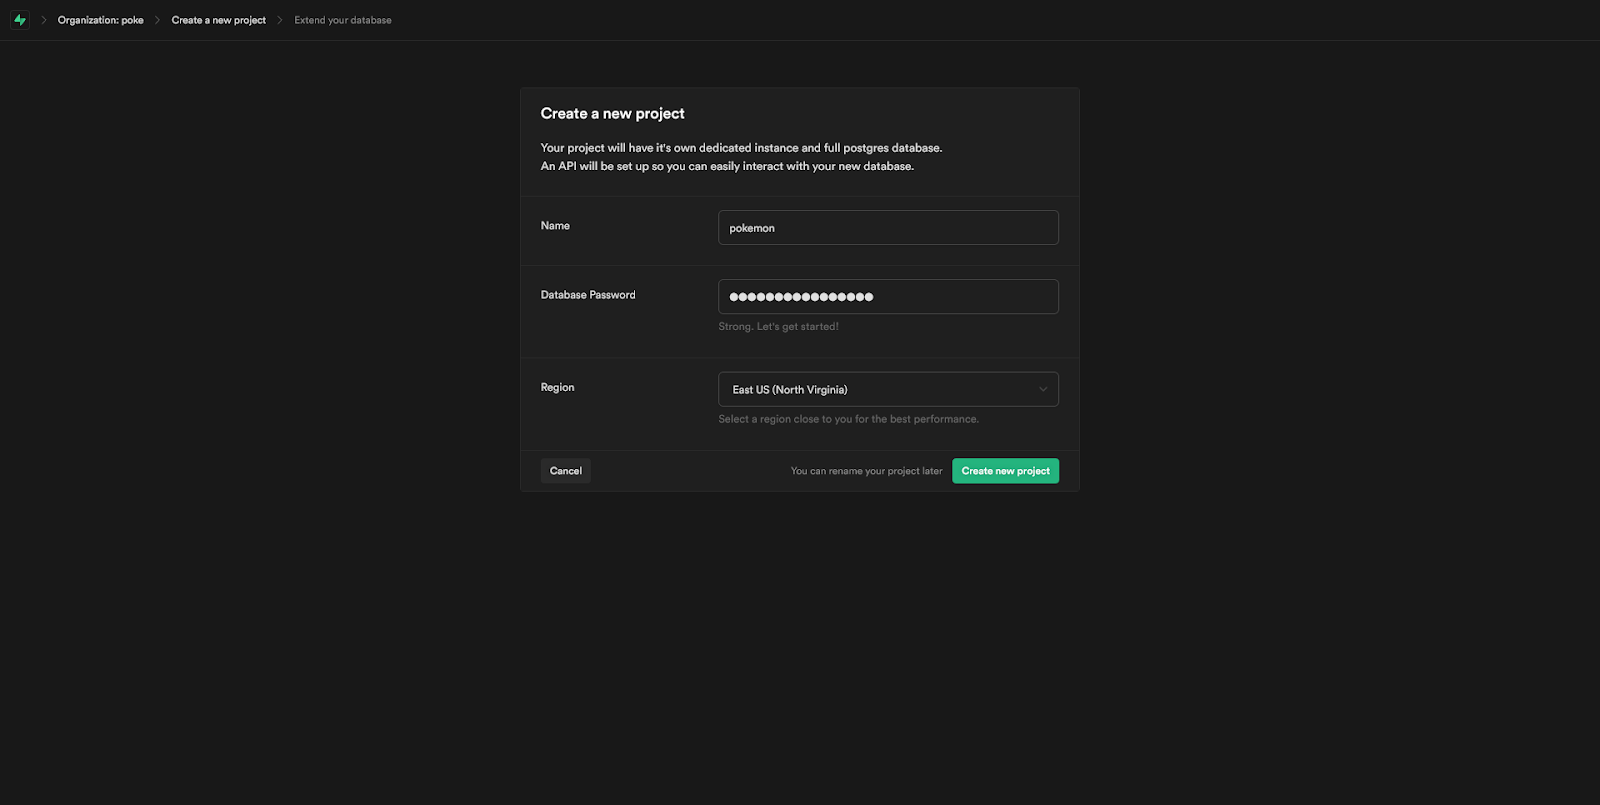
First, let’s sign in and create an organization from the Supabase dashboard. Then, under the project tab, click the create project button. That will prompt you to enter the database name, password and region where you want to host your database:

Next, we need to create a table from the project dashboard under the table tab. This section will prompt you to enter the database name and the fields of the database (primary key and others) along with the type of the data.
We will create a primary key with data type UUID with auto-generation enabled:

Now we need to enable this table to receive real-time updates. Move to the database tab from the left sidebar.
Next, select the replication tab. This section will display a table of tables that you have created. Enable the replication feature for a particular table, like so:


Now that we have created a database and a table with replication enabled, let’s see how to use the Supabase JavaScript SDK’s API methods.
The Supabase JavaScript API provides easy-to-understand methods. Since we are dealing with SQL, the API methods look similar to SQL queries:
const { data, error } = await supabase
  .from('pokemon')
  .insert([
    { name:'Pikachu', power: 'Fire', description: 'Fluffy' },
  ])
The above code is to insert a row in a table called pokemon. Notice how the Supabase connection object selects the table and the operation like an SQL query.
Data querying in Supabase is similar to a select statement in SQL:
let { data: pokemon, error } = await supabase
  .from('pokemon')
  .select("*")
More filter options are available with the Supabase query object. These will look similar to the where and like clause in an SQL query:
  .eq() ,
  .gt() ,
  .lt() ,
  .like() ,
  .is() ,
  .in()
Let’s see how we can integrate Supabase with React with Create React App. For this example, let’s create a small Pokémon application that maintains data about your favorite Pokémon.
First, let’s create a React app:
npx create-react-app supabase-pokemons
Now let’s install the dependencies that we will need to build this Pokémon application. We will be using Semantic UI for building the UI:
yarn add @supabase/supabase-js semantic-ui-react semantic-ui-css react-router-dom
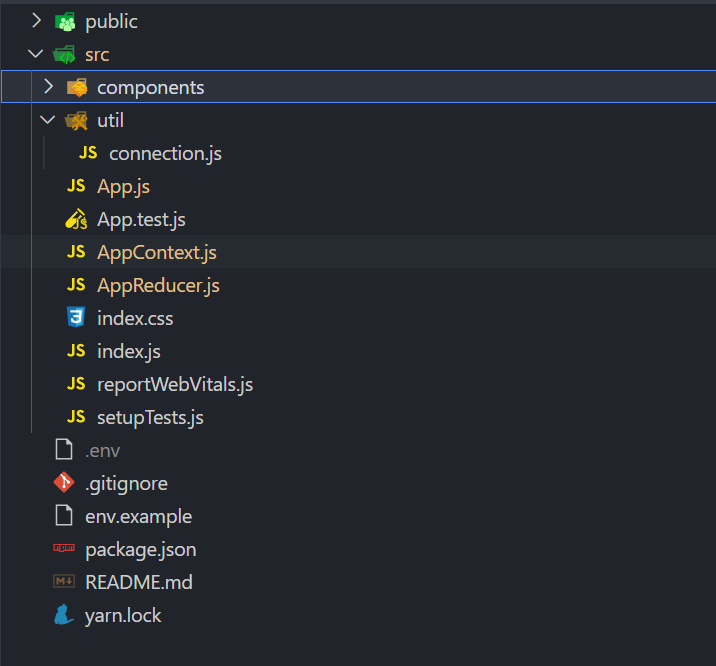
Now let’s structure the project directories. Since this is a small application, we will be using React’s Context API.

First, let’s create a .env file on the project root with the following keys:
REACT_APP_SUPABASE_URL= <SUPABASE_URL>
REACT_APP_SUPABASE_KEY= <SUPABASE_KEY>
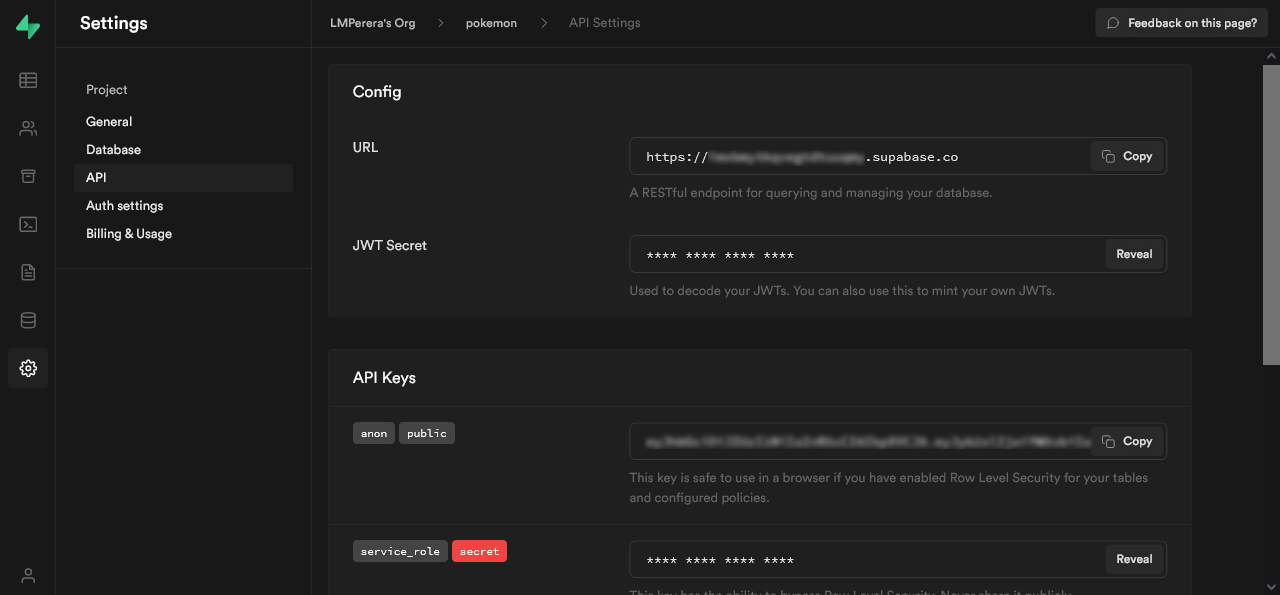
These keys are available on the Supabase dashboard under the settings section:

Now, let’s create the Supabase connection under util/connection.js with the following code snippet:
import { createClient } from '@supabase/supabase-js';
const REACT_APP_SUPABASE_URL = process.env.REACT_APP_SUPABASE_URL;
const REACT_APP_SUPABASE_KEY = process.env.REACT_APP_SUPABASE_KEY;
export const supabase = createClient(REACT_APP_SUPABASE_URL, REACT_APP_SUPABASE_KEY);

                                               connection.js file
Let’s add login functionality to the application with built in, third party service providers like Google and Github:
const signIn = async () => {
        await supabase.auth.signIn({ email: credentials.email, password: credentials.password });
        clear();
    }

    const signUp = async () => {
        await supabase.auth.signUp({ email: credentials.email, password: credentials.password })
        clear();
    }
As you can see, user management is simple to maintain. You can create it with a few lines of code.
Next, let’s see how we can integrate with Google and Github. First, you will need to create secret keys from the particular auth provider and add them to Supabase through the dashboard:
const gitHub = async () => {
        await supabase.auth.signIn({
            provider: 'github'
        })
    }
You can use the above code to integrate any other third party auth providers that Supabase supports.
It’s just a matter of changing the provider name, and Supabase will take care of the rest for you:
import { useState, useEffect, useContext } from "react"
import AppContext from "../AppContext";
import { useHistory } from "react-router-dom";
import { Grid, GridColumn, GridRow, Form, FormField, Input, Icon, Button, Header, Segment } from "semantic-ui-react"

const initState = { email: '', password: '', passwordConfirm: '' }

function Login({ supabase }) {
    let history = useHistory();
    const [isSignIn, setSignIn] = useState(false);
    const [credentials, setCredentials] = useState(initState);
    const { user, isLoggedIn, login, logout } = useContext(AppContext)

    useEffect(() => {
        const { data: authListener } = supabase.auth.onAuthStateChange(
            async (event, session) => {
                const currentUser = session?.user;
                login(session.user)
            }
        );
        return () => {
            authListener?.unsubscribe();
        };
    }, [user]);

    useEffect(() => {
        if (isLoggedIn) {
            history.push("/home");
        }
    }, [isLoggedIn])

    const onChange = (type, value) => {
        setCredentials({ ...credentials, [type]: value })
    }

    const clear = () => {
        setCredentials(initState)
    }

    const signIn = async () => {
        await supabase.auth.signIn({ email: credentials.email, password: credentials.password });
        clear();
    }

    const signUp = async () => {
        await supabase.auth.signUp({ email: credentials.email, password: credentials.password })
        clear();
    }

    const gitHub = async () => {
        await supabase.auth.signIn({
            provider: 'github'
        })
    }

    const google = async () => {
        await supabase.auth.signIn({
            provider: 'google'
        })
    }

    return (
        <Grid padded>
            <GridRow>
                <GridColumn width={5}></GridColumn>
                <GridColumn width={6}></GridColumn>
                <GridColumn width={5}></GridColumn>
            </GridRow>
            <GridRow>
                <GridColumn width={5}></GridColumn>
                <GridColumn width={6}>
                    <Segment>
                        <Form>
                            <FormField>
                                <Header as="h5">Email</Header>
                                <Input placeholder="Email" value={credentials.email} onChange={(e, { value }) => onChange('email', value)}></Input>
                            </FormField>
                            <FormField>
                                <Header as="h5">Password</Header>
                                <Input placeholder="Password" value={credentials.password} onChange={(e, { value }) => onChange('password', value)}></Input>
                            </FormField>
                            {isSignIn ?
                                <FormField>
                                    <Header as="h5">Confirm Password</Header>
                                    <Input placeholder="Password" value={credentials.passwordConfirm} onChange={(e, { value }) => onChange('passwordConfirm', value)}></Input>
                                </FormField>
                                : null}
                            <FormField>
                                <Button onClick={() => isSignIn ? setSignIn(false) : signIn()}>Login</Button>
                                <Button onClick={() => isSignIn ? signUp() : setSignIn(true)}>SignIn</Button>
                            </FormField>
                        </Form>
                    </Segment>
                    <Segment>
                        <Grid>
                            <GridRow>
                                <GridColumn width={8}>
                                    <Button icon labelPosition='left' fluid onClick={gitHub}>
                                        <Icon name='github' />
                                        Github
                                    </Button>
                                </GridColumn>
                                <GridColumn width={8}>
                                    <Button icon labelPosition='left' fluid onClick={google}>
                                        <Icon name='google' />
                                        Google
                                    </Button>
                                </GridColumn>
                            </GridRow>
                        </Grid>
                    </Segment>
                </GridColumn>
                <GridColumn width={5}></GridColumn>
            </GridRow>
            <GridRow>
                <GridColumn width={5}></GridColumn>
                <GridColumn width={6}></GridColumn>
                <GridColumn width={5}></GridColumn>
            </GridRow>
        </Grid>
    )
}

export default Login

                                               Login.js file
AppContext.js fileNext, let’s create the context for the application that will be keeping our application data.
Add an AppContext.js file and a reducer for the application context called AppReducer.js under the src directory:
import { createContext, useReducer } from "react";
import AppReducer from "./AppReducer"

const initialState = {
    user: null,
    pokemon: null,
    pokemons: [],
    isEditing: false,
    isLoggedIn: false,
}

const AppContex = createContext(initialState)

export const AppContextProvider = ({ children }) => {
    const [state, dispatch] = useReducer(AppReducer, initialState);

    const login = (data) => { dispatch({ type: 'LOGIN', payload: data }) }
    const logout = (data) => { dispatch({ type: 'LOGOUT', payload: data }) }
    const getPokemons = (data) => { dispatch({ type: 'GET_POKEMONS', payload: data }) }
    const selectPokemon = (data) => { dispatch({ type: 'SELECT_POKEMON', payload: data }) }
    const createPokemon = (data) => { dispatch({ type: 'CREATE_POKEMON', payload: data }) }
    const updatePokemon = (data) => { dispatch({ type: 'UPDATE_POKEMON', payload: data }) }
    const deletePokemon = (data) => { dispatch({ type: 'DELETE_POKEMON', payload: data }) }

    return (
        <AppContex.Provider value={{ ...state, login, logout, getPokemons, selectPokemon, createPokemon, updatePokemon, deletePokemon }}>
            {children}
        </AppContex.Provider >
    )
}

export default AppContex;

                                               AppContex.js file

const deleteItem = (pokemons, { id }) => {
    return pokemons.filter((pokemon) => pokemon.id !== id)
}

const updateItem = (pokemons, data) => {
    let pokemon = pokemons.find((pokemon) => pokemon.id === data.id);
    let updatedPokemon = { ...pokemon, ...data };
    let pokemonIndex = pokemons.findIndex((pokemon) => pokemon.id === data.id);
    return [
        ...pokemons.slice(0, pokemonIndex),
        updatedPokemon,
        ...pokemons.slice(++pokemonIndex),
    ];
}

const AppReducer = (state, action) => {
    switch (action.type) {
        case 'GET_POKEMONS':
            return {
                ...state,
                pokemons: action.payload
            };
        case 'SELECT_POKEMON':
            return {
                ...state,
                isEditing: true,
                pokemon: action.payload
            }
        case 'CREATE_POKEMON':
            return {
                ...state,
                pokemons: [action.payload, ...state.pokemons]
            };
        case 'UPDATE_POKEMON':
            return {
                ...state,
                isEditing: false,
                pokemons: updateItem(state.pokemons, action.payload)
            };
        case 'DELETE_POKEMON':
            return {
                ...state,
                pokemons: deleteItem(state.pokemons, action.payload)
            };
        case 'LOGIN':
            return {
                ...state,
                user: action.payload,
                isLoggedIn: true
            };
        case 'LOGOUT':
            return {
                ...state,
                user: null,
                isLoggedIn: false
            };
        default:
            return state
    }
}

export default AppReducer

                                               AppReducer.js file
Now we move towards our first usage of Supabase. Here we will start by adding data to the Pokémon table from a component called PokemonForm.jsx.
Under this file, let’s create two functions to create and update the Pokémon:
    const createPokemon = async ({ name, power, description }) => {
        try {
            await supabase
                .from('pokemon')
                .insert([
                    { name, power, description }
                ]);
        } catch (error) {

        } finally {
            clear();
        }
    }
The above function is responsible for creating a Pokémon. Since we have a table with an ID field of type UUID, it will create a unique ID to each data row.
Now notice that each command from Supabase returns a promise so that you can use Async/Await to handle async actions. The update functions will be as below:
const updatePokemon = async ({ id, name, power, description }) => {
        try {
            await supabase
                .from('pokemon')
                .update([
                    { name, power, description }
                ]).match({ id: id })
        } catch (error) {

        } finally {
            clear();
        }
    }
You can refer to the whole code from the snippet below:
import { useEffect, useState, useContext } from "react"
import AppContex from "../AppContext"
import { Form, FormField, Header, Input, Button, Segment } from 'semantic-ui-react'

const initState = { name: '', power: '', description: '' }

function PokemonForm({ supabase }) {
    const { isEditing, pokemon } = useContext(AppContex)
    const [newPokemon, setNewPokemon] = useState(initState);

    useEffect(() => {
        if (pokemon) {
            setNewPokemon(pokemon)
        }
    }, [pokemon])

    const createPokemon = async ({ name, power, description }) => {
        try {
            await supabase
                .from('pokemon')
                .insert([
                    { name, power, description }
                ]);
        } catch (error) {

        } finally {
            clear();
        }
    }

    const updatePokemon = async ({ id, name, power, description }) => {
        try {
            await supabase
                .from('pokemon')
                .update([
                    { name, power, description }
                ]).match({ id: id })
        } catch (error) {

        } finally {
            clear();
        }
    }

    const onChange = (type, value) => {
        setNewPokemon({ ...pokemon, [type]: value })
    }

    const clear = () => {
        setNewPokemon(initState)
    }

    const cancel = () => {
        clear()
    }

    return (
        <Segment>
            <Form>
                <FormField>
                    <Header as="h5">Name</Header>
                    <Input value={newPokemon.name} onChange={(e, { value }) => onChange('name', value)} />
                </FormField>
                <FormField>
                    <Header as="h5">Power</Header>
                    <Input value={newPokemon.power} onChange={(e, { value }) => onChange('power', value)} />
                </FormField>
                <FormField>
                    <Header as="h5">Description</Header>
                    <Input value={newPokemon.description} onChange={(e, { value }) => onChange('description', value)} />
                </FormField>
                <Button onClick={() => isEditing ? updatePokemon(newPokemon) : createPokemon(newPokemon)}>{isEditing ? 'Update' : 'Save'}</Button>
                <Button onClick={() => cancel()}>Cancel</Button>
            </Form>
        </Segment>
    )
}

export default PokemonForm
In the same way, you can delete a particular Pokémon by running the code below:
const deletePokemon = async (id) => {
        await supabase
            .from('pokemon')
            .delete().match({ id: id })
    }
Notice that we pass in the ID (which is the auto-generated UUID from Supabase) which will search the Pokémon by the given ID and perform the deletion.
Next, let’s create an event subscriber who will listen to real-time events throughout the application. Since we are subscribing to the event, the ideal place to listen to them would be the useEffect lifecycle hook in React.
Let’s create the event listener in the Home.jsx file:
    useEffect(() => {
        supabase
            .from('pokemon')
            .select().then(({ data }) => { getPokemons(data) })

        const subscription = supabase
            .from('pokemon')
            .on('*', payload => {
                alterPokemons(payload)
            })
            .subscribe()

        return () => supabase.removeSubscription(subscription)
    }, []);
Notice how we create the event listeners and the cleanup function for the unmount stage of the application with the return of the useEffect.
The Supabase object provides an API function called.on() that accepts two parameters. The first argument is the event type, and the second parameter is the callback function.
There are several events to which Supabase listens. They are:
INSERT: listens to data insert eventsUPDATE: listens to data update eventsDELETE: listens to data deletion events*: listens to all events that take place through the applicationNow, to listen to all the events that take place in the application, let’s create a function that will fire a reducer function based on the event type:
    const alterPokemons = (payload) => {
        switch (payload.eventType) {
            case "INSERT":
                createPokemon(payload.new);
                break;
            case "DELETE":
                deletePokemon(payload.old);
                break;
            case "UPDATE":
                return updatePokemon(payload.new)
            default:
                createPokemon(payload.new);
        }
    }
This function will trigger inside the .on() function. Notice that the payload returns three important values.
They are:
eventType: event types INSERT, UPDATE, and DELETEnew: new data/updated dataold: old dataThrough the above code snippets, you can see why Supabase is becoming a competitive alternative to Firebase. Supabase’s API provides all the cool features with only a few lines of code as compared with other services.
You can go through the code for this project with the following GitHub repo.
In conclusion, Supabase is the best open source alternative to Google’s Firebase. It offers some cool features with the power of PostgreSQL, and it doesn’t have any limitations with data types like other real-time database solutions.
You can find more information on Supabase by referring to its documentation.
Thank you for taking the time to read this. I would like to see your questions and comments on the topic in the comments section below. Cheers!
Install LogRocket via npm or script tag. LogRocket.init() must be called client-side, not
server-side
$ npm i --save logrocket

// Code:

import LogRocket from 'logrocket';
LogRocket.init('app/id');
// Add to your HTML:

<script src="https://cdn.lr-ingest.com/LogRocket.min.js"></script>
<script>window.LogRocket && window.LogRocket.init('app/id');</script>

@container scroll-state: Replace JS scroll listeners nowCSS @container scroll-state lets you build sticky headers, snapping carousels, and scroll indicators without JavaScript. Here’s how to replace scroll listeners with clean, declarative state queries.

Explore 10 Web APIs that replace common JavaScript libraries and reduce npm dependencies, bundle size, and performance overhead.

Russ Miles, a software development expert and educator, joins the show to unpack why “developer productivity” platforms so often disappoint.

Discover what’s new in The Replay, LogRocket’s newsletter for dev and engineering leaders, in the February 18th issue.
Would you be interested in joining LogRocket's developer community?
Join LogRocket’s Content Advisory Board. You’ll help inform the type of content we create and get access to exclusive meetups, social accreditation, and swag.
Sign up now