Stripe is a popular payment processor that makes it easy for developers to integrate payment methods into mobile applications. With a heavy focus on UX and security, Stripe has shaken up the e-commerce industry with its popularity among both shoppers and developers.

Shortly after Stripe released an SDK for React Native, the Stripe Flutter SDK was introduced, building on the functionality of the Stripe API. In this tutorial, we’ll explore the Stripe Flutter SDK by installing it and integrating it into an example application.
To follow along with this tutorial, you’ll need:
Let’s get started!
Let’s take a look at some of Stripe’s features that we’ll integrate into our Flutter app using the Stripe Flutter SDK.
Stripe first gained notoriety for simplifying international transactions in applications by supporting multiple currencies. Currently, Stripe supports many types of electronic payments.
For example, you can easily integrate wallets like Apple Pay and Google Pay into your Flutter application. Similarly, Stripe supports most popular credit and debit cards, as well as buy now pay later methods like Klarna and Afterpay.
It is straightforward to transfer funds between bank accounts using methods like redirects and vouchers. Stripe offers a payout schedule that makes it easy for you to add your own bank account information and receive payments made through your mobile app.
Stripe provides a native UI for securely accepting payments in both Android and iOS applications. Similarly, the SDK is shipped with a prebuilt UI for accepting payments in Google Pay and Apple Pay. However, you can easily build your own custom payment form in Stripe if you wish.
With Stripe’s built-in payment portal, you can set up either one-time purchases or fixed-price subscriptions.
Stripe maintains its focus on security by sending sensitive payment information to its own server instead of the host’s backend server, simplifying the collection of data and remaining compliant with Payment Card Information (PCI) security standards.
Additionally, Stripe performs 3D Secure authentication to comply with Europe’s Strong Customer Authentication guidelines, protecting your users’ most important information.
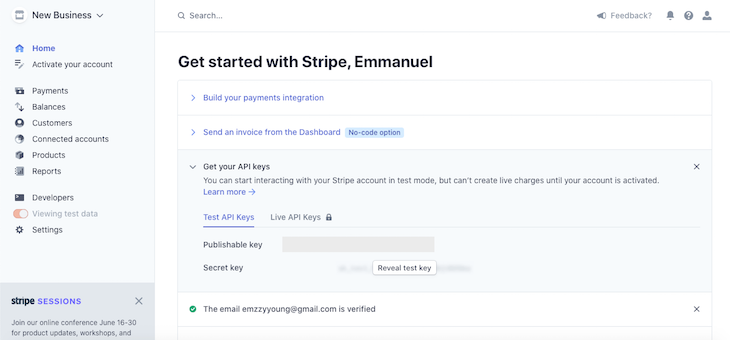
If you don’t have a Stripe account, first, create a new one. You’ll need to obtain your personal access key from your account. Head to the Developer section and look under API Keys, as seen in the screenshot below:
With the personal access keys in place, we’ll set up a new Flutter project and install the Stripe Flutter SDK package.
Navigate into your work directory and add the code below to initialize a new Flutter project:
flutter create stripe_app
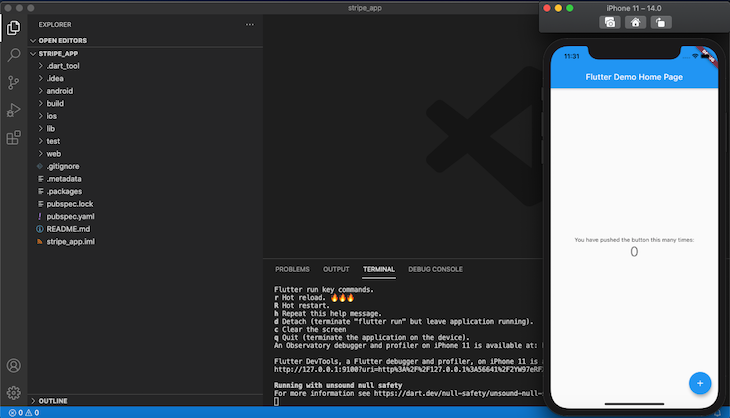
Once initialization is complete, open either your Android emulator or iOS Simulator. Navigate into the stripe_app folder and run the app with the command below:
cd stripe_app && flutter run
Your app should look similar to the screenshot below:
Next, let’s install the Stripe Flutter SDK and get started building our project. Navigate to your directory and copy and paste the code below in your terminal:
dart pub add flutter_stripe
To avoid compatibility issues, you should set up your project to match the required specifications below.
For an Android OS, you’ll need the following:
Theme.AppCompact for your activityFlutterFragmentActivity in MainActivity.kt instead of FlutterActivityThe Stripe Flutter SDK is compatible with apps targeting iOS 11 and above.
To avoid build error, navigate to iOS settings and find the stripePublishableKey proj or Runner.xcworkspastripe publishable key. Set the deployment target for the app to 12.0:

To communicate with the Stripe API from your Flutter app, copy the stripePublishableKey from the Stripe dashboard, navigate into the lib folder, create a new file called env. dart, and add the code below:
const stripePublishableKey = "your_publishable_key";
The stripePublishableKey constants hold the value of your key. Next, let’s set up card payment for our application and add buttons for Apple Pay and Google Pay.
The most popular payment option in Stripe is a credit or debit card. To build a basic card input, navigate into the lib folder and update the code in main. dart with the code below:
// main.dart
import 'package:flutter/material.dart';
import 'package:flutter_stripe/flutter_stripe.dart';
import 'package:stripe_app/.env.dart';
void main() async {
  WidgetsFlutterBinding.ensureInitialized();
  // set the publishable key for Stripe - this is mandatory
  Stripe.publishableKey = stripePublishableKey;
  runApp(App());
}
class App extends StatelessWidget {
  const App({Key key}) : super(key: key);
  @override
  Widget build(BuildContext context) {
    return MaterialApp(
      debugShowCheckedModeBanner: false,
      title: "FLutter tripe",
      theme: ThemeData(
        primaryColor: Colors.green,
      ),
        home: PaymentScreen(),
      );
  }
}
// payment_screen.dart
class PaymentScreen extends StatelessWidget {
  @override
  Widget build(BuildContext context) {
    return Scaffold(
      appBar: AppBar(),
      body: Column(
        children: [
          CardField(
            onCardChanged: (card) {
              print(card);
            },
          ),
          TextButton(
            onPressed: () async {
              // create payment method
              final paymentMethod =
                  await Stripe.instance.createPaymentMethod(PaymentMethodParams.card());
            },
            child: Text('pay'),
          )
        ],
      ),
    );
  }
}
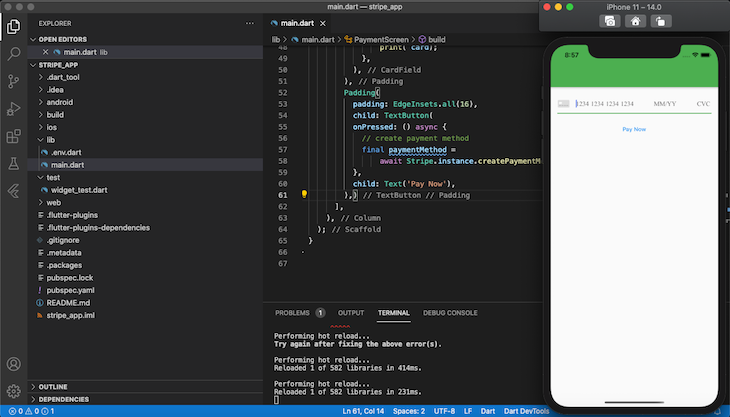
In the code block above, we import the Flutter Stripe SDK and the .env.dart file. Then, we initialize Stripe with the StripePublishableKey that we created earlier. PaymentScreen returns a scaffold for both the payment input filed and the button.
At this point, your app should look similar to the screenshot below:
The SDK is shipped with built-in support for pay plugins, including Apple Pay and Google Pay. The code snippet below creates an Apple Pay button:
// main.dart
import 'package:flutter/material.dart';
import 'package:flutter_stripe/flutter_stripe.dart';
import 'package:stripe_app/.env.dart';
void main() async {
  WidgetsFlutterBinding.ensureInitialized();
  // set the publishable key for Stripe - this is mandatory
  Stripe.publishableKey = stripePublishableKey;
  runApp(App());
}
class App extends StatelessWidget {
  const App({Key key}) : super(key: key);
  @override
  Widget build(BuildContext context) {
    return MaterialApp(
      debugShowCheckedModeBanner: false,
      title: "FLutter tripe",
      theme: ThemeData(
        primaryColor: Colors.green,
      ),
        home: ApplePay(),
      );
  }
}
class ApplePay extends StatefulWidget {
  @override
  _ApplePayState createState() => _ApplePayState();
}
class _ApplePayState extends State<ApplePay> {
  @override
  void initState() {
    Stripe.instance.isApplePaySupported.addListener(update);
    super.initState();
  }
  @override
  void dispose() {
    Stripe.instance.isApplePaySupported.removeListener(update);
    super.dispose();
  }
  void update() {
    setState(() {});
  }
  @override
  Widget build(BuildContext context) {
    return Scaffold(
      appBar: AppBar(),
      body: Column(
        children: [
          if (Stripe.instance.isApplePaySupported.value)
            Padding(
              padding: EdgeInsets.all(16),
              child: ApplePayButton(
                onPressed: _handlePayPress,
              ),
            )
          else
            Padding(
              padding: EdgeInsets.symmetric(horizontal: 16),
              child: Text('Apple Pay is not available in this device'),
            ),
        ],
      ),
    );
  }
}

Future<void> _handlePayPress() async {
  try {

  } catch (e) {
  }
}
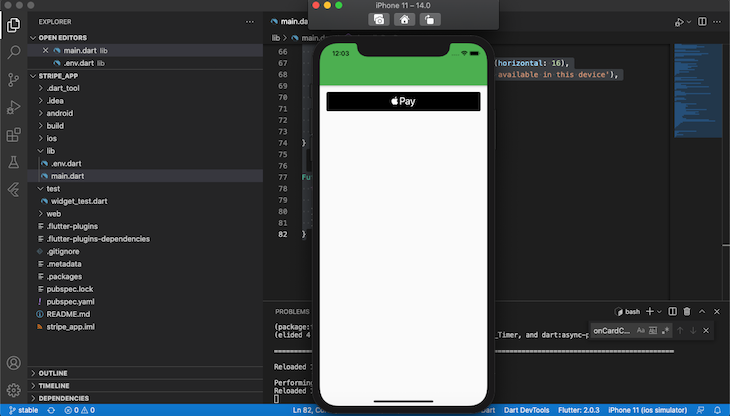
The ApplePay class returns a scaffold of the button and a _handlePayPress function that is fired each time the button is pressed. Recall that the Stripe Flutter SDK is shipped with Dart APIs that handle events and responses. However, you can create custom event handlers like we did with the _handlePayPress method.
Now, your app should look like the following screenshot:
Before we create the Google Pay button, let’s install the flutter pay package:
flutter pub add pay
On Installation complete, replace the code in main.dart with the code below to create the Google Pay button:
// main.dart
import 'package:flutter/material.dart';
import 'package:flutter_stripe/flutter_stripe.dart';
import 'package:pay/pay.dart';
import 'package:stripe_app/.env.dart';
import 'package:pay/pay.dart' as pay;
const _paymentItems = [
  pay.PaymentItem(
    label: 'Total',
    amount: '108.99',
    status: pay.PaymentItemStatus.final_price,
  )
];
void main() async {
  WidgetsFlutterBinding.ensureInitialized();
  // set the publishable key for Stripe - this is mandatory
  Stripe.publishableKey = stripePublishableKey;
  runApp(App());
}
class App extends StatelessWidget {
  const App({Key key}) : super(key: key);
  @override
  Widget build(BuildContext context) {
    return MaterialApp(
      debugShowCheckedModeBanner: false,
      title: "FLutter tripe",
      theme: ThemeData(
        primaryColor: Colors.green,
      ),
        home: GooglePay(),
      );
  }
}
class GooglePay extends StatefulWidget {
  @override
  _GooglePayState createState() => _GooglePayState();
}
class _GooglePayState extends State<GooglePay> {
  @override
  void initState() {
    Stripe.instance.isApplePaySupported.addListener(update);
    super.initState();
  }
  @override
  void dispose() {
    Stripe.instance.isApplePaySupported.removeListener(update);
    super.dispose();
  }
  void update() {
    setState(() {});
  }
  @override
  Widget build(BuildContext context) {
    return Scaffold(
      appBar: AppBar(),
      body: Column(
        children: [
          if (Stripe.instance.isApplePaySupported.value)
            Padding(
              padding: EdgeInsets.all(16),
              child: GooglePayButton(
              paymentConfigurationAsset: 'google_pay_payment_profile.json',
              paymentItems: _paymentItems,
              style: GooglePayButtonStyle.black,
              type: GooglePayButtonType.pay,
              margin: const EdgeInsets.only(top: 16),
              onPaymentResult: onGooglePayResult,
              loadingIndicator: const Center(
                child: CircularProgressIndicator(),
              ),
                onPressed: () async {
                }
              ),
            )
          else
            Padding(
              padding: EdgeInsets.symmetric(horizontal: 16),
              child: Text('Apple Pay is not available in this device'),
            ),
        ],
      ),
    );
  }
}

Future<void> onGooglePayResult(paymentResult) async {
    try {

  } catch (e) {
  }
  }
In the code above, we imported the pay package that we installed earlier, created a _paymentItems constant to hold our payment details, then set the value of paymentItems in the GoogleButton to _paymentItems.
Adding assets to your application requires creating a new section. Create a new folder named assets in the root directory of your project, then create a new file called google_pay_payment_profile.json. Finally, enable assets in pubspec.yaml. Note that paymentConfigurationAsset is required:

The Stripe Flutter SDK has functions that are called for specific query and response operations when sending and receiving data via the Stripe API.
fetchPaymentIntentClientSecret: returns a client’s secret from the backendconfirmApplePayPayment: confirms Apple paymentconfirmPaymentMethod: confirms the payment method by requiring clientSecret and payment detailsThe Stripe Flutter SDK is an easy and secure package for integrating and accepting payment in your Flutter app. In this tutorial, we explored Stripe’s features and capabilities, learning what makes it a popular choice for developers. We covered the required steps for setting up a Flutter application with Stripe, then added debit card payment and buttons for Apple Pay and Google Pay.
The Stripe Flutter SDK is a good choice anytime you need to add payment options in a mobile application. I hope you enjoyed this tutorial!
Install LogRocket via npm or script tag. LogRocket.init() must be called client-side, not
server-side
$ npm i --save logrocket

// Code:

import LogRocket from 'logrocket';
LogRocket.init('app/id');
// Add to your HTML:

<script src="https://cdn.lr-ingest.com/LogRocket.min.js"></script>
<script>window.LogRocket && window.LogRocket.init('app/id');</script>
Hey there, want to help make our blog better?
Join LogRocket’s Content Advisory Board. You’ll help inform the type of content we create and get access to exclusive meetups, social accreditation, and swag.
Sign up now
Learn how OpenAPI can automate API client generation to save time, reduce bugs, and streamline how your frontend app talks to backend APIs.

Discover how the Interface Segregation Principle (ISP) keeps your code lean, modular, and maintainable using real-world analogies and practical examples.

<selectedcontent> element improves dropdowns

Learn how to implement an advanced caching layer in a Node.js app using Valkey, a high-performance, Redis-compatible in-memory datastore.


