The Ethereum blockchain is number one on every significant smart contract blockchain metric, from the number of transactions to the total number of users and developers.

Developers often need to build on the Ethereum blockchain with languages other than Solidity.
Many SDKs and Ethereum clients help non-solidity developers build and interact with Ethereum blockchains like Web3JS, Web3Py, OpenEthereum, and Go-Ethereum.
Go-Ethereum, popularly referred to as Geth, is the official Ethereum client for building decentralized applications using the Go programming language. Geth is one of the preferred alternatives for running, setting up nodes, and interacting with Ethereum blockchains due to its ease of use.
In this tutorial, you’ll learn how to interact with the Ethereum blockchain with the Go programming language using the Go-Ethereum package.
You’ll need to meet these basic requirements to follow this tutorial:
The Replay is a weekly newsletter for dev and engineering leaders.
Delivered once a week, it's your curated guide to the most important conversations around frontend dev, emerging AI tools, and the state of modern software.
Using Go-Ethereum requires you to connect to an Ethereum blockchain. There are many options for you to choose from. You could decide to use Ethereum node providers like Infura or Alchemy, or you could use development blockchain networks like Ganache, Hardhat, and Foundry.
In this tutorial, you’ll be using Infura, the most popular Ethereum node provider, to connect to the Ethereum blockchain.
Infura provides functionality to connect to the Ethereum mainnet, testnet, and Ethereum layer 2s like the Arbitrum, Near, and Polygon networks.

Connecting to an Ethereum node using Infura requires that you get a URL from your Infura account. Check out this Web3Py tutorial on the LogRocket blog to learn how to get your Infura URL.
The next step is to install the Geth, the Go-Ethereum package. Run this command in your Go workspace.
go get github.com/ethereum/go-ethereum
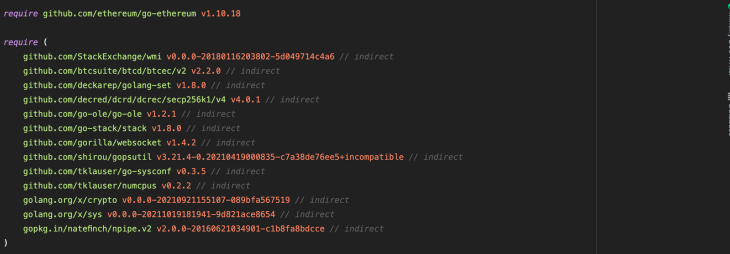
The command will install all the dependencies you’d need to follow this tutorial. Your go.mod file should look like this when you’re done.

If you get any installation errors, try updating your Go compiler to a more recent version.
In your Go workspace, create a main.go file for this tutorial, and import these modules.
import (
    "context"
    "fmt"
    "github.com/ethereum/go-ethereum/ethclient"
    "github.com/ethereum/go-ethereum/common/hexutil"
    "github.com/ethereum/go-ethereum/crypto"
    "log"
)
The context package is for setting time limits; the ethclient package provides the functionality for interacting with the Ethereum blockchain, and the log package is for handling errors.
The next step is to declare the context and client instances globally for use in various parts of your program.
var (
    ctx         = context.Background()
    url         = "Your Infura URL here"
    client, err = ethclient.DialContext(ctx, url)
)
The context variable ctx was declared using the Background method, so there are no deadlines; then a client instance client was declared using the DialContext method of the ethClient package, which takes in a context and a connection URL.
You can verify your connection to the Ethereum node by querying for the current block number of the Ethereum blockchain. Here’s how.
func currentBlock() {
    block, err := client.BlockByNumber(ctx, nil)
    if err != nil {
        log.Println(err)
    }
    fmt.Println(block.Number())
}
Using the Number method of the BlockByNumber method of your client instance client, you can query for the current block number of the Ethereum blockchain. At the time of writing this article, the current block number is 14893193.
You can also monitor the status of your queries on your Infura dashboard. Here’s the status of the block number query.

You can also query Ethereum wallet addresses using Geth and the wallet’s public address. To check the balance of a wallet, you’ll have to convert the public address (hex code) to a byte of strings first.
You can easily convert the public address hex to the byte of strings using the HexToAddress method of common subpackage of the Go-Ethereum package; here’s how.
address := common.HexToAddress("0x8335659d19e46e720e7894294630436501407c3e")
After that, you can check the balance using the BalanceAt method of your client instance. The BalanceAt method takes in a context,
balance, err := client.BalanceAt(ctx, address, nil)
    if err != nil {
        log.Print("There was an error", err)
    }
    fmt.Println("The balance at the current block number is", balance)
The result balance will be in Gwei, not Ether. One Gwei equals 0.00000000144 Ether.
Creating wallets is one of the key functionalities to find in blockchain clients.
Wallets are composed of three main components; the public key, the private key, and the public address.
Here’s how to generate these three components for an Ethereum wallet using Geth.
func createWallet() (string, string) {

}
The createWallet function doesn’t take in any parameters and it returns two strings.
You can generate a private key using the GenerateKey method of the crypto subpackage of the Go-Ethereum package as displayed in the getPrivateKey variable below. Remember to save the private key in secure storage.
  getPrivateKey, err := crypto.GenerateKey()

    if err != nil {
        log.Println(err)
    }
You can generate public keys from the private key using the FromECDSA method of the crypto subpackage. The FromECDSA method returns a byte that can be encoded into the hexadecimal using the Encode method of the hexutil subpackage of the Go-Ethereum package.
  getPublicKey := crypto.FromECDSA(getPrivateKey)
    thePublicKey := hexutil.Encode(getPublicKey)
You can generate the user’s public address from the public key using the PubkeyToAddress method of the crypto subpackage. The PubkeyToAddress takes in the PublicKey method of the private key variable you declared and returns an address that can be converted to the regular hexadecimal form by calling the Hex method.
 thePublicAddress := crypto.PubkeyToAddress(getPrivateKey.PublicKey).Hex()
return thePublicAddress, thePublicKey
The function returns the public address and public keys of the wallet you just created.
You can make transactions on the Ethereum blockchain mainnet/testnet using the Geth package.
Every transaction has to have a sender’s address and a recipient’s address. The transaction has to be signed using the sender’s private key.
  RecipientAddress := common.HexToAddress("0x4592d8f8d7b001e72cb26a73e4fa1806a51ac79d")

    privateKey, err := crypto.HexToECDSA("The Hexadecimal Private Key ")
    if err != nil {
        log.Fatal(err)
    }

    publicKey := privateKey.Public()
    publicKeyECDSA, ok := publicKey.(*ecdsa.PublicKey)
    if !ok {
        log.Fatal("Public Key Error")
    }

    SenderAddress := crypto.PubkeyToAddress(*publicKeyECDSA)
You declared the recipient’s address parameter using common.HexToAddress and the private key using crypto.HexToECDSA where errors were handled. In addition, you declared a public key variable publicKey where the public key was derived from the private key using the Public method, just like when you created a wallet.
Finally, you declared an ECDSA public key variable publicKeyECDSA from the publicKey variable using the (*ecdsa.PubicKey) method, handled possible errors, and the sender’s address was generated from the variable using the PubKeyToAddress method that took in a pointer to the ECDSA public key variable.
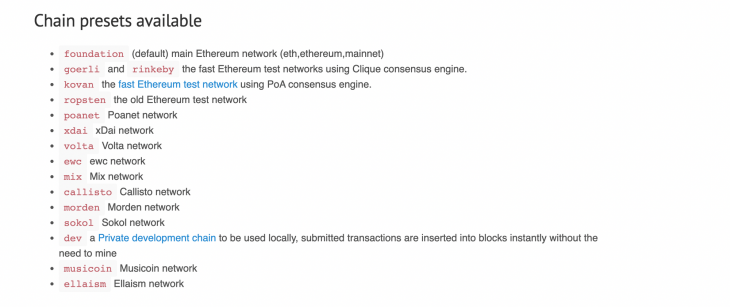
You’ll need to declare variables for the amount of Ether you’re sending (in Gwei), the nonce (the number of transactions from the address), the gas price, the gas limit, and the ChainID.
Here’s a list of chains from the OpenEthereum documentation.

nonce, err := client.PendingNonceAt(ctx, SenderAddress)
    if err != nil {

        log.Println(err)
    }

    amount := big.NewInt("amount    In Wei")
    gasLimit := 3600
    gas, err := client.SuggestGasPrice(ctx)


    if err != nil {
        log.Println(err)
    }

    ChainID, err := client.NetworkID(ctx)
    if err != nil {
        log.Println(err)
    }
Here, you declared a variable to get the pending nonce of the wallet address using the PendingNonceAt method that takes in a context and the address and handles an error. You declared variables for the gas limit and amount as amount and gasLimit respectively.
You declared a variable for the gas price using the SuggestGasPrice method of your client instance, and then a variable for the NetworkID using the NetworkID method where the variables took in a contest and errors were handled.
Once all these parameters are set, you can now send a transaction by creating a transaction, signing the transaction, and sending it to the blockchain where it can be approved or rejected.
transaction := types.NewTransaction(nonce, RecipientAddress, amount, uint64(gasLimit), gas, nil)
    signedTx, err := types.SignTx(transaction, types.NewEIP155Signer(ChainID), privateKey)
    if err != nil {
        log.Fatal(err)
    }
    err = client.SendTransaction(ctx, signedTx)
    if err != nil {
        log.Fatal(err)
    }

    fmt.Printf("transaction sent: %s", signedTx.Hash().Hex())
You used the types subpackage of the Go-Ethereum package to create a new transaction transaction using the NewTransaction method; the method took in the nonce, recipient address, amount, gas limit (converted to unsigned integer), gas price, and an optional parameter of data that was set to nil.
You declared a variable to sign the transaction using the SignTx method of the types package that took in the transaction, a signer method that took in the chain ID types.NewEIP155Signer(ChainID) and the private key.
Finally, you sent the transaction using the SendTransaction method of your client that took in a context, and the signed transaction variable and errors were handled.
The print statement returns the hexadecimal hash of the signed transaction if there are no errors.
You can also evaluate the number of transactions in any block using the Go-Ethereum package. The process is similar to that of evaluating the current block number.
func getTransactionsPerBlock() {
    block, err := client.BlockByNumber(ctx, nil)
    figure, err := client.TransactionCount(ctx, block.Hash())
    if err != nil {
        log.Fatal(err)
    }

    fmt.Println(figure)
}
In the getTransactionsPerBlock function, you declared a block variable, queried for a block by number, and queried for the transaction count using the Hash method of the block variable you declared. You handled errors from the queries and printed the figure variable holding the number of transactions in the block.
Additionally, you can query for the various details of transactions in a block like the amount, gas, gas price, nonce, and recipients.
func QueryTransactions() {
    block, _ := client.BlockByNumber(ctx, nil)
    for _, transaction := range block.Transactions() {
        fmt.Println(transaction.Value().String())
        fmt.Println(transaction.Gas())
        fmt.Println(transaction.GasPrice().Uint64())
        fmt.Println(transaction.Nonce())
        fmt.Println(transaction.To().Hex())
    }
}
In the QueryTransactions function, you declared a block variable to get a block by number using the BlockByNumber method and passed in nil to specify the current block. Then you used a range-based for loop to loop through the transactions in the block and printed the amount, gas, gas price, nonce, and recipient respectively.
You’ve learned how to use the Go-Ethereum package to develop your applications in Go using examples like transferring Ethereum and querying the blockchain.
The Ethereum ecosystem is growing fast, and there are numerous development tools you can choose from to build on the Ethereum blockchain. The LogRocket blog has tutorials on Ethereum clients like Web3Py, Web3JS and many blockchain articles you can learn from.
Client-side issues that impact users’ ability to activate and transact in your apps can drastically affect your bottom line. If you’re interested in monitoring UX issues, automatically surfacing JavaScript errors, and tracking slow network requests and component load time, try LogRocket.

LogRocket lets you replay user sessions, eliminating guesswork around why bugs happen by showing exactly what users experienced. It captures console logs, errors, network requests, and pixel-perfect DOM recordings — compatible with all frameworks.
LogRocket's Galileo AI watches sessions for you, instantly identifying and explaining user struggles with automated monitoring of your entire product experience.
Modernize how you debug web and mobile apps — start monitoring for free.

React Server Components and the Next.js App Router enable streaming and smaller client bundles, but only when used correctly. This article explores six common mistakes that block streaming, bloat hydration, and create stale UI in production.

Gil Fink (SparXis CEO) joins PodRocket to break down today’s most common web rendering patterns: SSR, CSR, static rednering, and islands/resumability.

@container scroll-state: Replace JS scroll listeners nowCSS @container scroll-state lets you build sticky headers, snapping carousels, and scroll indicators without JavaScript. Here’s how to replace scroll listeners with clean, declarative state queries.

Explore 10 Web APIs that replace common JavaScript libraries and reduce npm dependencies, bundle size, and performance overhead.
Would you be interested in joining LogRocket's developer community?
Join LogRocket’s Content Advisory Board. You’ll help inform the type of content we create and get access to exclusive meetups, social accreditation, and swag.
Sign up now