
Editor’s note: This post was updated on 22 October 2024 by David Omotayo to include updates about the key improvements in React Fiber since React v16, such as concurrency, automatic batching, and new hooks like useTransition, useSyncExternalStore, and useInsertionEffect.

Ever wondered what happens when you call ReactDOM.render(<App />, document.getElementById('root'))?
We know that ReactDOM builds the DOM tree under the hood and renders the application on the screen. But how does React actually build the DOM tree? And how does it update the tree when the app’s state changes?
In this post, we’ll learn what React Fiber is and how React built the DOM tree until React v15.0.0, the pitfalls of that model, and how the new model from React v16.0.0 to the current version solves these problems.
This post will cover a wide range of concepts that are purely internal implementation details and are not strictly necessary for actual frontend development using React.
The Replay is a weekly newsletter for dev and engineering leaders.
Delivered once a week, it's your curated guide to the most important conversations around frontend dev, emerging AI tools, and the state of modern software.
React Fiber is an internal engine change geared to make React faster and smarter. The Fiber reconciler, which became the default reconciler for React 16 and above, is a complete rewrite of React’s reconciliation algorithm to solve some long-standing issues in React.
Because Fiber is asynchronous, React can:
This change allows React to break away from the limits of the synchronous stack reconciler. Previously, you could add or remove items, for example, but it had to work until the stack was empty, and tasks couldn’t be interrupted.
This change also allows React to fine-tune rendering components, ensuring that the most important updates happen as soon as possible.
Now, to truly understand the powers of Fiber, let’s talk about the old reconciler: the stack reconciler.
Let’s start with our familiar ReactDOM.render(<App />, document.getElementById('root')).
The ReactDOM module passes the <App/ > to the reconciler, but there are two questions here:
<App /> refer to?Let’s unpack these two questions.
<App />?<App /> is a React element and “elements describe the tree.” According to the React blog, “An element is a plain object describing a component instance or DOM node and its desired properties.”
In other words, elements are not actual DOM nodes or component instances; they are a way to describe to React what kind of elements they are, what properties they hold, and who their children are.
This is where React’s real power lies: React abstracts away the complex pieces of how to build, render, and manage the lifecycle of the actual DOM tree by itself, effectively making the life of the developer easier.
To understand what this really means, let’s look at a traditional approach using object-oriented concepts.
In the typical object-oriented programming world, developers must instantiate and manage the lifecycle of every DOM element. For instance, if you want to create a simple form and a submit button, the state management still requires some effort from the developer.
Let’s assume the Button component has a isSubmitted state variable. The lifecycle of the Button component looks something like the flowchart below, where each state must be managed by the app:
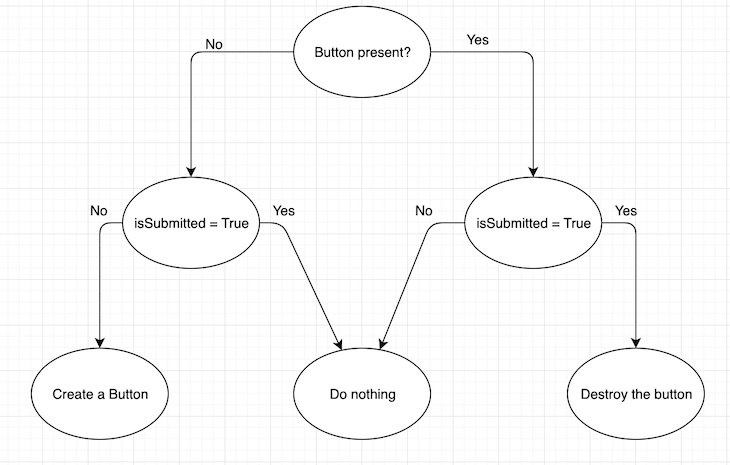
This size of the flowchart and the number of lines of code grow exponentially as the number of state variables increases.
So, React has elements to solve this problem; in React, there are two kinds of elements: the DOM element and the component element.
The DOM element is an element that’s a string; for instance, <button class="okButton"> OK </button>.
The component element is a class or a function, for example, <Button className="okButton"> OK </Button>, where <Button> is either a class or a functional component. These are the typical React components we generally use.
It is important to understand that both types are simple objects. They are mere descriptions of what must be rendered on the screen and don’t instigate rendering when you create and instantiate them.
This makes it easier for React to parse and traverse them to build the DOM tree. The actual rendering happens later when traversing finishes.
When React encounters a class or a function component, it will ask that element what element it renders based on its props.
For instance, if the <App> component rendered the following, then React will ask the <Form> and <Button> components what they render based on their corresponding props:
<Form>
  <Button>
    Submit
  </Button>
</Form>
So, if the Form component is a functional component that looks like the following, React will call render() to know what elements it renders and see that it renders a <div> with a child
const Form = (props) => {
  return(
    <div className="form">
      {props.form}
    </div>
  )
}
React will repeat this process until it knows the underlying DOM tag elements for every component on the page.
This exact process of recursively traversing a tree to know the underlying DOM tag elements of a React app’s component tree is known as reconciliation.
By the end of the reconciliation, React knows the result of the DOM tree, and a renderer like react-dom or react-native applies the minimal set of changes necessary to update the DOM nodes. This means that when you call ReactDOM.render() or setState(), React performs reconciliation.
In the case of setState, it performs a traversal and determines what changed in the tree by diffing the new tree with the rendered tree. Then, it applies those changes to the current tree, thereby updating the state corresponding to the setState() call.
Now that we understand what reconciliation is, let’s look at the pitfalls of this model.
Oh, by the way, why is this called the “stack” reconciler? This name is derived from the “stack” data structure, which is a last-in, first-out mechanism.
And, what does stack have anything to do with what we just saw? Well, as it turns out, since we are effectively performing recursion, it has everything to do with a stack.
To understand why that’s the case, let’s take a simple example and see what happens in the call stack:
function fib(n) {
  if (n < 2){
    return n
  }
  return fib(n - 1) + fib (n - 2)
}

fib(10)
As we can see, the call stack pushes every call to fib() into the stack until it pops fib(1), which is the first function call to return.
Then, it continues pushing the recursive calls and pops again when it reaches the return statement. In this way, it effectively uses the call stack until fib(3) returns and becomes the last item pop from the stack.
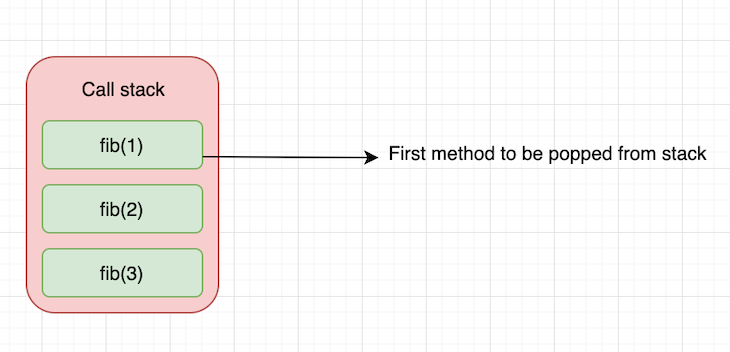
The reconciliation algorithm we just saw is a purely recursive algorithm. An update results in the entire subtree rerendering immediately. While this works well, this has some limitations.
As Andrew Clark notes, in a UI, it’s not necessary for every update to apply immediately; in fact, doing so can be wasteful, causing frames to drop and degrading the user experience.
Also, different types of updates have different priorities — an animation update must be completed faster than an update from a data store.
Now, what do we mean when we refer to dropped frames, and why is this a problem with the recursive approach? To understand this, let’s briefly review what frame rate is and why it’s important from a user experience point of view.
Frame rate is the frequency consecutive images appear on a display. Everything we see on our computer screens is composed of images or frames played on the screen at a rate that appears instantaneous to the eye.
To understand what this means, think of the computer display as a flipbook and the pages of the flipbook as frames played at some rate when you flip them.
Comparatively, a computer display is nothing but an automatic flipbook that plays continuously when things change on the screen.
Typically, for a video to feel smooth and instantaneous to the human eye, the video must play at a rate of about 30 frames per second (FPS); anything higher gives a better experience.
Most devices these days refresh their screens at 60 FPS, 1/60 = 16.67ms, which means a new frame displays every 16ms. This number is important because if the React renderer takes more than 16ms to render something on the screen, the browser drops that frame.
In reality, however, the browser has housekeeping to do, so all your work must be completed within 10ms. When you fail to meet this budget, the frame rate drops, and the content judders on screen. This is often referred to as jank, and it negatively impacts the user’s experience.
Of course, this is not a big concern for static and textual content. But in the case of displaying animations, this number is critical.
If the React reconciliation algorithm traverses the entire App tree each time there is an update, rerenders it, and the traversal takes more than 16ms, it will drop frames.
This is a big reason why many wanted updates categorized by priority and not blindly applying every update passed down to the reconciler. Also, many wanted the ability to pause and resume work in the next frame. This way, React could have better control over working with the 16ms rendering budget.
This led the React team to rewrite the reconciliation algorithm, which is called Fiber. So, let’s look at how Fiber works to solve this problem.
Now that we know what motivated Fiber’s development, let’s summarize the features needed to achieve it. Again, I am referring to Andrew Clark’s notes for this:
One of the challenges with implementing something like this is how the JavaScript engine works and the lack of threads in the language. To understand this, let’s briefly explore how the JavaScript engine handles execution contexts.
Whenever you write a function in JavaScript, the JavaScript engine creates a function execution context.
Each time the JavaScript engine starts, it creates a global execution context that holds the global objects; for example, the window object in the browser and the global object in Node.js. JavaScript handles both contexts using a stack data structure also known as the execution stack.
So, when you write something like this, the JavaScript engine first creates a global execution context and pushes it into the execution stack:
function a() {
  console.log("i am a")
  b()
}

function b() {
  console.log("i am b")
}

a()
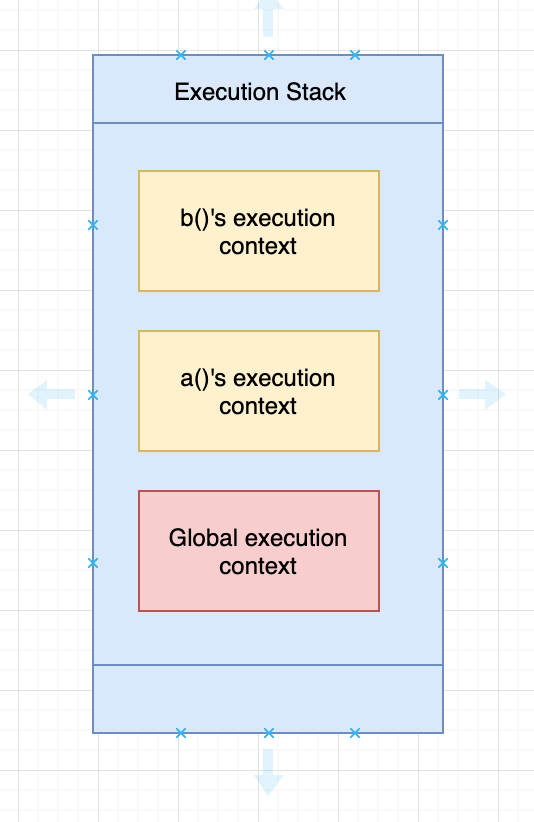
Then, it creates a function execution context for the a() function. Since b() is called inside a(), it creates another function execution context for b() and pushes it into the stack.
When the b() function returns, the engine destroys the context of b(). When we exit the a()function, the a() context is destroyed. The stack during execution looks like this:
But, what happens when the browser makes an asynchronous event like an HTTP request? Does the JavaScript engine stock the execution stack and handle the asynchronous event, or does it wait until the event completes?
The JavaScript engine does something different here: on top of the execution stack, the JavaScript engine has a queue data structure, also known as the event queue. The event queue handles asynchronous calls like HTTP or network events coming into the browser.
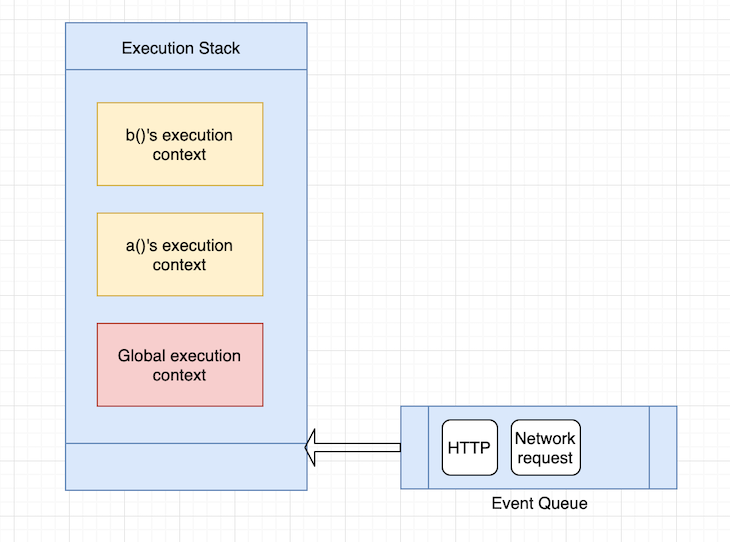
The JavaScript engine handles the items in the queue by waiting for the execution stack to empty. So, each time the execution stack empties, the JavaScript engine checks the event queue, pops items off the queue, and handles the event.
It is important to note that the JavaScript engine checks the event queue only when the execution stack is empty or the only item in the execution stack is the global execution context.
Although we call them asynchronous events, there is a subtle distinction here: the events are asynchronous with respect to when they arrive into the queue, but they’re not really asynchronous with respect to when they are actually handled.
Coming back to our stack reconciler, when React traverses the tree, it does so in the execution stack. So, when the updates arrive, they arrive in the event queue (sort of). And, only when the execution stack empties, the updates are handled.
This is precisely the problem Fiber solves by almost reimplementing the stack with intelligent capabilities—pausing, resuming, and aborting, for example.
Again referencing Andrew Clark, “Fiber is a reimplementation of the stack, specialized for React components. You can think of a single fiber as a virtual stack frame.
“The advantage of reimplementing the stack is that you can keep stack frames in memory and execute them however and whenever you want. This is crucial for accomplishing the goals we have for scheduling.
“Aside from scheduling, manually dealing with stack frames unlocks the potential for features such as concurrency and error boundaries. We will cover these topics in future sections.”
In simple terms, a fiber represents a unit of work with its own virtual stack. In the previous implementation of the reconciliation algorithm, React created a tree of objects (React elements) that are immutable and traversed the tree recursively.
In the current implementation, React creates a tree of fiber nodes that can mutate. The fiber node effectively holds the component’s state, props, and underlying DOM element it renders to.
And, since fiber nodes can mutate, React doesn’t need to recreate every node for updates; it can simply clone and update the node when there is an update.
In the case of a fiber tree, React doesn’t perform recursive traversal. Instead, it creates a singly-linked list and performs a parent-first, depth-first traversal.
A fiber node represents a stack frame and an instance of a React component. A fiber node comprises the following members:
<div> and <span>, for example, host components (strings), classes, or functions for composite components.
The key is the same as the key we pass to the React element.
Represents the element returned when we call render() on the component:
const Name = (props) => {
  return(
    <div className="name">
      {props.name}
    </div>
  )
}
The child of <Name> is <div> because it returns a <div> element.
Represents a case where render returns a list of elements:
const Name = (props) => {
  return([<Customdiv1 />, <Customdiv2 />])
}
In the above case, <Customdiv1> and <Customdiv2> are the children of <Name>, which is the parent. The two children form a singly-linked list.
Return is the return back to the stack frame, which is a logical return back to the parent fiber node, and thus, represents the parent.
pendingProps and memoizedPropsMemoization means storing the values of a function execution’s result so you can use it later, thereby avoiding recomputation. pendingProps represents the props passed to the component, and memoizedProps initializes at the end of the execution stack, storing the props of this node.
When the incoming pendingProps are equal to memoizedProps, it signals that the fiber’s previous output can be reused, preventing unnecessary work.
pendingWorkPrioritypendingWorkPriority is a number indicating the priority of the work represented by the fiber. The ReactPriorityLevel module lists the different priority levels and what they represent. With the exception of NoWork, which is zero, a larger number indicates a lower priority.
For example, you could use the following function to check if a fiber’s priority is at least as high as the given level. The scheduler uses the priority field to search for the next unit of work to perform:
function matchesPriority(fiber, priority) {
  return fiber.pendingWorkPriority !== 0 &&
         fiber.pendingWorkPriority <= priority
}
At any time, a component instance has at most two fibers that correspond to it: the current fiber and the in-progress fiber. The alternate of the current fiber is the fiber in progress, and the alternate of the fiber in progress is the current fiber.
The current fiber represents what is rendered already, and the in-progress fiber is conceptually the stack frame that has not returned.
The output is the leaf nodes of a React application. They are specific to the rendering environment (for example, in a browser app, they are div and span). In JSX, they are denoted using lowercase tag names.
Conceptually, the output of a fiber is the return value of a function. Every fiber eventually has an output, but the output is created only at the leaf nodes by host components. The output is then transferred up the tree.
The output is eventually given to the renderer so that it can flush the changes to the rendering environment. For example, let’s look at how the fiber tree looks for an app with the following code:
const Parent1 = (props) => {
  return([<Child11 />, <Child12 />])
}

const Parent2 = (props) => {
  return(<Child21 />)
}

class App extends Component {
  constructor(props) {
    super(props)
  }
  render() {
    <div>
      <Parent1 />
      <Parent2 />
    </div>
  }
}

ReactDOM.render(<App />, document.getElementById('root'))
We can see that the fiber tree is composed of singly-linked lists of child nodes linked to each other (sibling relationship) and a linked list of parent-to-child relationships. This tree can be traversed using a depth-first search.
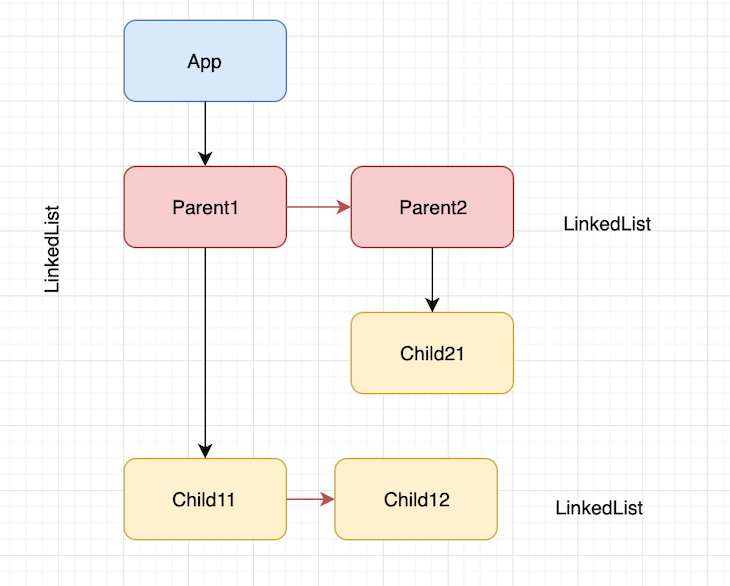
To understand how React builds this tree and performs the reconciliation algorithm on it, let’s look at a unit test in the React source code with an attached debugger to follow the process; you can clone the React source code and navigate to this directory.
To begin, add a Jest test and attach a debugger. This is a simple test for rendering a button with text. When you click the button, the app destroys the button and renders a <div> with different text, so the text is a state variable here:
'use strict';

let React;
let ReactDOM;

describe('ReactUnderstanding', () => {
  beforeEach(() => {
    React = require('react');
    ReactDOM = require('react-dom');
  });

  it('works', () => {
    let instance;

    class App extends React.Component {
      constructor(props) {
        super(props)
        this.state = {
          text: "hello"
        }
      }

      handleClick = () => {
        this.props.logger('before-setState', this.state.text);
        this.setState({ text: "hi" })
        this.props.logger('after-setState', this.state.text);
      }

      render() {
        instance = this;
        this.props.logger('render', this.state.text);
        if(this.state.text === "hello") {
        return (
          <div>
            <div>
              <button onClick={this.handleClick.bind(this)}>
                {this.state.text}
              </button>
            </div>
          </div>
        )} else {
          return (
            <div>
              hello
            </div>
          )
        }
      }
    }
    const container = document.createElement('div');
    const logger = jest.fn();
    ReactDOM.render(<App logger={logger}/>, container);
    console.log("clicking");
    instance.handleClick();
    console.log("clicked");

    expect(container.innerHTML).toBe(
      '<div>hello</div>'
    )

    expect(logger.mock.calls).toEqual(
      [["render", "hello"],
      ["before-setState", "hello"],
      ["render", "hi"],
      ["after-setState", "hi"]]
    );
  })

});
In the initial render, React creates a current tree that renders initially.
createFiberFromTypesAndProps() is the function that creates each React fiber using the data from the specific React element. When we run the test, put a breakpoint at this function, and look at the call stack:
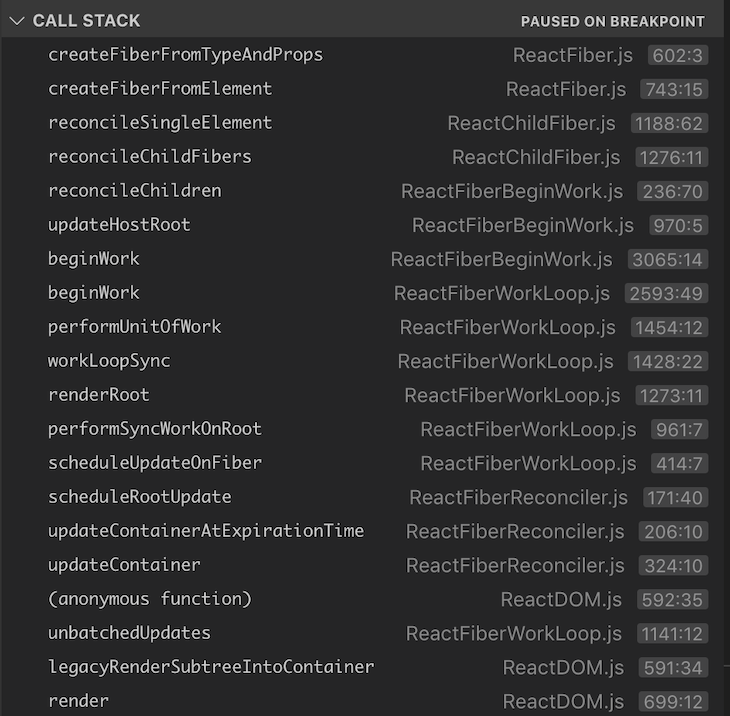
As we can see, the call stack tracks back to a render() call, which eventually goes down to createFiberFromTypeAndProps(). There are a few other functions that are of interest here: workLoopSync(), performUnitOfWork(), and beginWork().
workLoopSync()workLoopSync() is when React starts building up the tree, starting with the <App> node and recursively moving on to <div>, <div>, and <button>, which are the children of <App>. The workInProgress function holds a reference to the next fiber node that has work to do.
performUnitOfWork()performUnitOfWork() takes a fiber node as an input argument, gets the alternate of the node, and calls beginWork(). This is the equivalent of starting the execution of the function execution contexts in the execution stack.
beginWork()When React builds the tree, beginWork() simply leads up to createFiberFromTypeAndProps() and creates the fiber nodes. React recursively performs work and eventually performUnitOfWork() returns a null, indicating that it has reached the end of the tree.
instance.handleClick()Now, what happens when we perform instance.handleClick(), which clicks the button and triggers a state update? In this case, React traverses the fiber tree, clones each node, and checks whether it needs to perform any work on each node.
When we look at the call stack of this scenario, it looks something like this:
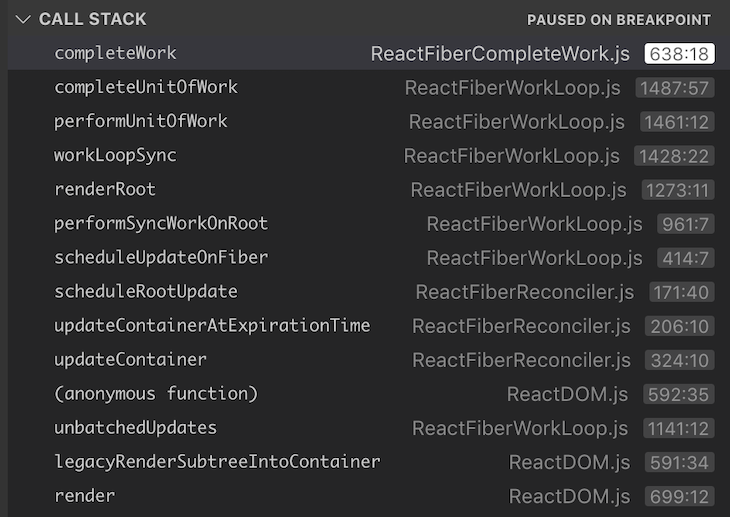
Although we did not see completeUnitOfWork() and completeWork() in the first call stack, we can see them here. Just like performUnitOfWork() and beginWork(), these two functions perform the completion part of the current execution, which means returning back to the stack.
As we can see, together these four functions execute the unit of work and give control over the work being done currently, which is exactly what was missing in the stack reconciler.
The image below shows that each fiber node is composed of four phases required to complete that unit of work.
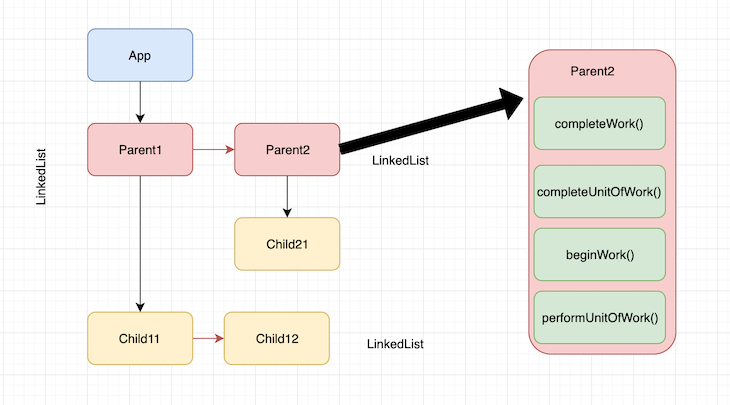
It’s important to note here that each node doesn’t move to completeUnitOfWork() until its children and siblings return completeWork().
For instance, it starts with performUnitOfWork() and beginWork() for <App/>, then moves on to performUnitOfWork() and beginWork() for Parent1, and so on. It comes back and completes the work on <App> once all the children of <App/> complete the work.
This is when React completes its render phase. The tree that’s newly built based on the click() update is called the workInProgress tree. This is basically the draft tree waiting to be rendered.
Once the render phase completes, React moves on to the commit phase, where it basically swaps the root pointers of the current tree and workInProgress tree, thereby effectively swapping the current tree with the draft tree it built up based on the click() update.
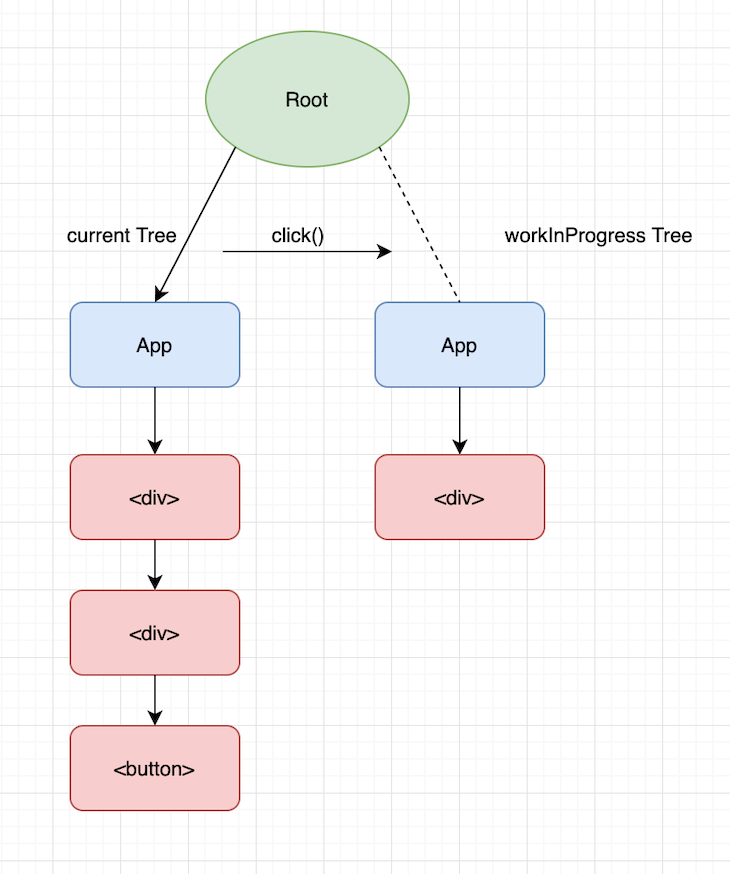
Not just that, React also reuses the old current after swapping the pointer from root to the workInProgress tree. The net effect of this optimized process is a smooth transition from the previous state of the app to the next state and the next state, and so on.
And what about the 16ms frame time? React effectively runs an internal timer for each unit of work being performed and constantly monitors this time limit while performing the work.
The moment the time runs out, React pauses the current unit of work, hands the control back to the main thread, and lets the browser render whatever is finished at that point.
Then, in the next frame, React picks up where it left off and continues building the tree. Then, when it has enough time, it commits the workInProgress tree and completes the render.
React Fiber has seen several significant changes and improvements since its introduction in React v16, with the most impactful updates in React v18. These changes are particularly aimed at improving performance and developer experience while addressing issues related to asynchronous rendering and concurrency.
Here are the key improvements and changes since React v16:
The most significant update to React fiber since its inception is concurrency. This is a foundational update to React’s core rendering model which leverages the capabilities of React Fiber to provide interruptible rendering.
Concurrent mode lets React pause, abort, or resume rendering updates based on priority and handle multiple updates concurrently rather than waiting for one update to finish before starting another. This is a stark contrast to the traditional, synchronous rendering model where updates are rendered in a single, uninterrupted, synchronous transaction.
Although concurrency mode was initially developed alongside the React Fiber architecture in React v16, it was officially released with React v18 as the core rendering mechanism and offered key features such as:
Automatic batching is a key feature that is the direct result of the underlying changes in React Fiber. It helps to reduce the number of re-renders that happen when a state changes by allowing React to group multiple state updates into a single re-render.
For example, when you call multiple setState functions in a single render cycle, React automatically batches them together into a single update. This can be observed in the code example below:
function MyComponent() {
  const [count, setCount] = useState(0);

  const handleClick = () => {
    // Multiple state updates within a single event handler
    setCount(count + 1);
    setCount(count + 2);
  };

  console.log("Rendering")

  return (
    <div>
      <p>Count: {count}</p>
      <button onClick={handleClick}>Increment</button>
    </div>
  );
}
The handleClick function calls setCount twice, once to increment the count by 1 and then again to increment it by 2.
React automatically batches these two state updates into a single update. This means that only one re-render will occur, and “rendering” will only log once in the terminal.
Before the release of React v18, batched updates were performed inside the React event handler. This meant that outside of React’s lifecycle (such as inside a setTimeout or a promise), updates would not be batched automatically. With React Fiber’s improved update in v18, updates are batched across all contexts, including asynchronous code, setTimeout, promises, and native event handlers.
Suspense is a feature that is closely tied to concurrent mode and was initially introduced with React fiber in v16, but its capabilities were greatly expanded with updates in React v17 and v18.
The feature has undergone significant improvements since its initial release. It was originally designed to manage lazy loading (code splitting) of components using React.lazy, but its functionality has expanded, especially with the introduction of concurrent mode in v18.
Now, Suspense plays a key role in handling asynchronous operations like data fetching and offers more granular control over UI rendering during these operations. You can declaratively specify what React should show when a part of the tree is not yet ready to render.
This is done using a fallback option which renders a component or string while the asynchronous task is in operation:
<Suspense fallback={<div>Loading data...</div>}>
  <SomeComponent />
</Suspense>
Another key improvement is streaming in server side rendering (SSR) and selective hydration. With this improvement, the server can send an initial lightweight HTML shell to the client and hydrate content in chunks as data becomes available.
React can selectively hydrate only the parts of the app that are immediately visible to the user while suspending the rest until the necessary data or resources are ready.
Transitions is a new API built on top of React Fiber that uses its scheduling algorithm to distinguish and mark updates as urgent or non-urgent.
Urgent updates include tasks like user inputs or animations where immediate feedback is expected. Non-urgent updates, like rendering a list of search results, are low priority, and slight delays are acceptable.
The transitions API comprises a useTransition hook which allows you to mark state updates as not urgent, as every state update not marked is considered as urgent by default.
useTransition
The useTransition hook handles transitions between UI states in a non-blocking manner. It returns an array with two values:
isPending — A boolean indicating if the transition is in progressstartTransition — A function to start the transitionTo see how the hook works, imagine a component that displays a long list of items that can be filtered. Without useTransition, updating the filter can cause a laggy experience as React re-renders the long list each time the filter changes.
With useTransition, we can mark the update that renders the filtered list as non-urgent, keeping the user input responsive:
import React, { useState, useTransition } from 'react';

const FilteredList = ({ items }) => {
  const [filter, setFilter] = useState('');
  const [filteredItems, setFilteredItems] = useState(items);
  const [isPending, startTransition] = useTransition();

  const handleFilterChange = (e) => {
    const value = e.target.value;
    setFilter(value);

    // Mark this update as non-urgent
    startTransition(() => {
      const updatedItems = items.filter(item =>
        item.toLowerCase().includes(value.toLowerCase())
      );
      setFilteredItems(updatedItems);
    });
  };

  return (
    <div>
      <input
        type="text"
        value={filter}
        onChange={handleFilterChange}
        placeholder="Filter items"
      />
      {isPending && <p>Updating list...</p>}
      <ul>
        {filteredItems.map((item, index) => (
          <li key={index}>{item}</li>
        ))}
      </ul>
    </div>
  );
};

export default FilteredList;
In this example, setFilteris updated immediately as it’s urgent for the user to see their typing reflected in the input, while setFilteredItemsis wrapped in startTransition, allowing React to update the filtered list when the system is ready.
The isPending is used to display a loading message when the filtering process takes time. This will help improve user experience by giving the user feedback while the list is being updated in the background.
React v18 introduced a new client rendering API, createRoot and hydrateRoot, which offer a better way to handle and render root nodes. createRoot replaces the previous React.render API and is essential for enabling new features like concurrency. Improvements highlighted in previous and subsequent sections won’t work without it.
createRoot, like its predecessor, helps React connect with the DOM and manage it internally. It creates a root for the DOM node and binds it to a React node, such as a top-level component like <App>, or a React element constructed with createElement:
import { createRoot } from 'react-dom/client';

const root = createRoot(document.getElementById('root'));
root.render(<App />);
The hydrateRoot API is the SSR equivalent of the createRoot API. It replaces React.hydrate and allows you to render React components inside a browser DOM node whose HTML content was previously generated in a server environment:
import { hydrateRoot } from 'react-dom/client';

const root = hydrateRoot(document.getElementById('root'));
root.render(<App />);
As shown in the code examples, both APIs return an object with a render method. These methods serve the same purpose of rendering React components to the DOM but behave slightly differently.
The render method in createRoot creates a new root instance for the React application, meaning the component tree will be rendered from scratch. In contrast, the render method in hydrateRoot only hydrates an existing DOM structure previously rendered on the server.
The returned object also includes a second method, unmount, which is used to destroy the rendered tree inside a React root. Apps built entirely with React typically won’t need to call unmount; it’s mainly for third-party code that needs to unmount all components in the root and detach React from the root DOM node.
The React team has made transitioning to the new client rendering API easier by allowing users to continue using the existing APIs in React 17. This means existing React 17 applications can be gradually migrated to React v18 without breaking changes.
React v18 also introduced new hooks: useInsertionEffect and useSyncExternalStore, which serve specific purposes related to optimizing performance and addressing use cases that weren’t fully handled by existing hooks like useEffect or useLayoutEffect.
useSyncExternalStore
The useSyncExternalStore hook lets you synchronize your components with external data sources that don’t follow React’s update lifecycle. This hook ensures consistency between React’s internal state and external stores (such as state management libraries), especially during concurrent rendering.
useSyncExternalStore was specifically designed to address problems related to race conditions, which occur when an external store’s state changes during the rendering phase, leading to inconsistencies between the state React reads and the state it uses to render components.
Without useSyncExternalStore, libraries typically rely on useEffect and useLayoutEffect to subscribe to external stores and trigger re-renders when the store changes.
However, in a concurrently rendered environment, this can cause problems because useEffect runs after the commit phase, meaning React might finish rendering before detecting any changes in the external state, potentially leading to stale or inconsistent data.
Similarly, with useLayoutEffect, which runs before the browser paints, React might still commit a render based on an outdated external state because the state could have changed during React’s rendering process.
To learn more about the useSyncExternalStore hook, refer to this article.
useInsertionEffect
The useInsertEffect hook is designed for injecting styles or performing DOM manipulations before React makes any DOM mutations. This is especially useful for CSS-in-JS libraries like Emotion and styled components that need to ensure styles are inserted before the rendering phase to avoid flickering or style inconsistencies.
I hope you enjoyed reading this post. Please feel free to leave comments or questions if you have any.
Install LogRocket via npm or script tag. LogRocket.init() must be called client-side, not
server-side
$ npm i --save logrocket

// Code:

import LogRocket from 'logrocket';
LogRocket.init('app/id');
// Add to your HTML:

<script src="https://cdn.lr-ingest.com/LogRocket.min.js"></script>
<script>window.LogRocket && window.LogRocket.init('app/id');</script>

Claude Code is deceptively capable. Point it at a codebase, describe what you need, and it’ll autonomously navigate files, write […]

Compare the top AI development tools and models of February 2026. View updated rankings, feature breakdowns, and find the best fit for you.

Broken npm packages often fail due to small packaging mistakes. This guide shows how to use Publint to validate exports, entry points, and module formats before publishing.

Discover what’s new in The Replay, LogRocket’s newsletter for dev and engineering leaders, in the February 11th issue.
Hey there, want to help make our blog better?
Join LogRocket’s Content Advisory Board. You’ll help inform the type of content we create and get access to exclusive meetups, social accreditation, and swag.
Sign up now
15 Replies to "A deep dive into React Fiber"
goooooooooooooooooooooooooooooooooooooooooooooooooooood
First of all thanks for the very well informed documentation for understanding few very fundamental implementation of JS. Just one question I wanted to put, where you were describing asynchronous behaviour of JS execution I feel you missed one part that before adding to queue tasks assigned to web api’s in case of browser. Please can you also explain that. Also please help me correcting if my understanding is wrong.
goood, thanks for this post. i’d like to ask one question, how the fiber pause work?
using window.requestIdleCallback()
I believe `requestIdleCallback ` is no longer used, see comments on the following issue https://github.com/facebook/react/issues/13206#issuecomment-418926993.
The above priorities link is broken. Here is the current one:
https://github.com/facebook/react/blob/main/packages/scheduler/src/SchedulerPriorities.js
OMG, it’s f****ing best ever article on this theme!!! Author, you are crazy! I can’t understand one thing, why it’s not in the official docs of REACT ???!?!?!?!?!?!?!
Thank you so much for this
Thank you, article is good! Also found quite good video about Fiber on youtube. https://youtu.be/xgCgq7lWoCs
thank you for the article
Great article. Now I’m trying to understand core concepts of the VDOM. It help me much.
Thank You!
It was soo goood
There’s a typo: “createFiberFromTypesAndProps” should be “createFiberFromTypeAndProps”.
The stack trace might be outdated as well, given this TODO in the source: https://github.com/facebook/react/blob/v19.0.0/packages/react-reconciler/src/ReactFiber.js#L551-L552
Thanks for catching the typo; it will be fixed shortly. I’ll also add a note regarding the consolidation of the “createFiberFromTypeAndProps” function into “createFiberFromElement.”
How does React Fiber differ from the previous React architecture (React Stack)?