Editor’s note: This article was last updated by Adebiyi Adedotun on 21 February 2024 to demonstrate editable table cells and to recommend techniques for optimizing the performance of large datasets in React.

Sometimes when we create a table to present data in our application, we may want to add a sorting functionality for data management.
While there are libraries like React Table that allow us to add a sorting functionality and more, sometimes using libraries is not the best fit, especially if we want a simple table with total flexibility.
In this tutorial, we will cover how to create a sortable table with React from scratch. We will sort table rows in ascending or descending order by clicking on the table headers. We’ll also add functionality that allows a default sorting by a specific column, and we’ll build a reusable, sortable table component.
Finally, we’ll learn how to properly use the JavaScript sort() function and some important React principles. In the end, we will have a working sortable table that looks like the image below. You can interact with the project and after that, get started!
To follow this tutorial, you must have a working knowledge of React.
Let’s start by creating a React project with Create React App and starting the development server. Once the project is up and running, we will create the table markup.
The table markup follows the following structure that includes the table caption:
<table>
  <caption>Caption here</caption>
  <thead>
    <tr>
      <th>{/* ... */}</th>
    </tr>
  </thead>
  <tbody>
    <tr>
      <td>{/* ... */}</td>
    </tr>
  </tbody>
</table>
Because React is a component-based library, we can split the markup into different component files. The Table component will serve as the parent component holding the TableHead and TableBody components.
Inside these children components, we will render the table heading and the body contents respectively. Finally, we will render the parent component inside the App component.
In the src folder, let’s create the files so we have the following structure:
react-sortable-table
   ...
    ├── src
    │    ├── components
    │    │      ├── Table.js
    │    │      ├── TableBody.js
    │    │      └── TableHead.js
    │    ├── images
    │    ├── App.js
    │    ├── index.css
    │    └── index.js
Notice we also added an images folder in the src. This will hold the icons that indicate the direction of sorting. Let’s get the icons from the project here and add them to the src/images folder.
Next, open the src/index.js and update the file so we have this:
import React from 'react';
import ReactDOM from 'react-dom/client';
import './index.css';
import App from './App';

const root = ReactDOM.createRoot(document.getElementById('root'));
root.render(
 <React.StrictMode>
  <App />
 </React.StrictMode>
);
Then, update the src/App.js file so we have the following:
const App = () => {
 return <>App</>;
};

export default App;
Before we save the files, let’s get the CSS for the project here to replace the src/index.css file. If we now save the files, we should see a simple “App” text rendered in the frontend.
Usually, when we work with tables, we fetch the table’s data from an API or a backend server asynchronously. However, for this tutorial, we will generate some mock but realistic data from Mockaroo and get the returned JSON data that looks like this:
[
 {
  "id": 1,
  "full_name": "Wendall Gripton",
  "email": "[email protected]",
  "gender": "Male",
  "age": 100,
  "start_date": "2022-01-26"
 },
 // ...
]
Let’s create a data.json in the src folder, copy the data from the project file here, and paste it into the file we just created. Save the file.
In the file, you’ll notice we added some null values to represent the missing values. This was intentional to show how to properly sort values of the null data type.
In the components/Table.js file, let’s start by adding the following code:
import { useState } from "react";
import tableData1 from "../tableData1.json";
import TableBody from "./TableBody";
import TableHead from "./TableHead";
const Table = () => {
const [tableData, setTableData] = useState(tableData1);
const columns = [
{ label: "Full Name", accessor: "full_name" },
{ label: "Email", accessor: "email" },
{ label: "Gender", accessor: "gender" },
{ label: "Age", accessor: "age" },
{ label: "Start date", accessor: "start_date" },
];
return (
<>
<table className="table">
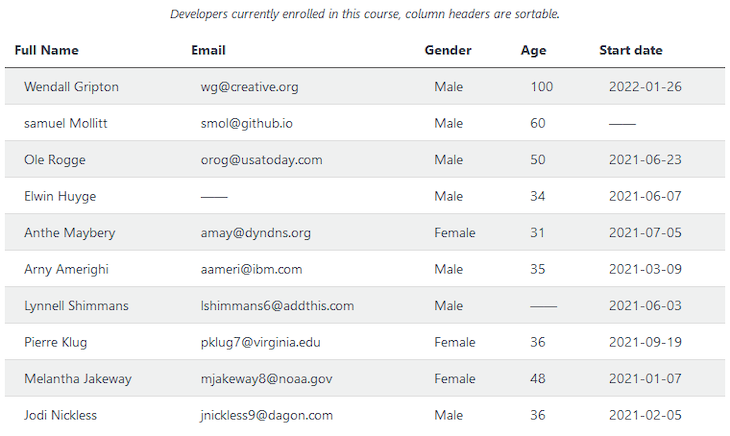
<caption>
Developers currently enrolled in this course, column headers are sortable.
</caption>
<TableHead columns={columns} />
<TableBody columns={columns} tableData={tableData} />
</table>
</>
);
};
export default Table;
The code is self-explanatory. We imported the table data and stored it in the state. Then, we passed it to the TableBody component via the prop. We also defined the table headers as an array of objects and assigned them to the columns variable.
We can now loop through the variable in the TableHead component to display the table headers and also use the accessor keys to dynamically access and display the body row data. For this, the accessor must match the data keys in the src/tableData1.json file.
Next, let’s access the data in the children’s components so we can render them. Let’s add the following code to the components/TableHead.js file:
const TableHead = ({ columns }) => {
 return (
  <thead>
   <tr>
    {columns.map(({ label, accessor }) => {
     return <th key={accessor}>{label}</th>;
    })}
   </tr>
  </thead>
 );
};

export default TableHead;
Next, let’s add the following code in the components/TableBody.js file:
const TableBody = ({ tableData, columns }) => {
 return (
  <tbody>
   {tableData.map((data) => {
    return (
     <tr key={data.id}>
      {columns.map(({ accessor }) => {
       const tData = data[accessor] ? data[accessor] : "——";
       return <td key={accessor}>{tData}</td>;
      })}
     </tr>
    );
   })}
  </tbody>
 );
};

export default TableBody;
Finally, update the src/App.js file to include the Table component:
import Table from "./components/Table";

const App = () => {
 return (
  <div className="table_container">
   <h1>Sortable table with React</h1>
   <Table />
  </div>
 );
};

export default App;
Save all files and check the frontend. We should see our table rendered:
Now, whenever we click any of the table headers, we can sort that particular column in ascending or descending order. To achieve this, we must use an ordering function that knows how to collate and order items. In this case, we will use the sort() function.
However, depending on the item’s data type, we can sort elements using different methods. Let’s quickly take a look at that.
sort() functionIn the simplest form, we can use the sort() function to arrange the elements in the arr array:
const arr = [3, 9, 6, 1];

arr.sort((a, b) => a - b);
console.log(arr); // [1, 3, 6, 9]
The sort(), through its algorithm, knows how to compare its elements. By default, it sorts in ascending order. The above syntax works if the sort items are numbers. For strings, we have something like this:
const arr2 = ["z", "a", "b", "c"];

arr2.sort((a, b) => (a < b ? -1 : 1));
console.log(arr2); // ["a", "b", "c", "z"]
Here, the sort() compares items and returns an integer to know if an item is moved up or down in the list. In the above implementation, if the compare function returns a negative number, the first item, a, is less than b, and therefore moved up, which indicates ascending order and vice versa.
Understanding the sorting principle with the sort() function is crucial to ordering table data. Now, let’s look at some more examples.
Say we’re sorting the following data by name:
const data = [
  { name: "Ibas", age: 100 },
  {
    name: "doe",
    age: 36
  }
];
We will have the following code:
const data1 = [...data].sort((a, b) => (a.name < b.name ? -1 : 1));

data1.map((d) => console.log("without conversion", d.name)); // Ibas, doe
Notice that the output is not what we expect. We expect doe to be listed before Ibas based on the default ascending rules. This happens because characters are sorted by their Unicode values.
In the Unicode table, capital letters have a lesser value than small letters. To ensure we see the expected result, we must sort by case-insensitive by converting the sort items to lower cases or upper cases.
Our code should now look like so:
const data2 = [...data].sort((a, b) =>
  a.name.toLowerCase() < b.name.toLowerCase() ? -1 : 1
);

data2.map((d) => console.log("with conversion", d.name)); // doe, Ibas
Now, this works as expected. However, in our project, we will sort the table headers by different data types, which include number, string, and date.
In the above implementation, we cannot pass a number because the .toLowerCase() function only exists on strings. This is where the localeCompare() function comes in.
localeCompare() with the sort() functionThe localeCompare() function is capable of handling different data types, including strings in different languages, so they appear in the right order. This is perfect for our use case.
If we use localeCompare() to sort our data array by name, we have the following:
const data3 = [...data].sort((a, b) => a.name.localeCompare(b.name));

data3.map((d) => console.log("with localeCompare", d.name, d.age)); // doe 36, Ibas 100
Like the earlier compare function, the localeCompare() also returns a number. In the above implementation, it returns a negative number if the a.name is less than the b.name and vice versa. This function is only applied to a string, but it provides an option for numeric sorting.
Back to our data array, we can sort by age number by calling .toString() on age to get a string representation:
const data4 = [...data].sort((a, b) =>
  a.age.toString().localeCompare(b.age.toString())
);

data4.map((d) => console.log("with localeCompare", d.name, d.age)); // ibas 100, doe 36
Again, in the code, we notice that 100 is coming before 36, which is not what we expect. This also happens because the values are strings and hence, "100" < "36" is correct. For numeric sorting, we must specify the numeric option:
const data5 = [...data].sort((a, b) =>
  a.age.toString().localeCompare(b.age.toString(), "en", {
    numeric: true
  })
);

data5.map((d) => console.log("with localeCompare", d.name, d.age)); /// doe 36, Ibas 100
In the code above, are now getting the proper arrangement. In the code, we also included an optional "en" locale to specify the application language. Now that we’ve refreshed how to use the sort() function, implementing it in our project will be a piece of cake.
onClick event and sorting dataWhen we click a particular table header, we must keep track of the sort order and the sort column. For this, we must use the useState Hook.
In the components/TableHead.js, import the useState Hook and use it like so:
import { useState } from "react";

const TableHead = ({ columns }) => {
 const [sortField, setSortField] = useState("");
 const [order, setOrder] = useState("asc");
 return (
  // ...
 );
};

export default TableHead;
Next, add an onClick event to the table header, th, and its handler function above the return statement:
const TableHead = ({ columns }) => {
 // ...
 const handleSortingChange = (accessor) => {
  console.log(accessor);
 };
 return (
  <thead>
   <tr>
    {columns.map(({ label, accessor }) => {
     return (
      <th key={accessor} onClick={() => handleSortingChange(accessor)}>
       {label}
      </th>
     );
    })}
   </tr>
  </thead>
 );
};

export default TableHead;
Let’s save the file. If we open the console and click the table headers, we should see their respective accessor keys.
Next, let’s define the logic to switch the order on every header click by updating the handleSortingChange handler so we have the following:
const handleSortingChange = (accessor) => {
 const sortOrder =
  accessor === sortField && order === "asc" ? "desc" : "asc";
 setSortField(accessor);
 setOrder(sortOrder);
 handleSorting(accessor, sortOrder);
};
At this point, we have access to the latest sort order. Now, to manipulate the table data, we must pass the order up a level to the parent Table component. We’ve done that using the handleSorting() function call.
This is because the Table component is the one that holds the data in the state. Therefore, it is the only component that can change it. In React, we can raise an event like we did in this file and then handle it in the parent component via the props.
So, before we save the file, let’s ensure we destructure the component prop and have access to the handleSorting:
const TableHead = ({ columns, handleSorting }) => {
Save the file. Next, let’s open the components/Table.js file to handle the event. First, in the return, let’s ensure we pass the handleSorting to the TableHead instance as a prop:
return (
 <>
  <table className="table">
   {/* ... */}
   <TableHead columns={columns} handleSorting={handleSorting} />
   <TableBody columns={columns} tableData={tableData} />
  </table>
 </>
);
We can rewrite the above to look simpler, like so:
return (
 <>
  <table className="table">
   {/* ... */}
   <TableHead {...{ columns, handleSorting }} />
   <TableBody {...{ columns, tableData }} />
  </table>
 </>
);
Either of the above methods is fine.
Finally, let’s add the handleSorting handler above the return statement:
const handleSorting = (sortField, sortOrder) => {
 console.log(sortField, sortOrder)
};
Let’s save all the files.
The handleSorting handler expects two parameters because we passed them from the TableHead component. In the meantime, we log these parameters to the console whenever we click the table headers.
Next, we will use the sort() function alongside the localeCompare() to properly sort the table data. Fortunately, we learned that earlier in this tutorial.
By applying the sorting logic, the handleSorting handler now looks like this:
const handleSorting = (sortField, sortOrder) => {
 if (sortField) {
  const sorted = [...tableData].sort((a, b) => {
   return (
    a[sortField].toString().localeCompare(b[sortField].toString(), "en", {
     numeric: true,
    }) * (sortOrder === "asc" ? 1 : -1)
   );
  });
  setTableData(sorted);
 }
};
The code should be clear enough. If you need a refresher, please revisit the earlier explanation. Here, we sort the table data by the column headers and then update the tableData state via the setTableData() updater function.
Notice how we reverse the sort order by checking for the "asc" value and switch the returned value.
Let’s save and test our projects. The project should work until we click on the column that includes null values. Let’s handle that by updating the handler to check for null values:
const handleSorting = (sortField, sortOrder) => {
 if (sortField) {
  const sorted = [...tableData].sort((a, b) => {
   if (a[sortField] === null) return 1;
   if (b[sortField] === null) return -1;
   if (a[sortField] === null && b[sortField] === null) return 0;
   return (
    a[sortField].toString().localeCompare(b[sortField].toString(), "en", {
     numeric: true,
    }) * (sortOrder === "asc" ? 1 : -1)
   );
  });
  setTableData(sorted);
 }
};
Now, save the file and test the project. It should work.
Next, let’s add a sortable key to the columns items and specify a Boolean value to allow or disallow sorting for any column:
const columns = [
 { label: "Full Name", accessor: "full_name", sortable: true },
 { label: "Email", accessor: "email", sortable: false },
 { label: "Gender", accessor: "gender", sortable: true },
 { label: "Age", accessor: "age", sortable: true },
 { label: "Start date", accessor: "start_date", sortable: true },
];
Then, we can access this key in the TableHead component and use it to activate a click event like so:
return (
 <thead>
  <tr>
   {columns.map(({ label, accessor, sortable }) => {
    return (
     <th
      key={accessor}
      onClick={sortable ? () => handleSortingChange(accessor) : null}
     >
      {label}
     </th>
    );
   })}
  </tr>
 </thead>
);
Now, we should be able to sort any columns except those with a sortable value of false.
This is straightforward. Here, let’s dynamically add the default, up, and down class names to the table header (th) element. These classes are already styled in our CSS file to add arrow icons.
In the components/TableHead.js file, update the return statement so we have the following:
return (
 <thead>
  <tr>
   {columns.map(({ label, accessor, sortable }) => {
    const cl = sortable
     ? sortField === accessor && order === "asc"
      ? "up"
      : sortField === accessor && order === "desc"
      ? "down"
      : "default"
     : "";
    return (
     <th
      // ...
      className={cl}
     >
      {label}
     </th>
    );
   })}
  </tr>
 </thead>
);
In the code, we use the nested ternary operator to check the order status and assign class names accordingly. Save and test your project.
React allows us to reuse component logic if the need arises. For instance, if we need to include another data table in a different section of our project, we can extract and share similar logic between components using a custom Hook.
Here, we’ll create a custom Hook to reuse sorting functionality in different table components.
Let’s start by extracting the sorting logic into a reusable function called useSortableTable. In the src folder, create a file called useSortableTable.js and add the following code:
import { useState } from "react";
export const useSortableTable = (data) => {
 const [tableData, setTableData] = useState(data);

 const handleSorting = (sortField, sortOrder) => {
  if (sortField) {
   const sorted = [...tableData].sort((a, b) => {
    if (a[sortField] === null) return 1;
    if (b[sortField] === null) return -1;
    if (a[sortField] === null && b[sortField] === null) return 0;
    return (
     a[sortField].toString().localeCompare(b[sortField].toString(), "en", {
      numeric: true,
     }) * (sortOrder === "asc" ? 1 : -1)
    );
   });
   setTableData(sorted);
  }
 };

 return [tableData, handleSorting];
};
In the above code, we’ve only extracted the sorting logic into a custom Hook file. The Hook takes the table data as an argument and returns the sorted data when we click the column header. Next, we’ll use the Hook in place of the logic in the Table component.
Open the components/Table.js file. Then, import and use the useSortableTable() custom Hook like so:
// ...
import { useSortableTable } from "../useSortableTable";

const Table = () => {
 const columns = [
  // ...
 ];
 const [tableData, handleSorting] = useSortableTable(tableData1);
 return (
  // ...
 );
};

export default Table;
With this implementation, the Table component contains less code. If we save the files and test our project, it should work as expected. Now we can reuse the logic in any other table component.
Table componentIn the previous section, we learned how to reuse component logic with a custom Hook. This enables us to reuse the sorting functionality. Now let’s see how we can further abstract the table logic and only expose a Table instance where we can pass along some props related to a specific table.
In our code, we are currently rendering the <Table /> in the src/App.js. Let’s bring all the data related to that table from the Table component and use it inside the src/App.js. This data includes the table body content, columns, and table caption.
The src/App.js file now looks like so:
import Table from "./components/Table";
import tableData1 from "./tableData1.json";

const columns = [
 // ...
];

const App = () => {
 return (
  <div className="table_container">
   <h1>Sortable table with React</h1>
   <Table
    caption="Developers currently enrolled in this course, column headers are sortable."
    data={tableData1}
    columns={columns}
   />
  </div>
 );
};

export default App;
Now, we can receive the props from the Table component and then use them in our render:
// ...
const Table = ({ caption, data, columns }) => {
 const [tableData, handleSorting] = useSortableTable(data);

 return (
  <>
   <table className="table">
    <caption>{caption}</caption>
    <TableHead {...{ columns, handleSorting }} />
    <TableBody {...{ columns, tableData }} />
   </table>
  </>
 );
};

export default Table;
Save the files and test the project.
Let’s get another data table and render it using the same Table component. To start, create a tableData2.json file in the src folder. Then, copy the data from the project file and paste it into the tableData2.json file.
Next, let’s create a component file called RenderAnotherTable.js in the components folder and render the new table:
import Table from "./Table";
import tableData2 from "../tableData2.json";

const columns = [
 { label: "Name", accessor: "name", sortable: true },
 { label: "Country", accessor: "country", sortable: true },
 { label: "GitHub username", accessor: "github_username", sortable: true },
 { label: "Course price", accessor: "money", sortable: true },
];

const RenderAnotherTable = () => {
 return (
  <>
   <Table
    caption="List of developers with an affordable course."
    data={tableData2}
    columns={columns}
   />
  </>
 );
};

export default RenderAnotherTable;
Now, we can render this new component inside any file. In our case, we’ll render it in the src/App.js file:
import RenderAnotherTable from "./components/RenderAnotherTable";
// ...
const App = () => {
 return (
  <div className="table_container">
   {/* ... */}
   <br />
   <RenderAnotherTable />
  </div>
 );
};

export default App;
Save all files and test your project. It should work as expected.
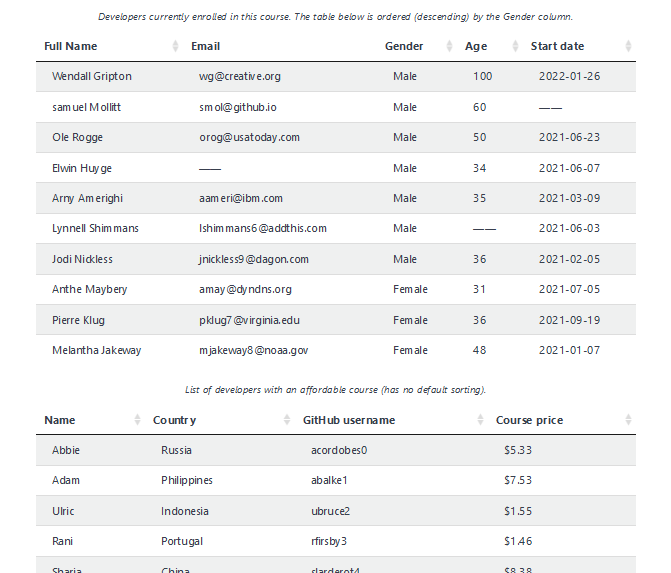
Let’s add logic to enable us to order the table by a specific column on the initial render. Let’s find the columns array in the src/App.js file and add a sortbyOrder key with a desc value:
const columns = [
 // ...
 { label: "Gender", accessor: "gender", sortable: true, sortbyOrder: "desc" },
 // ...
];
With this, we will have the table sorted in descending order according to the Gender column. In the Table component, let’s also pass the columns to the useSortableTable Hook so that we can define the default sort functionality:
const Table = ({ caption, data, columns }) => {
 const [tableData, handleSorting] = useSortableTable(data, columns);

 return (
  // ...
 );
};

export default Table;
Next, open the src/useSortableTable.js file and access the columns:
export const useSortableTable = (data, columns) => {
 const [tableData, setTableData] = useState(data);

 const handleSorting = (sortField, sortOrder) => {
  // ...
 };

 return [tableData, handleSorting];
};
On the initial render, instead of passing the unsorted table data to the state, we’ll pass a function that detects if we want to default sort on a particular column and then returns the sorted table. So let’s initialize the state with a function that takes the data and column and defines the default sort logic like so:
function getDefaultSorting(defaultTableData, columns) {
 const sorted = [...defaultTableData].sort((a, b) => {
  const filterColumn = columns.filter((column) => column.sortbyOrder);

  // Merge all array objects into single object and extract accessor and sortbyOrder keys
  let { accessor = "id", sortbyOrder = "asc" } = Object.assign(
   {},
   ...filterColumn
  );

  if (a[accessor] === null) return 1;
  if (b[accessor] === null) return -1;
  if (a[accessor] === null && b[accessor] === null) return 0;

  const ascending = a[accessor]
   .toString()
   .localeCompare(b[accessor].toString(), "en", {
    numeric: true,
   });

  return sortbyOrder === "asc" ? ascending : -ascending;
 });
 return sorted;
}

export const useSortableTable = (data, columns) => {
 const [tableData, setTableData] = useState(getDefaultSorting(data, columns));

 // ...
 return [tableData, handleSorting];
};
On the initial render, we check if any of the columns have the sortbyOrder key and then sort the column by the specified value — either ascending or descending. If we save our files and test the project, it should work. You can see for yourself here.
To implement editable table cells, we will use the native input. The theory here is to render an input in place of a table cell (td) when clicked, then handle the state as is typical in React.
The first step is to expose the state setter setTableData from useSortableTable. This is so that when we edit and update a table cell, we also update the canonical state:
export const useSortableTable = (data, columns) => {
  const [tableData, setTableData] = useState(getDefaultSorting(data, columns));

  // ... other code ...

  // Return setTableData too
  return [tableData, setTableData, handleSorting];
};
Then in the Table component, we pass setTableData to the TableBody:
const Table = ({ caption, data, columns }) => {
  // Extract setTableData
  const [tableData, setTableData, handleSorting] = useSortableTable(
    data,
    columns
  );

  return (
    <table className="table">
      {/* ... other code ... */}
      {/* Pass setTableData down */}
      <TableBody {...{ columns, tableData, setTableData }} />
    </table>
  );
};
The bulk of the work will be done in the TableBody. But first, let’s look at the complete code and break down the constituent parts:
const TableBody = ({ tableData, columns, setTableData }) => {
  // New state: Use this to track the table cell being edited
  const [editCell, setEditCell] = useState({});

  // New event handler
  const handleChange = (inputValue, accessor) => {
    const newDataState = [...tableData];

    // Find the row and updated the property
    const row = newDataState.find((row) => row.id === editCell.id);
    row[accessor] = inputValue;

    // Update the state
    setTableData(newDataState);
  };

  return (
    <tbody>
      {tableData.map((data) => {
        return (
          <tr key={data.id}>
            {columns.map(({ accessor }) => {

              // New variable: What cell are we currently editing?
              const isEditing =
                editCell.id === data.id && editCell.accessor === accessor;

              // Updated variable
              const tData = data[accessor]
                ? data[accessor]
                : isEditing
                  ? ""
                  : "——";

              // Updated return
              return (
                <td
                  key={accessor}
                  onClick={() => setEditCell({ id: data.id, accessor })}
                >
                  {isEditing ? (
                    <input
                      value={tData}
                      onChange={(e) => handleChange(e.target.value, accessor)}
                      onBlur={() => setEditCell({})}
                      autoFocus
                    />
                  ) : (
                    tData
                  )}
                </td>
              );
            })}
          </tr>
        );
      })}
    </tbody>
  );
};
What’s happening here is that in order to make each table cell editable, we have added an input that renders in place of the normal value. Clicking on the table data td sets the state and tracks the current table cell.
We handle the input as is typical in React with onChange. Then, we use handleChange to first find the current row and then update the cell in that row with the value of the input.
Because we are now toggling between an input and an ordinary value, you might encounter some styling issues. What this means is that you need to be precise with the column width of each table cell. One good way to do this is to explicitly set the width of the input and also set the table layout to fixed.
table {
 table-layout: fixed;
}

Keep in mind that updating the state here is only done locally, so you might need to do this differently, like by updating the database instead.
Rendering large lists in React (whether in a table or not) can be performance-intensive. Here are some strategies for optimization, especially when working with large datasets:
useMemo or useCallback. For example, we can memoize the sorted data using useMemo to avoid sorting the data every time the component re-renders. However, premature memoization can lead to bugs or even worsen performance due to the overhead of comparisonArray.sort() is one way to sort. If it becomes insufficient, we can also use a custom algorithm that fits our specific use case: QuickSort, HeapSort, etc.Adding sorting functionality to a table is vital for data management and improving user experience, especially for tables with many rows.
In this tutorial, we learned how to add the sort feature (including default sorting functionality by a specific column) to a React table without using any library. We also learned how to reuse the table logic to add another data table to a different section of our project. Furthermore, we learned about how to possibly edit table cells as well as useful performance techniques to employ when rendering large datasets.
If you liked this tutorial, please share it around the web. And, if you have questions or contributions, share your thoughts in the comment section.
You can find the project source code on my GitHub.
Install LogRocket via npm or script tag. LogRocket.init() must be called client-side, not
server-side
$ npm i --save logrocket

// Code:

import LogRocket from 'logrocket';
LogRocket.init('app/id');
// Add to your HTML:

<script src="https://cdn.lr-ingest.com/LogRocket.min.js"></script>
<script>window.LogRocket && window.LogRocket.init('app/id');</script>
Would you be interested in joining LogRocket's developer community?
Join LogRocket’s Content Advisory Board. You’ll help inform the type of content we create and get access to exclusive meetups, social accreditation, and swag.
Sign up now
This guide walks you through creating a web UI for an AI agent that browses, clicks, and extracts info from websites powered by Stagehand and Gemini.

This guide explores how to use Anthropic’s Claude 4 models, including Opus 4 and Sonnet 4, to build AI-powered applications.

Which AI frontend dev tool reigns supreme in July 2025? Check out our power rankings and use our interactive comparison tool to find out.

Learn how OpenAPI can automate API client generation to save time, reduce bugs, and streamline how your frontend app talks to backend APIs.


3 Replies to "Creating a React sortable table"
But how add events edit delete to each row in last column?
Great article, what would complete this table is option to edit cells
Awesome article, thanks heaps Ibas!