Page transitions can greatly impact the overall user experience for a website or application. A seamless and effortless flow between webpages can be helpful in maintaining a user’s focus and interest. Conversely, clunky or slow transitions can be a major turnoff, resulting in a higher bounce rate and a reduction in engagement and conversions.

In this article, we’ll discuss improving user experience by creating smooth page transitions with Barba.js, a popular JavaScript library.
Jump ahead:
Barba.js is a JavaScript library that handles the transition between webpages, allowing the user to experience a seamless page change with an animation, rather than a jarring browser reload with a blank page. This improves the overall look and feel of the website and enhances user experience.
Barba.js operates by updating the content of a page dynamically, without having to reload the entire page. This results in a faster and more seamless experience for the user, as they can move between pages without any interruptions or delays. The library is designed to be lightweight, making it easy to implement and use in a wide range of projects.
A key feature of Barba.js is its ability to cache pages, ensuring a fast loading experience — even when a user navigates back and forth between pages. It also provides a range of customization options, allowing developers to create unique and tailored page transitions. In addition, the library supports the preloading of pages, providing a smooth and uninterrupted experience, even when a user clicks on a link.
Let’s look at the different ways we can bring Barba.js into our project.
We can install Barba.js with a bundler or via a CDN.
Barba.js is available on the npm registry and can be installed through the command line using a package manager such as npm or yarn:
# npm
npm install @barba/core

# yarn
yarn add @barba/core
Then, you can import it into your project like any other module:
import barba from '@barba/core';
The fastest way to use Barba.js in your project is to simply load the latest build from your favorite CDN; this approach requires minimal setup:
// HTML
<!-- unpkg -->
<script src="https://unpkg.com/@barba/core"></script>

<!-- jsdelivr -->
<script src="https://cdn.jsdelivr.net/npm/@barba/core"></script>
Next, init Barba.js, like so:
// HTML
<script>
  barba.init({
    // ...
  })
</script>
You can also use an external script file and just link it:
// HTML
<script src="./app.js"></script>
Barba.js needs to understand your site architecture so that it knows which elements to swap and which elements to retain.
Here’s how your markup should look:
// HTML
<body data-barba="wrapper">

<!-- You can have contents that will not be swapped in here, like <div class="navbar"> -->

<main data-barba="container" data-barba-namespace="home">
<!-- put here the content you wish to swap -->
</main>

<!-- You can have contents that will not be swapped in here, like <footer> -->
</body>
Let’s take a closer look at the Barba.js attributes:
wrapper: Central component of Barba.js that holds the entire page structure. Any elements within the barba-wrapper, but outside of the barba-container, will not be swapped during transition, making it a safe area to place items such as headers, footers, or navigation bars. The wrapper is typically placed on the <body> tag, but it can also be placed within a <div> or <section> elementcontainer: **Section of the page that gets swapped during transition; this is where you should place the <main> content of a particular page. The container is typically defined within the <main> tag, but it can also be placed within a <div> or <section> element. One thing to note is that Barba.js appends the container to the wrapper, meaning it will always be at the bottom of the wrappernamespace: Provides the ability to assign a unique name to each page, which can then be used to create specific transition rules for each page, if desiredBarba.js alters the behavior of a website making it work like a single page application and thereby enabling the library to create smooth transitions without having to reload the entire site.
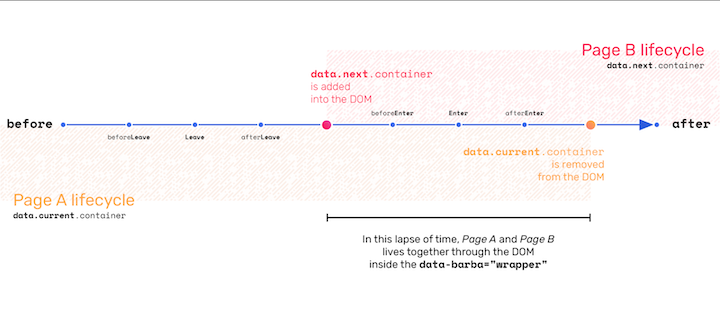
Here are the three steps of the Barba.js lifecycle when navigating between two pages:
mouseover or touchstart events, Barba.js pre-fetches and caches the next page’s content in the background, so that the transition between pages is seamless and fastdata-barba=container of the next page is added to the end of the element with the attribute "data-barba='wrapper"data-barba=container attribute is removed from the DOMBarba.js provides us with different hooks at different stages of the transition lifecycle. One example is the afterLeave hook, which enables us to perform any necessary post-transition actions, such as updating the page’s title:
Great! Now that we have all the setup and transition logic covered, let’s build a simple example so that we can really see Barba.js in action.
Barba.js is a transition library, not an animation library. You’ll still need an animation library, like GSAP, to handle animations.
The transition consists of two parts:
leave () animation: Takes place when leaving the current pageenter () animation: Occurs when entering the next pageLet’s get started!
First, we’ll need to set up a new project. Our example will be built with plain HTML, CSS, and JavaScript.
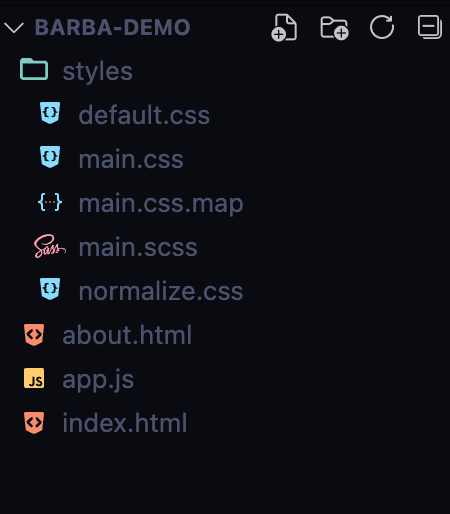
Here’s what our project folder structure should look like:
- Root folder
  |
  |- index.html
  |- about.html
  |- app.js
  |- styles
  |   |
  |   |- main.scss
Once our project folder structure is complete, we’ll need to add two libraries, GSAP and Barba.js, into our project. For this example, we’ll use a CDN to import both libraries.
Here’s what that will look like for each page:
<!DOCTYPE html>
<html lang="en">
      <head>
            <meta charset="UTF-8" />
            <meta http-equiv="X-UA-Compatible" content="IE=edge" />
            <meta
                  name="viewport"
                  content="width=device-width, initial-scale=1.0"
            />
            <title>Barba-demo Home</title>
            <link rel="stylesheet" href="main.css" />
      </head>
      <body data-barba="wrapper">
            <main data-barba="container"></main>
            <script src="https://cdnjs.cloudflare.com/ajax/libs/gsap/3.11.4/gsap.min.js"></script>
            <script src="https://cdn.jsdelivr.net/npm/@barba/core"></script>
            <script src="app.js"></script>
      </body>
</html>
In both the index.html and about.html pages, the custom stylesheet is linked at the <head> element, and the libraries are imported through CDN links in the <body> element.
In the code above, we inform Barba.js about the structure of our website by using the attributes data-barba="wrapper" and data-barba="container". These attributes are applied to each page of our site so that Barba.js knows what part of each webpage to swap.
Here’s a CodeSandbox with the entire project:
suspicious-architecture-l6mqlt
suspicious-architecture-l6mqlt by Nelson Michael using @barba/core, gsap, parcel-bundler, sass
Here’s the entire code for the index.html page:
<!DOCTYPE html>
<html lang="en">
      <head>
            <meta charset="UTF-8" />
            <meta http-equiv="X-UA-Compatible" content="IE=edge" />
            <meta
                  name="viewport"
                  content="width=device-width, initial-scale=1.0"
            />
            <title>Barba-demo Home</title>
            <link rel="stylesheet" href="styles/main.css" />
      </head>
      <body data-barba="wrapper">
            <div class="page-transition-container">
                  <span class="page-transition"></span>
                  <span class="page-transition"></span>
            </div>
            <nav>
                  <p>Wivalow</p>
                  <ul>
                        <li><a href="/index.html">Home</a></li>
                        <li><a href="/about.html">About</a></li>
                  </ul>
            </nav>
            <main data-barba="container">
              <div class="img-container">
                <img src="https://images.unsplash.com/photo-1675873725360-b15df4950952?ixlib=rb-4.0.3&ixid=MnwxMjA3fDB8MHxwaG90by1wYWdlfHx8fGVufDB8fHx8&auto=format&fit=crop&w=465&q=80" alt=""/>
                  <div class="bg-underlay"></div>
                  </div>
                  <div class="desc">
                    <h1>Top<br />Echelon<br />Luxury</h1>
                    <p>Experience the epitome of luxury and style with Wivalow.<br> Shop with us and elevate your wardrobe to new heights.</p>
                  </div>
            </main>
            <script src="https://cdnjs.cloudflare.com/ajax/libs/gsap/3.11.4/gsap.min.js"></script>
            <script src="https://cdn.jsdelivr.net/npm/@barba/core"></script>
            <script src="app.js"></script>
      </body>
</html>
Our about.html page is exactly the same; we’re only changing the images, just for the sake of distinction.
The index.html file includes the below code. This is the element that will be animated during transition. We’re using the element as an overlay over the entire page:
<div class="page-transition-container">
    <span class="page-transition"></span>
    <span class="page-transition"></span>
</div>
Here’s the CSS for the above overlay code:
.page-transition-container{
      display: flex;
      flex-direction: column;
      position: absolute;
      z-index:15;
      height:100vh;
      width:100%;
      top:0;
      left:0;
      margin:0;
      pointer-events: none;
      .page-transition{
            transform: scaleX(0);
            background: #2c2c2c;
            height:50%;
      }
}
Now, let’s get to the main bit of our code.
I’m going to summarize the process in just two steps: defining a function to handle the animation with GSAP and defining a leave() transition with Barba.js.
First, we define a transition function that uses GSAP to animate our overlay element that has a class of .page-transition:
const transition=()=>{
      let tl = gsap.timeline();
      tl.to('.page-transition', { duration: .5, scaleX:1, transformOrigin: "bottom right", stagger: .2})
      tl.to('.page-transition', { duration: .5, scaleX: 0, transformOrigin: "bottom right", stagger: .1 , delay:.1})
}
The animation consists of two parts: first, the element scales up on the x-axis over 0.5s with a stagger of 0.2s; then it scales down over 0.5s with a stagger of 0.1s and a delay of 0.1s.
leave() transition with Barba.jsNext, we initialize Barba.js and define a leave() transition within an object inside the transitions array:
barba.init({
        transitions: [{
            leave(){
                  transition();
            }
      }]
})
Barba.js offers various hooks that can be utilized to initiate a transition animation at various stages during the page change process. Here’s a comprehensive list of the available hooks.
The leave() hook instructs Barba.js to immediately switch the content of the current page, defined by the element with the data-barba="container" attribute, with the content of the next page while animating the overlay element to create a smooth page transition.
Now any time we leave a page, we have a smooth transition animation, instead of a hard page reload.
What if we want a different kind of animation for specific pages? Well, we can easily achieve that by setting a data-barba-namespace="unique-name" attribute on the element with the data-barba="container" attribute. We can now reference that name in the transitions array, like so:
barba.init({
        transitions: [{
            name: "unique-name"
            leave(){
                  differentTransition();
            }
      },
      {
          name: "another-unique-name"
          enter(){
                anotherDifferentTransition();
        }
      }
]
})
What if we want to specify different types of animation for specific pages? Well, we can easily achieve that with transition rules. We can set a data-barba-namespace="unique-name" attribute on the element with the data-barba="container" attribute and then reference that name in the transitions array, like so:
// JavaScript

barba.init({
        transitions: [{
            namespace: "unique-name"
            leave(){
                  differentTransition();
            }
      },
      {
          namespace: "another-unique-name"
          enter(){
                anotherDifferentTransition();
        }
      }
]
})
But here’s the real gist of the Barba.js transition resolution feature — by using rules, we can define specific transitions based on a namespace, route, or custom logic to be initiated when a user visits a specific page.
The transition resolution rules are made up of keywords and conditions.
Think of rules as simple if statements:
if(condition is met){
  runTransition()
}
Let’s take a closer look at this feature.
Keywords simply define our logic flow. For example, we could use the from keyword to indicate that the transition should be triggered when a user leaves the current page. Or, we could use the to keyword to indicate that the transition should occur when the user enters the next page. We could even use both keywords in one transition:
barba.init({
  transitions: [

    {
      from: {
        //
      },
      leave() {
        transition();
      }
    }


  ]
});
Keywords and their conditions are fulfilled based on priority. This impacts how the keywords should be used and what precedence they will take:
| Keyword | Priority |
|---|---|
to and from |
high |
to |
medium |
from |
low |
Conditions define the logic that must be fulfilled before a transition can be carried out. There are three kinds of conditions that we can declare:
custom: We provide Barba.js with a custom function that returns either true or false; the transition only runs if true is returnedroute: When using the Barba.js router, we can use this condition to check that the route matchesnamespace: We tell Barba.js to only trigger the transition if the declared namespace matches. For more context, if a transition is declared with the from keyword, Barba.js checks that the namespace provided matches the namespace declared on the current page; if a transition is declared with the to keyword, Barba.js ensures that it matches the namespace of the next pageWe can also declare multiple conditions and Barba.js will apply a transition if all conditions are met:
barba.init({
  transitions: [
    {
      //keyword
      from: {
        // namespace condition
        namespace: ["home"]
        // or route condition
        route: ["index"]
        // or custom condition
      custom: ({ trigger }) => {
        return trigger.classList && trigger.classList.contains('use-custom-transition');
      },
      },
      // transition that would run only if conditions are met
      leave() {
        transition();
      }
    }
  ]
});
N.B., in the above example, thecustom condition code was selected from the Barba.js docs. Here, trigger is the link that prompts the transition
It’s also important to note a condition’s priority. Just like keywords, some conditions will take precedence over others due to their higher priority:
| Condition | Priority |
|---|---|
custom |
high |
route |
medium |
namespace |
low |
Barba.js is a powerful tool for creating smooth page transitions and enhancing user experience on your website. With its easy setup and customizable options, Barba.js provides a wide range of options to create transitions that match your specific needs. Whether you’re looking to add a touch of animation to your site or simply make the flow between pages more seamless, Barba.js is an excellent choice.
There’s no doubt that frontends are getting more complex. As you add new JavaScript libraries and other dependencies to your app, you’ll need more visibility to ensure your users don’t run into unknown issues.
LogRocket is a frontend application monitoring solution that lets you replay JavaScript errors as if they happened in your own browser so you can react to bugs more effectively.

LogRocket works perfectly with any app, regardless of framework, and has plugins to log additional context from Redux, Vuex, and @ngrx/store. Instead of guessing why problems happen, you can aggregate and report on what state your application was in when an issue occurred. LogRocket also monitors your app’s performance, reporting metrics like client CPU load, client memory usage, and more.
Build confidently — start monitoring for free.

Learn how to build smooth staggered animations in CSS using modern features like sibling-index(), complete with practical examples, fallbacks, and accessibility tips.

Compare the top AI development tools and models of July 2026. View updated rankings, feature breakdowns, and find the best fit for you.

Learn how to detect unused and ghost dependencies in JavaScript projects using Knip, a project-level linter that keeps your dependency graph accurate.

Learn how Storybook MCP enables AI agents to understand your component library, generate accurate UI, and validate code using documentation, stories, and automated tests.
Hey there, want to help make our blog better?
Join LogRocket’s Content Advisory Board. You’ll help inform the type of content we create and get access to exclusive meetups, social accreditation, and swag.
Sign up now

