In this article, we’ll take a look at developing an oracle with an Ethereum smart contract. Below is a brief overview of the technologies we’ll be working with, along with links for further learning.
Before we dive in too deeply, let’s answer some basic questions on the technologies we’ll be looking into.
The blockchain can be described as a computing infrastructure designed to facilitate highly trustworthy collaboration. It’s a public database that is updated and shared across many computers in a network. This trustworthy collaboration provides participants with a firm belief in the reliability of the collaboration.
Vitaly Buterin, the founder of Ethereum, recognized that the most popular blockchain network, Bitcoin, had limitations due to its stack-based scripting, lack of functionality, and low capacity for application development beyond the transfer of cryptocurrency ownership.
Where Ethereum diverges from Bitcoin is that it possesses an inbuilt, Turing-complete programming language, establishes a smart contract, and provides a decentralized application platform that allows anyone to define, create, and trade cryptocurrencies and crypto-assets.
A smart contract is a way to establish trust in a collaborative process on the blockchain. This replaces brand-based trust with cryptographically-based trust by moving the enforcement and custody mechanisms of a contract to software logic, which is run across a decentralized network. With smart contracts, developers can build and deploy user-facing apps (games, marketplaces, etc.), and these are often called decentralized applications (DApps).
Oracles were born of a desire to expand the types of collaboration possible on blockchains. They connect blockchains to external systems and enable access to data from off-chain systems, acting as a source of truth to the blockchain. As a result, they provide blockchains with secure gateways to off-chain systems, allowing smart contract applications to verify external events, and trigger actions on external services.
Hence, oracles serve as a bridge between the two environments: on-chain referring to the blockchain network, and off-chain referring to outside-world systems.
There are different types of oracles that involve some combination of fetching, validating, and delivering data:
There are multiple blockchain teams actively working on possible oracle solutions:
Chainlink is considered the frontrunner, so we’ll explore it in this article. Chainlink provides an out-of-the-box ability to connect our smart contracts to most APIs, including from off-chain APIs.
Chainlink also operates a Chainlink Market, which is an authenticated list of node operators that leverage the Chainlink network to make their data accessible on-chain directly through their own Chainlink nodes.
Our development will be done with Remix, a web IDE for creating, running, and debugging smart contracts in the browser. With Remix, we don’t need a development machine, as everything is included in the web interface.
Metamask allows anyone to interact with Ethereum-compatible blockchains, allowing the creation of an address. It also integrates easily with Remix.
In this article, we shall explore the process of retrieving the current price of Bitcoin from an off-chain system, leveraging the Chainlink client, to create an oracle smart contract. We’ll also retrieve the latest price of Ethereum using an authenticated on-chain data source from Chainlink.
In order to explore these two different methods of retrieving data in our smart contracts, we’ll create two separate smart contracts and deploy them to the blockchain.
To begin our development process, setting up the MetaMask wallet is key. Install the MetaMask extension. Once the installation is successful, open your browser extension list and click the MetaMask icon.
![]()
Follow the instructions in MetaMask to create a new wallet. Make sure to securely store your 12-word mnemonic phrase in a secure location that only you can access.
Set MetaMask to use the Kovan test network.
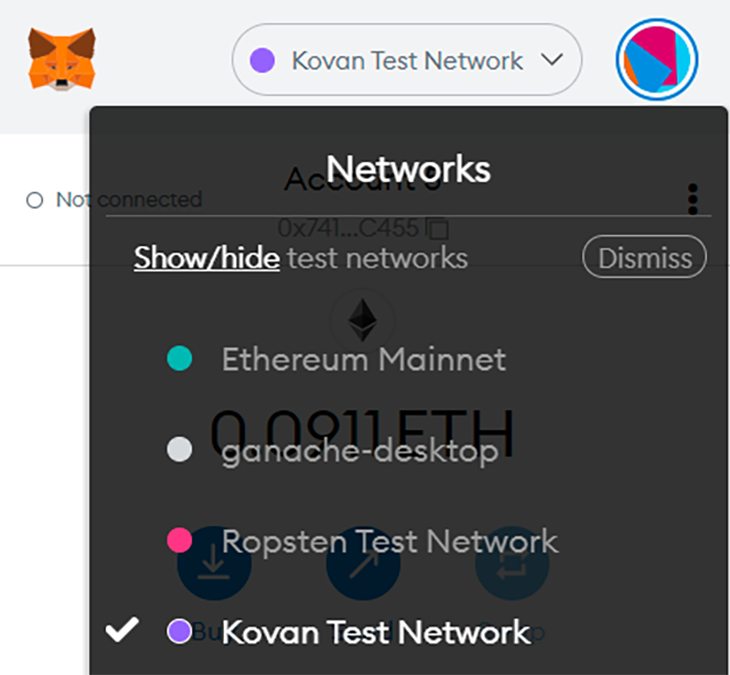
The next step is funding the MetaMask wallet. The Kovan Testnet provides Kovan Ether (KEth), which has no market value and allows us access to the Kovan testnet.
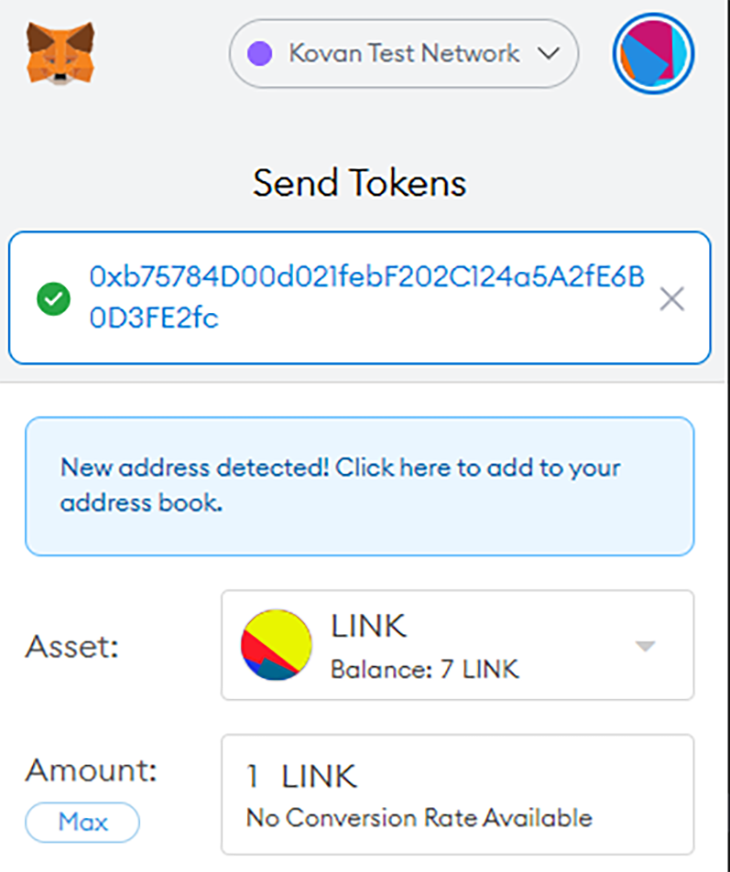
Chainlink provides a Faucet for obtaining Chainlink’s cryptocurrency LINK for testing purposes. We’ll use this LINK to ensure the successful execution of our smart contract, since it depends on the Chainlink network.
Follow the steps recorded in the below gif to send 0.1 test ETH and 10 test LINK to your MetaMask wallet on the Kovan testnet.

RequestPrice oracleChainlink enables smart contracts to access any external data source. Relying on the Chainlink contract library gives us access to a set of tools that enable the creation of smart contracts that can consume data and serve as oracles.
In Remix, create a new file named RequestPrice.sol, which will hold our smart contract code.
Chainlink’s request-and-receive data cycle allows for the consumption of an API response, which our contract needs to inherit from ChainlinkClient.
To build an API request in our smart contract, we rely on the struct Chainlink.Request. The request should include the oracle, the job ID, the fee, and the callback function signature.
The oracle keyword refers to the specific chainlink node that a contract makes an API call from, and the jobId refers to a specific job for that node to run. RequestPrice is flexible enough to call any public URL.
Choosing an oracle node is important. Our smart contract needs to make an HTTP GET request, hence the right choice of node would be one that supports the HTTP GET adapter. You can view a list of the various oracle nodes available on the Chainlink site.
In our RequestPrice.sol file, our smart contract is defined and we’ve set our data source to the public API CryptoCompare. The function requestPriceData defined in our contract allows the retrieval of the current price of BTC in USD.
// SPDX-License-Identifier: GPL-3.0

pragma solidity >=0.7.0 <0.9.0;

import "@chainlink/contracts/src/v0.8/ChainlinkClient.sol";

contract RequestPrice is ChainlinkClient {
    using Chainlink for Chainlink.Request;

    uint256 public price;

    address private oracle;
    bytes32 private jobId;
    uint256 private fee;

    constructor() {
        setPublicChainlinkToken();
        oracle = 0xc57B33452b4F7BB189bB5AfaE9cc4aBa1f7a4FD8;
        jobId = "d5270d1c311941d0b08bead21fea7747";
        fee = 0.1 * 10 ** 18;
    }

    /**
     * Create a Chainlink request to retrieve API response, find the target
     * data.
     */
    function requestPriceData() public returns (bytes32 requestId)
    {
        Chainlink.Request memory request = buildChainlinkRequest(jobId, address(this), this.fulfill.selector);


        // Set the URL to perform the GET request on
        request.add("get", "https://min-api.cryptocompare.com/data/generateAvg?fsym=BTC&tsym=USD&e=Kraken");

        // Specify the path for retrieving the data
        request.add("path", "RAW.PRICE");
        // Sends the request
        return sendChainlinkRequestTo(oracle, request, fee);
    }

      /**
     * Callback Function
     */
    function fulfill(bytes32 _requestId, uint256 _price) public recordChainlinkFulfillment(_requestId)
    {
        price = _price;
    }
}
The response type specified in the RequestPrice contract is an unsigned integer (uint256), but multiple data types can be specified, such as:
bytes32: Strings and byte valuesbool: True or false valuesint256: Signed integersuint256: Unsigned integersIn the Remix IDE, click Solidity Compiler to view the compiler settings.
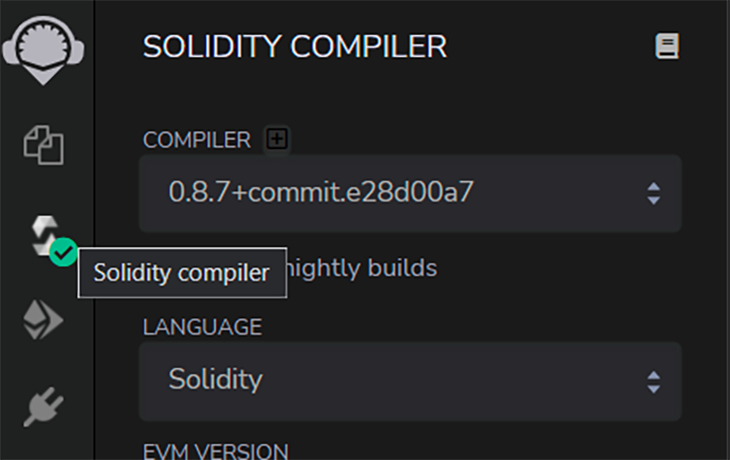
We’ll use the default compiler settings, but make sure your version of Solidity is the same as what’s used in the compiler. Click Compile RequestPrice.sol to compile the smart contract we’ve just created.

After compiling the contract, navigate to the Deploy and Run tab. Select the Injected Web3 environment in the dropdown to deploy the contract to the blockchain.
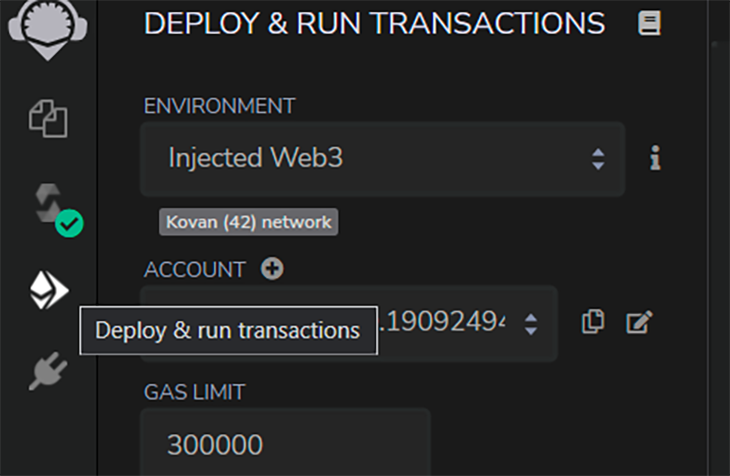
Before deploying, look closely at the Contract name, as other contracts with similar names might be available.
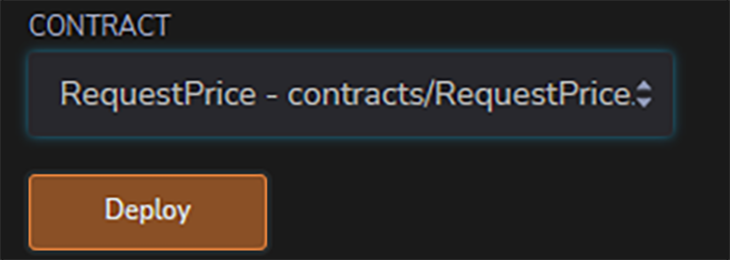
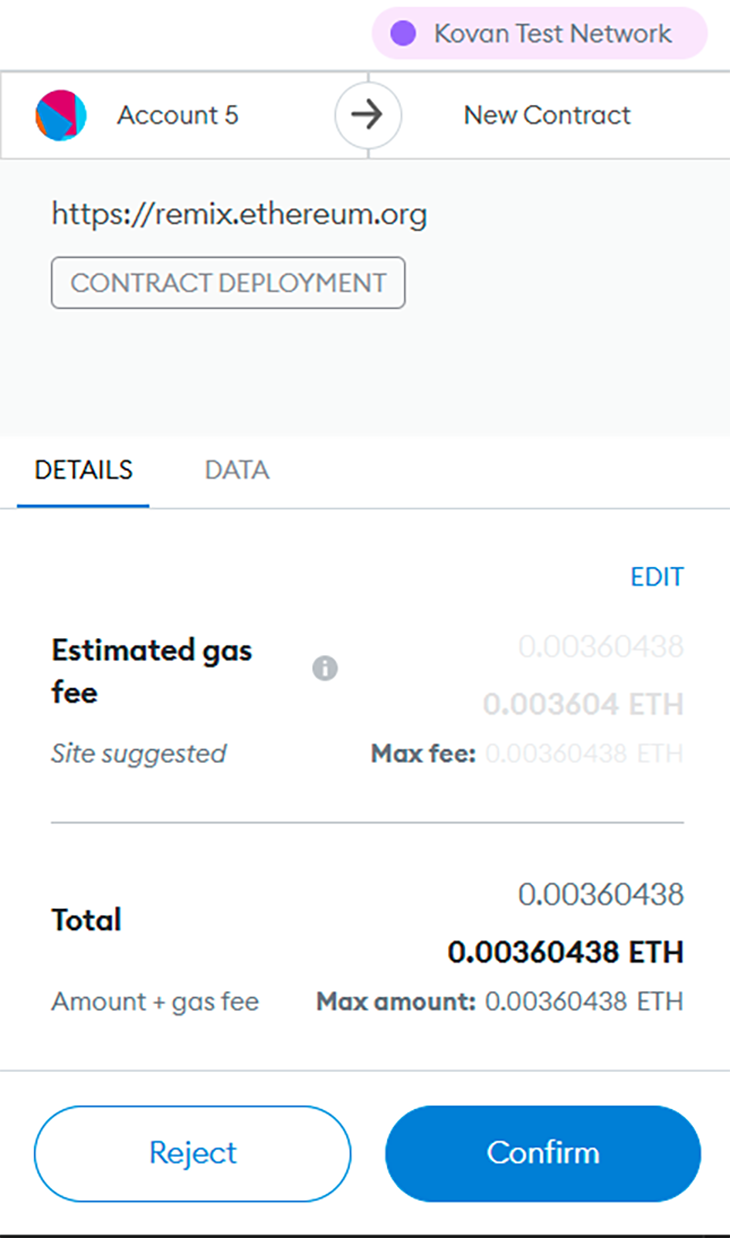
Click the Deploy button. MetaMask should open and prompt you for payment to deploy the contract.
Return to our MetaMask wallet and confirm that it is set to the Kovan network before accepting the transaction.
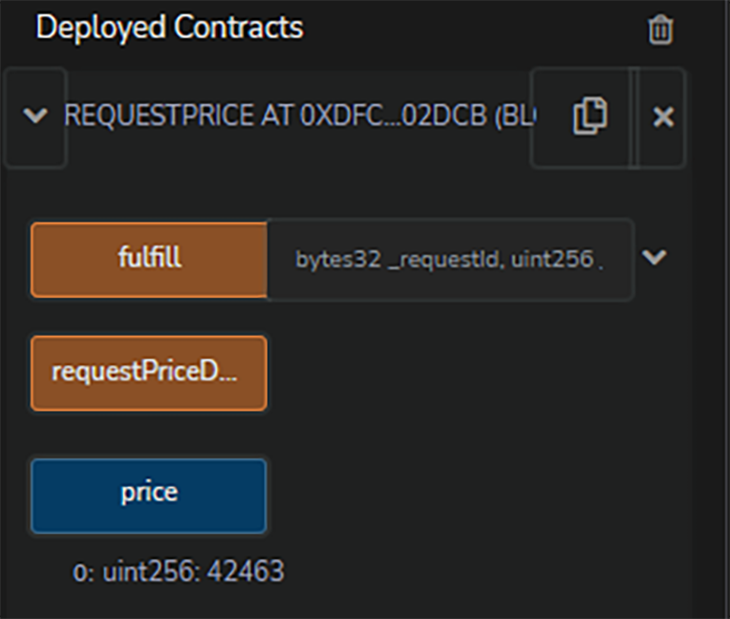
Once the transaction completes, your contract should appear under the Deployed Contracts list in Remix. Click the Contract dropdown to view its variables and functions.

RequestPrice smart contractIn order to run the functions in our contract, we need to fund the contract. We’ll fund our Solidity contract with the native token of the Chainlink network, LINK, which we obtained using their Faucet.
In the Deployed Contracts section, use the Copy button near the contract title to copy the contract address. Then, follow these steps:
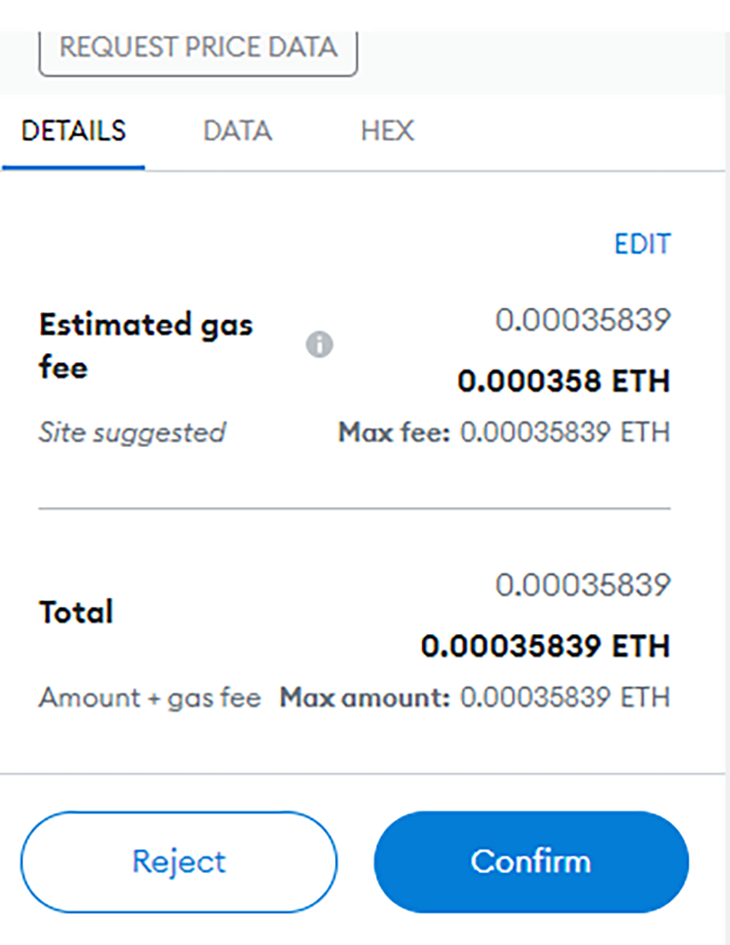
Returning to our Remix IDE, under the Deploy and Run Transactions tab, navigate to the Deploy Contract section and click the requestPriceData button.
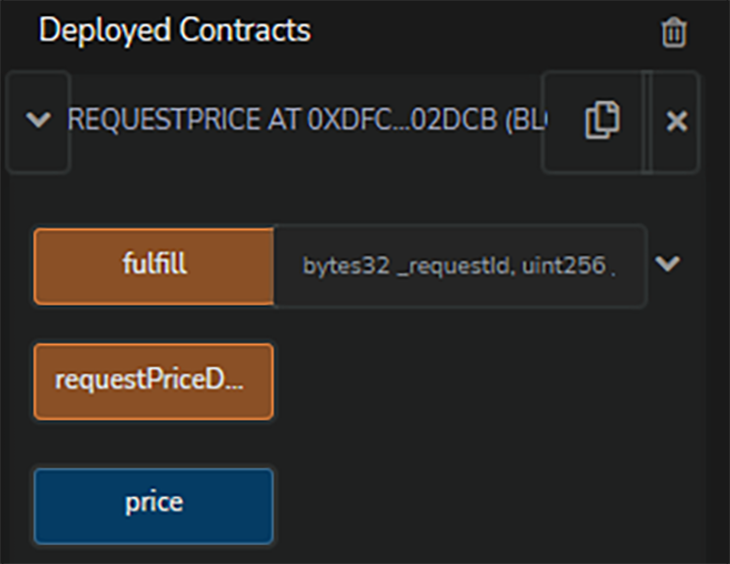
You should receive a prompt from MetaMask asking for confirmation of the transaction. Click the Confirm button.
Finally, click the price variable button to see the current price of Bitcoin in USD.
If you made it this far, you have successfully created and deployed an oracle smart contract on the Ethereum blockchain.
In the next implementation of a smart contract, we’ll look at a little more in-depth implementation using Chainlink Data Feeds.
Earlier, I mentioned that there are different methods for retrieving data in our smart contracts with Chainlink besides through HTTP requests. A key aspect to consider when building a smart contract is the quality of the data source that feeds data into our oracle.
To help with this, Chainlink curates a list of decentralized data feeds to provide secure sources of data to power our decentralized applications. All we need to do is pull the data into our smart contract from another, on-chain smart contract.
You can access the Ethereum data feeds curated by Chainlink on the Chainlink website.
Let’s test it out. Create another file in Remix called EthPrice.sol.
// SPDX-License-Identifier: GPL-3.0

pragma solidity >=0.7.0 <0.9.0;

import "@chainlink/contracts/src/v0.8/interfaces/AggregatorV3Interface.sol";

contract EthPrice {

     AggregatorV3Interface internal ethFeed;

     // Precomputing hash of strings
       bytes32 ethHash = keccak256(abi.encodePacked("ETH"));

    /**
     * Network: Kovan
        0x9326BFA02ADD2366b30bacB125260Af641031331
     * Address: 0x169e633a2d1e6c10dd91238ba11c4a708dfef37c
     */
    constructor() {
        ethFeed = AggregatorV3Interface(0x9326BFA02ADD2366b30bacB125260Af641031331);
    }

    /**
     * Returns the latest price
     */
    function getEthPrice() public view returns (int) {
        (
            uint80 roundID,
            int price,
            uint startedAt,
            uint timeStamp,
            uint80 answeredInRound
        ) = ethFeed.latestRoundData();
        return price;
    }

}
Deploy the contract from the Deployment tab in Remix and run the function.

This tutorial was quite exhilarating, as we saw how we can extend the capabilities of blockchains and smart contracts into real-world applications by providing accurate data to our decentralized applications.
Creating secure and trustworthy oracles is a key aspect of the blockchain revolution, as it enables the movement of off-chain world systems onto on-chain systems. In our second smart contract implementation, we looked at how Chainlink helps to ensure the reliability of data used in DApps by providing a list of vetted, single-source data providers and decentralized data providers.
Client-side issues that impact users’ ability to activate and transact in your apps can drastically affect your bottom line. If you’re interested in monitoring UX issues, automatically surfacing JavaScript errors, and tracking slow network requests and component load time, try LogRocket.

LogRocket lets you replay user sessions, eliminating guesswork around why bugs happen by showing exactly what users experienced. It captures console logs, errors, network requests, and pixel-perfect DOM recordings — compatible with all frameworks.
LogRocket's Galileo AI watches sessions for you, instantly identifying and explaining user struggles with automated monitoring of your entire product experience.
Modernize how you debug web and mobile apps — start monitoring for free.
Would you be interested in joining LogRocket's developer community?
Join LogRocket’s Content Advisory Board. You’ll help inform the type of content we create and get access to exclusive meetups, social accreditation, and swag.
Sign up now
Learn how OpenAPI can automate API client generation to save time, reduce bugs, and streamline how your frontend app talks to backend APIs.

Discover how the Interface Segregation Principle (ISP) keeps your code lean, modular, and maintainable using real-world analogies and practical examples.

<selectedcontent> element improves dropdowns

Learn how to implement an advanced caching layer in a Node.js app using Valkey, a high-performance, Redis-compatible in-memory datastore.


