RecyclerViewIn this article, will learn how to create a dynamic RecyclerView.Adapter that enables us to display a list of items with a different ViewHolder for different backend-controlled viewTypes in Android apps.

This list will be heterogeneous, meaning it will contain a UI ranging from grid and nested horizontal lists, among other things.
Before we jump into the code and start creating a dynamic adapter, we must talk about how backend responses are usually structured and how we can map them to Kotlin classes to eventually get our content.
The server response may look like this:
[
    {
        "type": "caraousel",
        "image-urls": [...]
    },
    {
        "type" : "banner",
        "banner-url" : ".."
    },
    {
        "type": "horizontal-list",
        "data" : [
            {...}, {...}, {...}
        ]
    }
]
Here, we have a list of objects with a type property that indicates what kind of data it will contain. Now, if we simply use a JSON deserializer like Gson or Jackson in the default configuration, it will lead to runtime crashes.
One workaround solution is creating a data class, as follows:
data class ApiResponse (
    val type: String,
    val imageUrls: List<String>? = null,
    val bannerUrl: String? = null,
    val data: List<CustomData>? = null
)
The above solutions work for a small number of types, but as our types start growing, this class gets bloated and we must add null checks everywhere.
A more streamlined approach is to let our JSON deserializers know that the data will be polymorphic and that, depending on the type, the other properties will be assigned a proper Kotlin class type.
Let’s see an example of this using the Moshi adapter for the Retrofit library.
Moshi polymorphic JSON adapterTo use the Moshi polymorphic JSON adapter, we must add the required dependencies in our build.gradle file:
implementation "com.squareup.moshi:moshi:1.12.0"
implementation "com.squareup.moshi:moshi-adapters:1.12.0"
implementation "com.squareup.moshi:moshi-kotlin:1.12.0"
implementation "com.squareup.retrofit2:converter-moshi:2.9.0"
We can then start creating the required Kotlin data classes, and in this scenario, it’s ideal to use Kotlin’s sealed class.
To begin, first map all of the different types to an enum:
enum class ResponseType {
    @Json(name = "banner") BANNER,
    @Json(name = "quote") QUOTE,
    @Json(name = "carousel") CAROUSEL,
    @Json(name = "contact") CONTACT,
    @Json(name = "grid") GRID
}
Then, create a parent sealed class and add all the common properties to it. In our case, we’re only adding the type field:
sealed class Response(@Json(name = "type") val type: ResponseType)
We can next create different data classes that represent our various types, all of which will extend the above sealed class:
sealed class Response(@Json(name = "type") val type: ResponseType)

data class Banner(@Json(name = "banner-url") val bannerUrl: String): Response(ResponseType.BANNER)

data class Quote(val quote: String, val author: String): Response(ResponseType.QUOTE)

data class Carousel(@Json(name = "image-urls") val imageUrls: List<String>): Response(ResponseType.CAROUSEL)

data class Contacts(@Json(name = "contacts") val contactList: List<Contact>): Response(ResponseType.CONTACT)

data class Grid(@Json(name = "grid-urls") val gridUrls: List<String>): Response(ResponseType.GRID)

data class Contact(
    val name: String,
    val avatar: String,
    val city: String,
    val id: String
)
We can now proceed to create Moshi‘s polymorphic adapter and map each of the above data classes to the server response’s type field:
val polymorphicAdapter =
    PolymorphicJsonAdapterFactory.of(Response::class.java, "type")
            .withSubtype(Banner::class.java, "banner")
            .withSubtype(Quote::class.java, "quote")
            .withSubtype(Carousel::class.java, "carousel")
            .withSubtype(Contacts::class.java, "contact")
            .withSubtype(Grid::class.java, "grid")

val moshi: Moshi = Moshi.Builder()
    .add(polymorphicAdapter)
    .add(KotlinJsonAdapterFactory())
    .build()
And then, pass the above Moshi instance to our Retrofit adapter as follows:
val retrofit: Retrofit = Retrofit.Builder()
    .baseUrl("https://my-json-server.typicode.com/jobinlawrance/")
    .addConverterFactory(MoshiConverterFactory.create(moshi))
    .addCallAdapterFactory(RxJava2CallAdapterFactory.create())
    .build()
To test out our above adapter and to develop further, I created a mock API. Enacting a GET request using Retrofit to this endpoint, we can successfully see the adapter working.
Now, let’s proceed to writing the UI-related code.
Even though we can use the above data classes we wrote for data modeling, as a clean practice, we will create separate data classes for our UI logic.
Let’s start by creating a marker interface to use as a base for our UI data classes, each of which corresponds to the different types of views that we intend to display:
// this is our marker interface
interface BaseUI

data class BannerUI(val imageUrl: String): BaseUI

data class QuoteUI(val quote: String, val author: String): BaseUI

data class CarouselUI(val imageUrls: List<String>): BaseUI

data class ContactListUI(val contacts: List<ContactUI>): BaseUI

data class GridUI(val imageUrls: List<String>): BaseUI

data class ContactUI(
    val name: String,
    val avatar: String,
    val city: String,
    val id: String
)
Now, create a simple utility extension to map each of our data models to the UI models:
fun Banner.toBannerUI() = BannerUI(imageUrl = bannerUrl)

fun Quote.toQuoteUI() = QuoteUI(quote, author)

fun Carousel.toCarouselUI() = CarouselUI(imageUrls)

fun Contact.toContactUI() = ContactUI(name, avatar, city, id)

fun Contacts.toContactListUI() =
    ContactListUI(contacts = contactList.map { it.toContactUI() })

fun Grid.toGridUI() = GridUI(imageUrls = gridUrls)

fun Response.toBaseUI(): BaseUI =
    when(this) {
        is Banner -> this.toBannerUI()
        is Carousel -> this.toCarouselUI()
        is Contacts -> this.toContactListUI()
        is Grid -> this.toGridUI()
        is Quote -> this.toQuoteUI()
    }

fun List<Response>.toBaseUIList(): List<BaseUI> {
    return this.map { it.toBaseUI() }
}
ViewHolders and adapterNext, let’s move on to creating our different UIs to display in our single recyclerview, each with their own RecyclerView.ViewHolder
First, start by adding some essential dependencies in our build.gradle file:
implementation "androidx.recyclerview:recyclerview:1.2.1"
implementation 'com.github.bumptech.glide:glide:4.12.0'
annotationProcessor 'com.github.bumptech.glide:compiler:4.12.0'
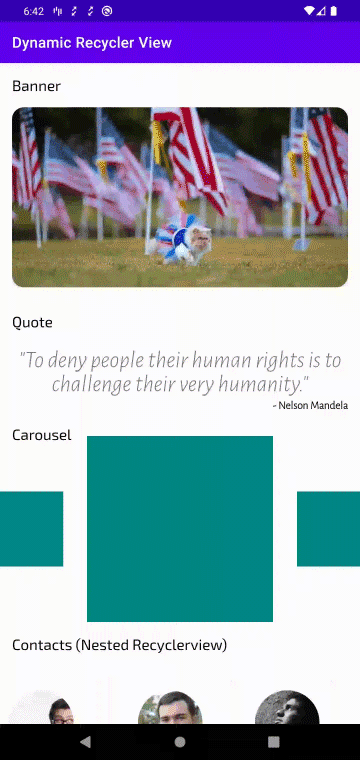
The following are the different types of views that we will create for this article and their corresponding ViewHolders:
Recyclerview)These will correspond with the following ViewHolders:
All of the aboveViewHolders extends a base ViewHolder class:
abstract class BaseViewHolder<in T>(binding: ViewBinding) :
    RecyclerView.ViewHolder(binding.root) {

    val context: Context = binding.root.context
    abstract fun bind(item: T)
}
When we create our dynamic adapter, we must override an additional getItemViewType() method to inform our RecyclerView.Adapter about the different viewTypes:
override fun getItemViewType(position: Int): Int {
    return when (uiList[position]) {
        is BannerUI -> BANNER.ordinal
        is QuoteUI -> QUOTE.ordinal
        is CarouselUI -> CAROUSEL.ordinal
        is ContactListUI -> CONTACT.ordinal
        is GridUI -> GRID.ordinal
        else -> -1
    }
}
We return the enum ordrinal (or we can return the layout ID int, for example, R.layout.some_layout) as a unique integer.
In our onCreateViewHolder() method, we can then check the viewType field and create our appropriate ViewHolders:
override fun onCreateViewHolder(parent: ViewGroup, viewType: Int):
  BaseViewHolder<BaseUI> {
    val inflater = LayoutInflater.from(parent.context)
    return when (viewType) {
        BANNER.ordinal -> {
            val binding = ViewholderBannerBinding.inflate(inflater, parent, false)
            BannerViewHolder(binding)
        }
        QUOTE.ordinal -> {
            val binding = ViewholderQuoteBinding.inflate(inflater, parent, false)
            QuoteViewHolder(binding)
        }
        CAROUSEL.ordinal -> {
            val binding = ViewholderCarouselBinding.inflate(inflater, parent, false)
            CarouselViewHolder(binding)
        }
        CONTACT.ordinal -> {
            val binding = ViewholderContactsBinding.inflate(inflater, parent, false)
            ContactsViewHolder(binding)
        }
        GRID.ordinal -> {
            val binding = ViewholderGridBinding.inflate(inflater, parent, false)
            GridViewHolder(binding)
        }
        else -> throw IllegalArgumentException("The viewtype value of $viewType is not supported")
    } as BaseViewHolder<BaseUI>
}
Finally, in our onBindViewHolder(), we can simply call holder.bind(uiList[position]) on our BaseViewHolder.
And there’s the finalized app; the complete adapter code can be found here.
The above code achieves our initial goal of displaying a dynamic list using a RecyclerView, but the solution is far from perfect.
It is fine for small projects, but if we take a look at our adapter, we can see that any time we add a new viewType, we must make changes to our adapter class which will eventually load the adapter class.
Right now, we are violating SOLID’s open/close principle that says, “Software entities (classes, modules, functions, etc.) should be open for extension, but closed for modification.”
To begin adhering to SOLID, we can move the ViewHolder instantiation code as a static method to each of the individualViewHolders. As an example, let’s add the below code to QuoteViewHolder class:
companion object {
    fun createViewHolder(inflater: LayoutInflater, parent: ViewGroup):
      QuoteViewHolder {
        val binding = ViewholderQuoteBinding.inflate(inflater, parent, false)
        return QuoteViewHolder(binding)
    }
}
Now, let’s use the Visitor pattern and delegate the responsibility of checking the viewTypes to a separate class.
We begin by defining a Visitable interface:
interface Visitable {
    fun type(typeFactory: TypeFactory) : Int
}
Then, we can extend our BaseUI to the interface:
interface BaseUI: Visitable
We can create the TypeFactory interface to handle the different types using method overloading to handle the multiple viewTypes:
class TypeFactoryImpl : TypeFactory {
    override fun type(bannerUI: BannerUI): Int = ResponseType.BANNER.ordinal
    override fun type(quoteUI: QuoteUI): Int = ResponseType.QUOTE.ordinal
    override fun type(carouselUI: CarouselUI): Int = ResponseType.CAROUSEL.ordinal
    override fun type(contactListUI: ContactListUI): Int = ResponseType.CONTACT.ordinal
    override fun type(gridUI: GridUI): Int = ResponseType.GRID.ordinal

    override fun holder(
        inflater: LayoutInflater,
        parent: ViewGroup,
        viewType: Int
    ): BaseViewHolder<*> {
        return when (viewType) {
            ResponseType.BANNER.ordinal ->
                BannerViewHolder.createViewHolder(inflater, parent)
            ResponseType.QUOTE.ordinal ->
                QuoteViewHolder.createViewHolder(inflater, parent)
            ResponseType.CAROUSEL.ordinal ->
                CarouselViewHolder.createViewHolder(inflater, parent)
            ResponseType.CONTACT.ordinal ->
                ContactsViewHolder.createViewHolder(inflater, parent)
            ResponseType.GRID.ordinal ->
                GridViewHolder.createViewHolder(inflater, parent)
            else -> throw
                  IllegalArgumentException(
                    "The viewtype value of $viewType is not supported"
                  )
        }
    }
}
Here, the holder function handles the responsibility of creating our different ViewHolders.
Now, we can pass the TypeFactory to our different viewTypes and implement the type method:
data class BannerUI(val imageUrl: String): BaseUI {
    override fun type(typeFactory: TypeFactory): Int {
        return typeFactory.type(this)
    }
}

data class QuoteUI(val quote: String, val author: String): BaseUI {
    override fun type(typeFactory: TypeFactory): Int {
        return typeFactory.type(this)
    }
}

data class CarouselUI(val imageUrls: List<String>): BaseUI {
    override fun type(typeFactory: TypeFactory): Int {
        return typeFactory.type(this)
    }
}

data class ContactListUI(val contacts: List<ContactUI>): BaseUI {
    override fun type(typeFactory: TypeFactory): Int {
        return typeFactory.type(this)
    }
}

data class GridUI(val imageUrls: List<String>): BaseUI {
    override fun type(typeFactory: TypeFactory): Int {
        return typeFactory.type(this)
    }
}
The onCreateViewHolder and getItemViewType of our adapter can simply delegate the TypeFactory to the above views, thus making the adapter class very lean:
override fun onCreateViewHolder(parent: ViewGroup, viewType: Int):
    BaseViewHolder<BaseUI> {
    val inflater = LayoutInflater.from(parent.context)
    return typeFactory.holder(inflater, parent, viewType) as BaseViewHolder<BaseUI>
}

override fun onBindViewHolder(holder: BaseViewHolder<BaseUI>, position: Int) {
    holder.bind(uiList[position])
}

override fun getItemCount(): Int = uiList.size

override fun getItemViewType(position: Int): Int {
    return uiList[position].type(typeFactory)
}
Next time we add a new viewType, we do not need to touch the adapter class at all!
The visitor pattern implementation can be found in the feature/visitor-pattern branch of the sample repo.
In summary, we saw how to map dynamic server responses in Kotlin using a polymorphic adapter. We also created multiple ViewHolders and used recyclerview adapter’s getItemViewType function to specify our different viewTypes.
Finally, we used a visitor pattern to clean our adapter class so when we add a new viewType, we don’t need to edit our existing adapter code.
LogRocket is an Android monitoring solution that helps you reproduce issues instantly, prioritize bugs, and understand performance in your Android apps.
LogRocket's Galileo AI watches sessions for you, instantly identifying and explaining user struggles with automated monitoring of your entire product experience.
LogRocket also helps you increase conversion rates and product usage by showing you exactly how users are interacting with your app. LogRocket's product analytics features surface the reasons why users don't complete a particular flow or don't adopt a new feature.
Start proactively monitoring your Android apps — try LogRocket for free.

A guide for using JWT authentication to prevent basic security issues while understanding the shortcomings of JWTs.

Discover how to build, render, and automate product demo videos with Remotion, replacing traditional screen recordings with reusable React code.

Chrome’s Modern Web Guidance embeds modern web platform skills into AI coding agents, helping them choose native HTML, CSS, and browser APIs over legacy patterns.

Learn how to use Fallow to analyze AI-generated code, detect dead code, duplicate logic, and complexity issues, and integrate automated code quality checks into your AI-assisted development workflow.
Hey there, want to help make our blog better?
Join LogRocket’s Content Advisory Board. You’ll help inform the type of content we create and get access to exclusive meetups, social accreditation, and swag.
Sign up now

