@layer at-ruleCSS is fairly easy for most developers to learn, but it can be unforgiving to those who lack proper structural plans for their code. This is primarily due to the cascade’s ferocious resistance to control.

Some developers have been able to tame the cascade using methodologies such as inverted triangle CSS (ITCSS), object-oriented CSS (OOCSS), and the block element modifier (BEM). These methods allow a developer to write structural and logical codes that keep selector specificity as low as possible in an established order.
In most scenarios, these methodologies are effective, but they don’t completely address conflicts between selector specificity and order of appearance.
Thankfully, cascade layers is coming to CSS. The new @layer at-rule aims to fully hand control of the cascade back to developers. With cascade layers, developers can decide how they would like to order layers and can more easily separate and access individual layers.
In this article, we’ll introduce the cascade @layer at-rule, discuss how it works, and explore how this feature can be used to prevent or address conflicts between style rules.
The Replay is a weekly newsletter for dev and engineering leaders.
Delivered once a week, it's your curated guide to the most important conversations around frontend dev, emerging AI tools, and the state of modern software.
The cascade is a core CSS algorithm that allows several stylesheets to influence a document’s presentation and define the resolution of competing property values assigned to elements within the document.
The cascade’s primary job is to assess an unordered list of CSS declarations for a given property in which the selector matches a particular element and also check for conflicting values. If the cascade identifies any conflicting values, it will sort them according to their declaration’s precedence and output a single cascading value to be applied to the element.
For example, the paragraph element in the following code has conflicting value pairs, red and blue:
/*<p class="text" id="text">...</p>*/

.text{
  color: red;
}

#text{
  color: blue;
}
In this type of situation, the cascade will have to determine which declaration takes precedence.
To do so, the cascade will sort the declarations in descending order of priority, according to the following criteria:
The cascade checks each declaration against these criteria, determining which declaration has the greatest cascade weight. If a result is undecided for a particular criterion, the cascade will move on to the next.
Cascade layers is a new CSS feature that is part of the cascading inheritance level 5 specifications. The feature was initially proposed by Miriam Suzanne, a CSS spec author, in 2019. Cascade layers allows style rules to be split Into several layers using the @layer at-rule and also permits the order of specificity of the layers to be determined.
With cascade layers, there’s no need to worry about the specificity of each selector within a layer block or the order in which declarations are arranged in the stylesheet. This is because the browser will always respect the order of the cascade layers and ignore the specificity and order of appearance of the selectors. We’ll discuss this in more detail later in this article, and we’ll also look at some CSS layer order examples.
@layerThe cascade layers @layer is a name-defining at-rule much like the CSS @keyframe and @font-face at-rules. It is the official syntax for defining cascade layers. It accepts an identifier or name that can be referenced and used to create a cascade layer block anywhere in the stylesheet.
Cascade layers can be defined in one of two ways using the @layer at-rule:
@import at-rule
@import(reset.css) layer(reset);
This method appends the content of an external or third-party stylesheet whose relative URL is specified in the @import at-rule to a new or existing layer. For example, we can import and create a layer for a reset stylesheet as follows:
@import(reset.css) layer(reset);
@layer reset {
    *{
      margin: 0;
      padding: 0;
    }
}
Layers can also be declared without imports or layer blocks, by instead using an identifier (name) that can be referenced later in the same layer-scope (stylesheet).
If a declared layer name matches that of an existing layer defined in the same layer scope, the nested style rules in the block will be appended to the existing layer:
@layer reset;
@layer typography;
@layer theme;

@layer reset{ /*Appends to the reset layer*/
   *{
     margin: 0;
     padding: 0;
  }
}

@layer typography{ /*Appends to the typography layer*/
   ...
}

@layer theme{ /*Appends to the theme layer*/
   ...
}

@layer utilities{ /*Creates a new layer*/
  ...
}
If a layer block’s identifier doesn’t match an existing layer, a new layer will be created.
Layers defined without an identifier are known as anonymous layers. They can’t be referenced as they do not have a name; therefore, extra style rules cannot be appended to this type of layer.
/*Anonymous layer block*/
@layer {
  …
}
//Anonymous @import layer
@import(reset.css) layer;
A layer’s priority is based on when it first appears in the stylesheet. For example, the layer order of the snippet we examined earlier would be as follows:
resettypographythemeWhen referencing the identifier of a layer later in the stylesheet, the order in which the layer appears does not matter. It is the initial appearance that determines a layer’s priority.
@layer reset; /*first layer*/
@layer typography; /*second layer*/
@layer theme; /*third layer*/

@layer theme { /*Appends to third layer*/
  …
}
@layer reset { /*Appends to first layer*/
  …
}
@layer typography { /*Appends to second layer*/
  …
}
As shown in this snippet, the layer order remains the same regardless of the order and location of which layers are referenced in the stylesheet.
A layer stack can also be created with a shorthand syntax that accepts multiple identifiers provided in a single line comma-separated rule:
@layer reset, typography, theme;
This method has the same behavior as a multiple lines declaration order.
When evaluating the layers criterion, the cascade will always pick the winning rule from a selector associated with a cascade layer that comes later in the layer order. This is because cascade layers are prioritized by order of appearance, just like traditional CSS declarations.
Let’s bring back the quintessential layer stack:
@layer reset, typography, theme;
In this stack, style rules defined in the typography layer will take priority over the reset layer, while the theme layer styles will take priority over all the previous layers.
In other words, a simple later-declared layer will always take precedence and override an earlier-declared layer, even if the earlier-declared layer has a greater cascade weight. Here’s a practical example:
/*<h2 class=”title” Id=”title”>…</h2>*/

@layer typography {
    h2 #title{
      color: orange;
    }
}
@layer headings {
    .title{
      color: #333;
    }
}
Although the selector in the typography layer has a higher specificity than the selector in the headings layer, the latter still prevails because the layer it’s nested in is last in the layer order.
Unlayered styles follow style rules outside of the cascade layers and take the highest priority over any layers in a stylesheet. As such, unlayered styles will always win out over styles nested within layers regardless of their specificity or order of appearance. This is because every unlayered style is automatically added to an implicit final layer, and therefore has the highest priority.
For example, consider this code:
/*<p class=”subtitle”>…</p>*/

@layer article {
  .subtitle{
    Color: red ;
  }
}
P{
  color: #333 ;
}
Even though the rule in the article layer has a more specific selector, it will be overridden by the less specific P selector. As a result, the paragraph element’s content will be gray instead of red.
The order in which the unlayered styles appear doesn’t affect their priority over layers. If the P selector in the example above is defined or placed before the article layer, the paragraph will still be gray.
Now, let’s add unlayered styles to the layer-scope of the model layer stack:
@layer reset, typography, theme;

h2{ /*unlayered styles*/
  …
}
@layer reset{
  …
}
@layer typography{
  …
}
@layer theme{
  …
}
The new layer order will be as follows:
resettypographythemeunlayered stylesHowever, this layer priority will be reversed in instances involving an !important flag. Competing styles with an !important flag in an earlier-defined layer will always be prioritized over styles with !important flags in a later-defined layer, as well as over unlayered styles.
@layer reset{ /*1st layer*/
 h2{
   color: black !important;
 }
}
@layer typography{ /*2nd layer*/
 h2{
   color: #333 !important;
 }
}
@layer theme{ /*3rd layer*/
 h2{
   color: pink !important;
 }
}
H2{ /*1st unlayered style*/
color: blue;
}
H2{ /*2nd unlayered style*/
color: red !important;
}
The order of specificity in this example will be as follows:
!mportant reset!mportant typography!mportant theme!mportant unlayered styleunlayered styleLayer blocks can also be nested within other layers:
@layer theme{
  @layer dark{
     ...
  }

  @layer light{
     ...
  }
}
When a layer is nested within another layer, its identifier will become a combination of the parent’s identifier and the child’s identifier separated by a period.
@layer typography{
  @layer headings{

  }
}

@layer typography.headings{
  h2{
     color: blue;
  }
}
In this example, we append extra styles to the headings layer nested within the typography layer, using the typography.headings layer block.
Alternatively, nested layers can be defined upfront in a layer stack:
@layer theme{
   @layer theme.dark theme.light;
}
Nested layers are scoped within the nesting layer. As such, layers outside the parent layer can’t be referenced by a nested layer. Instead, a new layer with the same identifier will be created.
@layer reset theme typography;

@layer typography{
  @layer theme {
   .dark{
     background-color: #333;
   }
  }
}
For example, in this code we tried to append extra styles to the theme layer with a nested theme layer block inside the typography layer. But, since a nested layer can only reference layers within its scope, a new theme layer was created instead.
The specificity behavior within layers is the same as the layer order specificity. Layers that come later in a nested layer stack will have the highest priority.
@layer theme{
  h2{ /*nested unlayered style*/
   color: black;
  }
  @layer dark{ /*nested layer*/
    h2{
       color: #fff;
    }
  }
}
In this example, the h2 selector will have a higher priority than the theme.dark layer selector, because styles outside a layer will always come last in the layer order.
Once cascade layers is fully supported, it will be positioned right before the specificity and order of appearance criteria in the CSS cascade algorithm, giving it higher precedence over these criteria.
In cases where the cascade evaluates competing rules in the layers criterion, and the winning rule is determined in the layer order, the algorithm won’t consider the specificity or order of appearance.
New and experimental CSS features can generally be adopted or progressively integrated using polyfills or CSS properties like @support.
Unfortunately, at the time of this writing, there aren’t any polyfills available for cascade layers, and the @support property doesn’t currently work with this feature.
However, you can start experimenting and getting familiar with cascade layers using one of several browsers that currently support the feature.
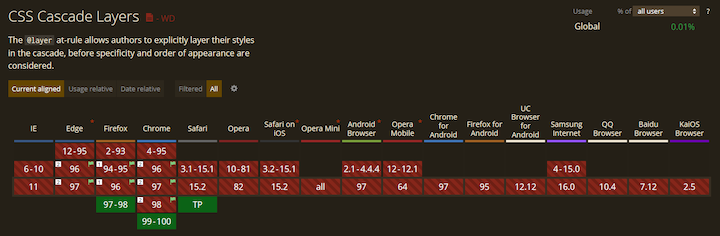
The cascade layer feature is currently experimentally supported by default in these browsers:
In this article, we introduced cascade layers and explored layer order, layer specificity, unlayered styles, and nested layers. We also reviewed the cascade algorithm positioning and the current availability of polyfill and browser support for cascade layers.
With cascade layers, there’s no need to spend precious time wrestling with the specificity or order of appearance of CSS layers. Cascade layers provides more control over the cascade and curb intricacies, such as regressions and styles collision, in codebases.
Read more about cascade layers in the official documentation.
As web frontends get increasingly complex, resource-greedy features demand more and more from the browser. If you’re interested in monitoring and tracking client-side CPU usage, memory usage, and more for all of your users in production, try LogRocket.

LogRocket lets you replay user sessions, eliminating guesswork around why bugs happen by showing exactly what users experienced. It captures console logs, errors, network requests, and pixel-perfect DOM recordings — compatible with all frameworks.
LogRocket's Galileo AI watches sessions for you, instantly identifying and explaining user struggles with automated monitoring of your entire product experience.
Modernize how you debug web and mobile apps — start monitoring for free.

AI companies are buying developer tools as coding agents turn runtimes, package managers, and linters into strategic infrastructure.

Learn how AI-assisted development governance uses rules, agents, hooks, and protocols to help AI coding tools produce safer, more consistent code.

A step-by-step guide to building your first MCP server using Node.js, covering core concepts, tool design, and upgrading from file storage to MySQL.

Using security headers in your Next.js apps is a highly effective way to secure websites from common security threats.
Hey there, want to help make our blog better?
Join LogRocket’s Content Advisory Board. You’ll help inform the type of content we create and get access to exclusive meetups, social accreditation, and swag.
Sign up now

