The Replay is a weekly newsletter for dev and engineering leaders.
Delivered once a week, it's your curated guide to the most important conversations around frontend dev, emerging AI tools, and the state of modern software.
Deployment is one part of the software development workflow that can easily be automated. Automating the deployment removes many errors and lets you stay focused on things that matter.
In React Native, you have to typically deploy apps on two platforms: Android and iOS. Both platforms use different languages and build tools. In this tutorial, we will build a continuous deployment pipeline of a React Native app on App Center via Azure DevOps.
First, you need to set up a React Native project. Follow React Native’s official setup guide and bootstrap the project using the following command:
npx react-native init MyProject
After the above command completes, navigate to the newly created project directory using the following command:
cd MyProject
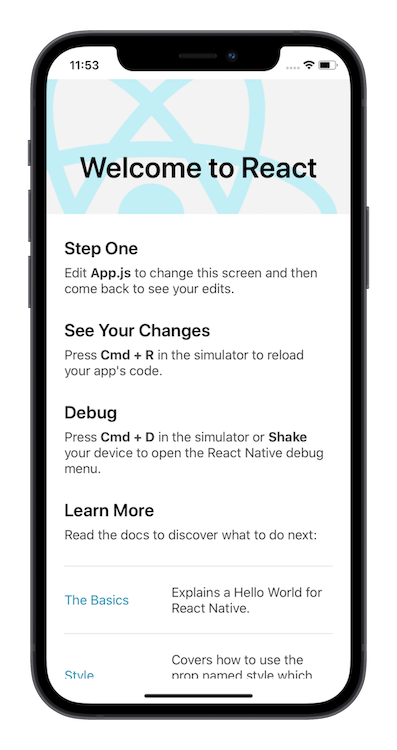
Then, build the project using yarn android — if you have Android set up — or yarn ios if you wish to test it on iOS. After the build completes, you should see the following screen:
Now we need to push our code to Azure DevOps. Head over to Azure DevOps and create a new project there using this official guide.
We need to push our project code to this project’s Git repo. Inside the project directory, run the following commands:
git remote add origin <YOUR_AZURE_DEVOPS_REPO_URL>
git push -u origin --all
Once your code is pushed to Azure DevOps, we need to take care of a couple things before writing the deployment script. First, we need to change Android’s gradle files so that it can take the build parameters from the command line as arguments. Then, we need to upload all the Android/iOS certificates and keys to Azure DevOps. Keeping secrets in the repo is never a good practice.
Perform the following changes in your android/build.gradle file:
diff --git a/android/build.gradle b/android/build.gradle
index ed5a568..5cfd558 100644
--- a/android/build.gradle
+++ b/android/build.gradle
@@ -1,11 +1,25 @@
 // Top-level build file where you can add configuration options common to all sub-projects/modules.

 buildscript {
+
+    def getMyVersionCode = { ->
+        def code = project.hasProperty('versionCode') ? versionCode.toInteger() : 1
+        println "VersionCode is set to $code"
+        return code
+    }
+
+    def getMyVersionName = { ->
+        def name = project.hasProperty('versionName') ? versionName : "1.0"
+        println "VersionName is set to $name"
+        return name
+    }
     ext {
         buildToolsVersion = "29.0.2"
         minSdkVersion = 16
         compileSdkVersion = 29
-        targetSdkVersion = 29
+        targetSdkVersion = 29
+        versionName = getMyVersionName()
+        versionCode = getMyVersionCode()
     }
     repositories {
         google()
Next, add the following changes in your android/app/build.gradle file:
diff --git a/android/app/build.gradle b/android/app/build.gradle
index 64f4347..5774b17 100644
--- a/android/app/build.gradle
+++ b/android/app/build.gradle
@@ -132,8 +132,8 @@ android {
         applicationId "com.myproject"
         minSdkVersion rootProject.ext.minSdkVersion
         targetSdkVersion rootProject.ext.targetSdkVersion
-        versionCode 1
-        versionName "1.0"
+        versionCode rootProject.ext.versionCode
+        versionName rootProject.ext.versionName
     }
     splits {
         abi {
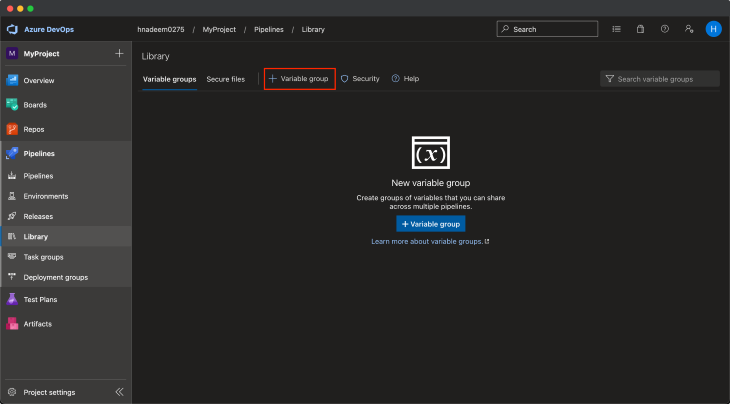
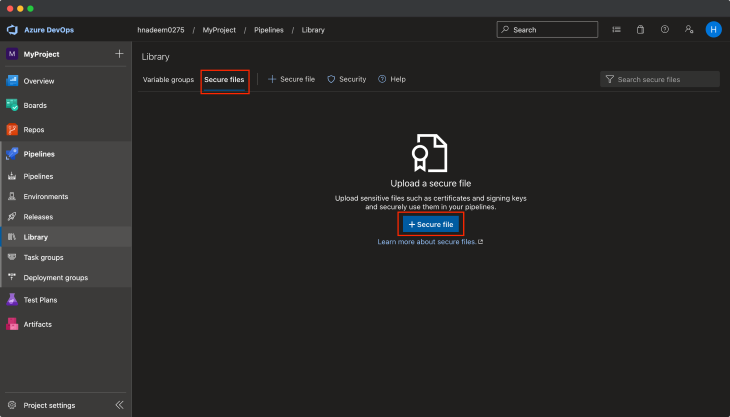
First, follow React Native’s official guide for creating a production signing key and get a .keystore file and credentials. Second, generate iOS credentials (provision profile and signing certificate) using your Apple account. Go to Azure DevOps → Your Project → Pipelines → Library and create a new variable group as shown in the following screenshots:
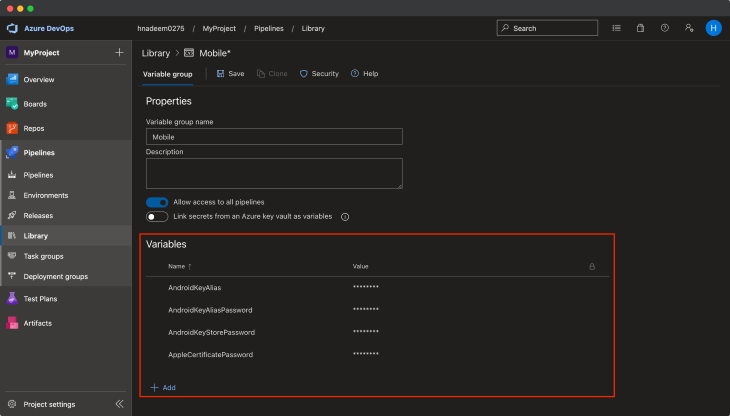
Next, go to Azure DevOps → Your Project → Pipelines → Library and upload the iOS signing certificate and provision profile, as well as Android’s signing key, as shown in the screenshot below:
Now we are all set with the necessary configurations. Let’s begin writing the Azure pipeline script.
At the root of your project, create a new file:
touch azure-pipelines.yml
In this file, first, we will tell when the script should be executed. I will trigger it on every commit on the master branch. There are many ways you can trigger the script. Based on branch name, or when a new tag is pushed, etc. Possibilities are endless. There is a comprehensive list of triggers in official docs that you can use. Add the following lines to the file:
trigger:
  branches:
    include:
      - master
After this, we need to define that we will be using the environmental variables and secure files that we just set up in Pipelines → Library. Add the following lines at the end of your current file:
variables:
  - group: Mobile # change it to the name you have set
Let’s now tell the OS that we want to run this script on. Because iOS can be built only on MacOS but Android can be built on all platforms, it is best to just use MacOS, as it will accommodate both platforms. Add the following lines at the end of your current file:
pool:
  vmImage: 'macos-latest'
Follow these steps one by one:
- checkout: self
    persistCredentials: true
    clean: true
- task: NodeTool@0
    displayName: 'Install Node'
    inputs:
      versionSpec: '12.19.0' # you can use your desired version here
package.json.
- script: yarn install
    displayName: Install Dependencies
version in package.json and set that version to the environmental variables to be used in later steps as build version.
- script: |
      # Disable autocommit on version bump
      yarn config set version-sign-git-tag false
      yarn config set version-git-tag false
      yarn config set version-commit-hooks false
      # Checkout branch where the build is triggered
      git checkout $(Build.SourceBranchName)
      # Extract existing version of package.json
      oldVer=$(jq -r ".version" package.json)
      # Bump version
      yarn version --patch
      # Add bumped version to staging
      git add *
      # Extract new version of package.json
      newVer=$(jq -r ".version" package.json)
      # Set environment variables
      echo "##vso[task.setvariable variable=OLD_VERSION]$oldVer"
      echo "##vso[task.setvariable variable=NEW_VERSION]$newVer"
    displayName: 'Bump version and set variables'
- task: ios-bundle-version@1
    displayName: 'Bump iOS version'
    inputs:
      sourcePath: 'ios/MyProject/Info.plist'
      versionCodeOption: 'buildid'
      versionCode: '$(Build.BuildId)'
      versionName: '$(NEW_VERSION)'
      printFile: false
NEW_VERSION as the argument to the Gradle build script.
- task: Gradle@2
    displayName: 'Build APK'
    inputs:
      gradleWrapperFile: 'android/gradlew'
      workingDirectory: 'android/'
      options: '-PversionName=$(NEW_VERSION) -PversionCode=$(Build.BuildId)'
      tasks: 'assembleRelease'
      publishJUnitResults: false
      javaHomeOption: 'JDKVersion'
      jdkVersionOption: '1.8'
      gradleOptions: '-Xmx3072m'
      sonarQubeRunAnalysis: false
AndroidKeyStorePassword, AndroidKeyAlias, and AndroidKeyAliasPassword comes from Library. Make sure these name matches what you set in Library.
- task: AndroidSigning@3
    displayName: 'Sign APK'
    inputs:
      apkFiles: 'android/app/build/outputs/apk/release/*.apk'
      apksignerKeystoreFile: 'mobile-prod.keystore'
      apksignerKeystorePassword: '$(AndroidKeyStorePassword)'
      apksignerKeystoreAlias: '$(AndroidKeyAlias)'
      apksignerKeyPassword: '$(AndroidKeyAliasPassword)'
      zipalign: true
- task: PublishBuildArtifacts@1
    displayName: 'Publish APK to artifacts'
    inputs:
      PathtoPublish: 'android/app/build/outputs/apk/release'
      ArtifactName: 'android'
      publishLocation: 'Container'
appSlug can be found from the URL of your app on App Center, and distributionGroupId can be found from your app’s distribution group on App Center.
- task: AppCenterDistribute@3
    displayName: 'Upload APK to AppCenter'
    inputs:
      serverEndpoint: 'App Center'
      appSlug: 'hnadeem/MyProject-Android'
      appFile: 'android/app/build/outputs/apk/release/app-release-unsigned.apk'
      releaseNotesOption: 'file'
      isMandatory: true
      destinationType: 'groups'
      distributionGroupId: 'f940ccde-a812-4ade-98d8-76c3ab1d0c2e'
      isSilent: true
package.json, Android, and iOS project. Now we need to commit these changes.
- script: |
      tag="mobile_$(NEW_VERSION)"
      echo "New tag $tag"
      git add *
      git commit -m "Update version from $(OLD_VERSION) to $(NEW_VERSION)"
      git tag $tag
      git pull --rebase origin $(Build.SourceBranchName)
      git push origin $(Build.SourceBranchName)
      git push --tags
    displayName: Bump commit
AppleCertificatePassword comes from Library. Make sure this name matches what you set in Library.
- task: InstallAppleCertificate@2
    displayName: Install Apple Certificate
    inputs:
      certSecureFile: 'MobileProd.p12'
      certPwd: '$(AppleCertificatePassword)'
      keychain: 'temp'
      deleteCert: true
- task: InstallAppleProvisioningProfile@1
    displayName: 'Install Apple Provisioning Profile'
    inputs:
      provisioningProfileLocation: 'secureFiles'
      provProfileSecureFile: 'MyProject.mobileprovision'
      removeProfile: true
- task: CocoaPods@0
    displayName: 'Install CocoaPods'
    inputs:
      workingDirectory: 'ios'
APPLE_CERTIFICATE_SIGNING_IDENTITY and APPLE_PROV_PROFILE_UUID, which are auto-populated by Azure DevOps based on our previous steps where we provided certificates.
- task: Xcode@5
    displayName: 'Build IPA'
    inputs:
      actions: 'build'
      configuration: 'Release'
      sdk: 'iphoneos'
      xcWorkspacePath: 'ios/MyProject.xcworkspace'
      scheme: 'MyProject'
      packageApp: true
      exportPath: 'output'
      signingOption: 'manual'
      signingIdentity: '$(APPLE_CERTIFICATE_SIGNING_IDENTITY)'
      provisioningProfileUuid: '$(APPLE_PROV_PROFILE_UUID)'
- task: CopyFiles@2
    displayName: 'Copy IPA'
    inputs:
      contents: '**/*.ipa'
      targetFolder: '$(build.artifactStagingDirectory)'
      overWrite: true
      flattenFolders: true
- task: PublishBuildArtifacts@1
    displayName: 'Publish IPA to artifacts'
    inputs:
      PathtoPublish: '$(build.artifactStagingDirectory)'
      ArtifactName: 'ios'
      publishLocation: 'Container'
appSlug can be found from the URL of your app on App Center, and distributionGroupId can be found in your app’s distribution group on App Center.
- task: AppCenterDistribute@3
    displayName: 'Upload IPA to AppCenter'
    inputs:
      serverEndpoint: 'App Center'
      appSlug: 'hnadeem/MyProject-iOS'
      appFile: 'output/MyProject.ipa'
      releaseNotesOption: 'file'
      isMandatory: true
      destinationType: 'groups'
      distributionGroupId: '058a4704-ea24-4877-a2f0-bdfaff9335dc'
      isSilent: true
That’s about it for the scripting part! Here’s our complete azure-pipelines.yml for this tutorial:
trigger:
  branches:
    include:
      - master
variables:
  - group: Mobile # change it to the name you have set
pool:
  vmImage: 'macos-latest'
steps:
  - checkout: self
    persistCredentials: true
    clean: true
  - task: NodeTool@0
    displayName: 'Install Node'
    inputs:
      versionSpec: '12.19.0' # you can use your desired version here
  - script: yarn install
    displayName: Install Dependencies
  - script: |
      # Disable autocommit on version bump
      yarn config set version-sign-git-tag false
      yarn config set version-git-tag false
      yarn config set version-commit-hooks false
      # Checkout branch where the build is triggered
      git checkout $(Build.SourceBranchName)
      # Extract existing version of package.json
      oldVer=$(jq -r ".version" package.json)
      # Bump version
      yarn version --patch
      # Add bumped version to staging
      git add *
      # Extract new version of package.json
      newVer=$(jq -r ".version" package.json)
      # Set environment variables
      echo "##vso[task.setvariable variable=OLD_VERSION]$oldVer"
      echo "##vso[task.setvariable variable=NEW_VERSION]$newVer"
    displayName: 'Bump version and set variables'
  - task: ios-bundle-version@1
    displayName: 'Bump iOS version'
    inputs:
      sourcePath: 'ios/MyProject/Info.plist'
      versionCodeOption: 'buildid'
      versionCode: '$(Build.BuildId)'
      versionName: '$(NEW_VERSION)'
      printFile: false
  - task: Gradle@2
    displayName: 'Build APK'
    inputs:
      gradleWrapperFile: 'android/gradlew'
      workingDirectory: 'android/'
      options: '-PversionName=$(NEW_VERSION) -PversionCode=$(Build.BuildId)'
      tasks: 'assembleRelease'
      publishJUnitResults: false
      javaHomeOption: 'JDKVersion'
      jdkVersionOption: '1.8'
      gradleOptions: '-Xmx3072m'
      sonarQubeRunAnalysis: false
  - task: AndroidSigning@3
    displayName: 'Sign APK'
    inputs:
      apkFiles: 'android/app/build/outputs/apk/release/*.apk'
      apksignerKeystoreFile: 'mobile-prod.keystore'
      apksignerKeystorePassword: '$(AndroidKeyStorePassword)'
      apksignerKeystoreAlias: '$(AndroidKeyAlias)'
      apksignerKeyPassword: '$(AndroidKeyAliasPassword)'
      zipalign: true
  - task: PublishBuildArtifacts@1
    displayName: 'Publish APK to artifacts'
    inputs:
      PathtoPublish: 'android/app/build/outputs/apk/release'
      ArtifactName: 'android'
      publishLocation: 'Container'
  - task: AppCenterDistribute@3
    displayName: 'Upload APK to AppCenter'
    inputs:
      serverEndpoint: 'App Center'
      appSlug: 'hnadeem/MyProject-Android'
      appFile: 'android/app/build/outputs/apk/release/app-release-unsigned.apk'
      releaseNotesOption: 'file'
      isMandatory: true
      destinationType: 'groups'
      distributionGroupId: 'f940ccde-a812-4ade-98d8-76c3ab1d0c2e'
      isSilent: true
  - script: |
      tag="mobile_$(NEW_VERSION)"
      echo "New tag $tag"
      git add *
      git commit -m "Update version from $(OLD_VERSION) to $(NEW_VERSION)"
      git tag $tag
      git pull --rebase origin $(Build.SourceBranchName)
      git push origin $(Build.SourceBranchName)
      git push --tags
    displayName: Bump commit
  - task: InstallAppleCertificate@2
    displayName: Install Apple Certificate
    inputs:
      certSecureFile: 'MobileProd.p12'
      certPwd: '$(AppleCertificatePassword)'
      keychain: 'temp'
      deleteCert: true
  - task: InstallAppleProvisioningProfile@1
    displayName: 'Install Apple Provisioning Profile'
    inputs:
      provisioningProfileLocation: 'secureFiles'
      provProfileSecureFile: 'MyProject.mobileprovision'
      removeProfile: true
  - task: CocoaPods@0
    displayName: 'Install CocoaPods'
    inputs:
      workingDirectory: 'ios'
  - task: Xcode@5
    displayName: 'Build IPA'
    inputs:
      actions: 'build'
      configuration: 'Release'
      sdk: 'iphoneos'
      xcWorkspacePath: 'ios/MyProject.xcworkspace'
      scheme: 'MyProject'
      packageApp: true
      exportPath: 'output'
      signingOption: 'manual'
      signingIdentity: '$(APPLE_CERTIFICATE_SIGNING_IDENTITY)'
      provisioningProfileUuid: '$(APPLE_PROV_PROFILE_UUID)'
  - task: CopyFiles@2
    displayName: 'Copy IPA'
    inputs:
      contents: '**/*.ipa'
      targetFolder: '$(build.artifactStagingDirectory)'
      overWrite: true
      flattenFolders: true
  - task: PublishBuildArtifacts@1
    displayName: 'Publish IPA to artifacts'
    inputs:
      PathtoPublish: '$(build.artifactStagingDirectory)'
      ArtifactName: 'ios'
      publishLocation: 'Container'
  - task: AppCenterDistribute@3
    displayName: 'Upload IPA to AppCenter'
    inputs:
      serverEndpoint: 'App Center'
      appSlug: 'hnadeem/MyProject-iOS'
      appFile: 'output/MyProject.ipa'
      releaseNotesOption: 'file'
      isMandatory: true
      destinationType: 'groups'
      distributionGroupId: '058a4704-ea24-4877-a2f0-bdfaff9335dc'
      isSilent: true
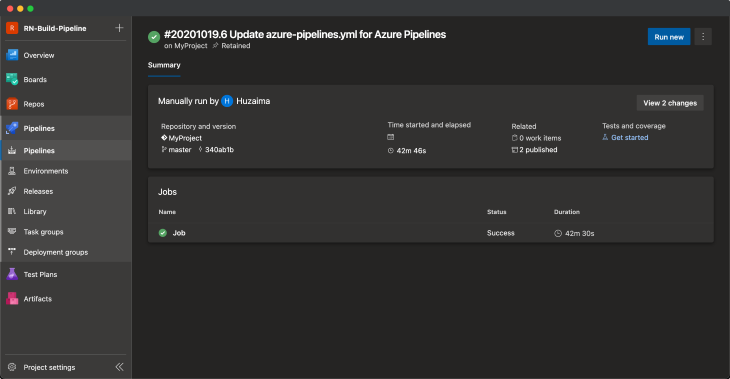
Now it’s time to push our commit to the master branch to see this deployment script in action.
Here you can see the job run on the master branch and that two artifacts were published.
This was a brief tutorial on how to set up a continuous deployment pipeline on Azure DevOps for a React Native project. Using continuous deployment, you will get rid of human errors and save a lot of time. Any new developer will be able to start working on the project without having to worry about deployments.

LogRocket's Galileo AI watches sessions for you and and surfaces the technical and usability issues holding back your React Native apps.
LogRocket also helps you increase conversion rates and product usage by showing you exactly how users are interacting with your app. LogRocket's product analytics features surface the reasons why users don't complete a particular flow or don't adopt a new feature.
Start proactively monitoring your React Native apps — try LogRocket for free.
Local AI proxy tutorial for detecting, masking, and rehydrating PII before prompts reach cloud LLMs.

Learn how Graph RAG uses connected knowledge structures to improve retrieval beyond simple text similarity.

Learn how sibling-index() enables clean, JavaScript-free stagger animations using native CSS.

useEffect breaks AI streaming responses in ReactSee why useEffect breaks AI streaming in React, and how moving stream state outside React fixes flicker and stale updates.
Hey there, want to help make our blog better?
Join LogRocket’s Content Advisory Board. You’ll help inform the type of content we create and get access to exclusive meetups, social accreditation, and swag.
Sign up now
