Organizations all over the world are turning to blockchain technology to improve data storage, security, and management. This has resulted in the need to ensure that applications built on the blockchain network are thoroughly tested.

In this article, we will discuss what blockchain testing is all about, including the benefits and drawbacks, the types of blockchain testing, the phases, and some useful tools. We will also create and test a smart contract using some of the recommended testing tools.
The Replay is a weekly newsletter for dev and engineering leaders.
Delivered once a week, it's your curated guide to the most important conversations around frontend dev, emerging AI tools, and the state of modern software.
Blockchain testing is the systematic evaluation of the blockchain’s various functional components (e.g., smart contracts). Unlike traditional software testing, blockchain testing involves several components such as blocks, mining, transactions, wallets, and so on, all of which require special tools to test.
Blockchain testing aids in the development of various quality stages, ranging from system performance to the security of the blockchain application.
According to Santu Maity, Enterprise Architect at IBM, the best approach for blockchain testing encompasses the entire environment. This includes blockchain-based applications, both mobile and web, that interact with the blockchain system’s functional component, like an API, smart contracts, and nodes.
Blockchain testing ensures that all entities involved in a blockchain network have been properly validated for operation. As a result, it provides organizations with a secure and functional infrastructure.
Blockchain testing aids in the delivery of quality products, thereby improving user experience. It also eliminates flaws in a decentralized system where money is involved in order to prevent financial damage.
One of the most significant challenges is a lack of testing tools. Currently, there are few testing tools available for each blockchain framework; therefore, using the wrong tool can cause problems.
Another issue in the blockchain ecosystem is a lack of professional expertise. Because blockchain technology is still relatively new in the tech world, it has not seen widespread adoption among software developers.
Yet another challenge is testing strategy. Blockchain testing necessitates a thorough knowledge and understanding of how blockchain works.
The security of the blockchain network can also be difficult. Blockchain applications are now being used in a variety of economic sectors. As a result, data security is critical for preventing nefarious activities.
The inability to provide an adequate performance and load testing provides little or no knowledge on the performance of blockchain applications under certain conditions.
The following is a comprehensive list of the types of testing one can perform on a blockchain:
The initiation phase is the first stage of testing a blockchain system. Here, the testers become acquainted with the system’s lifecycle by analyzing and comprehending its functionality, allowing them to gain a better understanding of all components involved. A detailed map is generated that includes all of the system components and subcomponents, as well as all of the interfaces, to provide a good understanding of how the system works overall.
In the design phase, the key components of the system that must be tested are identified, and a well detailed test strategy tailored to the blockchain system is developed. This test strategy describes the system’s test cases and test environment specifications.
During this phase, it is decided how each type of test will be performed, with an estimate of how many tests will be performed at each level and to what extent.
If the system is not available, alternative testing strategies must be devised. Setting up a private blockchain for testing is an alternative test strategy. API testing, functional testing, performance testing, security testing, and so on are examples of these tests.
This is the final phase, which includes a report on the overall test performed in the system. System performance, low level check, and validation of blocks, transactions, and smart contracts are the fundamental exercises that must be executed during this phase.
Ethereum Tester is an Ethereum testing tool that includes Web3 Integration, API, and Smart Contracts. This allows development teams to recreate a production-like Ethereum blockchain.
An open source testing library, it is simple to implement and has manageable API support for a variety of testing requirements.
This tool is primarily used to locally test Ethereum contracts. It generates a blockchain simulation that allows anyone to test multiple accounts.
Exonum TestKit specializes in testing the activity of the entire service of the blockchain application. We can use the tool to perform API testing and transaction execution without having to worry about network operations or consensus algorithms.
Corda is an open source, distributed ledger platform based on blockchain technology. Contract testing, integration testing, flow testing, and load testing are all made easier with the built in testing tool.
Truffle is a blockchain testing tool with features that go beyond basic testing, such as working with Chai and Mocha. It is a well known name among Ethereum developers for identifying amazing testing features, such as automated contract testing.
The Populus framework includes Ethereum’s testing functionality, which is well integrated as a set of properties focused toward contract deployment testing. These frameworks are mostly built around the pytest framework, allowing for its very simple implementation.
Now let’s move on to the tutorial section of the article. Here, we will develop and test a sample smart contract with Truffle now that you’ve grasped the basics of blockchain testing.
In this example, we will create a car tracking system for an auto shop. We will cover the following:
To work with Truffle, you’ll need to have the following software installed on your computer:
Run the following command in your terminal once they’ve been installed successfully:
npm install -g truffle
The command above will install Truffle globally on your computer. Type “truffle version” in the terminal to see if Truffle is installed correctly.
Create a new project directory with the following:
mkdir truffle-project
Migrate into your new project directory like so:
cd truffle-project
Then, initialize Truffle:
truffle init
The above command will generate the following directory structure for Truffle:
contracts/, which contains the smart contract source codes, written in Solidity. Inside this directory there’s an important contract called Migrations.sol.
migrations/. Deployment of smart contracts is managed with the migration system. It is used to monitor changes in the smart contract.
test/ is where test codes and files for the smart contracts are kept. Tests can written in either Solidity or JavaScript.
truffle-config.js is the Truffle configuration file where you can define your deployment network for deploying your smart contracts.
In the contracts/ directory, create a new file called Auto.sol and add the following:
// SPDX-License-Identifier: MIT
pragma solidity ^0.8.9;

contract Purchase {
  address[20] public buyers;
}
pragma solidity ^0.8.9; indicates the minimum version of Solidity required. The pragma command means “additional information that only the compiler cares about”, while the caret symbol (^) means “the version indicated or higher.”
When writing Solidity, data types like array and strings must be declared. Solidity provides a special data type called address, which is also an Ethereum address stored as 20 byte values. This address can be used to send and receive Ether.
Within the contract Purchase{ scope, we define a public variable called borrower with an address type and a length of 20, which is an array of Ethereum addresses. Always remember to add a semicolon (;) at the end of every statement, to avoid an error.
Now let’s create a function that allows users to make a borrow request. Below the variable declaration, add the following:
// buying a car
function buy (uint carId) public returns (uint) {
    require(carId >= 0 && carId <= 19);

    buyer[carId] = msg.sender;

    return carId;
  }
According to the code above, the function accepts an integer (uint) parameter carId and is expected to return an integer as the output. The require() statement is used to ensure that the carId is within the buyer array’s range. Because arrays in Solidity are indexed from zero, the carId value must be between zero and 19.
If the carId is within the range, the address from which the call was made is added to our buyer array, which is denoted by msg.sender. We then return the carId that was passed.
Next we write a function that get all the buyers, like so:
// get all buyers
  function getBuyers() public view returns (address[20] memory) {
    return buyers;
  }
We return the buyer as a type address[20] memory which contains the variable’s data location. view in the function declaration indicates that the function will not change the state of the contract.
Following that, we must compile our Solidity code so that the Ethereum Virtual Machine (EVM) can understand it.
Open the terminal in your project’s root directory and type the following command:
truffle compile
The above command will compile all smart contracts in the contracts folder and as well as create a build directory that contains a contracts folder with artifacts.
Artifacts are .json files that serve as a JavaScript wrapper for interacting with the corresponding smart contracts.
Now that the contract has been successfully compiled, it’s time to migrate it to the blockchain.
A migration is a deployment script that is used to change the state of your application’s contracts, moving them from one state to the next.
To deploy the smart contract over the blockchain, we will first create the migration configuration file. This is a JavaScript file that handles deployment of the smart contracts on the blockchain.
However, in order to deploy the smart contracts with migrations, we must first gain access to their artifacts, which were generated as a result of the Truffle compile command. Inside the migration directory is a default migration file 1_initial_migration.js that handles deployment of the Migration.sol file.
Lets create our own migration configuration file, 2_deploy_contract.js, with the following:
const PurchaseContract = artifacts.require('Purchase');

module.exports = function(deployer) {
  deployer.deploy(PurchaseContract);
};
The artifacts.require() method is used to specify the smart contract to use for interacting with the blockchain. Because a source file may contain multiple contracts, we specified the name of the contract definition rather than the name of the .sol file. In this case we use Purchase rather than Auto.
The migrations are then exported as a function with a parameter (deployer). The object deployer is responsible for staging deployments. Next, we deploy PurchaseContract.
Next, we will be using another blockchain testing tool called Ganache to provide an interface to deploy our smart contracts and carry out tests. You can either download or use the command line npm i -g ganache-cli.
If you are using Ubuntu OS, you might find it difficult to run the Ganache application. Simply right-click on the application file, go to properties, then to permissions and tick allow executing file as program. Then re-run the application.
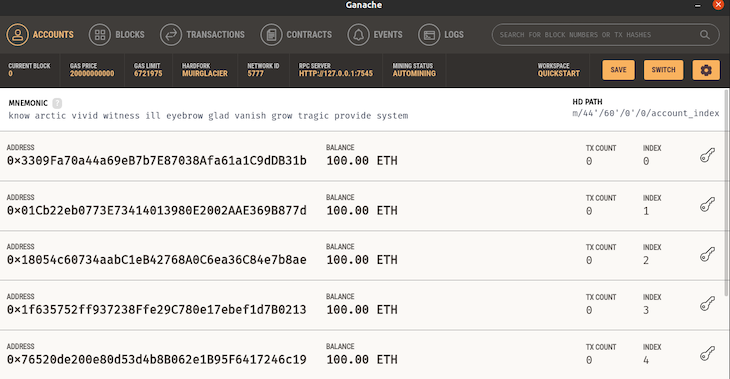
I will be using the Ganache GUI for this tutorial. Run the application and select quickstart. The following image will be displayed on the screen:

Now let’s migrate our smart contract:
truffle migrate
After a successful migration, you will see the following:
Compiling your contracts...
===========================
> Everything is up to date, there is nothing to compile.


Starting migrations...
======================
> Network name:    'ganache'
> Network id:      5777
> Block gas limit: 6721975 (0x6691b7)


1_initial_migration.js
======================

   Replacing 'Migrations'
   ----------------------
   > transaction hash:    0x7f4ad90e465b3e6501e8a49f3af1692ba39df66cbb6e014061b9e7e592167c02
   > Blocks: 0            Seconds: 0
   > contract address:    0x5A61A1989d92Fb349fAcd409Fdc8A4C640853fD9
   > block number:        1
   > block timestamp:     1636840180
   > account:             0x3309Fa70a44a69eB7b7E87038Afa61a1C9dDB31b
   > balance:             99.99502316
   > gas used:            248842 (0x3cc0a)
   > gas price:           20 gwei
   > value sent:          0 ETH
   > total cost:          0.00497684 ETH


   > Saving migration to chain.
   > Saving artifacts
   -------------------------------------
   > Total cost:          0.00497684 ETH


2_deploy_contract.js
====================

   Replacing 'Purchase'
   --------------------
   > transaction hash:    0x039224bded1eec1272e422d79ea146aa0026d13252fa7c495628829dbf7d5e42
   > Blocks: 0            Seconds: 0
   > contract address:    0xA89fdCd07E195be4555E07025b8613224e312F97
   > block number:        3
   > block timestamp:     1636840182
   > account:             0x3309Fa70a44a69eB7b7E87038Afa61a1C9dDB31b
   > balance:             99.98848808
   > gas used:            284241 (0x45651)
   > gas price:           20 gwei
   > value sent:          0 ETH
   > total cost:          0.00568482 ETH


   > Saving migration to chain.
   > Saving artifacts
   -------------------------------------
   > Total cost:          0.00568482 ETH


Summary
=======
> Total deployments:   2
> Final cost:          0.01066166 ETH
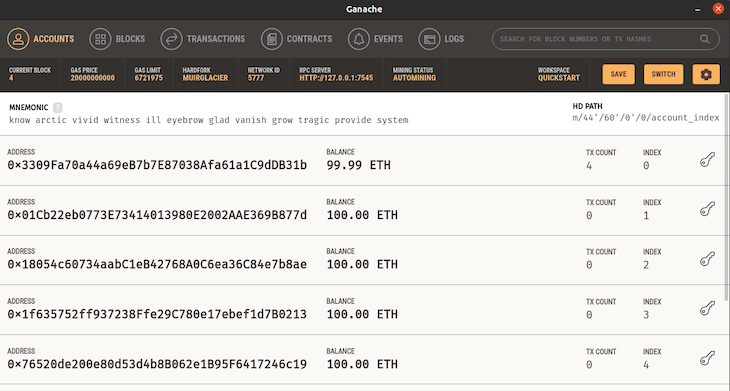
Now go back to your Ganache application:

You will notice the current block, which was previously zero, is now four. Also, the first address started with 100 Ether, now it has 99.99 Ether. This is due to the transaction costs of migration.
We have successfully created and deployed our smart contract on our local blockchain. Now we can test our smart contract to make sure it does what it is supposed to.
There are two methods of testing smart contracts in Truffle. The first is by using Solidity and the second is by using JavaScript. For this tutorial, we will be using the JavaScript method.
In the test directory, create a new file purchase.test.js and write the following:
const Purchase = artifacts.require("Purchase");
contract("Purchase", (accounts) => {
 let purchase;
 let expectedBuyer;
 before(async () => {
     purchase = await Purchase.deployed();
 });
 describe("get account addresses for every purchase", async () => {
  before("buy a car using accounts[0]", async () => {
    await purchase.buy(4, { from: accounts[0] });
    expectedBuyer = accounts[0];
  });
  it("can retrieve buyer's address by car id", async () => {
    const buyer = await purchase.buyers(4);
    assert.equal(buyer, expectedBuyer, "Expected to return buyer's account.");
  });
  it("can retrieve addresses of every buyers", async () => {
    const buyers = await purchase.getBuyers();
    assert.equal(buyers[4], expectedBuyer, "Buyer should be included.");
  });
 });
});
First, we use the artifacts.require() method to import our Purchase contract. Then we declare a contract and pass in our Purchase instance as the first argument, followed by a callback function as the second.
The parameter for the callback function is accounts. The accounts provides the network’s available accounts. We use before to ensure that the purchased car with ID 4 is assigned to the first account.
We then run a test to see which address purchased the car with ID 4. To compare the actual value (buyer) and the expected value (expectedBuyer), we use the assert.equal method. If the test fails, the error message is printed to the console.
Finally, we check to see if it returns all of the buyers’ addresses. Then we check to see if the address with UD 4 is among the returned buyer addresses.
Now we test our contract by running the following command:
truffle test
If the test passes, you should see a similar result below:
Using network 'test'.


Compiling your contracts...
===========================
> Everything is up to date, there is nothing to compile.


  Contract: Purchase
    get account addresses for every purchase
      ✓ can retrieve buyer's address by car id (102ms)
      ✓ can retrieve addresses of every buyers (429ms)


  2 passing (2s)
As blockchain adoption grows, the need to deliver high quality products cannot be met without investing in blockchain and blockchain testing expertise.
Blockchain testing ensures that all components in the system are working properly and that all applications are interacting with it in a trustworthy manner.
Client-side issues that impact users’ ability to activate and transact in your apps can drastically affect your bottom line. If you’re interested in monitoring UX issues, automatically surfacing JavaScript errors, and tracking slow network requests and component load time, try LogRocket.

LogRocket lets you replay user sessions, eliminating guesswork around why bugs happen by showing exactly what users experienced. It captures console logs, errors, network requests, and pixel-perfect DOM recordings — compatible with all frameworks.
LogRocket's Galileo AI watches sessions for you, instantly identifying and explaining user struggles with automated monitoring of your entire product experience.
Modernize how you debug web and mobile apps — start monitoring for free.

Explore how the Universal Commerce Protocol (UCP) allows AI agents to connect with merchants, handle checkout sessions, and securely process payments in real-world e-commerce flows.

React Server Components and the Next.js App Router enable streaming and smaller client bundles, but only when used correctly. This article explores six common mistakes that block streaming, bloat hydration, and create stale UI in production.

Gil Fink (SparXis CEO) joins PodRocket to break down today’s most common web rendering patterns: SSR, CSR, static rednering, and islands/resumability.

@container scroll-state: Replace JS scroll listeners nowCSS @container scroll-state lets you build sticky headers, snapping carousels, and scroll indicators without JavaScript. Here’s how to replace scroll listeners with clean, declarative state queries.
Would you be interested in joining LogRocket's developer community?
Join LogRocket’s Content Advisory Board. You’ll help inform the type of content we create and get access to exclusive meetups, social accreditation, and swag.
Sign up now