
Analytics play a significant role in improving user experiences by trying to understand user behavior and interactions within applications. React Native is compatible with three major analytics tools that aid in improving experiences in React Native apps: App Center Analytics by Microsoft, Firebase Analytics by Google, and Segment.

In this post, we will explore the advantages of each tool and how they help developers navigate and utilize analytics within React Native.
The Replay is a weekly newsletter for dev and engineering leaders.
Delivered once a week, it's your curated guide to the most important conversations around frontend dev, emerging AI tools, and the state of modern software.
Created by Microsoft, App Center Analytics is part of the App Center SDK that captures user sessions and tracks all interactions with the app while collecting device and OS information.
To use App Center Analytics, we must install the App Center React Native SDK.
First, we must create an account and a new app on appcenter.ms. The React Native documentation shows how to install the packages and integrate the SDK for iOS and Android. In this post, we’ll cover a high-level installation overview.
Begin by installing the SDK using Yarn:
yarn add appcenter appcenter-analytics appcenter-crashes --exact
Inside the app directory, run cd ios && pod install --repo-update to install the iOS dependencies.
Next, use Xcode to create a new file and name it AppCenter-Config.plist. Right-click the root folder; choose Add New File and Property List file.
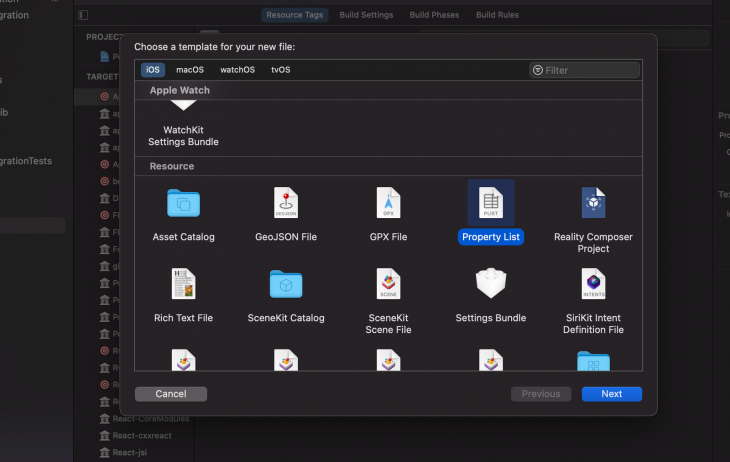
With the file open, copy and paste the code below inside the file we just created:
<?xml version="1.0" encoding="UTF-8"?>
<!DOCTYPE plist PUBLIC "-//Apple//DTD PLIST 1.0//EN" "https://www.apple.com/DTDs/PropertyList-1.0.dtd">
<plist version="1.0">
    <dict>
    <key>AppSecret</key>
    <string>{APP_SECRET_VALUE}</string>
    </dict>
</plist>
Change {APP_SECRET_VALUE} with the APP_SECRET key from the application we created in appcenter.ms.
The content inside AppCenter-Config.plist should look like the figure below:
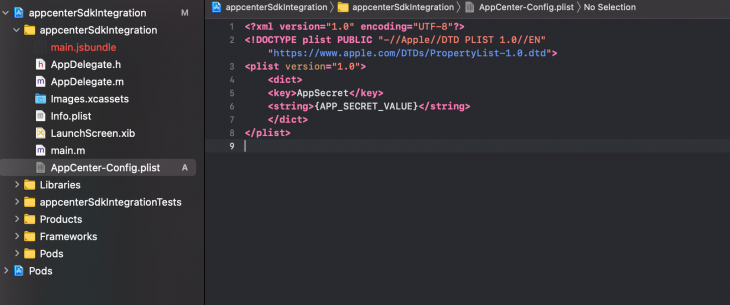
To initialize the SDK, add these lines of code to the top of the AppDelegate.m file:
#import <AppCenterReactNative.h>
#import <AppCenterReactNativeAnalytics.h>
#import <AppCenterReactNativeCrashes.h>
Within didFinishLaunchingWithOptions, add these lines:
[AppCenterReactNative register];
  [AppCenterReactNativeAnalytics registerWithInitiallyEnabled:true];
  [AppCenterReactNativeCrashes registerWithAutomaticProcessing];
Now, click the Build icon or type Command + B to build the app.
For the Android application, add the appcenter-config.json file inside android/app/src/main/assets.
The content inside the file should look like the code below; we must also replace {APP_SECRET_VALUE} with the valid app secret:
{
    "app_secret": "{APP_SECRET_VALUE}"
}
The last step for the Android app is to add these lines to res/values/strings.xml:
<string name="appCenterCrashes_whenToSendCrashes" moduleConfig="true" translatable="false">DO_NOT_ASK_JAVASCRIPT</string>
<string name="appCenterAnalytics_whenToEnableAnalytics" moduleConfig="true" translatable="false">ALWAYS_SEND</string>
For the SDK to work properly, avoid using any other service that does crash reporting except the AppCenter SDK.
With the installation complete, use AppCenter Analytics methods within the React Native code to collect user data.
In this example, we’ll report sales and track how a user navigates through an online store app using the trackEvent() method.
This method triggers anytime a user takes an action, like clicking the Buy button. It then reports and tracks the event, collecting the data about the user’s purchase like the type of the product that was bought, the price, and the quantity.
In the code, trackEvent() is used like the following:
import {View,Text, TouchableOpacity, TouchableHighlight} from 'react-native';
import Analytics from 'appcenter-analytics';

export default App(){
const __OnBuyButtonPressed=()=>{

  Analytics.trackEvent('Purchase', { price: '9.99', type: 'cloth' });
}
return(
  <View>
        <TouchableHighlight  onPress={__OnBuyButtonPressed}>
          <View
            style={{
              flexDirection: "row",
              justifyContent: "space-around"
            }}
          >
            <Text style={styles.signInButtonTextStyle}>Continue</Text>
          </View>
        </TouchableHighlight>
      </View>
)}
Custom events can also collect unique data. For example, we can create a custom event for Navigation actions to see how the user navigates through the app.
With the event data collected and sent to the App Center dashboard, we see all the logs, events, OS data, device information, and more that can help us identify how to best serve our users’ experiences.
One of the other benefits of using AppCenter Analytics is that data can be linked and exported to Azure, which gives users access to features like Azure Application Insights to help analyze data.
Formerly known as simply Firebase Analytics, Google Analytics for Firebase supports React Native as well. It tracks the user behavior using custom and predefined events and can be integrated with the Firebase SDK.
As one of the most popular cloud services in mobile development, Firebase supports the majority of platforms and can be used anywhere. It’s easy to integrate with React Native, and its simple functionalities have made it popular among the developer community.
To use the Firebase SDK capabilities in React Native, we will install react-native-firebase, which is an open source project that integrates the Firebase SDK into React Native.
First, we must create a new app on the Firebase console and generate credentials. In the console, select Create a project to create a new app and follow the prompts.
Once the project is created, click the iOS button.
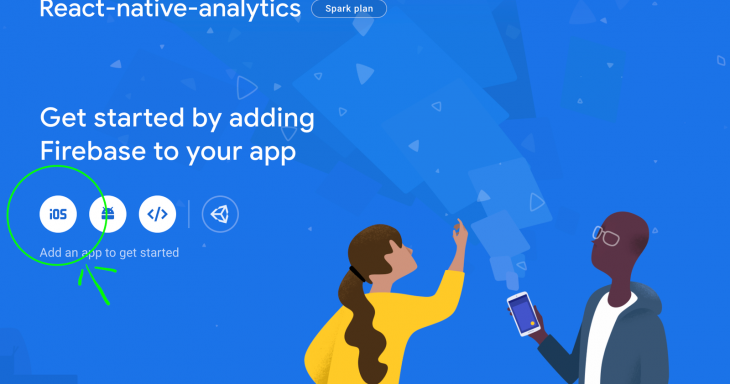
A new window appears, prompting us to enter informationI from an iOS bundle identifier to register our app.
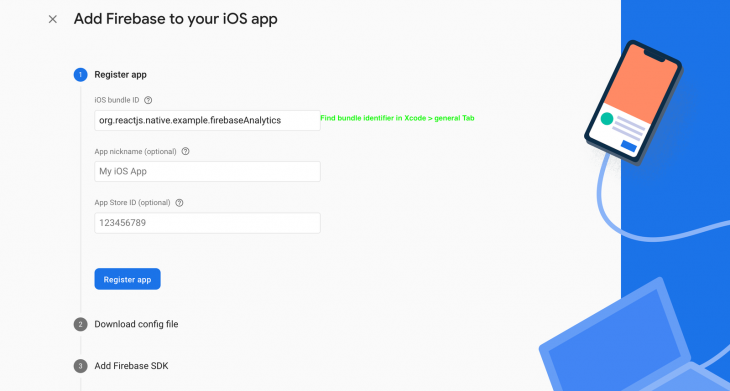
To get the bundle identifier, open the project in Xcode, open the General tab, and copy the text in the Bundle Identifier field.

The GoogleService-Info.plist file containing the Firebase credentials generates automatically after clicking Register app; we can now download the file.
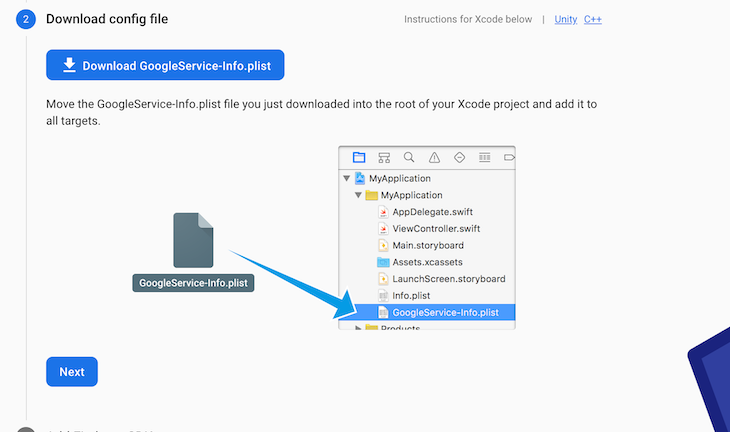
Then, copy and paste the file inside the project directory in Xcode.
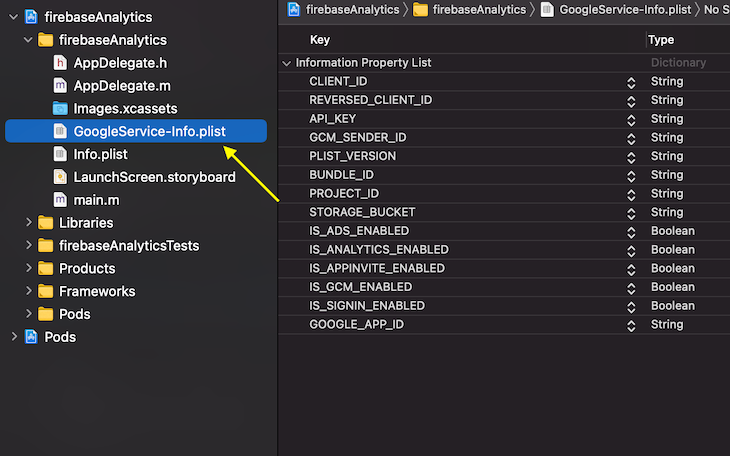
After creating the new app on the Firebase console, we are ready to install the React Native dependencies.
Add the package using Yarn or npm, like the following:
yarn add @react-native-firebase/app
// with npm
npm install @react-native-firebase/app
Next, add the analytics module:
yarn add @react-native-firebase/analytics
If using a React Native version older than 0.60, run react-native link to link the packages. Otherwise, using a newer version will link the packages automatically.
After linking the packages, install the iOS pods in the project directory by running the command below:
cd iOS && pod install
This installs the dependencies needed for iOS.
To initialize the Firebase app, add the following lines of code to AppDelegate.m:
@import UIKit;
@import Firebase;

@implementation AppDelegate

- (BOOL)application:(UIApplication *)application
    didFinishLaunchingWithOptions:(NSDictionary *)launchOptions {
  [FIRApp configure];
  return YES;
}
Now, click the Build icon or type Command + B inside Xcode. If there are no issues, we can see the logs and the insights on the dashboard in the Firebase console. However, it may take some time for the data to populate.
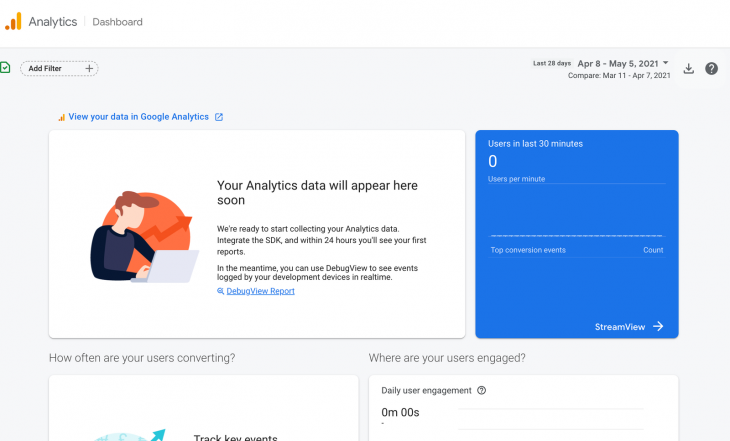
The basic usage of Google Analytics for Firebase with the React Native code is similar to the other analytics tools we talk about in this post. The difference, however, is the name of the methods.
Because Firebase has numerous built-in methods with meaningful names for events, developers have an easier and more efficient experience when working with them.
The basic usage inside the React Native code is showcased below. By simulating a Purchase event when the user clicks the Buy button, the Analytics().logEvent() method logs the purchase details:
import Analytics from '@react-native-firebase/analytics';
import {View,Text, TouchableOpacity, TouchableHighlight} from 'react-native';
import Analytics from 'appcenter-analytics';

export default App(){
const __OnBuyButtonPressed= async()=>{
   await Analytics().logEvent('Purchase', { price: '9.99', type: 'cloth' });
}
return(
  <View>
        <TouchableHighlight  onPress={__OnBuyButtonPressed}>
          <View
            style={{
              flexDirection: "row",
              justifyContent: "space-around"
            }}
          >
            <Text style={styles.signInButtonTextStyle}>Continue</Text>
          </View>
        </TouchableHighlight>
      </View>
)}
As an example, if our app provides an ecommerce service or an online shop, Firebase offers specific methods to track online shop events, like the Add to Cart event, which uses the logAddToCart() method.
Other methods include:
logLogin() tracks the login eventlogAppOpen() is called when the app openslogShare() tracks share activities within the appYou can find all the other predefined Firebase methods here.
Because Firebase supports many cross-platform apps, Firebase methods are easy to use even when switching from one programming language to another. For example, working with the Firebase code and methods in Swift are the same as in JavaScript, making the transition easier.
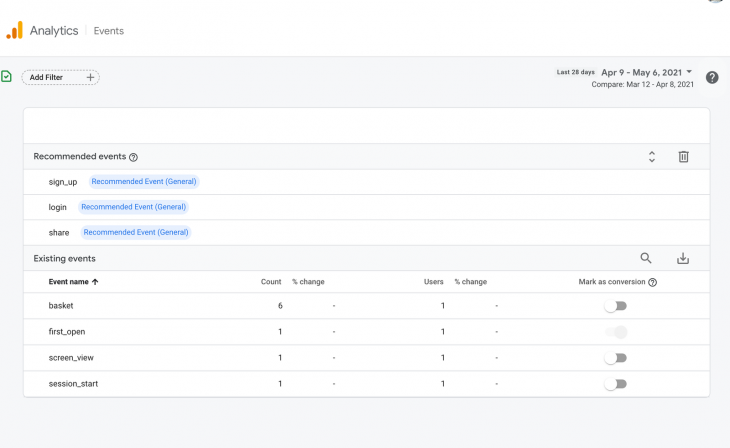
To find the methods we will use, let’s go to the event logs in the Events tab shown below.
We can also look at insights through Google Analytics itself. However, we must have the same account set up for Firebase as the Google Analytics account.
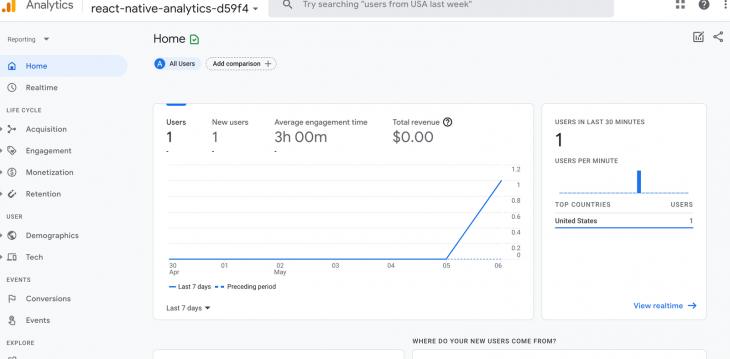
Segment is a data collector and analytics platform with API support for cross-platform and popular technologies like iOS, Android, .NET, and Python. By hosting data anywhere through a host of our choice, Segment can send collected data to its servers or any other supported Segment services like Google Analytics.
With Segment, we can fetch data using SQL queries like the following:
/*
@copyright https://github.com/segmentio/analytics-react-native
*/
select * from app.order_completed
order by price desc
One of the other benefits of using Segment is the ability to control data. If we want to focus on user privacy, for example, Segment allows us to control and set rules on what data should be collected, and classify and restrict access to specific types of data.
To install the analytics-react-native packages for Segment, we can use either Yarn or npm.
In this instance, we’ll use Yarn by installing the below code into our terminal:
yarn add @segment/analytics-react-native-firebase
// install pods
 cd ios && pod install
To initiate and connect with the Segment API, add the following code inside app.js or any other file using the Segment analytics module:
await analytics.setup('YOUR_WRITE_KEY', {
  // Record screen views automatically!
  recordScreenViews: true,
  // Record certain application events automatically!
  trackAppLifecycleEvents: true
})
Review Segment’s documentation to generate the write key.
We can then customize the setup, define how data is collected, and enable some platform-based functionalities, as shown in the code below:
// @ https://github.com/segmentio/analytics-react-native#cloud-based-connection-modes

import analytics from '@segment/analytics-react-native'
import firebase from '@segment/analytics-react-native-firebase'

analytics
    .setup('writeKey', {
        using: [mixpanel, firebase],
        recordScreenViews: true,
        trackAppLifecycleEvents: true,

        android: {
            flushInterval: 60000, // 60 seconds
            collectDeviceId: true
        },
        ios: {
            trackAdvertising: true,
            trackDeepLinks: true
        }
    })
    .then(() =>
        console.log('Analytics is ready')
    )
    .catch(err =>
        console.error('Something went wrong', err)
    )

analytics.track('Pizza Eaten')
analytics.screen('Home')
Let’s break down some properties and what they are meant for:
Using is an array of external analytics tools used with Segment which can send data to a third-party analytics service like Google AnalyticsrecordScreenViews tracks the number of times a screen is viewed by userstrackAppLifecycleEvents tracks app lifecycle events, like when the app is installed or if the app is in the background or in the foregroundAfter customizing the setup, we can start to dispatch the events using the Analytics.track() method:
analytics.track('Purchase',null,context:{price:"9.99",productType:"auto"})
analytics.screen('Product')
Segment offers many other tracking methods, such as analytics.identify(), which attaches an event to a specific user and can be helpful when tracking unique users:
# /*https://segment.com/docs/connections/sources/catalog/libraries/mobile/react-native/#tracking-methods */
analytics.identify("userId", {
  email: "[email protected]"
  name: "John Smith"
})
Because of its early and direct support in React Native, Facebook Analytics became one of the most popular React Native analytics tools. Unfortunately, the Facebook SDK for React Native is now deprecated, and will be no longer supported as of 30 June 2021. However, there is still a community fork available that you can use as an alternative: react-native-dbsdk-next.
With these popular analytics tools for React Native, there are benefits to each, yet choosing which tool to use depends on the type of project and the needs of that project. While Segment is optimal for controlling data and privacy, Google Analytics for Firebase has better support in React Native, and App Center Analytics has access to Azure features. With these analytics tools, their differing functionalities make analytics easier and more efficient for apps in React Native.

LogRocket's Galileo AI watches sessions for you and and surfaces the technical and usability issues holding back your React Native apps.
LogRocket also helps you increase conversion rates and product usage by showing you exactly how users are interacting with your app. LogRocket's product analytics features surface the reasons why users don't complete a particular flow or don't adopt a new feature.
Start proactively monitoring your React Native apps — try LogRocket for free.

@container scroll-state: Replace JS scroll listeners nowCSS @container scroll-state lets you build sticky headers, snapping carousels, and scroll indicators without JavaScript. Here’s how to replace scroll listeners with clean, declarative state queries.

Explore 10 Web APIs that replace common JavaScript libraries and reduce npm dependencies, bundle size, and performance overhead.

Russ Miles, a software development expert and educator, joins the show to unpack why “developer productivity” platforms so often disappoint.

Discover what’s new in The Replay, LogRocket’s newsletter for dev and engineering leaders, in the February 18th issue.
Would you be interested in joining LogRocket's developer community?
Join LogRocket’s Content Advisory Board. You’ll help inform the type of content we create and get access to exclusive meetups, social accreditation, and swag.
Sign up now