
Serverless architecture is one answer to the demand for scalable, efficient, and easily maintainable solutions in modern web development. NeonDB, a serverless PostgreSQL offering, stands out as a robust choice among the serverless databases available.
In this article, we’ll create a powerful and flexible GraphQL API by harnessing the combined capabilities of Prisma ORM, Apollo Server, and NeonDB’s serverless PostgreSQL. You can follow along with the project code and preview the live demo as we get started.
The Replay is a weekly newsletter for dev and engineering leaders.
Delivered once a week, it's your curated guide to the most important conversations around frontend dev, emerging AI tools, and the state of modern software.
There are many tools available to choose from in the serverless architecture ecosystem. So, why are we using this particular combination of tools?
NeonDB is an innovative serverless database solution that offers the power of PostgreSQL with the flexibility and cost-effectiveness of serverless computing. It eliminates the need for complex database management tasks, allowing developers to focus on crafting exceptional user experiences.
Leveraging Prisma ORM — a modern, type-safe database toolkit for Node.js and TypeScript — adds a layer of abstraction that simplifies database interactions. Meanwhile, Apollo Server facilitates the seamless integration of our GraphQL API.
So, we’ll set up a serverless PostgreSQL database with NeonDB, configure Prisma ORM for efficient data modeling, and implement Apollo Server to expose a GraphQL API.
By the end of this tutorial, you’ll have a functional and scalable GraphQL API as well as a deeper understanding of the powerful synergy between serverless databases and cutting-edge development tools. Let’s get started.
It’s easy to set up Neon’s serverless Postgres. There are just four steps:
Start by signing up for a NeonDB account. Navigate to the NeonDB website and follow the registration process. Once registered, log in to your NeonDB dashboard.
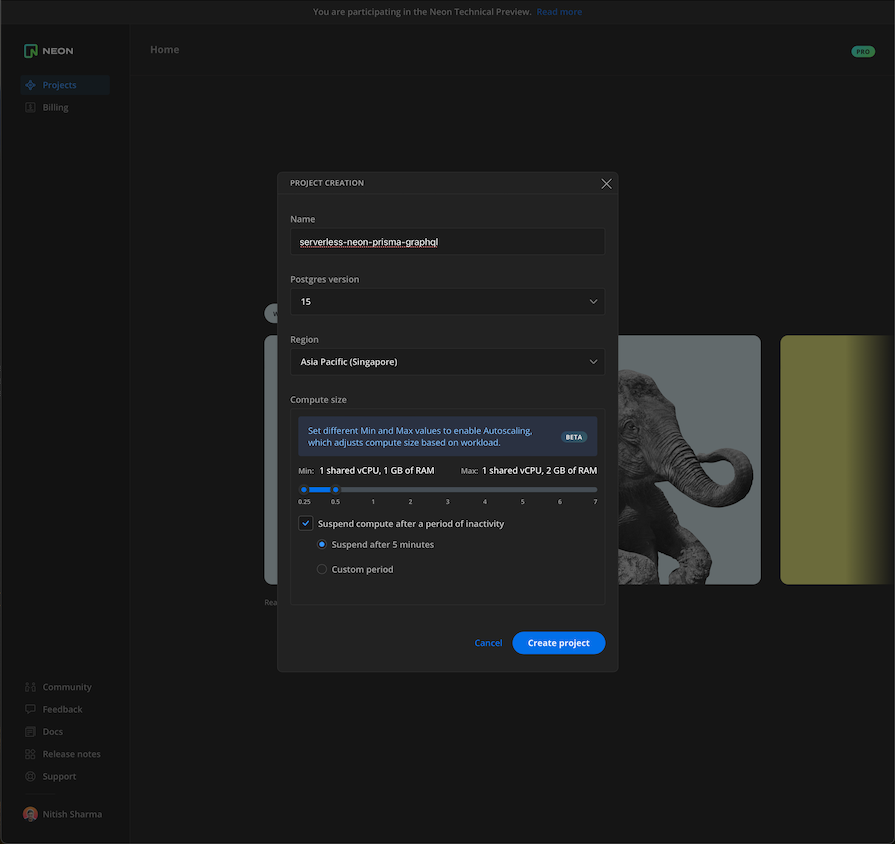
In your NeonDB dashboard, look for an option to create a new database instance. Provide a name for your database, choose the desired region for deployment, and configure any additional settings according to your project requirements:
Once your Neon database instance is set up, locate the connection details provided by NeonDB. This typically includes the endpoint URL, port, username, and password. You’ll need these details to connect your applications and services to the serverless Postgres instance:
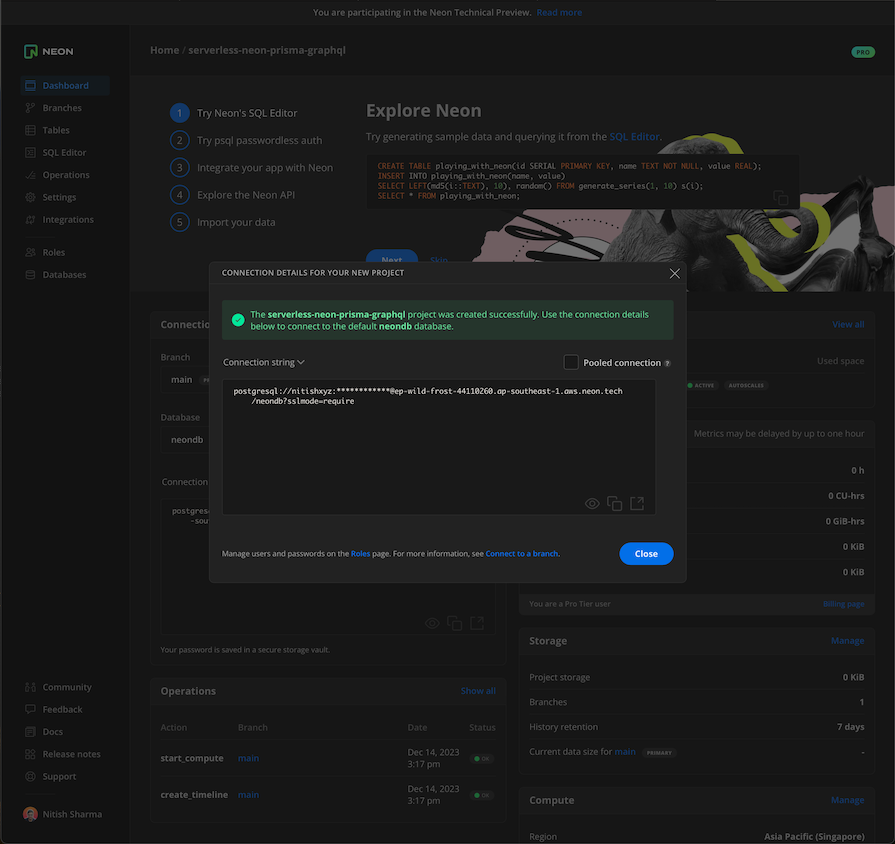
The image above shows an example of a direct connection to your database. You can also set up a pooled connection by checking the Pooled connection option:
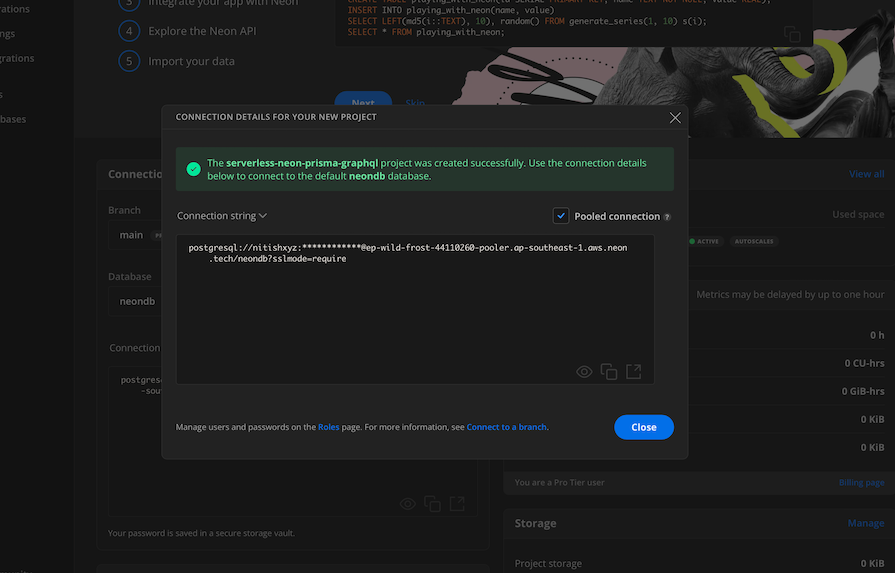
A direct connection opens a new connection with the database on every request, while a pooled connection caches the connection so it can be reused by multiple queries. We can only push migrations via direct connections, but to make queries and other requests, we should use a pooled connection.
Use the obtained connection details to connect to your NeonDB serverless Postgres instance from your development environment or server. You can use tools like psql or any PostgreSQL client library in your preferred programming language.
That’s all! Now that the dashboard is all set up, take some time to explore it. Familiarize yourself with the monitoring tools, performance metrics, and any additional features NeonDB provides for managing and optimizing your serverless Postgres database.
Create a new directory in a place that you prefer. For this article, we’re going to use serverless-neon-prisma-graphql as our directory name:
mkdir serverless-neon-prisma-graphql
Inside that directory, initialize a project using the following npm command:
npm init
Then, set the type key to module in your package.json file, which should look something like this:
{
  "name": "serverless-neon-prisma-graphql",
  "module": "index.js",
  "type": "module",
  "peerDependencies": {},
  "dependencies": {},
  "devDependencies": {}
}
Next, install and initialize TypeScript:
npm install typescript --save-dev
npx tsc --init
Now, install Prisma CLI as a development dependency to the project:
npm install prisma --save-dev
Set up Prisma with the init command, setting the provider to postgresql:
npx prisma init --datasource-provider postgresql
You should see the following output:
✔ Your Prisma schema was created at prisma/schema.prisma
  You can now open it in your favorite editor.

warn You already have a .gitignore file. Don't forget to add `.env` in it to not commit any private information.

Next steps:
1. Set the DATABASE_URL in the .env file to point to your existing database. If your database has no tables yet, read https://pris.ly/d/getting-started
2. Run prisma db pull to turn your database schema into a Prisma schema.
3. Run prisma generate to generate the Prisma Client. You can then start querying your database.

More information in our documentation: https://pris.ly/d/getting-started
This will create a .env file, which should look something like this:
# Environment variables declared in this file are automatically made available to Prisma.
# See the documentation for more detail: https://pris.ly/d/prisma-schema#accessing-environment-variables-from-the-schema

# Prisma supports the native connection string format for PostgreSQL, MySQL, SQLite, SQL Server, MongoDB and CockroachDB.
# See the documentation for all the connection string options: https://pris.ly/d/connection-strings

DATABASE_URL="postgresql://johndoe:randompassword@localhost:5432/mydb?schema=public"
Also, you’ll see a file schema.prisma with the following contents:
// This is your Prisma schema file,
// learn more about it in the docs: https://pris.ly/d/prisma-schema

generator client {
  provider = "prisma-client-js"
}

datasource db {
  provider = "postgresql"
  url      = env("DATABASE_URL")
}
Finally, install Prisma Client:
npm install @prisma/client
With that, our TypeScript project should be set up with Prisma.
Now that we’ve set up Prisma, the next crucial step is to establish the connection between Prisma and NeonDB, ensuring that our GraphQL API can seamlessly interact with the serverless Postgres instance.
First, let’s update the Prisma configuration. Open the prisma/schema.prisma file and ensure that the connection details match those of your NeonDB serverless Postgres instance. The configuration should look something like this:
// This is your Prisma schema file,
// learn more about it in the docs: https://pris.ly/d/prisma-schema

generator client {
  provider = "prisma-client-js"
}

datasource db {
  provider  = "postgresql"
  url       = env("DATABASE_URL") // This is the pooler connection string to your DB
  directUrl = env("DIRECT_DATABASE_URL") // This is the direct connection string to your DB
}
As you can see, we added a directUrl key to the datasource connector. This is because we will use a pooled connection for client queries and a direct connection for deploying migrations.
Next, we’ll update the .env file like so:
DATABASE_URL="postgresql://pooler-connection-string-from-neon?sslmode=require&connect_timeout=600&pgbouncer=true"
DIRECT_DATABASE_URL="postgresql://direct-connection-string-from-neon?sslmode=require&connect_timeout=300"
Be sure to configure your connection strings with the parameters at the end. Then, source your .env configuration in the terminal to apply these strings. This step is crucial, as it enables the app to access the database correctly using the specified parameters.
Now, we’ll add some basic schema definitions to our schema.prisma file. Update your schema so that it looks like this:
// This is your Prisma schema file,
// learn more about it in the docs: https://pris.ly/d/prisma-schema
generator client {
  provider      = "prisma-client-js"
}
datasource db {
  provider  = "postgresql"
  url       = env("DATABASE_URL") // This is the pooler connection string to your DB
  directUrl = env("DIRECT_DATABASE_URL") // This is the direct connection string to your DB
}
model User {
  id        Int      @id @default(autoincrement())
  email     String   @unique
  name      String?
  posts     Post[]
  createdAt DateTime @default(now())
  updatedAt DateTime @updatedAt
}
model Post {
  id        Int      @id @default(autoincrement())
  title     String
  content   String?
  published Boolean  @default(false)
  author    User?    @relation(fields: [authorId], references: [id])
  authorId  Int?
  createdAt DateTime @default(now())
  updatedAt DateTime @updatedAt
}
Next, we will deploy our migrations using the following command:
npx prisma migration dev -n initUserAndPost
You should see the following output for this command, which should tell us that our migrations have been created and applied, as well as that our database and schema have been synced:
Environment variables loaded from .env
Prisma schema loaded from prisma/schema.prisma
Datasource "db": PostgreSQL database "neondb", schema "public" at "connection-name.ap-southeast-1.aws.neon.tech"

Applying migration `20231214095829_init_user_and_post`

The following migration(s) have been created and applied from new schema changes:

migrations/
  └─ 20231214095829_init_user_and_post/
    └─ migration.sql

Your database is now in sync with your schema.

✔ Generated Prisma Client (v5.7.0) to ./node_modules/@prisma/client in 41ms
Congratulations, you’ve successfully deployed your first migration using Prisma to NeonDB Postgres.
Apollo Server is a versatile GraphQL server implementation developed by the team behind the Apollo GraphQL client. It simplifies the process of building, deploying, and managing GraphQL APIs, providing a flexible and feature-rich framework for creating robust, efficient, and extensible GraphQL APIs.
AWS Lambda is a serverless computing service that allows you to run code without provisioning or managing servers. It provides automatic scaling, cost efficiency, and the ability to run code in response to events, making it ideal for deploying GraphQL servers.
Deploying our GraphQL server on AWS Lambda allows us to leverage the benefits of serverless architecture, ensuring that resources are allocated only when needed. This means you only pay for the compute time consumed by your GraphQL requests.
We’re going to deploy Apollo Server to AWS Lambda for their combined benefits of serverless architecture, scalability, and cost efficiency. This approach leverages the strengths of both Apollo Server and AWS Lambda to create a highly performant and easily scalable GraphQL API.
Before we can get started with this step of our project, there are a few things you need to do:
Then, let’s begin by installing Apollo Server, GraphQL, and AWS Lambda integrations we need, like so:
npm install @apollo/server graphql @as-integrations/aws-lambda
Create a directory named src with the following command:
mkdir src
The src directory will organize our server code files. Inside src, create a new file named server.ts:
touch server.ts
This file will hold our Apollo Server configurations. Add the following basic server setup in the server.ts file:
import { ApolloServer } from '@apollo/server';

import { startServerAndCreateLambdaHandler, handlers } from '@as-integrations/aws-lambda';


const typeDefs = `#graphql
  type Query {
    test: String
  }
`;

const resolvers = {
  Query: {
    test: () => 'Hello World!',
  },
};

const server = new ApolloServer({
  typeDefs,
  resolvers,
});

export const graphqlHandler = startServerAndCreateLambdaHandler(
  server,
  handlers.createAPIGatewayProxyEventV2RequestHandler(),
);
This setup integrates Apollo Server with AWS Lambda, allowing us to trigger our GraphQL API by AWS Lambda functions. We initialized an Apollo Server with a simple GraphQL schema and query resolver, then exported a handler function that works with the AWS Lambda API Gateway integration.
Now that the basic configuration is done, we will create a deployment pipeline with Serverless Framework.
The Serverless Framework, or Serverless, is a powerful tool that simplifies the deployment and management of serverless applications. It’s an excellent choice for deploying Apollo Server on AWS Lambda. Let’s set up the Serverless Framework for our deployments.
We’ll start by configuring our Serverless services. We’re going to create a file named serverless.yml, which will be responsible for deploying our GraphQL server to AWS Lambda:
touch serverless.yml
Then, write the basic configuration for deployments as shown below:
service: apollo-lambda
provider:
  name: aws
  region: ${opt:region, 'ap-south-1'}
  runtime: nodejs18.x
  httpApi:
    cors: true
functions:
  graphql:
    # The format is: <FILENAME>.<HANDLER>
    handler: src/server.graphqlHandler # highlight-line
    events:
      - httpApi:
          path: /
          method: POST
      - httpApi:
          path: /
          method: GET
plugins:
  - serverless-plugin-typescript
You can change the region and runtime Node version according to your needs. However, the handler name must be in the following format:
filename.exportedHandlerName
In the above file, we’ve set our handler to src/server.graphqlHandler, where the file name is server.ts and the exported handler name is graphqlHandler — all of which we set up before.
Next, install the following Serverless plugin to set up TypeScript support:
npm install serverless-plugin-typescript --save-dev
Now, it’s time to update a couple of our files. First, let’s update our package.json file to the following:
{
  "name": "serverless-neon-prisma-graphql",
  "module": "serverless.ts",
  "type": "module",
  "peerDependencies": {
    "typescript": "^5.0.0"
  },
  "dependencies": {
    "@apollo/server": "^4.9.5",
    "@as-integrations/aws-lambda": "^3.1.0",
    "graphql": "^16.8.1",
    "@prisma/client": "^4.16.2"
  },
  "devDependencies": {
    "prisma": "^4.15.0",
    "serverless-plugin-typescript": "^2.1.5"
  }
}
In the initial package.json file, the dependencies, peerDependencies, and devDependencies were all empty. We installed these dependencies in the steps above. This file provides a reference regarding which versions of these packages we used as a fallback in case the next versions break anything.
Then, update the tsconfig.json file to include the serverless.ts file and exclude the .serverless/**/*/ folder:
{
  "compilerOptions": {
    "lib": ["ESNext"],
    "moduleResolution": "node",
    "noUnusedLocals": true,
    "noUnusedParameters": true,
    "removeComments": true,
    "sourceMap": true,
    "target": "ES2020",
    "outDir": "lib",
    "allowSyntheticDefaultImports": true
  },
  "include": ["src/*.ts", "serverless.ts"],
  "exclude": [
    "node_modules/**/*",
    ".serverless/**/*",
    ".webpack/**/*",
    "_warmup/**/*",
    ".vscode/**/*"
  ],
  "ts-node": {
    "require": ["tsconfig-paths/register"]
  }
}
Then, set up your AWS credentials in the following path:
~/.aws/credentials
The file should look like this, replacing the access key placeholders with your own access key IDs:
[default]
aws_access_key_id = your-access-key-id
aws_secret_access_key = your-access-key-id-secret
At this point, our server is set up. To test the server locally, we’ll need to create a file named query.json with the following contents:
{
  "version": "2",
  "headers": {
    "content-type": "application/json",
  },
  "isBase64Encoded": false,
  "rawQueryString": "",
  "requestContext": {
    "http": {
      "method": "POST",
    },
  },
  "rawPath": "/",
  "routeKey": "/",
  "body": "{\"operationName\": null, \"variables\": null, \"query\": \"{ test }\"}"
}
In this file, we added a JSON object that contains a basic GraphQL request with a basic query to the local server using the Serverless CLI. Invoke the following command to test the serverless config:
serverless invoke local -f graphql -p query.json
This command will use the payload from the query.json file and test it with our server setup. You should see the following output in your terminal:
{
  "statusCode": 200,
  "headers": {
    "cache-control": "no-store",
    "content-type": "application/json; charset=utf-8",
    "content-length": "28"
  },
  "body": "{\"data\":{\"Hello\":\"World!\"}}\n"
}
The output signifies that the GraphQL schema is correct and that the resolvers are working as well, as indicated by the Hello : World! that we should see.
Finally, to deploy, use the following command:
npx serverless deploy
With Apollo Server and our serverless config set up, our next step is to connect Apollo Server to Neon using Prisma. First, we will add serverless-dotenv-plugin so we can use the .env variables in AWS Lambda:
npm install serverless-dotenv-plugin --save-dev
Then, let’s update our serverless configuration to match the following:
service: apollo-lambda
provider:
  name: aws
  region: ${opt:region, 'ap-south-1'}
  runtime: nodejs18.x
  httpApi:
    cors: true
functions:
  graphql:
    # The format is: <FILENAME>.<HANDLER>
    handler: src/server.graphqlHandler # highlight-line
    events:
      - httpApi:
          path: /
          method: POST
      - httpApi:
          path: /
          method: GET
plugins:
  - serverless-plugin-typescript
  - serverless-dotenv-plugin
package:
  patterns:
    - "!node_modules/.prisma/client/libquery_engine-*"
    - "node_modules/.prisma/client/libquery_engine-rhel-*"
    - "!node_modules/prisma/libquery_engine-*"
    - "!node_modules/@prisma/engines/**"
In the above, we added a dotenv plugin so that env variables can be loaded. We also added patterns under package to exclude ! some parts of the generated Prisma client that are not required as well as include the file ending in rhel, as it matches AWS Lambda’s architecture.
Next, we need the prisma.schema file to be available at runtime, as it generates the client and types for our project. Create a file named template.yaml and add the following content:
Loader:
  - .prisma=file
  - .so.node=file
AssetNames: "[name]"
Add the following to your .env file to configure the Prisma CLI to use the correct binary targets for our project’s deployment environment:
PRISMA_CLI_BINARY_TARGETS=native,rhel-openssl-1.0.x
Now in our server.ts file, we’ll import and initialize the Prisma client:
import { PrismaClient } from "@prisma/client";

const prisma = new PrismaClient();
Then we’ll update our typeDefs in our GraphQL schema as shown below:
const typeDefs = `#graphql
  type Query {
    fetchUsers: [User]
  }
  type User {
    id: Int!
    name: String!
    email: String!
    posts: [Post]
  }
  type Post {
    id: Int!
    title: String!
    content: String!
    published: Boolean!
  }
  type Mutation {
    createUser(name: String!, email: String!): User!
    createDraft(title: String!, content: String!, authorEmail: String!): Post!
    publish(id: Int!): Post
  }
`;
Previously, we only had a test query to test our configuration without making actual calls to the database. Now we’ve added GraphQL types to make the data accessible from the resolvers. So, update the resolvers to resolve the above queries and mutations:
const resolvers = {
  Query: {
    fetchUsers: async () => {
      const users = await prisma.user.findMany({
        include: {
          posts: true,
        },
      });
      return users;
    },
  },
  Mutation: {
    // @ts-expect-error
    createUser: async (parent, args) => {
      const user = await prisma.user.create({
        data: {
          name: args.name,
          email: args.email,
        },
      });
      return user;
    },
    // @ts-expect-error
    createDraft: async (parent, args) => {
      const post = await prisma.post.create({
        data: {
          title: args.title,
          content: args.content,
          published: false,
        },
      });
      return post;
    },
  },
};
Also, we need to update our schema.prisma file to accomodate the AWS Lambda architecture. To do that, add the following to the generator configuration:
generator client {
  provider      = "prisma-client-js"
  binaryTargets = ["native", "rhel-openssl-1.0.x"]
}
This is a breaking change if you’re deploying from a Mac. To work around, that we’re going to set up GitHub Actions to create a deployment pipeline.
In a moment, we’re going to create workflow files that will deploy our GraphQL server to AWS Lambda using Serverless via GitHub actions. But first, let’s set up some repository secrets.
Head over to GitHub and create a repository if you haven’t already. Navigate to Settings > Secrets and variables > Actions:
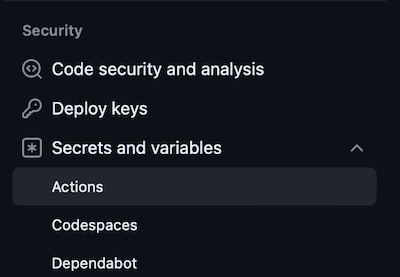
Then hit the New repository secret button to create one:

As a reminder, secrets are variables that you create in an organization, repository, or repository environment. In this case, we’re creating one for GitHub Actions so that these are not accessible to anyone else. Name your variable and add the secret value:
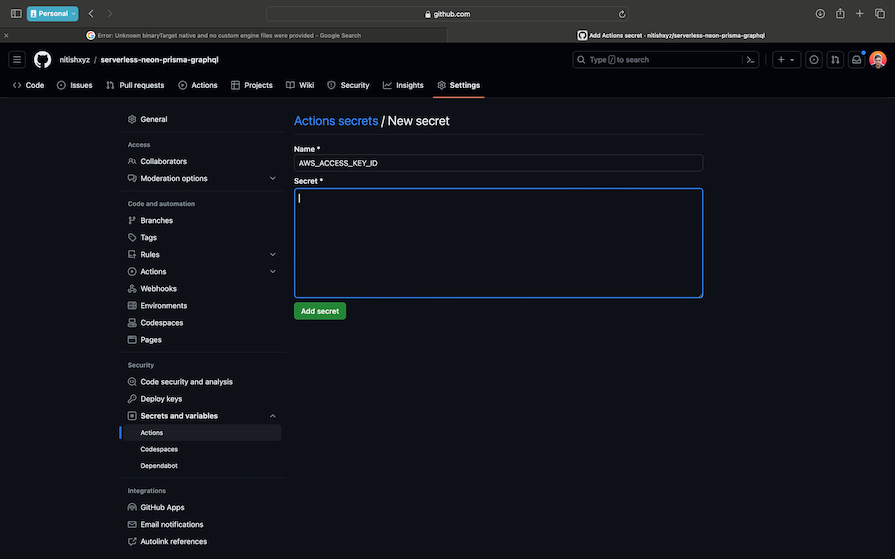
Add the following variables:
AWS_ACCESS_KEY_IDAWS_SECRET_ACCESS_KEYENVYou should see these environment variables now in your repository secrets:

Note that the ENV secret should hold your current .env contents. The other two should contain your AWS credentials to allow us to use aws-actions.
Now, let’s add some scripts to the package.json file to automate our deployment process:
"scripts": {
    "prisma:generate": "npx prisma generate",
    "build": "tsc",
    "deploy": "npm run prisma:generate && npm run build && npx serverless deploy"
},
Then, we’ll create a workflow file, which will trigger a GitHub action when we push new code to the main branch. Create a new directory called .github/workflows/ and then create a file in this directory called deploy.yml:

We need to use aws-actions/configure-aws-credentials to configure the root credentials for the npm script. This will allow us to deploy to the account with the configured credentials. Use the following config in the deploy.yml file:
name: CDK Deployment
on:
  push:
    branches:
      - main
jobs:
  deploy:
    runs-on: ubuntu-latest
    steps:
      - name: Checkout code
        uses: actions/checkout@v2
      - name: Configure AWS credentials
        uses: aws-actions/configure-aws-credentials@v1
        with:
          aws-access-key-id: ${{ secrets.AWS_ACCESS_KEY_ID }}
          aws-secret-access-key: ${{ secrets.AWS_SECRET_ACCESS_KEY }}
          aws-region: ap-south-1
      - name: Install dependencies
        run: npm install
      - name: Deploy infrastructure
        run: |
          export AWS_ACCESS_KEY_ID="${{ secrets.AWS_ACCESS_KEY_ID }}"
          export AWS_SECRET_ACCESS_KEY="${{ secrets.AWS_SECRET_ACCESS_KEY }}"
          # Use main account credentials
          echo "${{ secrets.ENV }}" > .env
          source .env
          npm run deploy
Now all we need to do is push our changes to the main branch and deployment will begin. Head over to the Actions tab in your repository to see the progress:
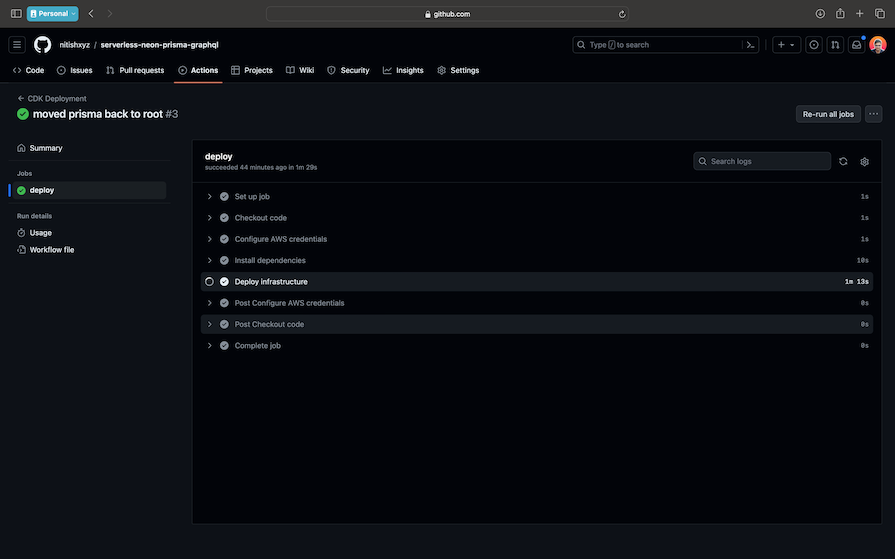
If you drop down the Deploy infrastructure item, you should be able to see the deployment URL:
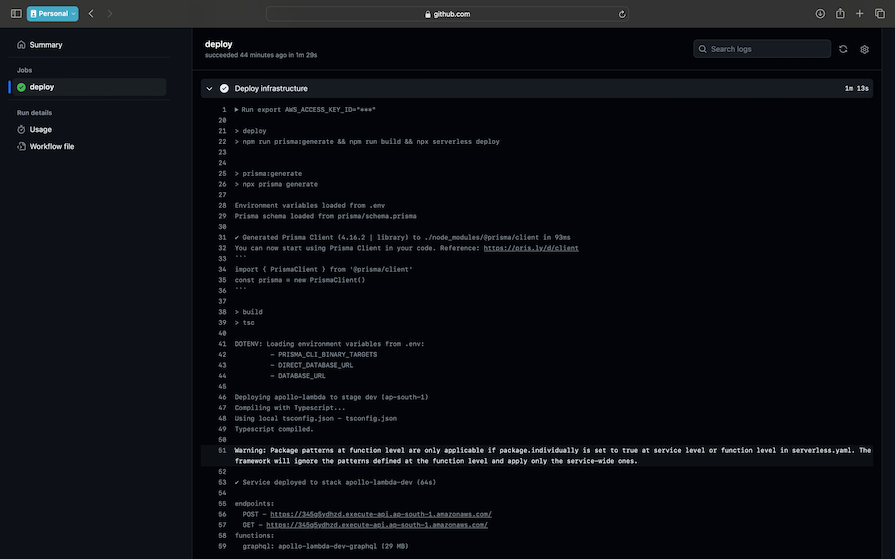
And with that, we’re all done. You can check out the live demo, where you should see the final deployment hosted over AWS Lambda:
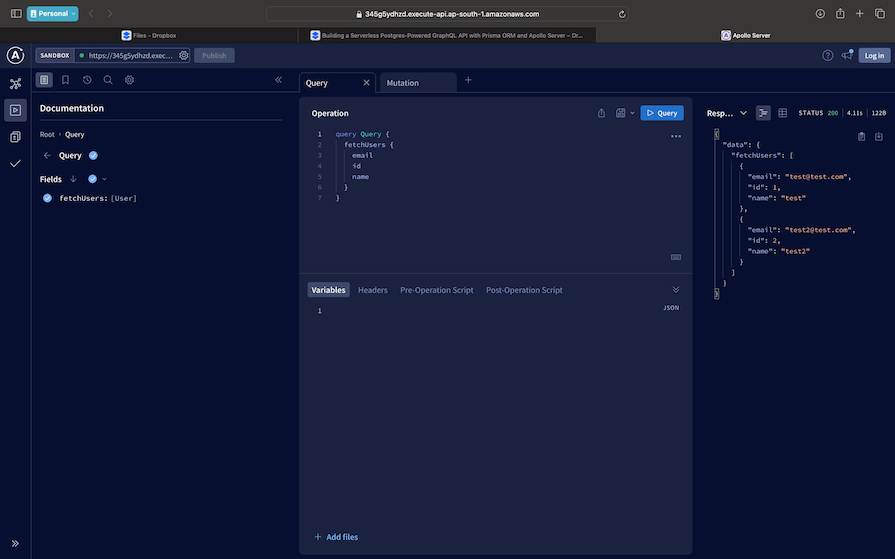
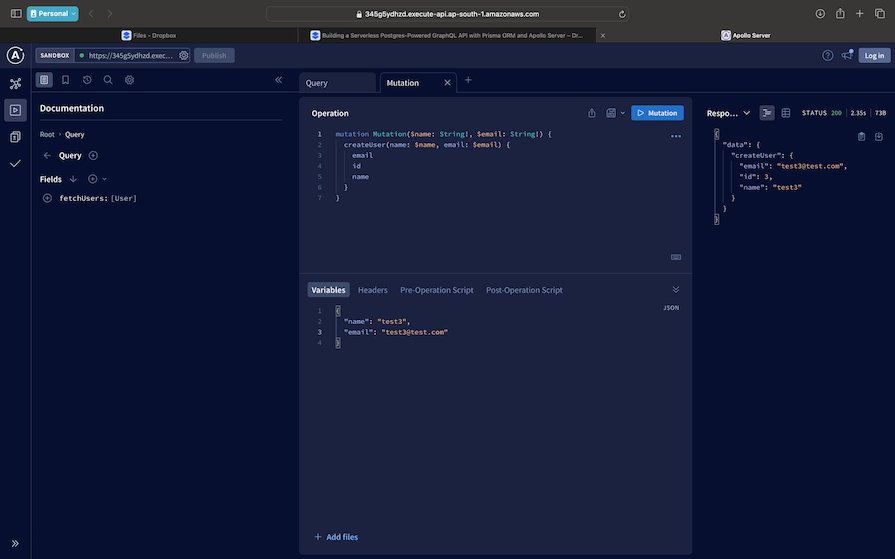
Apollo Studio self-documents the GraphQL schema that we have in the app. The screenshot above shows a query to list the users. The screenshot below shows a mutation with its outputs:
NeonDB, a serverless PostgreSQL solution, streamlines database-related tasks. Prisma ORM simplifies data modeling with its clean syntax, contributing to code readability and maintainability. Apollo Server seamlessly integrates GraphQL capabilities into applications, offering flexibility and efficiency.
In this tutorial, we combined the strengths of NeonDB, Prisma ORM, and Apollo Server within a serverless architecture to achieve a fully functional and scalable GraphQL API. We also used GitHub Actions to ensure a seamless and automated deployment.
Throughout this practical guide to creating a serverless GraphQL API, we also explored the significance of serverless databases, powerful ORM tools, and serverless deployment frameworks in modern web development. These tools allow us as developers to focus on creating superior user experiences.
You can check out the final project’s code in this repository. Feel free to comment below if you have any questions.
While GraphQL has some features for debugging requests and responses, making sure GraphQL reliably serves resources to your production app is where things get tougher. If you’re interested in ensuring network requests to the backend or third party services are successful, try LogRocket.


LogRocket lets you replay user sessions, eliminating guesswork around why bugs happen by showing exactly what users experienced. It captures console logs, errors, network requests, and pixel-perfect DOM recordings — compatible with all frameworks.
LogRocket's Galileo AI watches sessions for you, instantly aggregating and reporting on problematic GraphQL requests to quickly understand the root cause. In addition, you can track Apollo client state and inspect GraphQL queries' key-value pairs.

@container scroll-state: Replace JS scroll listeners nowCSS @container scroll-state lets you build sticky headers, snapping carousels, and scroll indicators without JavaScript. Here’s how to replace scroll listeners with clean, declarative state queries.

Explore 10 Web APIs that replace common JavaScript libraries and reduce npm dependencies, bundle size, and performance overhead.

Russ Miles, a software development expert and educator, joins the show to unpack why “developer productivity” platforms so often disappoint.

Discover what’s new in The Replay, LogRocket’s newsletter for dev and engineering leaders, in the February 18th issue.
Hey there, want to help make our blog better?
Join LogRocket’s Content Advisory Board. You’ll help inform the type of content we create and get access to exclusive meetups, social accreditation, and swag.
Sign up now