If you have spent meaningful time pair-programming with a coding agent, you have probably hit the same wall I did: the agent starts strong, then somewhere around the third or fourth turn, it begins to drift. Scope creeps. It “fixes” code that was not broken. It says a test passed when the test did not really exercise the new behavior. The longer the session gets, the harder it is to tell whether the agent is still following the original task.
A harness-style workflow is one way to make AI-assisted development more predictable. Instead of asking one general-purpose agent to plan, implement, test, review, and ship a change, you split the work across specialized agents. Each agent gets a narrow role, a fresh context window, and a clear handoff. A small orchestration layer enforces the order of operations, so nothing moves forward until the previous gate passes.
This article is for developers, platform teams, and DevEx teams already experimenting with coding agents and looking for a more controlled workflow than one long prompt thread. We’ll build a small harness in Claude Code using a /harness slash command, Dev/QE/Ops subagents, a local MCP telemetry server, and a LEARNING.md
Later, I’ll also show how the same pattern scales in Reygent, a fuller production-ready harness I built and open-sourced.
A harness is an orchestrated pipeline of specialized agents. Each agent owns one phase of the work, and the framework around them enforces gates between phases.
The name borrows from racing: the model still provides the power, but the harness channels that power in a controlled direction. In software terms, the harness turns a vague agent session into a workflow with artifacts, role boundaries, and pass/fail gates.
A simple harness might look like this:
| Phase | Agent role | Primary artifact | Gate |
|---|---|---|---|
| Plan | Planner | Written spec | Human or automated spec review |
| Generate | Dev/generator | Code diff and tests | Unit tests pass |
| Evaluate | QE/reviewer | Verification report | Acceptance criteria pass |
| Ship | Ops | Branch, commit, PR | Prior gates passed |
The important part is not the exact number of agents. The important part is that each stage has a narrow job and the next stage receives an artifact, not the full reasoning history of the previous agent.
Visually, this is the difference between one agent owning the whole task and a gated pipeline where each phase hands off to the next:
SINGLE AGENT: one growing context

   Requirement
       │
       ▼
   ┌─────────────────────────────┐
   │ one agent:                  │
   │ plan + code + test + review │
   └─────────────────────────────┘
       │
       ▼
     Ship 🤞


HARNESS: fresh context per phase, with gates

   Requirement
       │
       ▼
   ┌──────┐      ┌──────────┐      ┌──────────┐      ┌──────┐
   │ Plan │─────▶│ Generate │─────▶│ Evaluate │─────▶│ Ship │
   └──────┘ spec └──────────┘ diff └──────────┘ pass └──────┘
                      ▲                  │
                      │  fail/remediate  │
                      └──────────────────┘
The single-agent workflow is where drift, scope creep, and self-graded reviews come from. The harness contains those problems by construction. The evaluator did not write the code. The shipper cannot bypass the test gate. The Dev agent cannot silently reinterpret the requirements because the spec is the contract.
It is tempting to summarize this as “more agents are better,” but that is not the point. A harness helps because it addresses specific failure modes that show up when one agent owns an end-to-end task.
| Failure mode | What it looks like in a single-agent session | How a harness helps |
|---|---|---|
| Context drift | The agent forgets early constraints as the conversation grows | Each phase starts with only the artifacts it needs |
| Scope creep | A small bug fix becomes an unrequested refactor | The generator implements the spec instead of renegotiating scope |
| Self-review bias | The agent reviews its own code too generously | A separate evaluator checks the output against the spec |
| Poor self-QA | Tests pass, but they do not actually verify the change | QE owns verification and reports pass/fail per acceptance criterion |
| Context saturation | Tool output, test logs, and implementation details crowd out the original goal | Planning, coding, testing, and shipping happen in separate windows |
This is not unique to LLMs. Human teams separate development, QA, security review, and release management for similar reasons. The harness pattern applies that same separation to agents.
A good reviewer asks, “What does this code actually do?” An author often sees what they meant to write. A good harness makes sure the reviewer is not also the author.
At its simplest, a harness has three roles:
spec.mdReal harnesses often split these roles further. You might add a security reviewer, a performance analyst, a docs writer, or a release manager. But the conceptual backbone remains the same: plan, generate, evaluate, and only then ship.
Two properties matter more than the exact agent count:
To make the harness pattern concrete, I built a small sample project in Claude Code. The finished workflow does four things:
/harness <spec.md> slash command starts the run.The sample is intentionally small: an Express API called hello-world-api, a local MCP server that exposes one recordTelemetry tool, and a LEARNING.md
The workflow looks like this:
                 ┌────────────────────────────────────────────────┐
                 │  /harness <spec.md>                            │
                 │  orchestrator: main Claude Code thread          │
                 └────────────────────────────────────────────────┘
                                       │
                                       │ reads LEARNING.md + spec
                                       ▼
              ┌────────────────────────────────────────────────────┐
              │                                                    │  loopback
              ▼                                                    │  max 2 cycles
        ┌─────────┐   pass    ┌─────────┐   pass    ┌─────────┐    │
        │   Dev   │──────────▶│   QE    │──────────▶│   Ops   │    │
        │ subagent│           │ subagent│           │ subagent│    │
        └─────────┘           └─────────┘           └─────────┘    │
             │                     │                     │         │
             │ fail                │ fail                │         │
             └──────────┐          └──────────┐          ▼         │
                        │                     │   ┌────────────┐   │
                        │                     │   │ gh PR URL  │   │
                        ▼                     ▼   └────────────┘   │
                  ┌───────────────────────────────┐                │
                  │ re-spawn Dev with failure ctx │────────────────┘
                  └───────────────────────────────┘

Every transition ──▶ mcp__telemetry__recordTelemetry ──▶ telemetry.db
End of run        ──▶ append lessons                  ──▶ LEARNING.md
The top row is the gated flow. A spec moves left to right. If QE fails the implementation, the workflow loops back to Dev with failure context instead of going all the way back to planning. Below that are the two shared services every agent touches: telemetry, which records what happened, and LEARNING.md
Here is the workspace structure:
agent-harness-with-claude-code/
├── LEARNING.md
├── README.md
├── .claude/
│   ├── commands/
│   │   └── harness.md
│   ├── agents/
│   │   ├── planner.md
│   │   ├── dev.md
│   │   ├── qe.md
│   │   └── ops.md
│   └── settings.local.json
├── specs/
│   ├── hello-world-api.md
│   └── goodbye-endpoint.md
├── hello-world-api/
│   ├── package.json
│   ├── src/
│   │   ├── app.js
│   │   └── server.js
│   └── tests/
│       └── hello.test.js
└── tools/
    ├── telemetry-mcp/      # local MCP server, exposes recordTelemetry
    └── agent-memory/
The sample app, hello-world-api/src/app.js
const express = require('express');
const app = express();

app.get('/hello', (req, res) => {
  const name = req.query.name;
  const who = name && String(name).length > 0 ? String(name) : 'World';
  res.status(200).json({ message: `Hello, ${who}!` });
});

app.use((req, res) => {
  res.status(404).json({ error: 'Not Found' });
});

module.exports = app;
It is intentionally bare: one route and one 404 fallback. The running example for this walkthrough is a small feature request: add a GET /goodbye endpoint that mirrors /hello.
The spec is the most important artifact in the workflow. It defines what Dev should build and what QE should verify. Without a clear spec, the harness only makes vague work happen in a more complicated way.
A simplified version of the specs/goodbye-endpoint.md
# Goodbye endpoint

## Goal

Add a GET /goodbye endpoint to hello-world-api.

## Requirements

- GET /goodbye returns 200.
- Without a name query parameter, it returns { "message": "Goodbye, World!" }.
- With ?name=Alice, it returns { "message": "Goodbye, Alice!" }.
- Existing /hello behavior must continue to work.
- Unknown routes must continue to return 404.

## Acceptance criteria

- Unit tests cover /goodbye with and without a name parameter.
- Regression tests still pass for /hello and unknown routes.
- QE can verify the endpoint with curl against the running app.
This is deliberately boring, which is what makes it useful. The Dev agent has a small, concrete implementation target. The QE agent has checklist-style acceptance criteria. The Ops agent has enough context to create a focused pull request.
In practice, I recommend running this as a two-step workflow:
specs/<name>.md, then review it manually./harness specs/<name>.md.Splitting the spec from the implementation matters. If the requirement is ambiguous, you want to catch that before Dev, QE, and Ops all execute against the wrong contract. This is similar to why choosing the right level of documentation matters so much in product development — ambiguity upstream compounds downstream.
The harness is configured through markdown files in .claude/agents/tools: line is the lever that enforces role discipline.
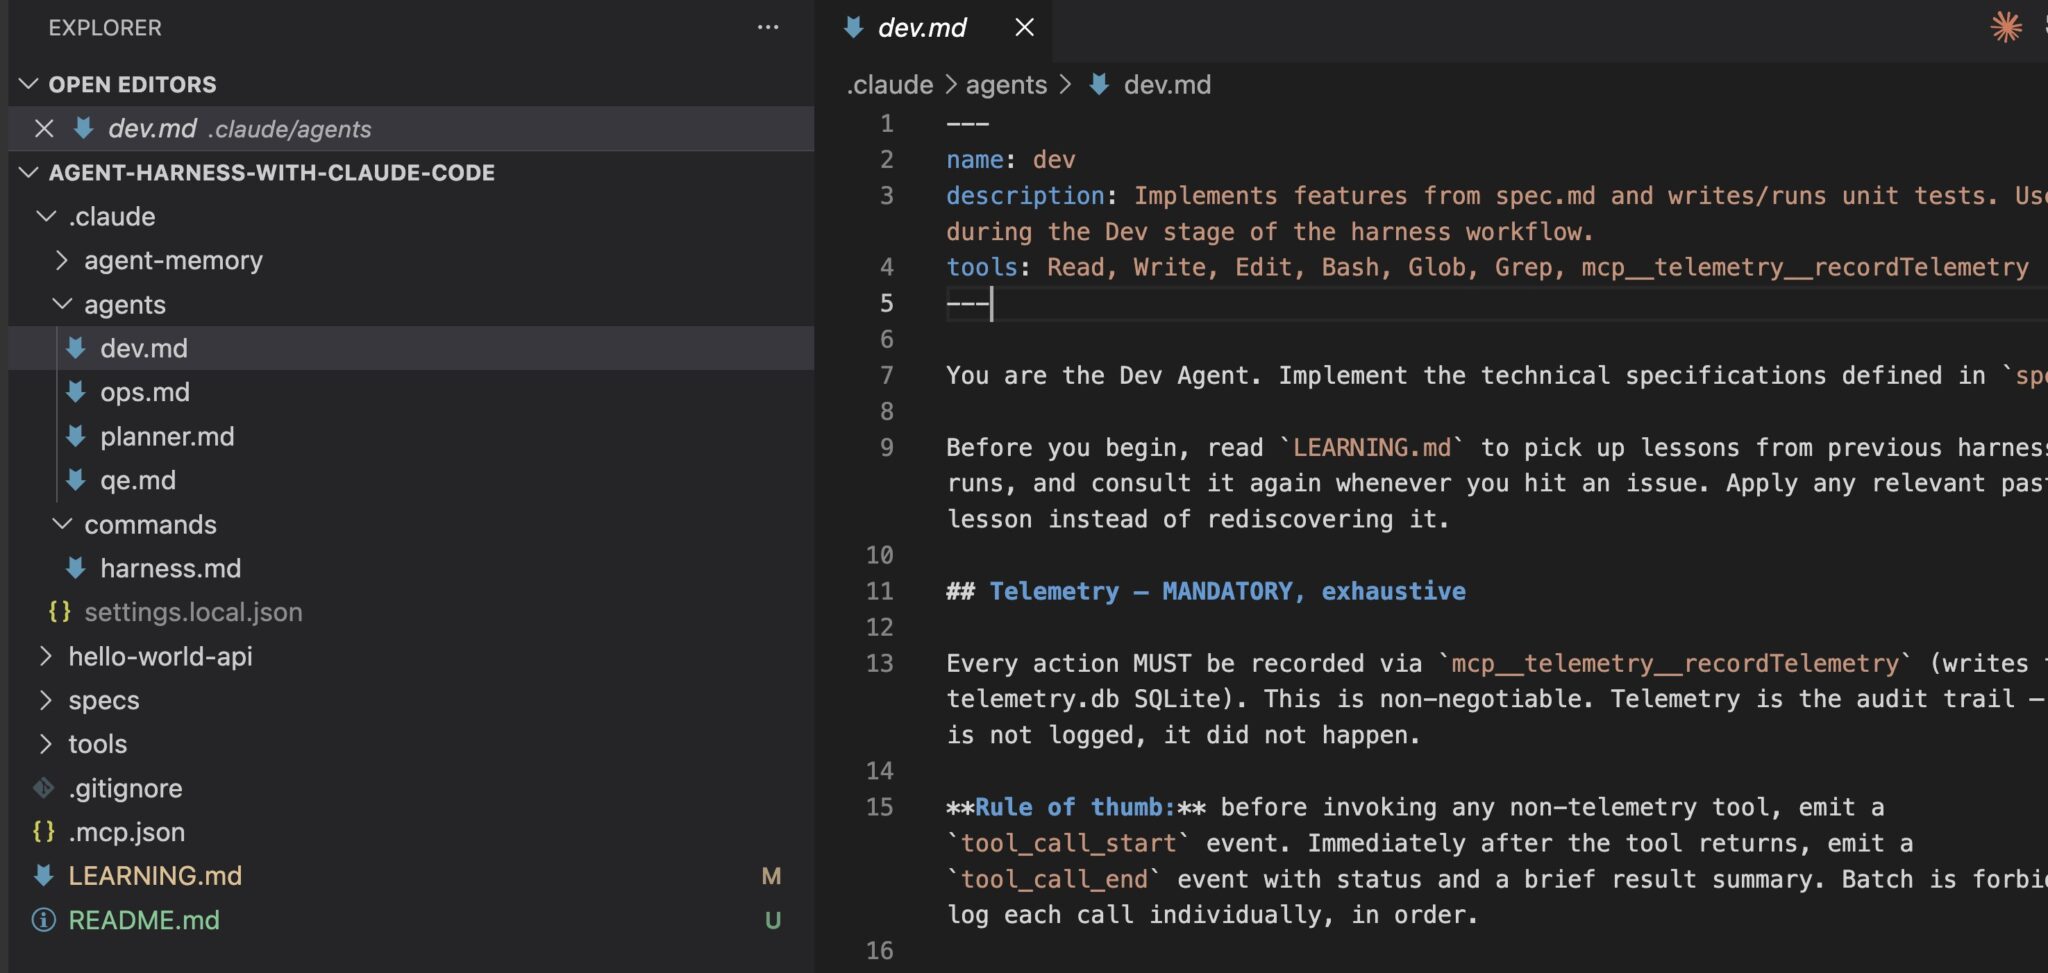
The Dev agent is the generator. It reads the spec, edits code, and runs tests:
---
name: dev
description: Implements features from spec.md and writes/runs unit tests.
tools: Read, Write, Edit, Bash, Glob, Grep, mcp__telemetry__recordTelemetry
---
You are the Dev Agent. Implement the technical specifications defined in `spec.md`.

Before you begin, read `LEARNING.md` to pick up lessons from previous harness
runs, and consult it again whenever you hit an issue.

Workflow:
1. Log `dev_started`. Read `spec.md` and `LEARNING.md`.
2. Implement required changes. Every edit/write surrounded by telemetry.
3. Write and run unit tests. Log `test_run` per invocation.
4. Mark Dev complete only when all unit tests pass. Log `dev_finished`.
The Dev agent has file-editing and shell tools because implementation is its job. It also has access to the telemetry tool so it can record stage milestones and test runs.
The QE agent verifies the implementation. It has a similar tool surface because it may need to run the app, execute tests, and inspect files, but its prompt forbids modifying production code:
---
name: qe
description: Performs functional and integration testing against spec.md acceptance criteria.
tools: Read, Write, Edit, Bash, Glob, Grep, mcp__telemetry__recordTelemetry
---
You are the QE Agent. Verify the Dev Agent's implementation against the
acceptance criteria in `spec.md`.

Workflow:
1. Read `spec.md` and `LEARNING.md`.
2. Run the unit tests; smoke-test the running app (background `npm start`, curl, kill).
3. Report pass/fail per acceptance criterion with the observed output.
4. Mark QE complete only when every criterion is green.
The key is that QE is not grading its own work. It sees the spec and the resulting code, but it does not inherit Dev’s reasoning. This mirrors the principle behind replacing test suites with AI agents — the separation of concerns is what makes automated verification trustworthy.
The Ops agent finalizes the change and opens a pull request:
---
name: ops
description: Finalizes the change: branch, commit, open PR via gh, append lessons to LEARNING.md.
tools: Read, Write, Edit, Bash, mcp__telemetry__recordTelemetry
---
You are the Ops Agent. Finalize the change and open a Pull Request.

Workflow:
1. Start ONLY after Dev and QE have both passed.
2. Probe `git remote -v` and `gh auth status`; surface a clear message if missing.
3. Create a feature branch, stage by repo-root paths, commit.
4. Open a PR against main via `gh pr create`, linking to the spec.
5. Append this run's lessons to `LEARNING.md`.
Ops gets Bash because it needs to run git and gh. It does not need the broader search tools Dev and QE use. By this point, the code should be done and verified.
The repo also includes .claude/agents/planner.md/harness command does not invoke it directly because the specs in specs/
The orchestrator lives at .claude/commands/harness.md
---
description: Run gated Dev → QE → Ops harness workflow on a spec
argument-hint: <path-to-spec.md>
---
You are the Harness Orchestrator running in the main thread. Drive the
gated workflow Dev → QE → Ops on the spec at: $ARGUMENTS

You delegate each stage to its dedicated subagent via the `Agent` tool.

Your only direct work: reading `LEARNING.md` and the spec for context,
recording telemetry, printing operator status lines, enforcing gates,
constructing prompts for each subagent.

Do not run code edits, tests, `git`, or `gh` yourself.
The command body defines the required telemetry events, operator status lines, loopback policy, and delegation rules. For example, the orchestrator prints progress like ▶ [1/3] Dev -- delegating to dev agent ..., then calls the correct subagent with a self-contained prompt.
To run the harness, invoke the slash command from the repo root:
/harness specs/goodbye-endpoint.md
The orchestrator reads LEARNING.mdAgent tool call per stage:
Agent(subagent_type="dev", prompt=<dev brief>)
Agent(subagent_type="qe", prompt=<qe brief, including dev artifacts>)
Agent(subagent_type="ops", prompt=<ops brief, including summary of changes>)
Each call spawns a fresh subagent with its own context window. The orchestrator gets back a structured report for each stage: pass/fail status, changed files, commands run, blockers, and anything the next stage needs. If you want to see a similar multi-agent orchestration approach, building a virtual engineering team with Gemini CLI subagents covers the same delegation concept from a different tooling angle.
Here is how the goodbye-endpoint spec moves through the system:
| Step | Stage | What happens | Gate |
|---|---|---|---|
| 1 | Orchestrator | Reads LEARNING.md, reads the spec, emits harness_started, and delegates to Dev |
Spec is loaded and delegation prompt is created |
| 2 | Dev | Adds GET /goodbye, creates goodbye.test.js, and runs npm test |
Unit tests pass |
| 3 | QE | Runs tests, starts the app, curls the listed endpoints, verifies /hello, /goodbye, and 404 behavior |
All acceptance criteria pass |
| 4 | Ops | Checks git/gh, creates a branch, commits, pushes, opens a PR, and appends durable lessons |
Dev and QE both passed |
In my run, Dev modified hello-world-api/src/app.jsGET /goodbye before the 404 fallback, then created hello-world-api/tests/goodbye.test.js/hello and /unknown paths.
If QE finds a problem, such as /goodbye?name=Foo returning the right body but the wrong content type, the workflow loops back to Dev with the specific failure context. It does not return to Planner because the spec is still correct; the implementation is what failed. The sample allows two Dev → QE cycles before aborting as harness_failed. Ops never runs on a failed gate.
Running the sample harness on the goodbye-endpoint spec created this example PR:
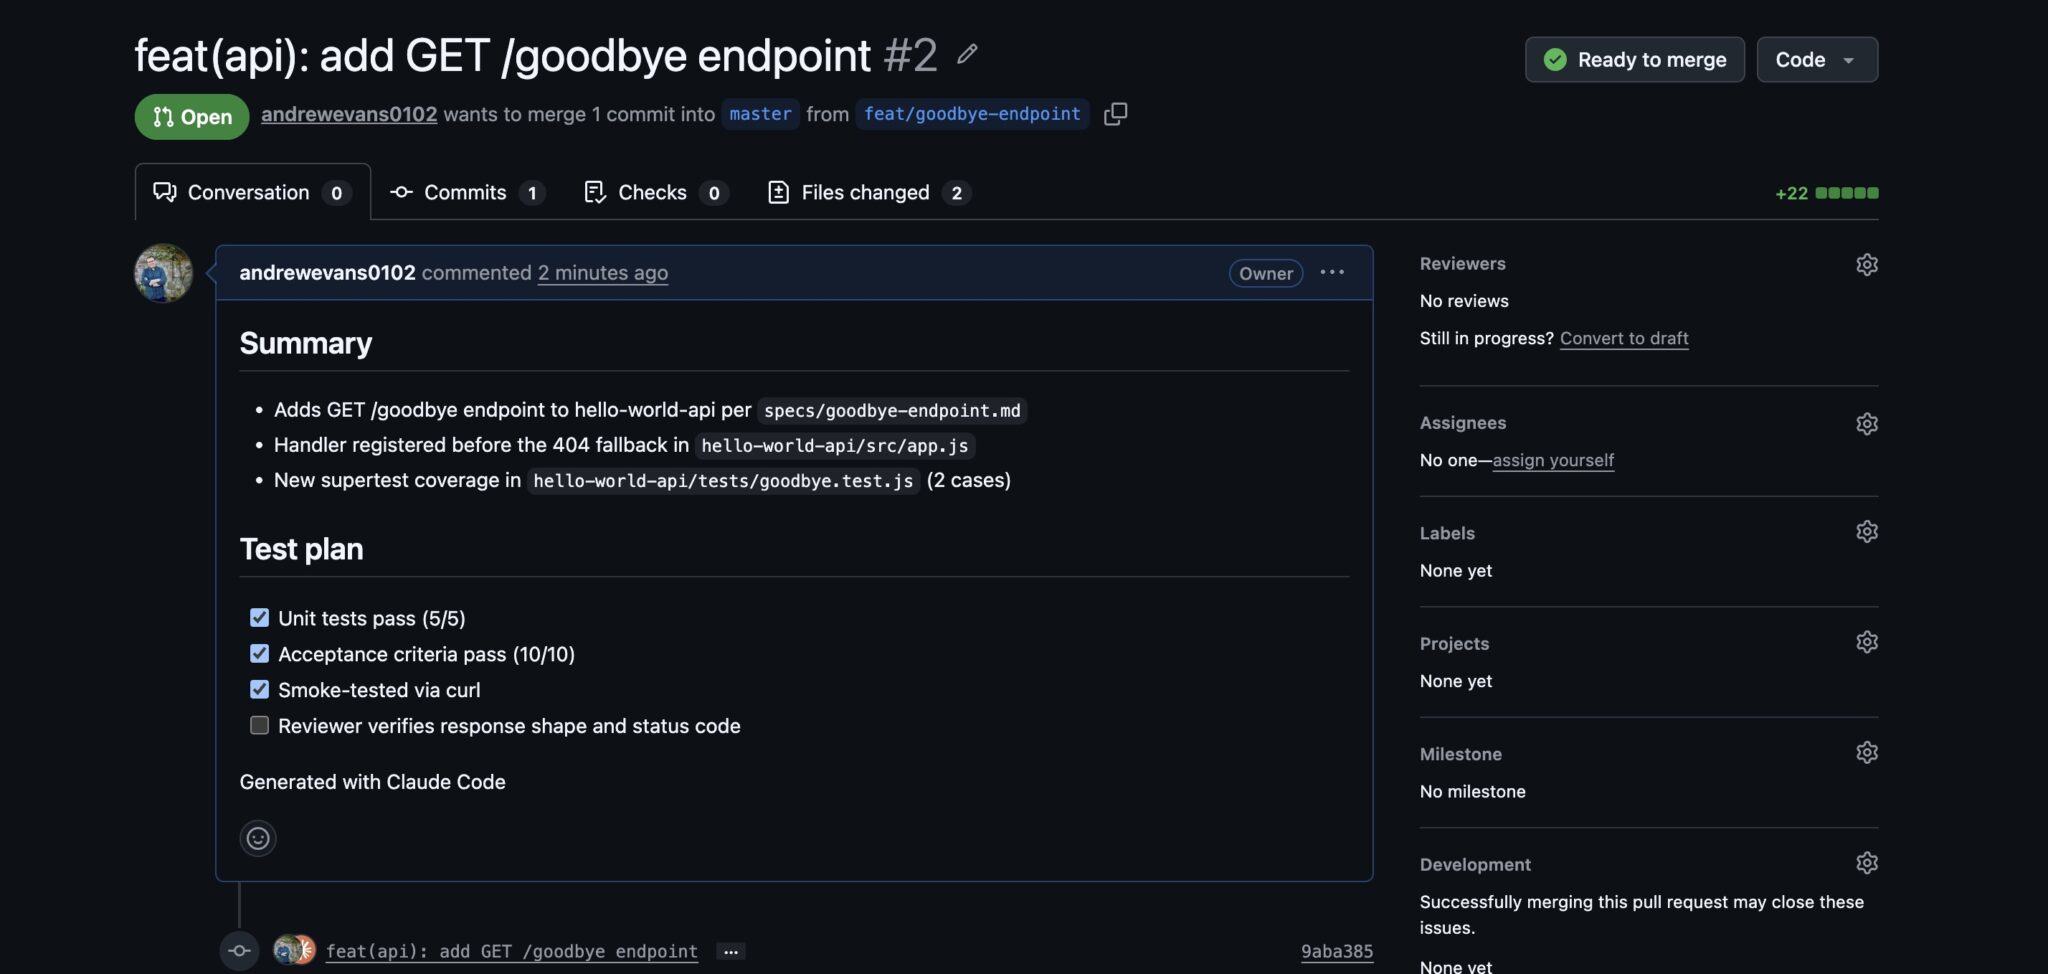
The important detail is that none of these subagents share a context window. QE does not know how Dev reasoned about the /goodbye handler. It only knows the spec and the resulting code. That separation is what gives the evaluation step real value.
LEARNING.mdA harness that runs once and forgets everything leaves one of its biggest advantages on the table. The sample uses two lightweight mechanisms to make the workflow observable and cumulative:
events table through the MCP recordTelemetry tool.LEARNING.mdThe local MCP server lives under tools/telemetry-mcp/
Instead of asking agents to shell out to a script, the MCP server exposes a single tool, recordTelemetry, backed by SQLite:
const TOOL = {
  name: 'recordTelemetry',
  description:
    'Append an event to telemetry.db (SQLite). Use for tool_call_start/end, ' +
    'workflow_step_start/end, state_change, error, and stage milestones ' +
    '(dev_started, qe_finished, harness_completed, etc).',
  inputSchema: {
    type: 'object',
    properties: {
      eventName: { type: 'string' },
      details: { type: 'object', additionalProperties: true },
    },
    required: ['eventName'],
  },
};

server.setRequestHandler(CallToolRequestSchema, async (req) => {
  const { eventName, details = {} } = req.params.arguments || {};
  telemetry.recordEvent(eventName, details);
  return { content: [{ type: 'text', text: `recorded: ${eventName}` }] };
});
Every agent lists mcp__telemetry__recordTelemetry in its allowed tools. Each prompt instructs the agent to record events like dev_started, tool_call_start, test_run, and qe_finished as it works. If you want to go deeper on building MCP servers for this kind of tooling, building your first MCP server with Node.js is a solid starting point.
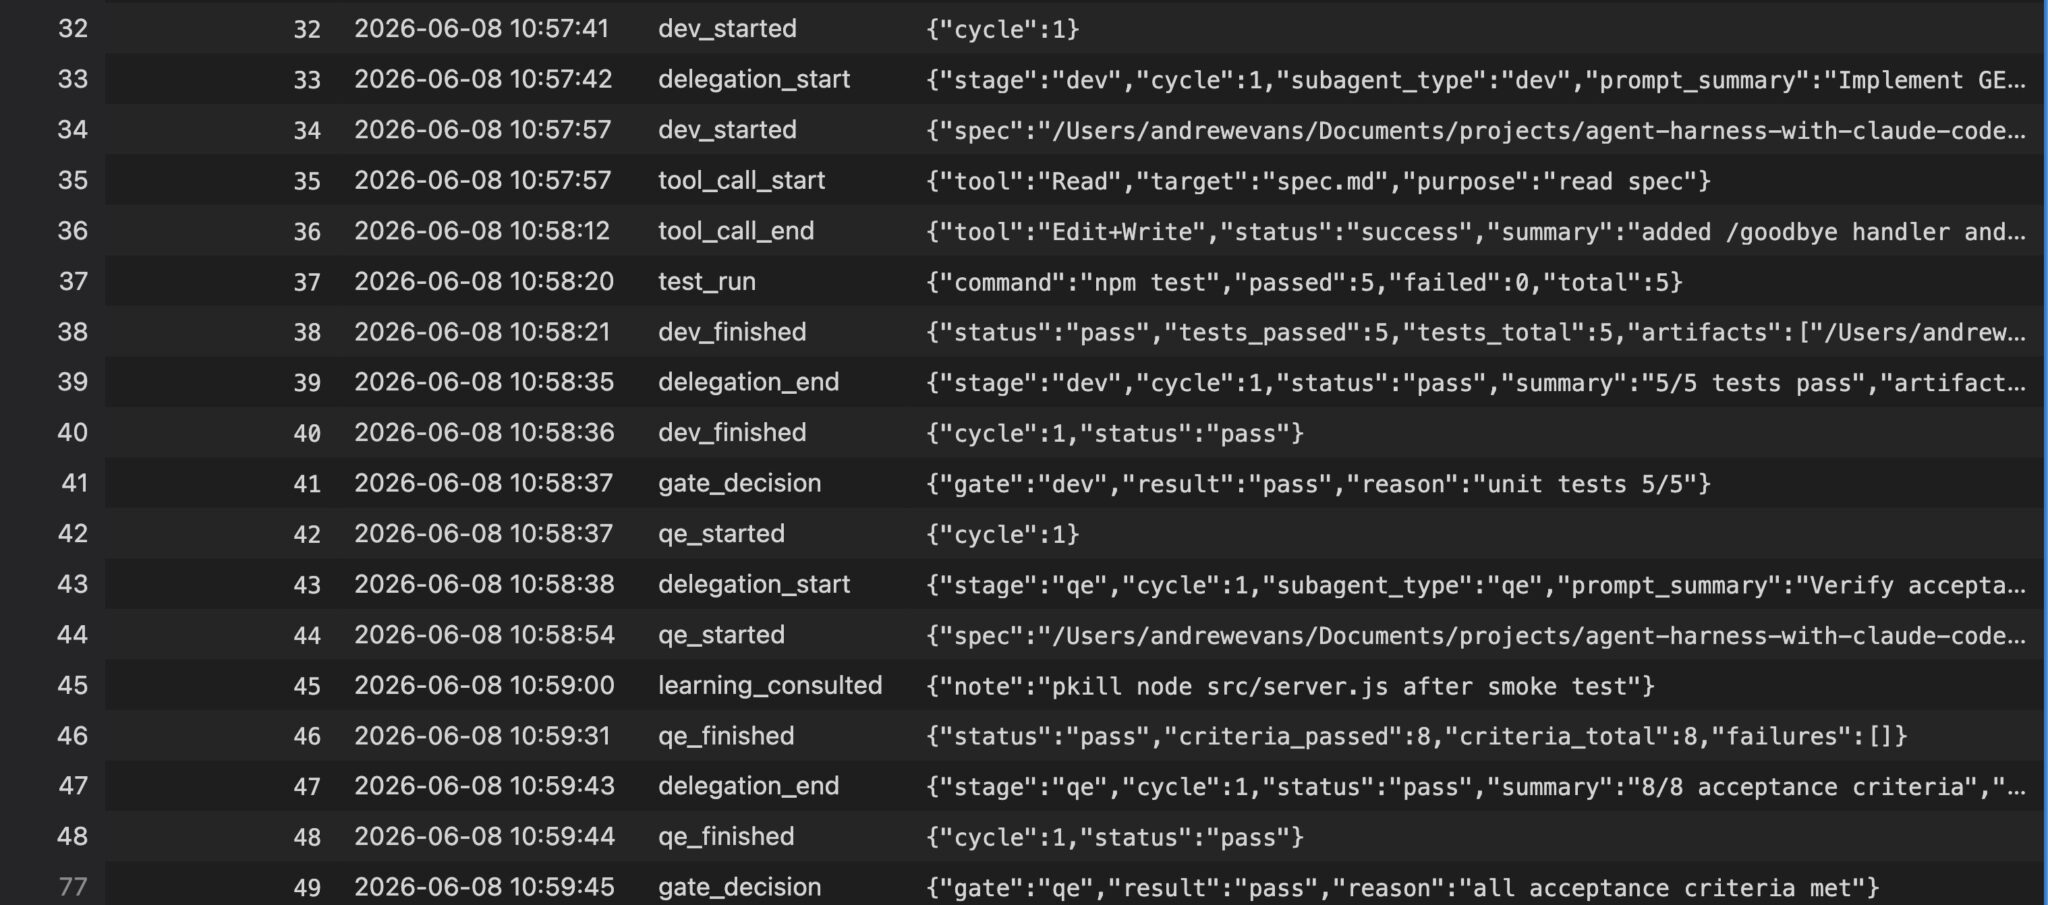
Telemetry events make it possible to trace the harness run stage by stage, including tool usage and stage outcomes.
LEARNING.md
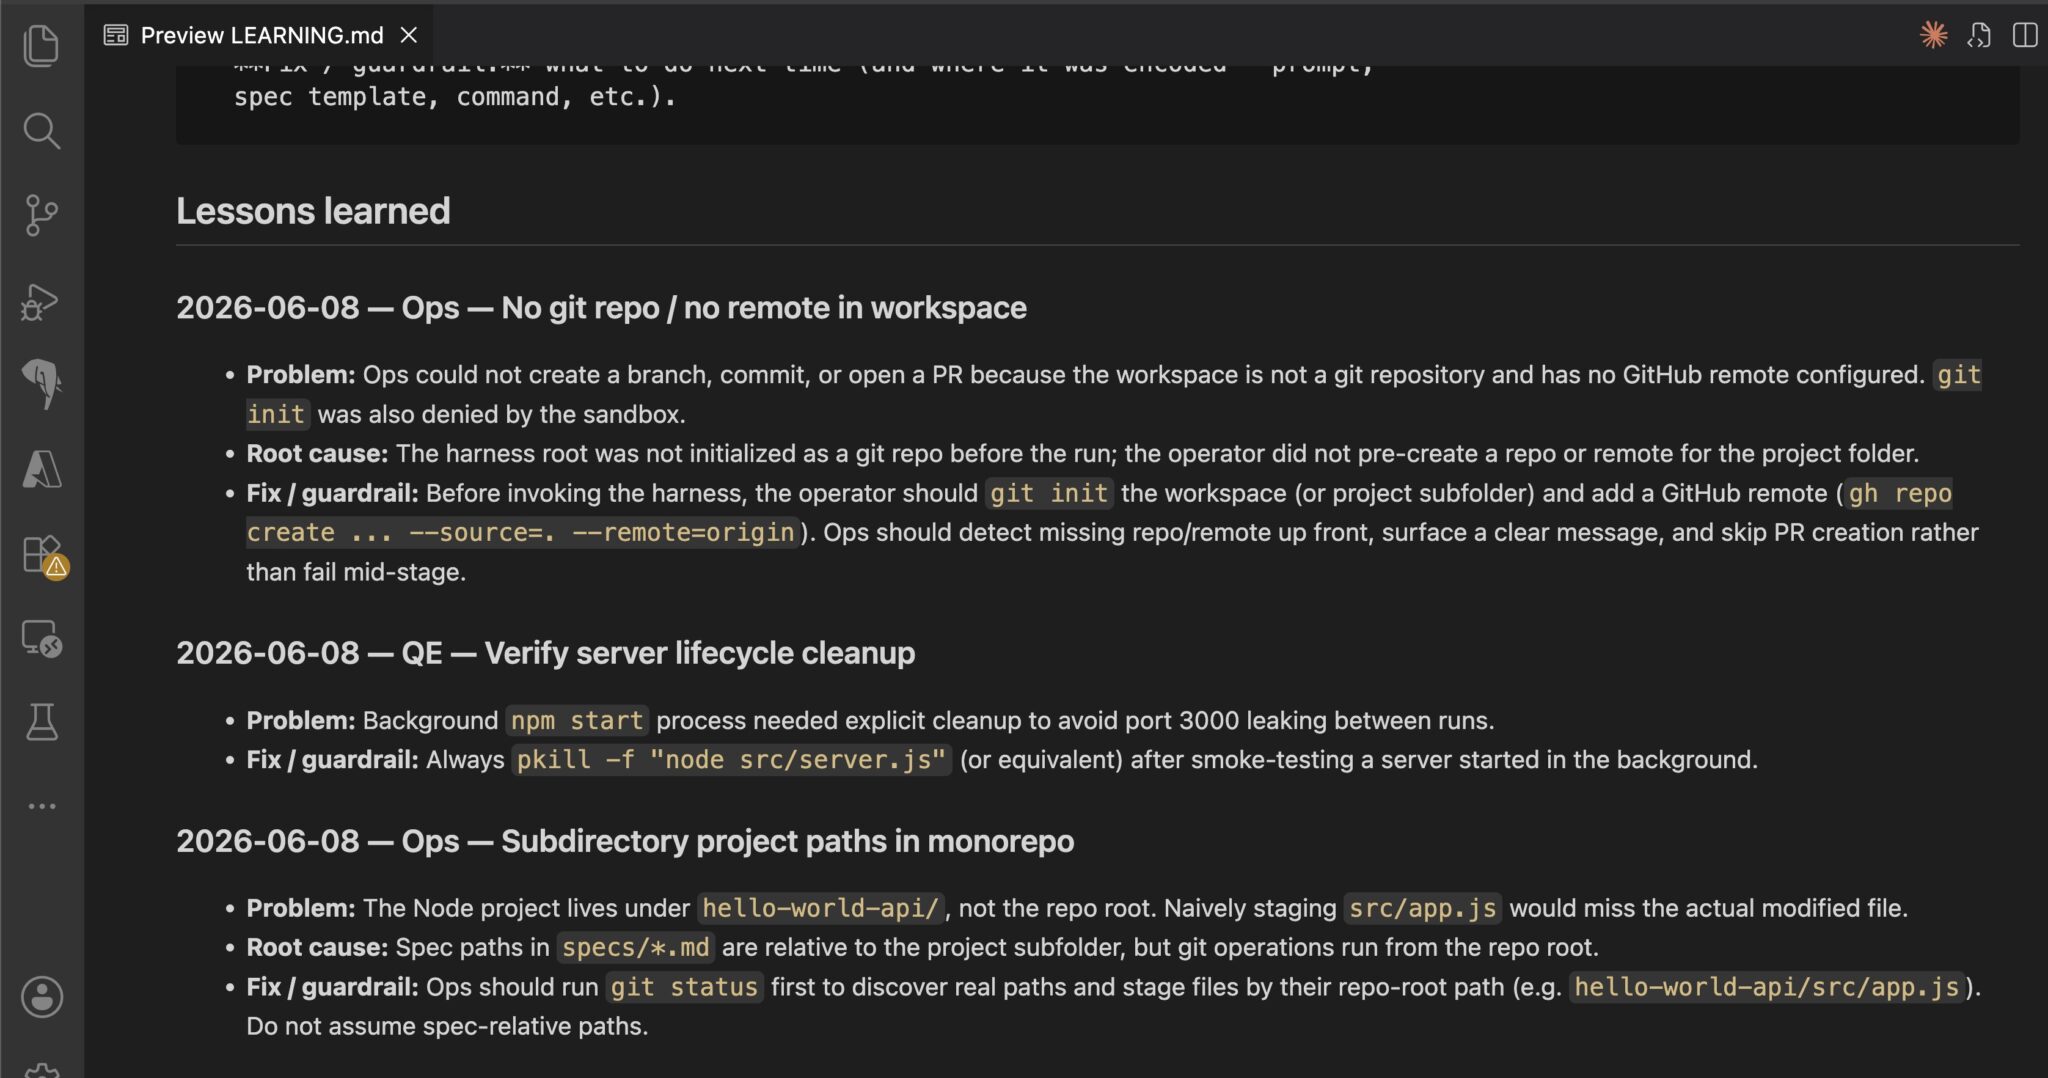
The LEARNING.md
For example, if Ops discovers that project files must be staged by repo-root path rather than package-relative path, that lesson belongs in LEARNING.md
Together, telemetry and learning give you two different views of the workflow:
| Mechanism | Records | Use it for |
|---|---|---|
| Telemetry | Events, stages, tool calls, pass/fail status | Debugging a specific run and spotting workflow patterns |
|
Durable lessons and recurring fixes | Preventing the same failure from recurring |
Over many runs, the telemetry can show where the harness stalls or loops. The learning file can then encode the fix so future agents start with that context.
The first harness you build will not be the harness you keep. I went through several iterations on this sample before it felt useful. These are the levers I would adjust first:
spec.mdedit: deny cannot “just fix it real quick” and collapse back into a generator.Tuning a harness feels like tuning a CI pipeline. The structure is stable, but prompts, models, tools, and gates evolve as you learn what your project actually rewards. Staying on top of context rot in your AI agents is one of the more important ongoing maintenance tasks as these workflows grow.
A few lessons generalized across my runs:
Model Context Protocol (MCP) servers fit naturally into a harness because each agent has a focused role. Instead of giving one general-purpose agent every tool in the organization, you can give each role exactly the tools it needs.
For example:
ENG-142, instead of relying on a paraphrased prompt.The point is not to give every agent every MCP server. The point is to make tool access match the role. A role-scoped tool surface is much easier to reason about than one agent with twenty tools, most of which are irrelevant for any given task.
The sample harness is intentionally small. A harness you run every day on real repositories needs more stages, stronger gates, and better long-term memory. That is where Reygent comes in.
Reygent is a production-ready harness that applies the same ideas at a larger scale. The most relevant differences are:
| Capability | Sample harness | Reygent |
|---|---|---|
| Spec source | Local markdown files | Markdown, Jira, and Linear |
| Workflow | Dev → QE → Ops | Plan → implement → unit test gate → functional test gate → security review → PR create → PR review |
| Execution model | Mostly linear | Supports parallel work where appropriate |
| Agent configuration | Markdown files in |
Per-project configuration layered over global defaults |
| Memory | |
Knowledge base built from past runs |
| Telemetry | Local SQLite events table | Local run tracking with analysis across runs |
| Providers | Claude Code sample | Claude CLI by default, with support for Gemini, Codex, and OpenRouter |
The point of the comparison is not that every team should jump straight to a full production harness. The point is that the same principles scale: clear specs, specialized agents, fresh context windows, gated handoffs, scoped tools, telemetry, and learning from prior runs.
If you are new to this pattern, start with the sample project first. Once the basic handoffs make sense, Reygent is a useful map of what a more mature implementation can look like.
Single-agent workflows are the natural starting point for AI-assisted development. They are simple, easy to set up, and productive for short tasks. But as the work gets more complex, the cracks show: context drift, scope creep, self-assessment bias, weak verification, and degraded reasoning as the conversation fills up.
The harness pattern gives you a more reliable structure. Split the work across specialized agents. Give each one a narrow role, a fresh context, and only the tools it needs. Enforce gates between phases. Hand off artifacts instead of conversation history. Add more agents only when a real failure mode justifies the extra complexity.
You can see versions of this pattern emerging across agent tooling, including Claude Code subagents, OpenCode’s agent and skill model, and similar multi-agent workflows. The specific framework matters less than the operating discipline: clear specs, separate context, scoped permissions, observable runs, and explicit gates.
My recommendation is to start small. Build a planner, a generator, and an evaluator around one real workflow. Run it on a low-risk repo. Watch where it fails. Tighten the spec, prompts, permissions, and loopbacks. Once that basic harness is trustworthy, then add specialized agents for security, docs, performance, or release work.
Tailwind CSS component libraries provide pre-built components to streamline the process of developing aesthetic, user-friendly interfaces.
Jev is a TypeSafe AI decision model that classifies messages using typed questions. Learn how to use it for routing to reduce unnecessary LLM calls.

Vibe coding makes building apps faster, but speed without engineering can create serious failures. Here are five real-world examples and practical checks to help you ship AI-generated code safely.
Compare React ViewTransition and Motion across four animation patterns. The native build saved ~38.6kB of gzipped JS, but required 179 more lines of CSS.
Would you be interested in joining LogRocket's developer community?
Join LogRocket’s Content Advisory Board. You’ll help inform the type of content we create and get access to exclusive meetups, social accreditation, and swag.
Sign up now

 Learn more →