
The web has become so intertwined with our daily lives that we barely even notice it anymore. You probably use a web app for things as mundane as reserving a table at a restaurant, hailing a ride, booking a flight, even checking the weather.

Most of us would be hard-pressed to get through a day without interacting with some type of web application. That’s why it’s so important to make your apps accessible to all, including those with auditory, cognitive, neurological, physical, speech, visual, or other disabilities.
Web accessibility is often referred to as a11y, where the number 11 represents the number of letters omitted. As developers, we shouldn’t assume that all users interact with our applications same way. According to web standards such as WAI-ARIA, it’s our responsibility to make our web apps accessible to everyone.
Let’s look at a real-world example to illustrate the importance of web accessibility.
Consider using this HTML form without mouse. If you can easily complete your desired task, then you can consider the form accessible.
In this tutorial, we’ll demonstrate how to build accessible components using Downshift. Downshift is a JavaScript library for building flexible, enhanced input components in React that comply with WAI-ARIA regulations.
Note: We’ll be using React Hooks in Downshift, so all the components will be built using Downshift hooks.
The Replay is a weekly newsletter for dev and engineering leaders.
Delivered once a week, it's your curated guide to the most important conversations around frontend dev, emerging AI tools, and the state of modern software.
To build a simple and accessible select component, we’ll use a React Hook called useSelect, which is provided by Downshift.
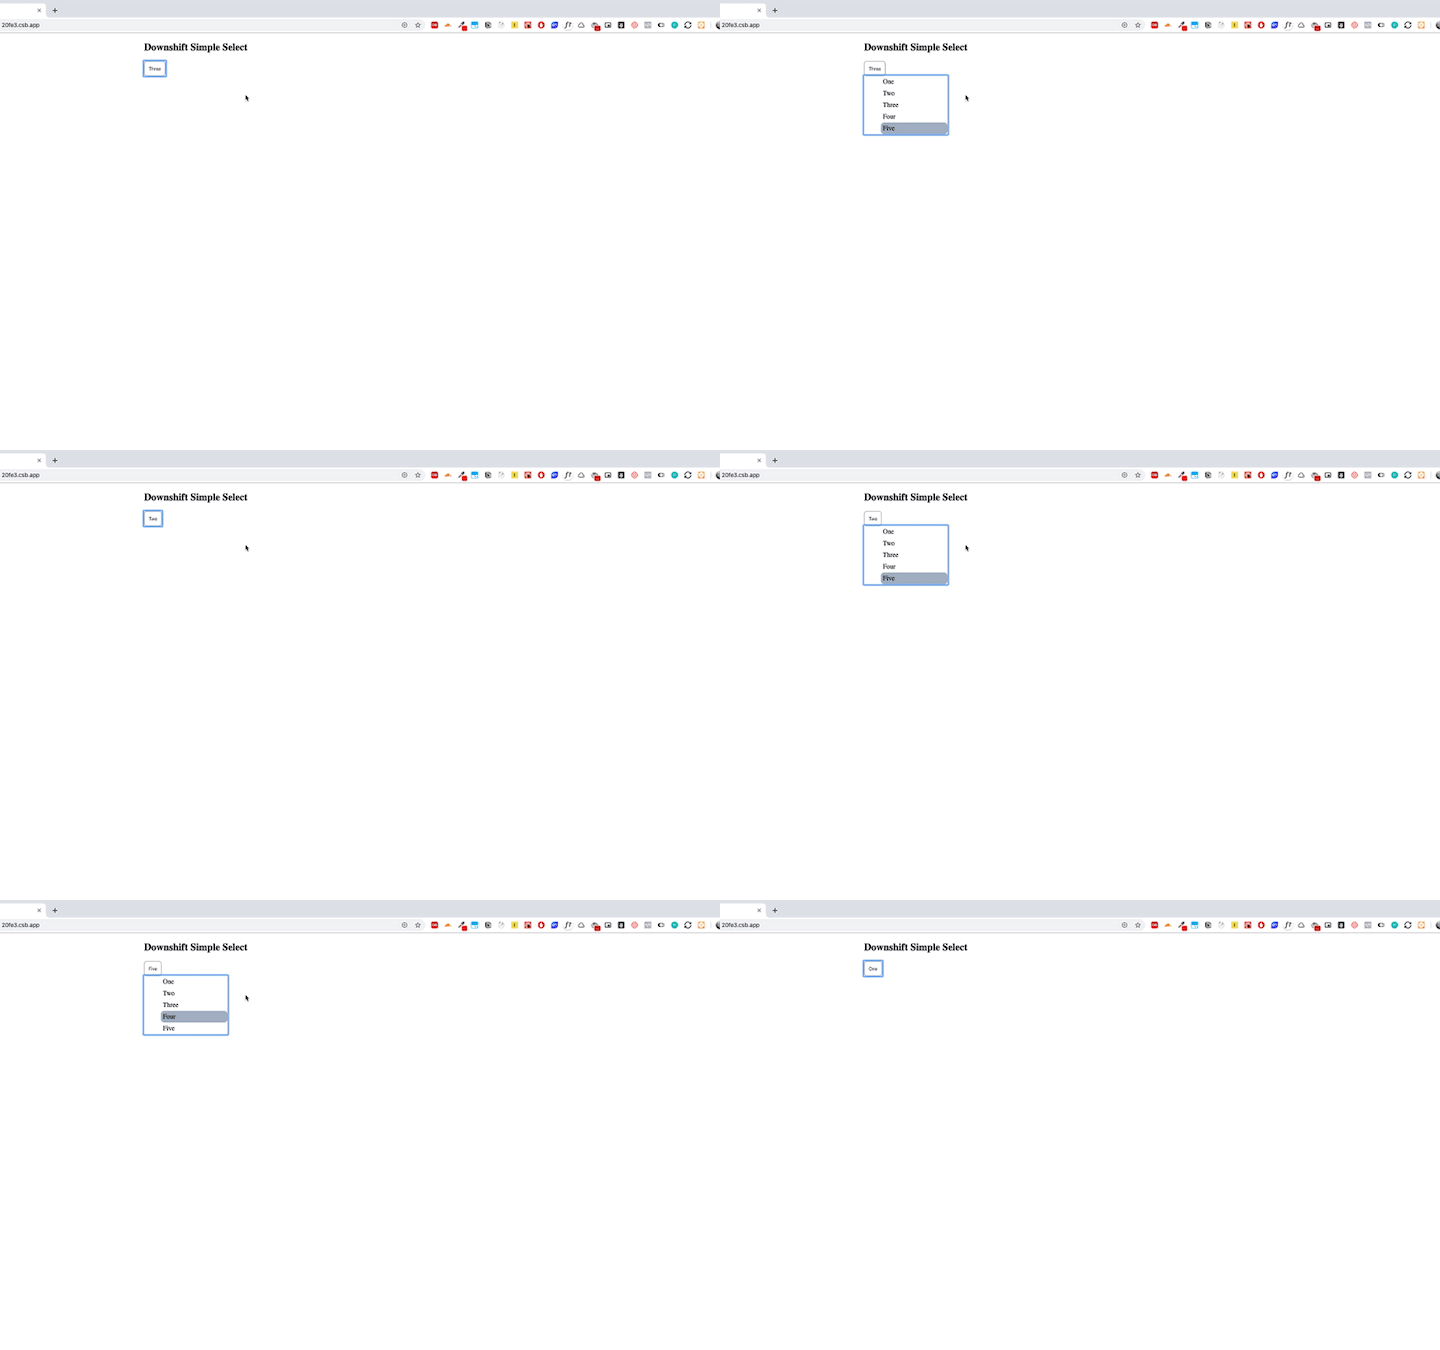
Create a file called DropDown.js and add the following code.
 import React from "react";
import { useSelect } from "downshift";
import styled from "styled-components";
const DropDownContainer = styled.div`
  width: 200px;
`;
const DropDownHeader = styled.button`
  padding: 10px;
  display: flex;
  border-radius: 6px;
  border: 1px solid grey;
`;
const DropDownHeaderItemIcon = styled.div``;
const DropDownHeaderItem = styled.p``;
const DropDownList = styled.ul`
  max-height: "200px";
  overflow-y: "auto";
  width: "150px";
  margin: 0;
  border-top: 0;
  background: "white";
  list-style: none;
`;
const DropDownListItem = styled.li`
  padding: 5px;
  background: ${props => (props.ishighlighted ? "#A0AEC0" : "")};
  border-radius: 8px;
`;
const DropDown = ({ items }) => {
  const {
    isOpen,
    selectedItem,
    getToggleButtonProps,
    getMenuProps,
    highlightedIndex,
    getItemProps
  } = useSelect({ items });
  return (
    <DropDownContainer>
      <DropDownHeader {...getToggleButtonProps()}>
        {(selectedItem && selectedItem.value) || "Choose an Element"}
      </DropDownHeader>
      <DropDownList {...getMenuProps()}>
        {isOpen &&
          items.map((item, index) => (
            <DropDownListItem
              ishighlighted={highlightedIndex === index}
              key={`${item.id}${index}`}
              {...getItemProps({ item, index })}
            >
              {item.value}
            </DropDownListItem>
          ))}
      </DropDownList>
      <div tabIndex="0" />
    </DropDownContainer>
  );
};
export default DropDown;
Here, we have styled-components and downshift library. Styled components are used to create CSS in JavaScript.
We also have the useSelect hook, which takes the items array as an argument and returns a few props, including the following.
isOpen helps to maintain the state of the menu. If the menu is expanded, isOpen will be true. If is collapsed, it will return falseselectedItem returns the selected item from the listgetToggleButtonProps provides an input button that we need to bind with our toggle button (it can be an input or a button)getMenuProps provides the props for the menu. We can bind this with a div or UI elementgetItemProps returns the props we need to bind with the menu list itemhighlightedIndex returns the index of a selected array element and enables you to style the element while renderingBelow are some other props that useSelect provides.
onStateChange is called anytime the internal state change. In simple terms, you can manage states such as isOpen and SelectedItem in your component state using this functionitemToString — If your array items is an object, selectedItem will return the object instead of a string value. For example:
selectedItem : { id : 1,value : "Sample"}
Since we cannot render it like this, we can convert it into a string using the itemToString props.
First, render the button that handles the toggle button of the select component.
{(selectedItem && selectedItem.value) || "Choose an Element"}
After that, render the menu and menu items with the Downshift props.
<DropDownList {...getMenuProps()}>
        {isOpen &&
          items.map((item, index) => (
            <DropDownListItem
              ishighlighted={highlightedIndex === index}
              key={`${item.id}${index}`}
              {...getItemProps({ item, index })}
            >
              {item.value}
            </DropDownListItem>
          ))}
</DropDownList>
Autocomplete works in the same way as the select component except it has search functionality. Let’s walk through how to build an autocomplete component using downshift.
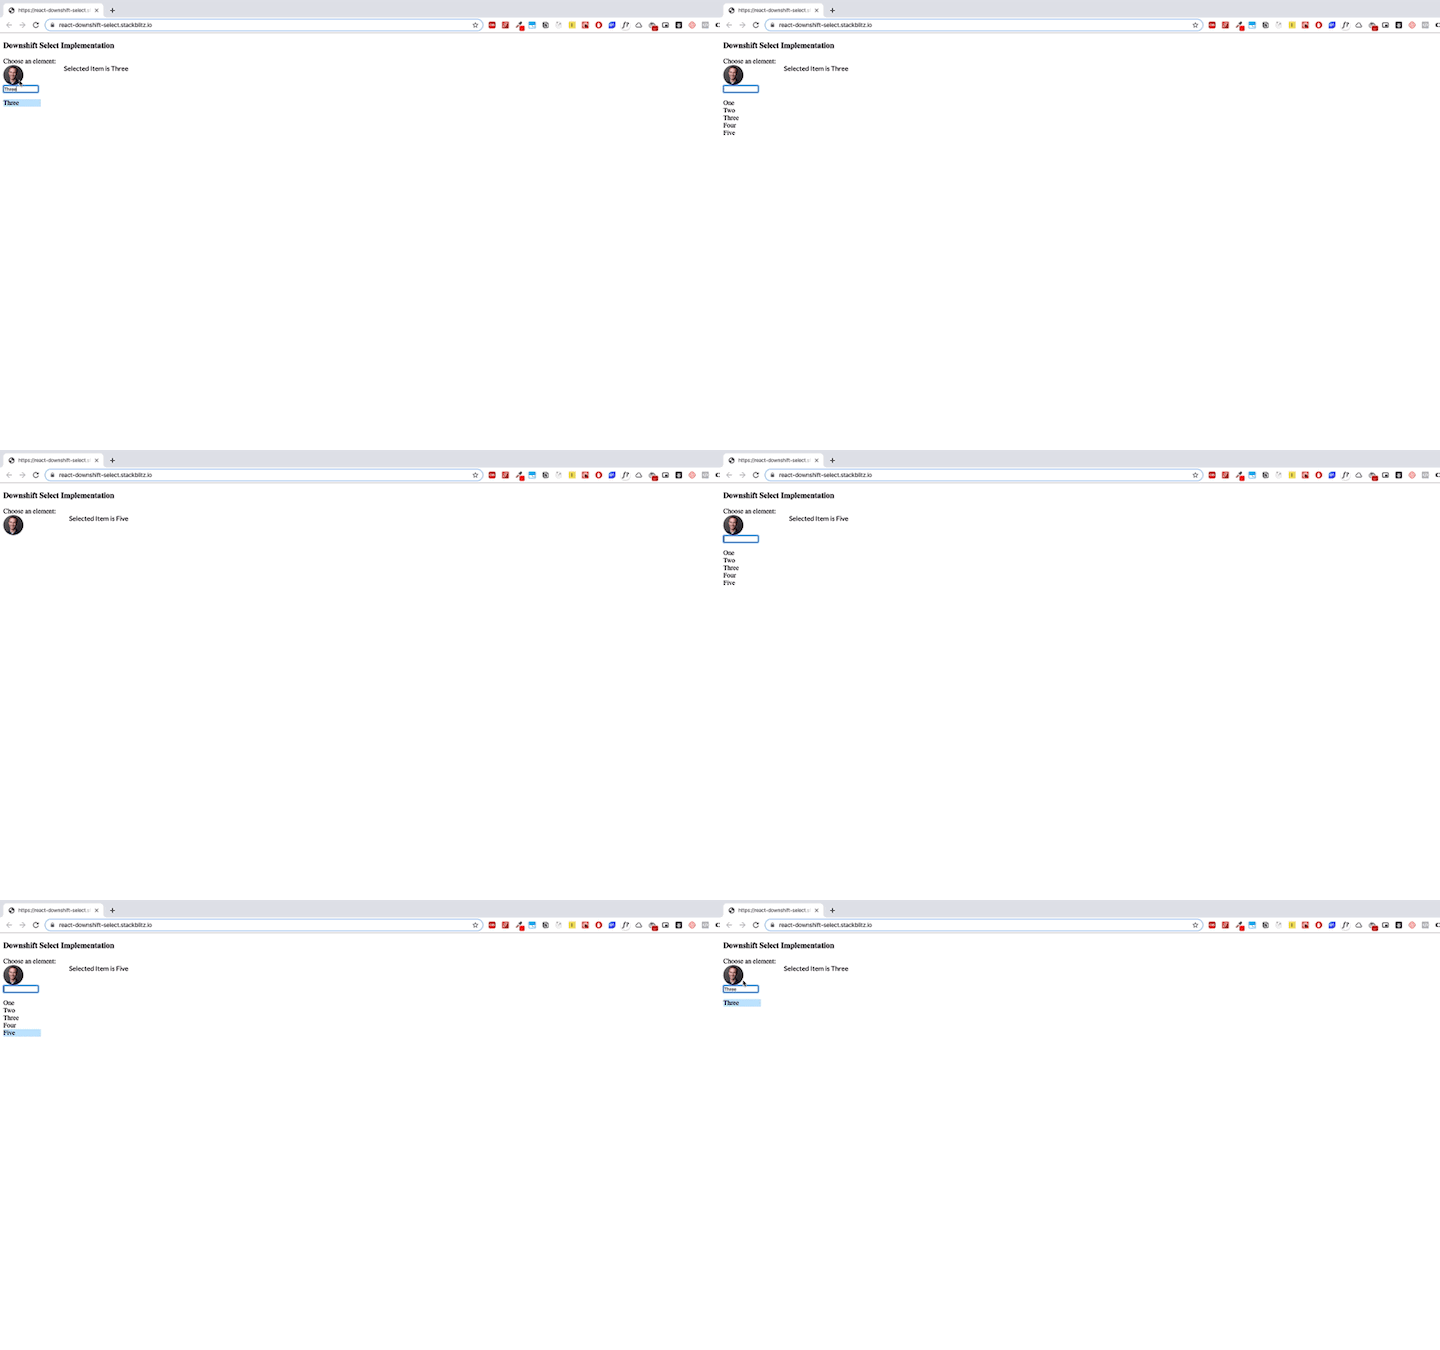
Unlike Downshift, the autocomplete component uses the useCombobox hook.
import React,{ useState } from 'react';
import { IconButton,Avatar,Icon } from '@chakra-ui/core';
import { useCombobox } from 'downshift';
import styled from "styled-components";
const Input = styled.input`
  width: 80px;
  border: 1px solid black;
  display :  ${({ isActive }) => isActive ? 'block' : 'none'}
  border-bottom-left-radius: ${({ isActive }) => isActive && 0};
  border-bottom-right-radius: ${({ isActive }) => isActive && 0};
  border-radius: 3px;
`;

const SelectHook = ({
  items,
  onChange,
  menuStyles
}) => {
  const [inputItems, setInputItems] = useState(items);
  const {
    isOpen,
    getToggleButtonProps,
    getLabelProps,
    getMenuProps,
    getInputProps,
    getComboboxProps,
    highlightedIndex,
    getItemProps,
    onStateChange,
    onSelectedItemChange,
    selectedItem,
    itemToString
  } = useCombobox({
    items: inputItems,
    itemToString : item => (item ? item.value : ""),
    onInputValueChange: ({ inputValue }) => {
      let inputItem = items.filter(item => {

         return item.value.toLowerCase().startsWith(inputValue.toLowerCase())
      }
        );

      setInputItems(inputItem)
    },
    onStateChange : (state) => {
      console.log("state",state);
      if(state.inputValue){
          onChange(state.selectedItem);
      }
      if(!state.isOpen){
          return {
            ...state,
            selectedItem : ""
          }
      }

    }
     });

   return (
      <div>
       <label {...getLabelProps()}>Choose an element:</label>
      <div {...getToggleButtonProps()}>
       <Avatar name="Kent Dodds" src="https://bit.ly/kent-c-dodds"/>
       </div>
      <div style={{ display: "inline-block" }} {...getComboboxProps()}>
        <Input {...getInputProps()} isActive={isOpen} />
      </div>
      <ul {...getMenuProps()} style={menuStyles}>
        {isOpen &&
          inputItems.map((item, index) => (
            <li
              style={
                highlightedIndex === index ? { backgroundColor: "#bde4ff" } : {}
              }
              key={`${item}${index}`}
              {...getItemProps({ item, index })}
            >
              {item.value}
            </li>
          ))}
      </ul>
    </div>
   )
}
export default SelectHook;
useCombobox takes the items array as an input as well as some other props we discussed in the previous component. useCombobox provides the following props.
getComboboxProps is a wrapper of input element in the select component that provides combobox props from Downshift.onInputValueChange is called when the value of the input element changes. You can manage the state of the input element in the component itself through this event callbackLet’s break down the component and try to understand its logic.
The component takes three props:
items, which represents the input element arrayonChange, which is called when selected item changesmenuStyles, which this is optional; you can either pass it as props or run the following
const SelectHook = ({
items,
onChange,
menuStyles
}) => { }
Now we have state value, which maintains the input value and useCombobox hook.
const [inputItems, setInputItems] = useState(items);

  const {
    isOpen,
    getToggleButtonProps,
    getLabelProps,
    getMenuProps,
    getInputProps,
    getComboboxProps,
    highlightedIndex,
    getItemProps,
    onStateChange,
    onSelectedItemChange,
    selectedItem,
    itemToString
  } = useCombobox({
    items: inputItems,
    itemToString : item => (item ? item.value : ""),
    onInputValueChange: ({ inputValue }) => {
      let inputItem = items.filter(item => {

         return item.value.toLowerCase().startsWith(inputValue.toLowerCase())
      }
        );

      setInputItems(inputItem)
    },
    onStateChange : (state) => {
      if(state.inputValue){
          onChange(state.selectedItem);
      }
      if(!state.isOpen){
          return {
            ...state,
            selectedItem : ""
          }
      }

    }
     });
Once we set up the hook, we can use all the props it provides for the autocomplete component.
Let’s start from the toggle button props. Set it up for any element you want to use as toggler.
<div {...getToggleButtonProps()}>
   <Avatar name="Kent Dodds" src="https://bit.ly/kent-c-dodds"/>
 </div>
This gives us an input element that we need to render along with dropdown.
<div style={{ display: "inline-block" }} {...getComboboxProps()}>
    <Input {...getInputProps()} isActive={isOpen} />
</div>
Finally, we have list and list item that takes Downshift props such as getMenuProps and getItemProps.
<ul {...getMenuProps()} style={menuStyles}>
        {isOpen &&
          inputItems.map((item, index) => (
            <li
              style={
                highlightedIndex === index ? { backgroundColor: "#bde4ff" } : {}
              }
              key={`${item}${index}`}
              {...getItemProps({ item, index })}
            >
              {item.value}
            </li>
          ))}
</ul>
react-downshift-select – StackBlitz
Starter project for React apps that exports to the create-react-app CLI.
In this section, we’ll demonstrate how to use Downshift with the dropdown in your form.
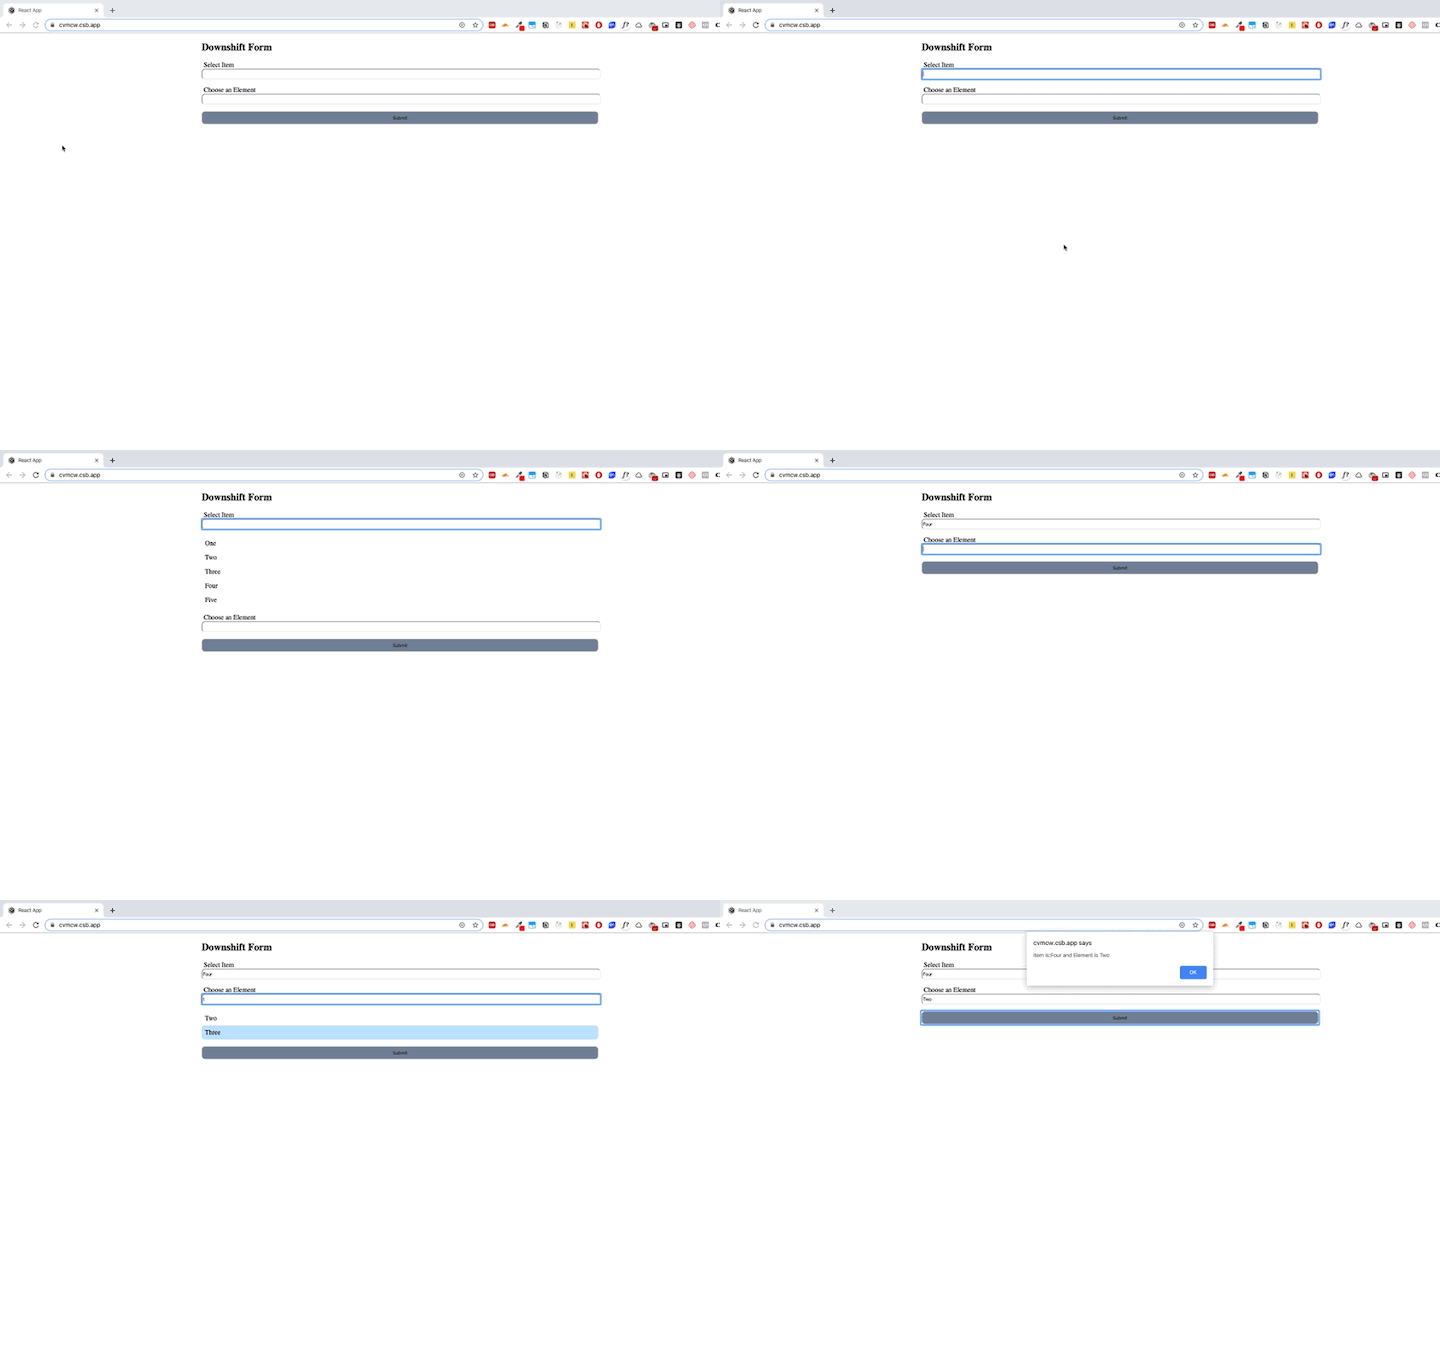
Here we have two components: DownshiftInput.js for the autocomplete component and App.js, which handles the form.
First, implement DownshiftInput.js.
import React, { useState } from "react";
import styled from "styled-components";
import { useCombobox } from "downshift";
const DropDownContainer = styled.div`
  width: 100%;
`;
const DropDownInput = styled.input`
  width: 100%;
  height: 20px;
  border-radius: 8px;
`;
const DropDownInputLabel = styled.label`
  padding: 5px;
`;
const DropDownMenu = styled.ul`
  max-height: "180px";
  overflow-y: "auto";
  width: "90px";
  border-top: 0;
  background: "white";
  position: "absolute";
  list-style: none;
  padding: 0;
`;
const DropDownMenuItem = styled.li`
  padding: 8px;
  background-color: ${props => (props.ishighlighted ? "#bde4ff" : "")};
  border-radius: 8px;
`;
const DownshiftInput = ({ items, onChange, labelName }) => {
  const [inputItems, setInputItems] = useState(items);
  const [inputValue, setInputValue] = useState("");
  const {
    isOpen,
    getInputProps,
    getLabelProps,
    getItemProps,
    getMenuProps,
    highlightedIndex
  } = useCombobox({
    items,
    itemToString: item => {
      return item && item.value;
    },
    onInputValueChange: ({ inputValue }) => {
      let inputItem = items.filter(item => {
        return item.value.toLowerCase().startsWith(inputValue.toLowerCase());
      });
      setInputItems(inputItem);
      setInputValue(inputValue);
    },
    onSelectedItemChange: ({ selectedItem }) => {
      onChange(selectedItem);
      setInputValue(selectedItem.value);
    }
  });
  return (
    <DropDownContainer>
      <DropDownInputLabel {...getLabelProps()}>{labelName}</DropDownInputLabel>
      <DropDownInput
        {...getInputProps({
          value: inputValue
        })}
      />
      <DropDownMenu {...getMenuProps()}>
        {isOpen &&
          inputItems.map((item, index) => (
            <DropDownMenuItem
              ishighlighted={highlightedIndex === index}
              key={`${item}${index}`}
              {...getItemProps({ item, index })}
            >
              {item.value}
            </DropDownMenuItem>
          ))}
      </DropDownMenu>
    </DropDownContainer>
  );
};
export default DownshiftInput;
Here we implemented the same logic that we used in the autocomplete component, the useCombobox hook.
Props that we used in this component include:
isOpen, which is used to manage the state of the menugetInputProps, which should bind with input elementgetLabelProps to map with labelsgetItemProps, which is used to bind the Downshift props with menu itemsgetMenuProps, which is used for mapping the downshift with our menuhighlightedIndex, which returns the highlighted element indexDownshift event callbacks from the hook include:
onInputValueChange, which returns the inputValue from the input elementonSelectedItemChange, which is called when a selected item changesApp.js:
import React, { useState } from "react";
import "./styles.css";
import styled from "styled-components";
import DownshiftInput from "./DownshiftInput";
const Container = styled.div`
  width: 50%;
  margin: auto;
  top: 50%;
  /* transform: translateY(-50%); */
`;
const ContainerHeader = styled.h2``;
const Form = styled.form`
  /* border: 3px solid grey; */
`;
const FormButton = styled.button`
  width: 100%;
  padding: 8px;
  background-color: #718096;
  border-radius: 8px;
`;
export default function App() {
  const [state, setState] = useState({
    item: {},
    element: {}
  });
  const items = [
    { id: "1", value: "One" },
    { id: "2", value: "Two" },
    { id: "3", value: "Three" },
    { id: "4", value: "Four" },
    { id: "5", value: "Five" }
  ];
  const onItemChange = value => {
    setState({ ...state, item: value });
  };
  const onElementChange = value => {
    setState({ ...state, element: value });
  };
  const onSubmit = e => {
    e.preventDefault();
    console.log("submitted", state);
    alert(`item is:${state.item.value} and Element is ${state.element.value}`);
  };
  return (
    <Container>
      <ContainerHeader>Downshift Form</ContainerHeader>
      <Form onSubmit={onSubmit}>
        <DownshiftInput
          items={items}
          onChange={onItemChange}
          labelName="Select Item"
        />
        <DownshiftInput
          items={items}
          onChange={onElementChange}
          labelName="Choose an Element"
        />
        <FormButton>Submit</FormButton>
      </Form>
    </Container>
  );
}
The final step is to build a chat box mentions feature. We can do this using Downshift.
Here’s an example of the finished product:
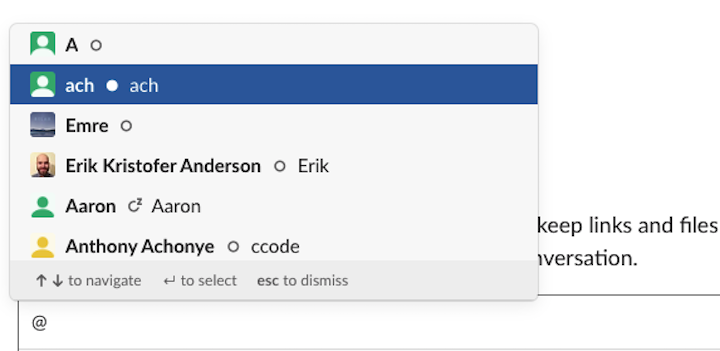
A dropdown opens on top of an input element. It’s a handy feature that mentions the user in the message.
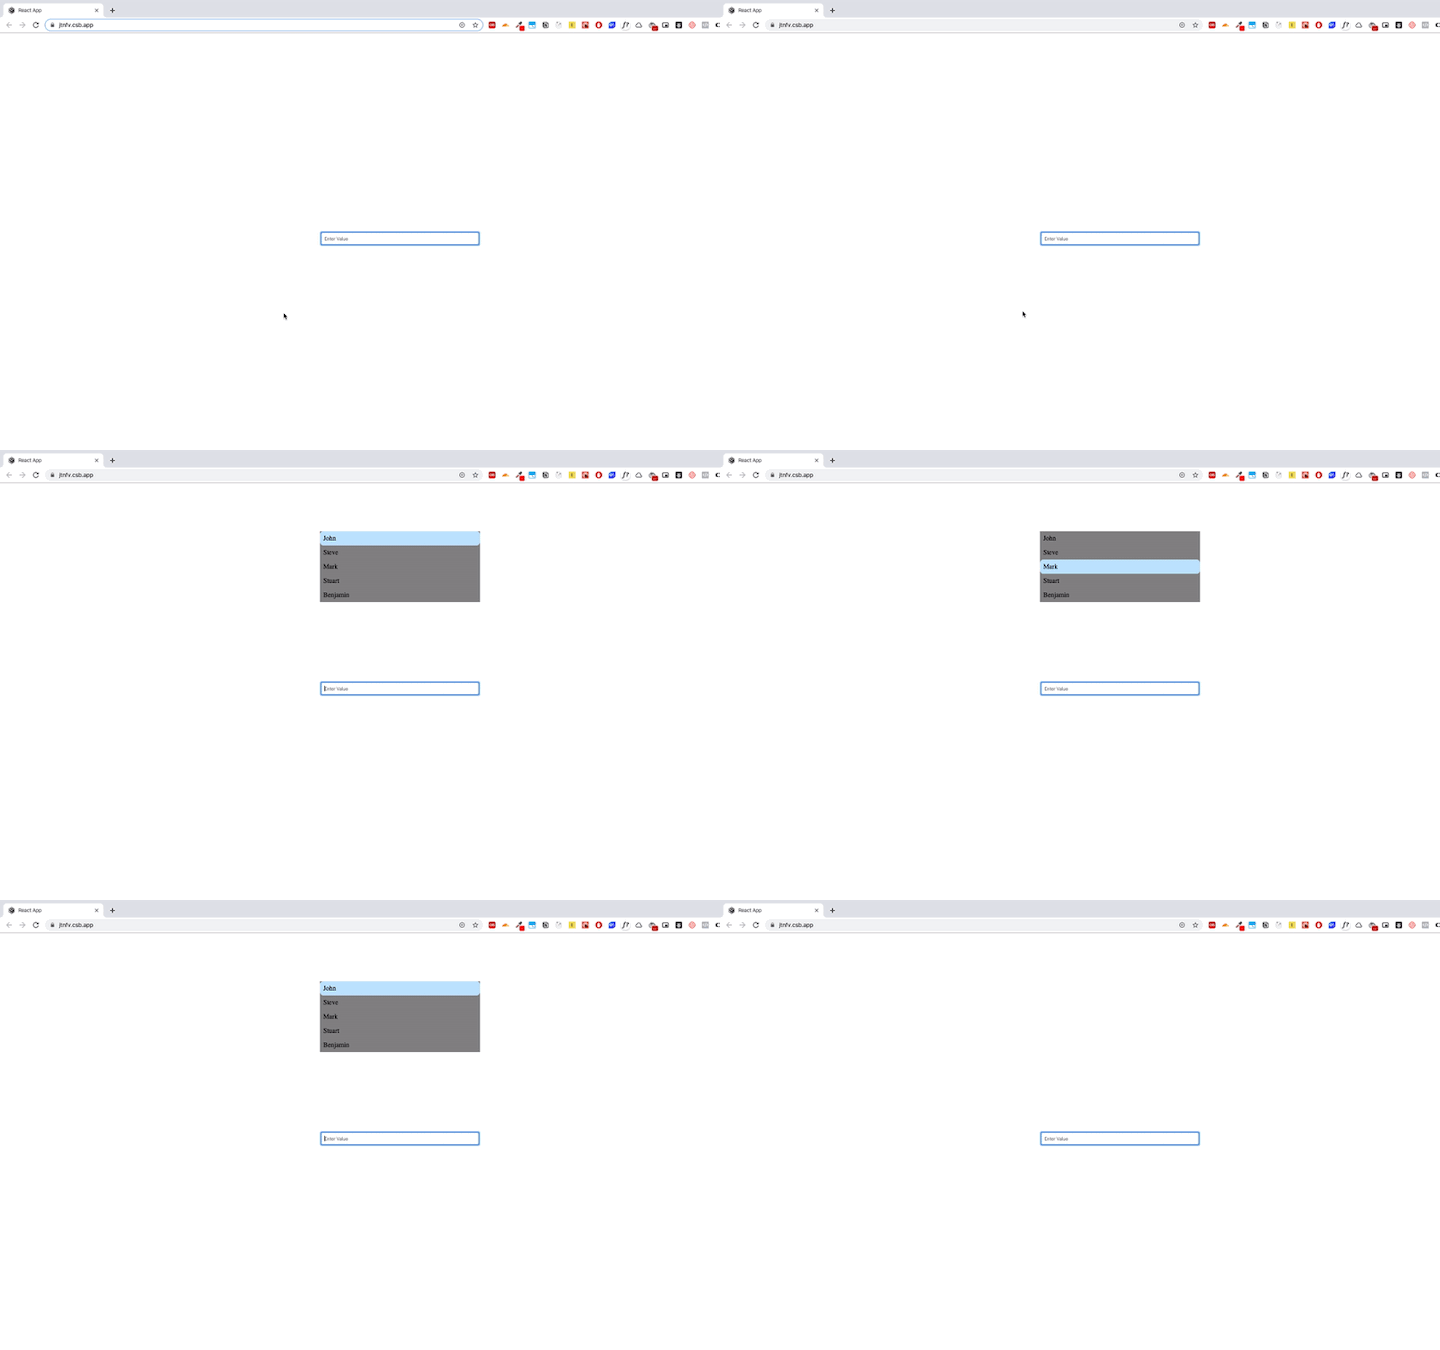
To place the dropdown on top of the input, we’ll use React Popper along with Downshift.
Let’s review the three most important concepts associated with Popper before building the component.
Manager — All the react popper components should be wrapped inside the manager componentReference — React Popper uses the reference component to manage the popper. If you use a button as a reference, the popper opens or closes based on the button componentPopper — This manages what should be rendered on Popper. Popper opens the custom component based on a different action, such as button click or input changeLet’s create a component called MentionComponent.js and add the following code.
import React, { useState } from "react";
import { useCombobox } from "downshift";
import styled from "styled-components";
import { Popper, Manager, Reference } from "react-popper";
const Container = styled.div``;
const DropDownInput = styled.input``;
const DropDownMenu = styled.ul`
  max-height: "180px";
  overflow-y: "auto";
  width: "90px";
  border-top: 0;
  background: "blue";
  position: "absolute";
  list-style: none;
  padding: 0;
`;
const DropDownMenuItem = styled.li`
  padding: 8px;
  background-color: ${props => (props.ishighlighted ? "#bde4ff" : "")};
  border-radius: 8px;
`;
const MentionComponent = ({ items }) => {
  const [inputItems, setInputItems] = useState(items);
  const {
    isOpen,
    getInputProps,
    getItemProps,
    getMenuProps,
    highlightedIndex
  } = useCombobox({
    items,
    itemToString: item => {
      console.log("item", item);
      return item ? item.value : null;
    },
    onInputValueChange: ({ inputValue }) => {
      let inputItem = items.filter(item => {
        return item.value.toLowerCase().startsWith(inputValue.toLowerCase());
      });
      setInputItems(inputItem);
    }
  });
  return (
    <Container>
      <Manager>
        <Reference>
          {/* {({ ref }) => (

          )} */}
          {({ ref }) => (
            <div
              style={{
                width: "20%",
                margin: "auto",
                display: "flex",
                alignItems: "flex-end",
                height: "50vh"
              }}
              // ref={ref}
            >
              <DropDownInput
                ref={ref}
                {...getInputProps({
                  placeholder: "Enter Value",
                  style: {
                    width: "100%",
                    padding: "8px",
                    borderRadius: "6px",
                    border: "1px solid grey"
                  }
                })}
              />
            </div>
          )}
        </Reference>
        {isOpen ? (
          <Popper placement="top">
            {({
              ref: setPopperRef,
              style,
              placement,
              arrowProps,
              scheduleUpdate
            }) => {
              return (
                <DropDownMenu
                  {...getMenuProps({
                    ref: ref => {
                      if (ref !== null) {
                        setPopperRef(ref);
                      }
                    },
                    style: {
                      ...style,
                      background: "grey",
                      opacity: 1,
                      top: "10%",
                      left: "40%",
                      width: "20%"
                    },
                    "data-placement": placement
                  })}
                >
                  {isOpen &&
                    inputItems.map((item, index) => (
                      <DropDownMenuItem
                        ishighlighted={highlightedIndex === index}
                        key={`${item}${index}`}
                        {...getItemProps({ item, index })}
                      >
                        {item.value}
                      </DropDownMenuItem>
                    ))}
                </DropDownMenu>
              );
            }}
          </Popper>
        ) : null}
      </Manager>
    </Container>
  );
};
export default MentionComponent;
Let’s break down each part one by one. Everything associated with React Popper should be wrapped inside the Manager component.
After that, the Reference component wraps the Input element.
 <Reference>
          {({ ref }) => (
            <div
              style={{
                width: "20%",
                margin: "auto",
                display: "flex",
                alignItems: "flex-end",
                height: "50vh"
              }}
              // ref={ref}
            >
              <DropDownInput
                ref={ref}
                {...getInputProps({
                  placeholder: "Enter Value",
                  style: {
                    width: "100%",
                    padding: "8px",
                    borderRadius: "6px",
                    border: "1px solid grey"
                  }
                })}
              />
            </div>
          )}
        </Reference>
Here we implemented getInputProps from Downshift and binded it with an input element.
The popper itself contains the menu and menu items with Downshift props such as getMenuProps and getItemProps.
{isOpen ? (
          <Popper placement="top">
            {({
              ref: setPopperRef,
              style,
              placement,
              arrowProps,
              scheduleUpdate
            }) => {
              return (
                <DropDownMenu
                  {...getMenuProps({
                    ref: ref => {
                      if (ref !== null) {
                        setPopperRef(ref);
                      }
                    },
                    style: {
                      ...style,
                      background: "grey",
                      opacity: 1,
                      top: "10%",
                      left: "40%",
                      width: "20%"
                    },
                    "data-placement": placement
                  })}
                >
                  {isOpen &&
                    inputItems.map((item, index) => (
                      <DropDownMenuItem
                        ishighlighted={highlightedIndex === index}
                        key={`${item}${index}`}
                        {...getItemProps({ item, index })}
                      >
                        {item.value}
                      </DropDownMenuItem>
                    ))}
                </DropDownMenu>
              );
            }}
          </Popper>
        ) : null}
We use the Downshift hook useCombobox like we used it in the autocomplete component. Most of the logic is same except that we’ll wrap it inside popper.js.
You should now have the basic tools and knowledge to build accessible components into your apps using Downshift. To summarize, we covered how to build an accessible simple select component, accessible autocomplete, and form dropdown as well as how to use Downshift with Popper.js.
In my point of view, we shouldn’t view web accessibility as a feature; we should consider it our responsibility to make the web accessible to everyone.
Install LogRocket via npm or script tag. LogRocket.init() must be called client-side, not
server-side
$ npm i --save logrocket

// Code:

import LogRocket from 'logrocket';
LogRocket.init('app/id');
// Add to your HTML:

<script src="https://cdn.lr-ingest.com/LogRocket.min.js"></script>
<script>window.LogRocket && window.LogRocket.init('app/id');</script>

Compare key features of popular meta-frameworks Remix, Next.js, and SvelteKit, from project setup to styling.

Discover what’s new in The Replay, LogRocket’s newsletter for dev and engineering leaders, in the February 4th issue.

AI-first isn’t about tools; it’s about how teams think, build, and decide. Ken Pickering, CTO at Scripta Insights, shares how engineering leaders can adapt.

Build context-aware, agentic frontend applications by connecting React state and actions to LLMs with CopilotKit.
Hey there, want to help make our blog better?
Join LogRocket’s Content Advisory Board. You’ll help inform the type of content we create and get access to exclusive meetups, social accreditation, and swag.
Sign up now
One Reply to "Building accessible components with Downshift"
Why? OMG so complicated and not possible to use a native HTML5 dropdown select as W3C recommend?