Ever wonder how to build a tag input field component for your React app? Here’s how.

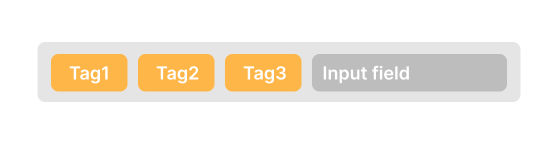
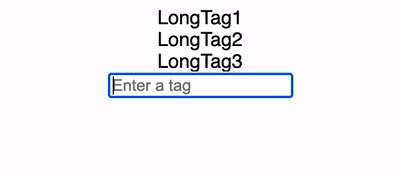
First, let’s start with a visual representation of the markup that we are going to implement. We need a container wrapping both tags and an input field. As we add more tags, the input field is forced further to the right, which gives the feeling of adding the tags into the input field.
A pseudo markup corresponding to the visualization above would be something like the following.
<div className="container">
  {tags.map((tag) => <div>{tag}</div>)}
  <input/>
</div>
At this point, it is clear that we need a state variable to store the entered tags, as well as another state variable to control the input field. input and tags states will be empty string and empty array by default respectively.
const [input, setInput] = useState('');
const [tags, setTags] = useState([]);
The next thing we need is to listen to changes on the input field so that we can set the input state and create a logic to populate the tags state when a certain key is pressed. Let’s assume we want to separate the tags with comma key, so when that key is pressed, we will push the content of input state as a new value to tags array.
To do that, we need to use onChange and onKeyDown events. So now our markup changes a little bit with the new attributes added:
<div className="container">
  {tags.map((tag) => <div className="tag">{tag}</div>)}
  <input
    value={input}
    placeholder="Enter a tag"
    onKeyDown={onKeyDown}
    onChange={onChange}
  />
</div>
This event is required only for listening to the changes on the input field and updates the input state variable.
const onChange = (e) => {
  const { value } = e.target;
  setInput(value);
};
Unlike onChange event, onKeyDown event exposes the key property, which tells us which keyboard key is pressed. Because we want to separate the tags with a comma, in an if statement, we need to check whether key is equal to ,.
The second check we have in the if statement is to ensure that the input state variable is not empty after the whitespace from both sides of the string is removed by trim() method.
The last check we need is to make sure that the tag does not exist already. Because we store tags in tags state variable, we simply check whether that array contains the same trimmedInput. If not, we can push this new tag into the tags array.
Once we are in the if statement, we need to prevent the default behaviour by calling e.preventDefault() so that the comma character does not appear in the input field even though it is registered. Next, push the tag into tags array by using setTags function. Finally, we clear the input field by passing and empty string to setInput function.
const onKeyDown = (e) => {
  const { key } = e;
  const trimmedInput = input.trim();

  if (key === ',' && trimmedInput.length && !tags.includes(trimmedInput)) {
    e.preventDefault();
    setTags(prevState => [...prevState, trimmedInput]);
    setInput('');
  }
};
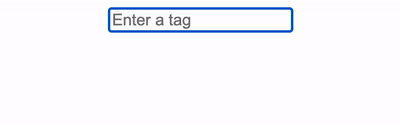
Now if you enter a text and hit the comma key, you’ll see the tag rendered on top of the input field and that the input field is cleared.
We also need to be able to delete the tags when the backspace key is pressed, for which there are two different approaches: Either delete the tag completely at once or delete the tag and return the tag content to the input field so that the user can edit the tag and submit again. I will show the implementation of the second approach.
Because we need to listen for a backspace key press, we are going to use the onKeyDown event again.
This time, key should be equal to "Backspace". We also need to check that the input field is empty and tags array is not empty.
Once these conditions hold, we need to remove the last item in the tags array and put that last element into the input field.
To do so, I am simply cloning the tags state variable by spreading it into a new array and then assigning it to a new variable called tagsCopy. The reason creating a clone of the array is not to mutate the state variable.
Then I call the pop() method on that variable to get the last element in the array and to also remove it from the array. This popped value is now stored in a variable called poppedTag.
We use setTags to update the tags state with the tagsCopy array, which is the array without the last tag. And now, we need that popped tag value in the input field, which is why we call setInput(poppedTag) to update the input state variable with the last tag value.
const onKeyDown = (e) => {
  const { key } = e;
  const trimmedInput = input.trim();

  if (key === ',' && trimmedInput.length && !tags.includes(trimmedInput)) {
    e.preventDefault();
    setTags(prevState => [...prevState, trimmedInput]);
    setInput('');
  }

  if (key === "Backspace" && !input.length && tags.length) {
    e.preventDefault();
    const tagsCopy = [...tags];
    const poppedTag = tagsCopy.pop();

    setTags(tagsCopy);
    setInput(poppedTag);
  }
};
This works just fine, but there is a catch. When you hit the backspace key and have the last tag in the input field, you might want to press and hold the backspace key to delete that tag completely — but with the current implementation, you’ll end up quickly deleting one tag after another if you don’t release the key quickly.
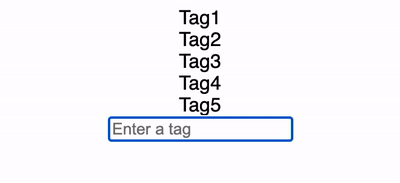
The behaviour I would expect is to delete the characters in the input field, then stop without removing the next tag unless the user releases the key and hits backspace again.
The solution to that problem is trivial. Along with onKeyDown event, we also need to use onKeyUp event to keep track of whether a key press is released or not. That way, we can detect if the user was holding down the backspace key to clear the input field.
First, we need a new boolean state variable to toggle both when a key is pressed and released.
const [isKeyReleased, setIsKeyReleased] = useState(false);
Set isKeyReleased to false in the onKeyDown function and to true in onKeyUp.
Then we need to use isKeyReleased as a condition for the if statement of the tag deletion logic. That way, we only delete the characters in the input field when the backspace key is pressed and held.
Below are the final versions of both functions.
const onKeyDown = (e) => {
  const { key } = e;
  const trimmedInput = input.trim();

  if (key === ',' && trimmedInput.length && !tags.includes(trimmedInput)) {
    e.preventDefault();
    setTags(prevState => [...prevState, trimmedInput]);
    setInput('');
  }

  if (key === "Backspace" && !input.length && tags.length && isKeyReleased) {
    const tagsCopy = [...tags];
    const poppedTag = tagsCopy.pop();
    e.preventDefault();
    setTags(tagsCopy);
    setInput(poppedTag);
  }

  setIsKeyReleased(false);
};

const onKeyUp = () => {
  setIsKeyReleased(true);
}
Don’t forget to update the HTML input tag with onKeyUp handler.
<input
  value={input}
  placeholder="Enter a tag"
  onKeyDown={onKeyDown}
  onKeyUp={onKeyUp}
  onChange={onChange}
/>
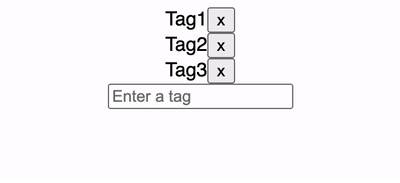
Being able to delete a specific tag is another required feature in order to create a good user experience. In order to implement this, we need to slightly change the tag markup by only adding an HTML button tag.
The onClick event handler of the button calls a function named deleteTag, where index of a tag is passed as an argument.
{tags.map((tag, index) => (
  <div className="tag">
    {tag}
    <button onClick={() => deleteTag(index)}>x</button>
  </div>
))}
The deleteTag function filters out the tags by their index values. Because we passed the index of the tag that we want to delete, we pick all the tags that don’t have that same index position in the array.
const deleteTag = (index) => {
  setTags(prevState => prevState.filter((tag, i) => i !== index))
}
At this point, we have a fully functional tag input field, but it obviously does not look good. I will not get into the details of styling, but below you can find an example CSS file so that it looks like this:

.container {
  display: flex;
  overflow: scroll;
  width: 100%;
  max-width: 100%;
  padding-left: 14px;
  border: 1px grey solid;
  border-radius: 5px;
  color: black
}

.container input {
  width: 100%;
  min-width: 50%;
  border: none;
  border-radius: 5px;
  padding: 14px;
  padding-left: 14px;
}

.tag {
  display: flex;
  align-items: center;
  margin: 7px 0;
  margin-right: 10px;
  padding: 0 10px;
  padding-right: 5px;
  border: 1px solid orange;
  border-radius: 5px;
  background-color: orange;
  white-space: nowrap;
  color: white;
}

.tag button {
  display: flex;
  padding: 6px;
  border: none;
  background-color: unset;
  cursor: pointer;
  color: white;
}
I hope you’ve found this tutorial on building a tag input field component in React helpful. Thanks for reading.
Install LogRocket via npm or script tag. LogRocket.init() must be called client-side, not
server-side
$ npm i --save logrocket

// Code:

import LogRocket from 'logrocket';
LogRocket.init('app/id');
// Add to your HTML:

<script src="https://cdn.lr-ingest.com/LogRocket.min.js"></script>
<script>window.LogRocket && window.LogRocket.init('app/id');</script>

Discover how React Fiber works under the hood. Learn how React builds the DOM, handles concurrent rendering, and works alongside React 19 features and the new React Compiler.

Learn how to use Skybridge, an open-source React framework, to build and deploy cross-platform AI apps and interactive UI widgets for ChatGPT, Claude, and MCP clients from a single codebase.

Learn how to set up Meilisearch, index documents, and build keyword, semantic, and hybrid search with AI-powered retrieval.

Compare pnpm and npm across security defaults, disk usage, dependency strictness, and workspace policy to decide which package manager fits your project.
Hey there, want to help make our blog better?
Join LogRocket’s Content Advisory Board. You’ll help inform the type of content we create and get access to exclusive meetups, social accreditation, and swag.
Sign up now

