The emergence and growth of Flutter has leveraged the development of cross-platform game design; Flutter games can be created with only a few lines of code for the design and logic, while maintaining a great UI/UX.

Flutter has the capability to render at up to 60FPS. You can exploit that capability to build a simple 2D, or even 3D, game. Keep in mind that more complex games won’t be a good idea to develop in Flutter, as most developers will gravitate towards native development for complex applications.
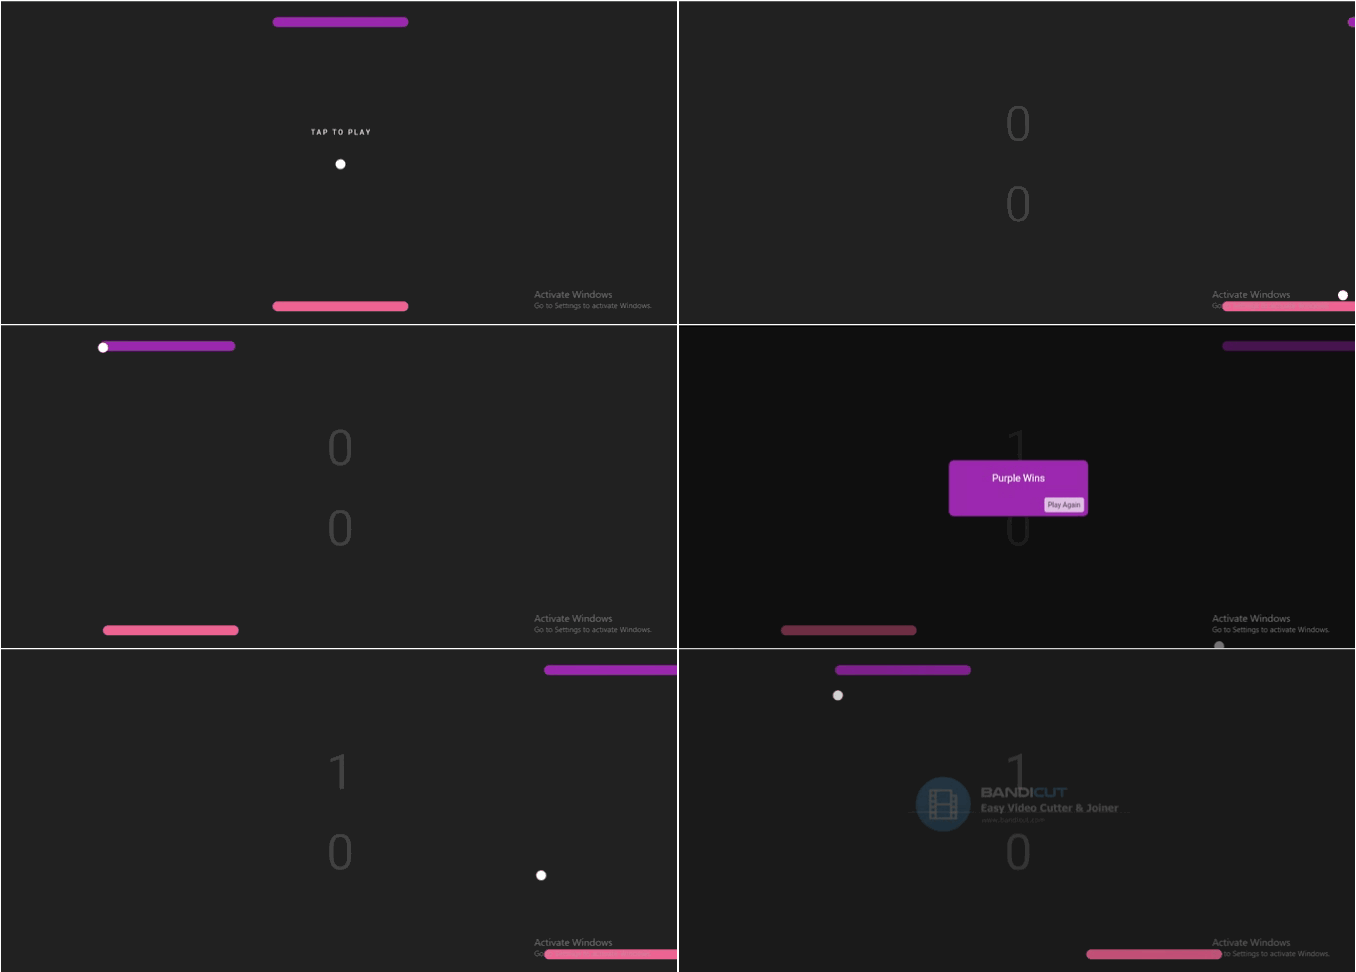
In this tutorial, we will be recreating one of the first computer games ever created: Pong. Pong is a simple game, so it’s a great place to start. This article is split into two main sections: game logic and the user interface, to make the build a bit clearer by focusing on the important sections separately.
Before we get into the build, let’s go over the prerequisites and setup.
The Replay is a weekly newsletter for dev and engineering leaders.
Delivered once a week, it's your curated guide to the most important conversations around frontend dev, emerging AI tools, and the state of modern software.
To understand and code along with this lesson, you will need the following:
In this post, we will be using Alignment(x,y) as a representation of Vector(x,y) for the position of the X and Y axis of the screen, which will help develop the physics of the game. We will also be creating stateless widgets for some of our variables and declare them in the homepage.dart file to make the code less bulky and easy to understand.
First, create a Flutter project. Clear the default code in the main.dart file, and import the material.dart package for including Material widgets in the application.
Next, create a class called MyApp() and return MaterialApp(), then create a statefulWidget HomePage() and pass it into the home parameter of MaterialApp() as shown below:
import 'package:flutter/material.dart';
import 'package:pong/homePage.dart';
void main() {
 runApp(MyApp());
}
class MyApp extends StatelessWidget {
 @override
 Widget build(BuildContext context) {
  return MaterialApp(
   debugShowCheckedModeBanner:false,
   home: HomePage(),
  );
 }
}
Within HomePage(), we need to write some functions and methods to take care of the mathematical and physics-related operations. These include handling collisions, accelerating or decelerating, and navigation in the game.
But first, we need to declare some parameters that will represent the positional alignments of the ball, players, and the initial score of both players. The code for the parameters should be placed under _HomePageState, to which we will refer later in the post:
//player variations
double playerX = -0.2;
double brickWidth = 0.4;
int playerScore = 0;
// enemy variable
double enemyX = -0.2;
int enemyScore = 0;
//ball
double ballx = 0;
double bally = 0;
var ballYDirection = direction.DOWN;
var ballXDirection = direction.RIGHT;
bool gameStarted = false;
...
Then, we provide an enumeration for directions for the ball and brick movement:
enum direction { UP, DOWN, LEFT, RIGHT }
...
To make this game work, we need to create artificial gravity so that when the ball hits the top brick (0.9) or bottom brick (-0.9), it goes in the opposite direction. Otherwise, if it does not hit either brick and goes to the top (1) or bottom (-1) of the playing field, it records it as a loss for the player.
When the ball hits the wall on the left (1) or right (-1), it goes in the opposite direction:
void startGame() {
 gameStarted = true;
 Timer.periodic(Duration(milliseconds: 1), (timer) {
  updatedDirection();
  moveBall();
  moveEnemy();
  if (isPlayerDead()) {
   enemyScore++;
   timer.cancel();
   _showDialog(false);
   // resetGame();
  }
   if (isEnemyDead()) {
   playerScore++;
   timer.cancel();
   _showDialog(true);
   // resetGame();
  }
 });
}
...
In the code above, we started with a function startGame() which changes the boolean gameStarted to true, after which we call a Timer() with a duration of one second.
Within the timer, functions like updatedDirection(),moveBall(), and moveEnemy() are passed alongside an if statement to check if either player has failed. If so, the score is accumulated, the timer is cancelled, and a dialog is shown.
The following functions ensure that the ball doesn’t go beyond 0.9 in alignment, and that the ball will only go in the opposite direction when it comes in contact with the brick:
void updatedDirection() {
 setState(() {
  //update vertical dirction
  if (bally >= 0.9 && playerX + brickWidth>= ballx && playerX <= ballx) {
   ballYDirection = direction.UP;
  } else if (bally <= -0.9) {
   ballYDirection = direction.DOWN;
  }
  // update horizontal directions
  if (ballx >= 1) {
   ballXDirection = direction.LEFT;
  } else if (ballx <= -1) {
   ballXDirection = direction.RIGHT;
  }
 });
}
void moveBall() {
 //vertical movement
 setState(() {
  if (ballYDirection == direction.DOWN) {
   bally += 0.01;
  } else if (ballYDirection == direction.UP) {
   bally -= 0.01;
  }
 });
 //horizontal movement
 setState(() {
  if (ballXDirection == direction.LEFT) {
   ballx -= 0.01;
  } else if (ballXDirection == direction.RIGHT) {
   ballx += 0.01;
  }
 });
}
...
Also, if the ball hits the left or right of the field, it goes in the opposite direction:
void moveLeft() {
 setState(() {
  if (!(playerX - 0.1 <= -1)) {
   playerX -= 0.1;
  }
 });
}
void moveRight() {
 if (!(playerX + brickWidth >= 1)) {
  playerX += 0.1;
 }
}
...
The moveLeft() and moveRight() functions help to control our bricks’ movement from left to right using the keyboard arrow. These work with an if statement to ensure the bricks do not go beyond the width of both axes of the field.
The function resetGame() returns the players and the ball to their default positions:
void resetGame() {
 Navigator.pop(context);
 setState(() {
  gameStarted = false;
  ballx = 0;
  bally = 0;
  playerX = -0.2;
  enemyX =- 0.2;
 });
}
...
Next, we create two functions, isEnemyDead() and isPlayerDead(), that return a boolean value. They check if either of the players has lost (if the ball has hit the vertical section behind the brick):
bool isEnemyDead(){
 if (bally <= -1) {
  return true;
 }
 return false;
}
bool isPlayerDead() {
 if (bally >= 1) {
  return true;
 }
 return false;
}
...
Finally, the function _showDialog displays a dialog when either player wins. It passes a boolean, enemyDied, to differentiate when a player loses. Then, it declares the non-losing player has won the round, and uses the winning player’s color for the displayed text “play again:”
void _showDialog(bool enemyDied) {
 showDialog(
   context: context,
   barrierDismissible: false,
   builder: (BuildContext context) {
    // return object of type Dialog
    return AlertDialog(
     elevation: 0.0,
     shape: RoundedRectangleBorder(
       borderRadius: BorderRadius.circular(10.0)),
     backgroundColor: Colors.purple,
     title: Center(
      child: Text(
       enemyDied?"Pink Wins": "Purple Wins",
       style: TextStyle(color: Colors.white),
      ),
     ),
     actions: [
      GestureDetector(
       onTap: resetGame,
       child: ClipRRect(
        borderRadius: BorderRadius.circular(5),
        child: Container(
          padding: EdgeInsets.all(7),
          color: Colors.purple[100],
          child: Text(
           "Play Again",
           style: TextStyle(color:enemyDied?Colors.pink[300]: Colors.purple[000]),
          )),
       ),
      )
     ],
    );
   });
}
Now, we will begin the development of the user interface.
Inside the widget build in the homePage.dart file, add the code below:
return RawKeyboardListener(
 focusNode: FocusNode(),
 autofocus: false,
 onKey: (event) {
  if (event.isKeyPressed(LogicalKeyboardKey.arrowLeft)) {
   moveLeft();
  } else if (event.isKeyPressed(LogicalKeyboardKey.arrowRight)) {
moveRight();
  }
 },
 child: GestureDetector(
  onTap: startGame,
  child: Scaffold(
    backgroundColor: Colors.grey[900],
    body: Center(
      child: Stack(
     children: [
      Welcome(gameStarted),
      //top brick
      Brick(enemyX, -0.9, brickWidth, true),
      //scoreboard
      Score(gameStarted,enemyScore,playerScore),
      // ball
      Ball(ballx, bally),
      // //bottom brick
      Brick(enemyX, 0.9, brickWidth, false)
     ],
    ))),
 ),
);
In the code, we return RawKeyboardListener(), which will provide movement from left to right as we are building on the web. This can also be replicated for a touchscreen device.
The widget GestureDetector() provides the onTap functionality used to call the function startGame written above in the logic. A child, Scaffold(), is also written to specify the app’s background color and body.
Next, create a class called Welcome and pass in a boolean to check if the game has started or not. If the game has not started, the text “tap to play” will become visible:
class Welcome extends StatelessWidget {

 final bool gameStarted;
 Welcome(this.gameStarted);
 @override
 Widget build(BuildContext context) {
  return Container(
    alignment: Alignment(0, -0.2),
    child: Text(
     gameStarted ? "": "T A P T O P L A Y",
     style: TextStyle(color: Colors.white),
    ));
 }
}
Now we can create another class, Ball, to handle the ball design and its position at every point in the field using Alignment(x,y). We pass these parameters through a constructor for mobility, like so:
class Ball extends StatelessWidget {
 final x;
 final y;
 Ball(this.x, this.y);
 @override
 Widget build(BuildContext context) {
  return Container(
   alignment: Alignment(x, y),
   child: Container(
    decoration: BoxDecoration(shape: BoxShape.circle, color: Colors.white),
    width: 20,
    height: 20,
   ),
  );
 }
}
Now let’s design the Brick class to handle the brick design, color, position, and player type.
Here, we use a mathematical equation (Alignment((2* x +brickWidth)/(2-brickWidth), y)) to pass the position for the x and y axis:
class Brick extends StatelessWidget {
 final x;
 final y;
 final brickWidth;
 final isEnemy;
 Brick( this.x, this.y, this.brickWidth, this.isEnemy);
 @override
 Widget build(BuildContext context) {
  return Container(
    alignment: Alignment((2* x +brickWidth)/(2-brickWidth), y),
    child: ClipRRect(
     borderRadius: BorderRadius.circular(10),
     child: Container(
       alignment: Alignment(0, 0),
       color: isEnemy?Colors.purple[500]: Colors.pink[300],
       height: 20,
       width:MediaQuery.of(context).size.width * brickWidth/ 2,
       ),
    ));
 }
}
Finally, the Score class should be placed directly underneath the build widget in the homepage.dart file; it displays the score of each player.
Create a constructor for the variables enemyScore and playerScore to handle the score of each player, and gameStarted to check if the game has started. This will display the content of the Stack(), or an empty Container():
class Score extends StatelessWidget {
 final gameStarted;
 final enemyScore;
 final playerScore;
 Score(this.gameStarted, this.enemyScore,this.playerScore, );
 @override
 Widget build(BuildContext context) {
  return gameStarted? Stack(children: [
   Container(
     alignment: Alignment(0, 0),
     child: Container(
      height: 1,
      width: MediaQuery.of(context).size.width / 3,
      color: Colors.grey[800],
     )),
   Container(
     alignment: Alignment(0, -0.3),
     child: Text(
      enemyScore.toString(),
      style: TextStyle(color: Colors.grey[800], fontSize: 100),
     )),
   Container(
     alignment: Alignment(0, 0.3),
     child: Text(
      playerScore.toString(),
      style: TextStyle(color: Colors.grey[800], fontSize: 100),
     )),
  ]): Container();
 }
}
The gif below shows a test of the game:

In this post, we covered alignment, RawKeyboardListener, widgets, booleans, ClipRect for containers, and mathematical functions in our code, all used to recreate the game Pong. The game could also be improved by increasing the number of balls or reducing the brick length, making it more complex.
I hope this post was as helpful and fun as it was building and documenting it. Feel free to use the principles in the article to recreate other classic games, or invent a new one. You can find a link to the code from this article on GitHub.
Install LogRocket via npm or script tag. LogRocket.init() must be called client-side, not
server-side
$ npm i --save logrocket

// Code:

import LogRocket from 'logrocket';
LogRocket.init('app/id');
// Add to your HTML:

<script src="https://cdn.lr-ingest.com/LogRocket.min.js"></script>
<script>window.LogRocket && window.LogRocket.init('app/id');</script>

Claude Code is deceptively capable. Point it at a codebase, describe what you need, and it’ll autonomously navigate files, write […]

Compare the top AI development tools and models of February 2026. View updated rankings, feature breakdowns, and find the best fit for you.

Broken npm packages often fail due to small packaging mistakes. This guide shows how to use Publint to validate exports, entry points, and module formats before publishing.

Discover what’s new in The Replay, LogRocket’s newsletter for dev and engineering leaders, in the February 11th issue.
Hey there, want to help make our blog better?
Join LogRocket’s Content Advisory Board. You’ll help inform the type of content we create and get access to exclusive meetups, social accreditation, and swag.
Sign up now