It can be incredibly challenging to build complex React projects from the ground up. They require both upfront knowledge and a deep understanding of an entire ecosystem.

In this already complex environment, a robust setup for your React app is crucial for its success because it can instantly improve the developer experience and free your team to focus on what truly matters — building an amazing product.
Curious how to go about building a robust React app? Let’s dive in.
The Replay is a weekly newsletter for dev and engineering leaders.
Delivered once a week, it's your curated guide to the most important conversations around frontend dev, emerging AI tools, and the state of modern software.
The first step toward creating a robust setup for our React app is simple. All we need is four main ingredients:
Let’s set them up!
To begin with, let’s create a React app with the following command:
npx create-react-app react-app-setup --template typescript
Because we used the TypeScript template, we already have TypeScript in place. Let’s also add the following script to package.json to make type checking a bit easier:
"typescript": "tsc --project tsconfig.json --noEmit"
In addition, Create React App gave us a very basic setup for React Testing Library, a test script in package.json, and a passing test to work with.
This is a nice start, but there is more to do.
Note: If you are unable to use Create React App for the initial project setup or prefer a different toolchain, you might need to setup TypeScript and React Testing Library manually.
To set up our linter, we first need to install it:
npm install eslint --save-dev
Then initialize it with the following command:
npm run eslint --init
Following the prompts, our final output should resemble the screenshot below:
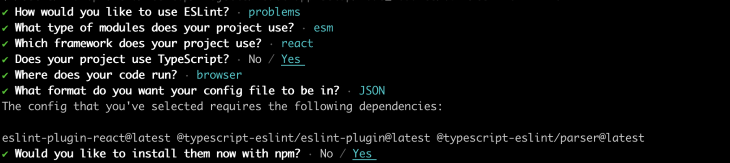
In the end, we should have a .eslintrc.json file at the root of our projects similar to this:
{
    "env": {
        "browser": true,
        "es2021": true
    },
    "extends": [
        "eslint:recommended",
        "plugin:react/recommended",
        "plugin:@typescript-eslint/recommended"
    ],
    "parser": "@typescript-eslint/parser",
    "parserOptions": {
        "ecmaFeatures": {
            "jsx": true
        },
        "ecmaVersion": 12,
        "sourceType": "module"
    },
    "plugins": [
        "react",
        "@typescript-eslint"
    ],
    "rules": {
    }
}
We can additionally configure the linter settings according to our needs. Let’s also add a lint script to package.json:
"lint": "eslint src --color"
Finally, we need to install Prettier:
npm install prettier --save-dev
And create a basic config file, .prettierrc.json, at the root of the project. The settings in this file depend entirely on your project’s needs and requirements.
{
    "printWidth": 80,
    "trailingComma": "all",
    "tabWidth": 4,
    "semi": false,
    "singleQuote": true,
    "arrowParens": "avoid"
}
Let’s also add a script to package.json that will check if our code is formatted correctly:
"prettier": "prettier src -check"
We now have some excellent tooling in place but no easy way to take advantage of it automatically. One great way to improve our setup further is to add a pre-commit hook to our project that will trigger certain checks to be performed by our tooling.
In our hook, we will check for linter errors and warnings, type errors, failing tests, and it will also automatically format our code. This probably sounds like a lot for a pre-commit hook — that’s because it is! To make the process more efficient, these checks will not be performed for the entire project, only for the staged files we are about to commit.
First, we need to install Husky and lint-staged:
npm install husky lint-staged --save-dev
To ensure we can only check the types of staged files, we should also install tsc-files:
npm install tsc-files --save-dev
Let’s also add our lint-staged config, defining the necessary checks to lint-staged.js at the root of our projects:
module.exports = {
    '*.{js,jsx,ts,tsx}': [
        'eslint --max-warnings=0',
        'react-scripts test --bail --watchAll=false --findRelatedTests --passWithNoTests',
        () => 'tsc-files --noEmit',
    ],
    '*.{js,jsx,ts,tsx,json,css,js}': ['prettier --write'],
}
Next, add a script for it in package.json:
"lint-staged": "lint-staged --config lint-staged.js",
Note: Depending on the project we are working on, even with
lint-stagedin place, performing all four checks on every commit might become too heavy and create a hurdle for developers to commit early and often. If this turns out to be the case, it’s good practice to reduce the load in the pre-commit hook in favor of performing the same checks in CI (see below).
To set up the pre-commit hook, create a script in package.json:
"husky-install": "husky install"
And run it with:
npm run husky-install
Then create your hook with the following command:
npx husky add .husky/pre-commit "npm run lint-staged"
The following file will be automatically generated in the .husky folder at the root of the project:
#!/bin/sh
. "$(dirname "$0")/_/husky.sh"
npm run lint-staged
From now on, the checks defined in the lint-staged config will run on every commit. We’ve successfully automated our tooling and freed ourselves from having to worry about it when we make new commits.
But wait, we are currently performing checks only on staged files. What about taking the entire project into account? With these partial checks, how can we even be certain that our app builds successfully and that it is truly ready to be deployed?
As seen above, there are limitations to the local checks we can perform via pre-commit hooks. To take full advantage of our tooling, we need to set up comprehensive checks that will run for the entire project and notify us and our team when there is a problem. How?
Let’s set up a continuous integration workflow with GitHub Actions.
First, we need to create a GitHub repo and push our project into it:
git remote add origin [email protected]:[your-username]/react-app-setup.git
git branch -M master
git push -u origin master
Then, to set up our CI workflow, we go to GitHub Actions, click New workflow, then choose Set up a workflow yourself. Finally, we need to add the following to our main.yml file.
name: React App CI
# Controls when the action will run.
on:
    # Triggers the workflow on push or pull request events but only for the master branch
    push:
        branches: [master]
    pull_request:
        branches: [master]
# A workflow run is made up of one or more jobs that can run sequentially or in parallel
jobs:
    react-app-workflow:
        # The type of runner that the job will run on
        runs-on: ubuntu-latest
        # Steps represent a sequence of tasks that will be executed as part of the job
        steps:
            - uses: actions/checkout@v2
            - name: Use Node.js 14.x
              uses: actions/setup-node@v2
              with:
                  node-version: 14.x
            - name: npm ci
              run: npm ci
            - name: test
              run: npm test
            - name: format
              run: npm run prettier
            - name: lint
              run: npm run lint
            - name: typescript
              run: npm run typescript
            - name: build
              run: npm run build --if-present
Click Start commit, fill in the form, and commit the new workflow to see it in action. Let’s break down the configuration.
First, we define when the workflow should be triggered. In our case, this will happen on push and pull_request for the master branch.
Then we define our runner, ubuntu-latest. Finally, we describe the steps that need to be completed for the workflow run to be successful.
As you can see, we are performing the same checks as in our pre-commit hook — lint, test, format, and type-checks — but this time, we are not limited to only the staged files.
In addition, we test if our project dependencies install correctly at the beginning of the workflow and if the build is successful.
This workflow can be very different and will likely be much more complicated in a real-world React project. It will probably include at the very least multiple environments, different integrations, e2e tests, and a deploy step — the CD part of CI/CD. You can also achieve similar results with a number of other CI/CD tooling. The above is simply a basic illustration to highlight the power of CI checks and their ability to make our lives easier through automation.
Two basic elements together form a robust project setup: suitable tooling and sensible automation. The example above focused on a React app to showcase one possible approach toward creating a robust setup.
Many of the same principles, tools, and concepts apply to a much wider array of software projects.
Additionally, keep in mind that the setup above is highly simplified. It is meant to serve as an illustration rather than a definitive guide and cannot replace thinking critically about the ideal setup for your project and your team.
Curious to play with the code yourself? Find a working example in this repo.
If you found this article useful, follow me on Twitter for more tech content!
Happy coding! ✨
Install LogRocket via npm or script tag. LogRocket.init() must be called client-side, not
server-side
$ npm i --save logrocket

// Code:

import LogRocket from 'logrocket';
LogRocket.init('app/id');
// Add to your HTML:

<script src="https://cdn.lr-ingest.com/LogRocket.min.js"></script>
<script>window.LogRocket && window.LogRocket.init('app/id');</script>

Claude Code vs. OpenCode in a real Next.js refactor: benchmark results, mistakes, prompts, and when to use each CLI agent.

Every time you explain your team’s coding standards to Claude, you are doing work that should be reusable. The same […]

Learn how to move beyond one-shot prompting in Claude with structured workflows for AI-assisted coding, debugging, PR reviews, documentation, testing, and automation.

Learn how to build advanced Next.js forms with rule engines, client-side previews, Server Actions, and server-validated form logic.
Would you be interested in joining LogRocket's developer community?
Join LogRocket’s Content Advisory Board. You’ll help inform the type of content we create and get access to exclusive meetups, social accreditation, and swag.
Sign up now

