A couple of years ago, the only way to bring your idea to life was by using an integrated development environment like VS Code. There were no shortcuts and no easy way out.

If you had no coding experience and didn’t have time to learn, you were out of luck. Fast forward to today, and you can generate a full-blown application simply by chatting with a bot.
Tools like Bolt.new provide a chat interface that lets you generate applications in minutes. This article will show frontend developers how to create professional web applications using Bolt.new.
The Replay is a weekly newsletter for dev and engineering leaders.
Delivered once a week, it's your curated guide to the most important conversations around frontend dev, emerging AI tools, and the state of modern software.
Bolt.new, built by StackBlitz, is an AI-powered web development agent that lets you prompt, run, edit, and deploy full-stack applications directly from your browser—with zero local setup required, from start to finish.
Unlike traditional development workflows that require extensive tool setup, Bolt.new provides a complete development environment accessible through simple conversational prompts.
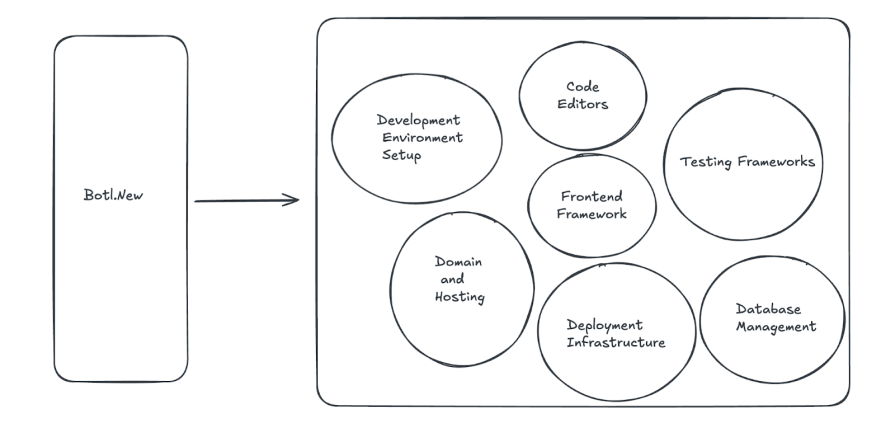
Before AI-powered web development agents, bringing a digital idea to life required developers to master several tools:
This approach often required weeks or months of learning, significant upfront costs, and regular maintenance. While Bolt.new doesn’t eliminate costs entirely, it brings the whole toolkit into one or two prompts.
Bolt.new lets you build digital products fast without needing advanced coding skills, big budgets, or long development timelines.
For frontend developers, it cuts through repetitive setup work and helps you quickly prototype big ideas. Even experienced developers can use it to spin up full-stack applications effortlessly.
Whether you’re technical or not, Bolt.new turns your ideas into working products quickly and affordably.
It’s important to note that Bolt isn’t ideal for highly complex enterprise applications requiring specialized security or extensive custom infrastructure.
Here’s what you’ll see on Bolt.new’s homepage when you’re successfully authenticated:

Let’s break down each part:
You can import designs from:
There are pre-built project templates you can choose from:
Understanding how tokens work in AI code generation is crucial to avoid wasting them.
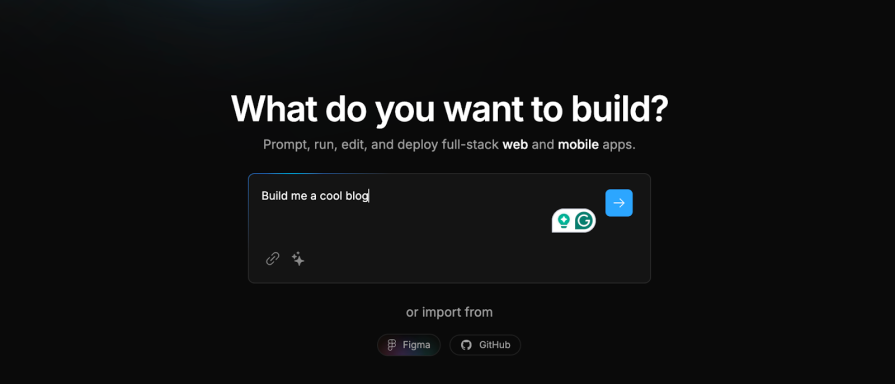
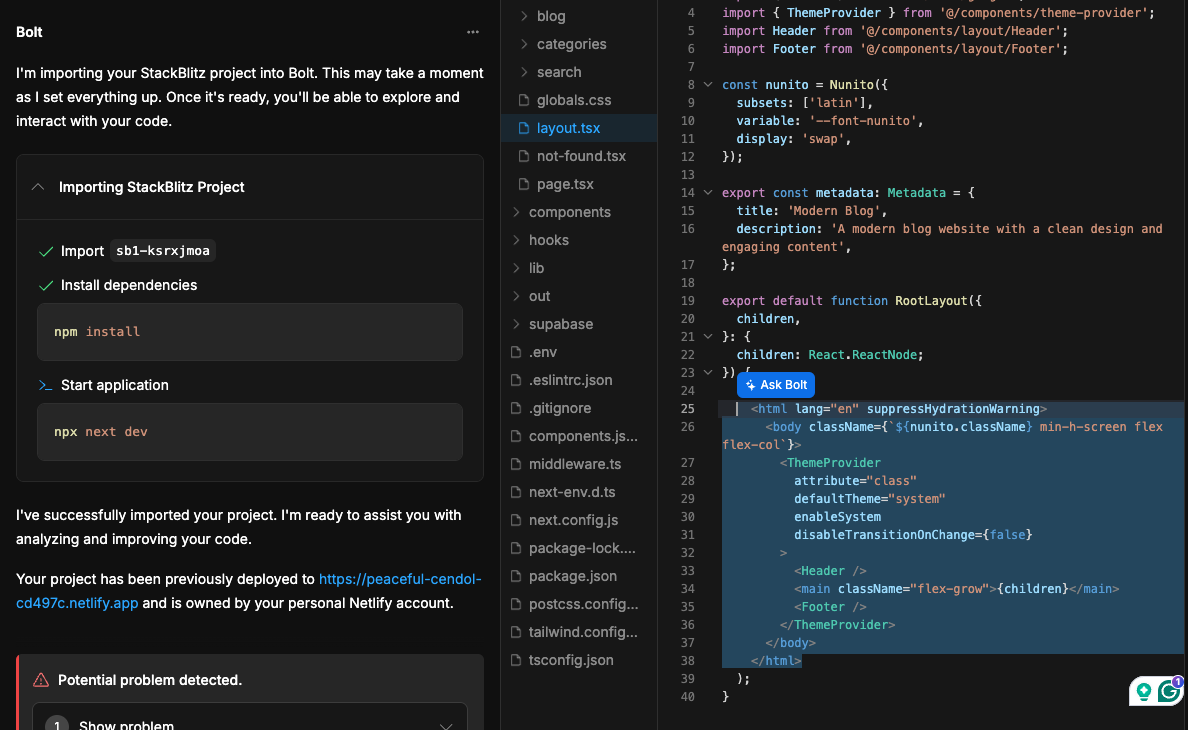
Let’s start by typing “Build me a cool blog site” in our chat interface:
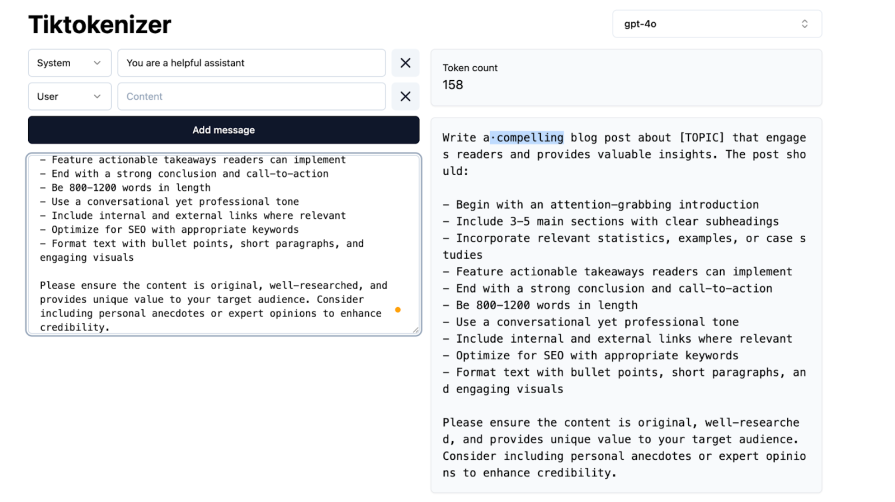
Every prompt you send to Bolt consumes your tokens. First, let’s establish how many tokens a simple prompt requires. I use Tiktokenizer, a free online tool, to check this:
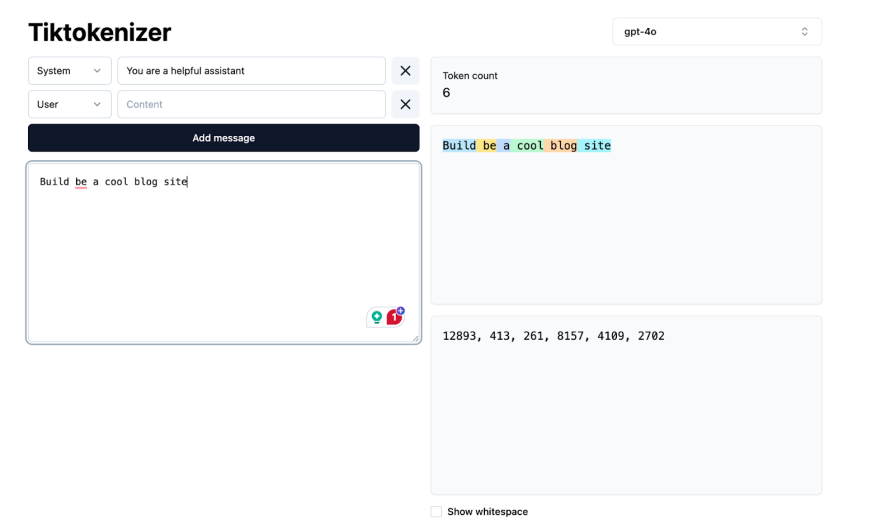
That prompt will take five tokens. But it’s also very vague. We can use the AI Prompt Enhancement feature to make our prompt more descriptive.
Let’s fill out that prompt with some more specifics. That’s going to give our AI a lot more direction:
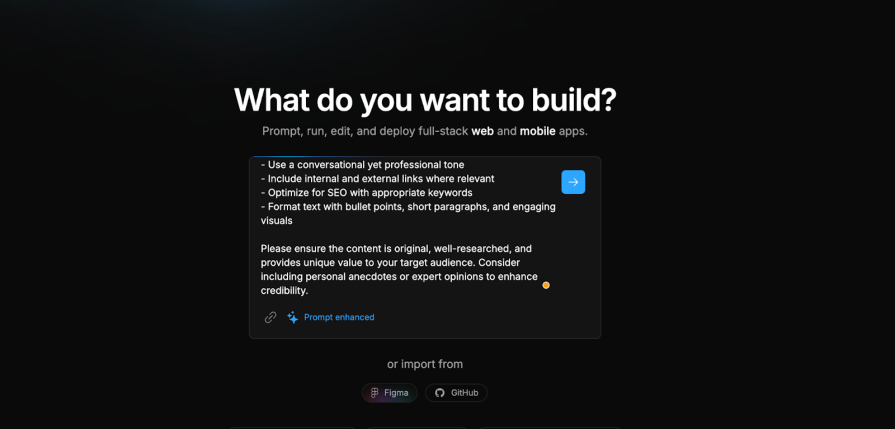
Now we have a more descriptive prompt. But those details also increase our token count to 158. Since we’re trying to make the best use of our tokens, why are we expanding our prompt?:
This is a case where more is better. Being detailed upfront saves tokens in the future. We won’t have to re-prompt with information we should have included earlier. This means Bolt won’t produce incomplete code or require rewrites that consume even more tokens. When we skip information and re-prompt later, the AI may have to rewrite code sections, exponentially increasing token consumption compared to providing comprehensive details upfront.
Here’s what I’ve learned about breaking down prompts effectively:
Start with the most important information. AI pays more attention to what comes first, so put your main needs and goals at the top.
Break your prompt into sections with simple titles:
## What I'm Building
[Basic description of your project]

## Tech Stack
[What tools and libraries to use]

## Features
[What the app should do]

## How It Should Look
[Design and style info]

## Code Details
[How to structure the code]

## What Not to Do
[Things to avoid]

## What I Want Back
[Exactly what you want as output]
For large projects, split into parts:
End with things that are easy to forget:
## Don't Forget:
- Handle errors when things go wrong
- Make it work on phones
- Add proper labels for screen readers
- Show loading messages
This approach helps you avoid getting incomplete answers that require re-prompting later. The more information you give Bolt, the better the response.
Put effort into your prompting. Be detailed and chat with Bolt like you would with a developer to get your app up and running.
Some developers enjoy grabbing a design from Dribbble.com before they begin prompting. Personally, I think Bolt gives the right level of visual appeal. We need the UI and functionality built, then we can integrate Supabase for our database and authentication.
Here’s the prompt I used:
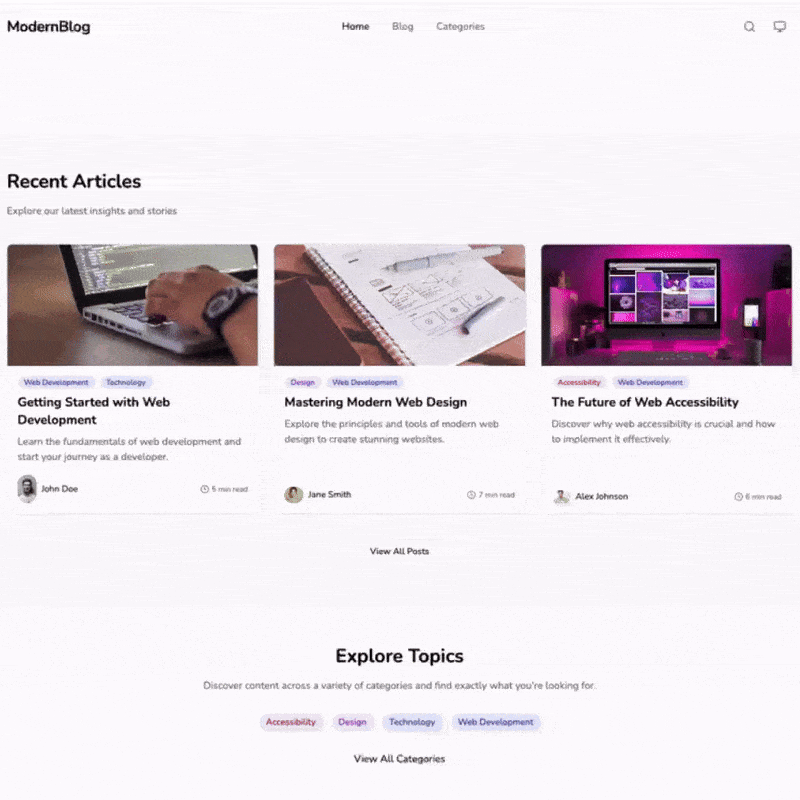
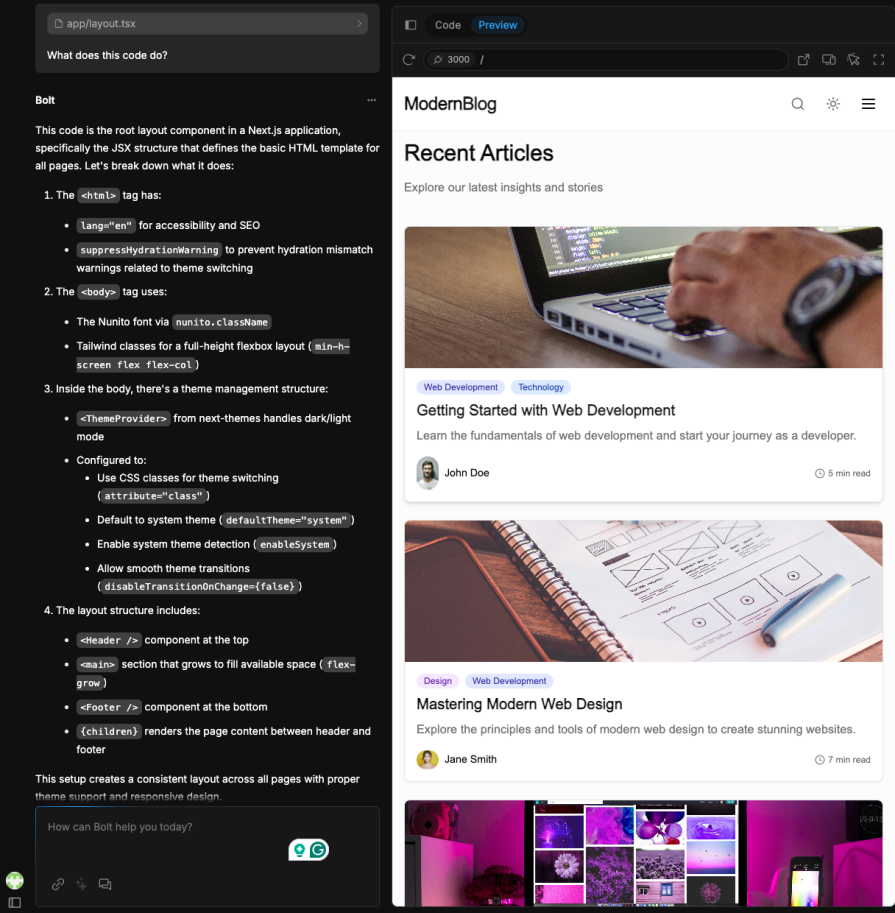
A modern, visually appealing blog website that looks professional and engaging. I want something that stands out from basic blog templates with cool design elements and a smooth user experience.
A complete, working blog website with:
Copy and paste this into Bolt and let it work its magic:
If you want to push further, ask Bolt to provide a complete working blog with Supabase auth, database queries, protected routes, and updated UI components. While Supabase automatic integrations aren’t supported for Next.js projects, you can easily do this yourself.
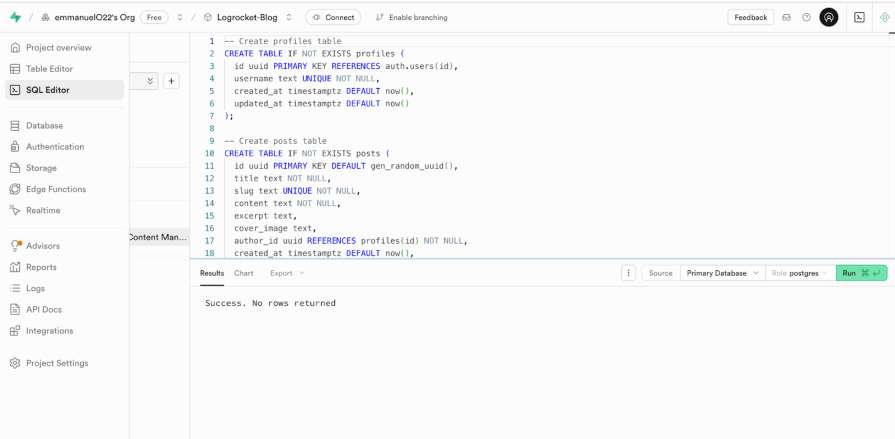
Start by asking Bolt to provide the SQL tables needed for the blog. The SQL code should look like this:
-- Create profiles table
CREATE TABLE IF NOT EXISTS profiles (
 id uuid PRIMARY KEY REFERENCES auth.users(id),
 username text UNIQUE NOT NULL,
 created_at timestamptz DEFAULT now(),
 updated_at timestamptz DEFAULT now()
);

-- Create posts table
CREATE TABLE IF NOT EXISTS posts (
 id uuid PRIMARY KEY DEFAULT gen_random_uuid(),
 title text NOT NULL,
 slug text UNIQUE NOT NULL,
 content text NOT NULL,
 excerpt text,
 cover_image text,
 author_id uuid REFERENCES profiles(id) NOT NULL,
 created_at timestamptz DEFAULT now(),
 updated_at timestamptz DEFAULT now()
);

-- Create categories table
CREATE TABLE IF NOT EXISTS categories (
 id uuid PRIMARY KEY DEFAULT gen_random_uuid(),
 name text UNIQUE NOT NULL,
 slug text UNIQUE NOT NULL,
 created_at timestamptz DEFAULT now()
);

-- Create post_categories junction table
CREATE TABLE IF NOT EXISTS post_categories (
 post_id uuid REFERENCES posts(id) ON DELETE CASCADE,
 category_id uuid REFERENCES categories(id) ON DELETE CASCADE,
 PRIMARY KEY (post_id, category_id)
);

-- Enable RLS
ALTER TABLE profiles ENABLE ROW LEVEL SECURITY;
ALTER TABLE posts ENABLE ROW LEVEL SECURITY;
ALTER TABLE categories ENABLE ROW LEVEL SECURITY;
ALTER TABLE post_categories ENABLE ROW LEVEL SECURITY;

-- Profiles policies
CREATE POLICY "Public profiles are viewable by everyone"
 ON profiles FOR SELECT
 TO public
 USING (true);

CREATE POLICY "Users can update own profile"
 ON profiles FOR UPDATE
 TO authenticated
 USING (auth.uid() = id)
 WITH CHECK (auth.uid() = id);

-- Posts policies
CREATE POLICY "Posts are viewable by everyone"
 ON posts FOR SELECT
 TO public
 USING (true);

CREATE POLICY "Authenticated users can create posts"
 ON posts FOR INSERT
 TO authenticated
 WITH CHECK (auth.uid() = author_id);

CREATE POLICY "Users can update own posts"
 ON posts FOR UPDATE
 TO authenticated
 USING (auth.uid() = author_id)
 WITH CHECK (auth.uid() = author_id);

CREATE POLICY "Users can delete own posts"
 ON posts FOR DELETE
 TO authenticated
 USING (auth.uid() = author_id);

-- Categories policies
CREATE POLICY "Categories are viewable by everyone"
 ON categories FOR SELECT
 TO public
 USING (true);

CREATE POLICY "Only authenticated users can create categories"
 ON categories FOR INSERT
 TO authenticated
 WITH CHECK (true);

-- Post categories policies
CREATE POLICY "Post categories are viewable by everyone"
 ON post_categories FOR SELECT
 TO public
 USING (true);

CREATE POLICY "Users can manage categories for own posts"
 ON post_categories FOR ALL
 TO authenticated
 USING (
   EXISTS (
     SELECT 1 FROM posts
     WHERE id = post_categories.post_id
     AND author_id = auth.uid()
   )
 );

-- Create function to handle updated_at
CREATE OR REPLACE FUNCTION handle_updated_at()
RETURNS TRIGGER AS $$
BEGIN
 NEW.updated_at = now();
 RETURN NEW;
END;
$$ LANGUAGE plpgsql;

-- Create triggers for updated_at
CREATE TRIGGER handle_profiles_updated_at
 BEFORE UPDATE ON profiles
 FOR EACH ROW
 EXECUTE FUNCTION handle_updated_at();

CREATE TRIGGER handle_posts_updated_at
 BEFORE UPDATE ON posts
 FOR EACH ROW
 EXECUTE FUNCTION handle_updated_at();
Copy this code, go to Supabase, create a new project, get the Anon key and project URL, and create an .env.local file.
For the SQL tables, go to the SQL editor and paste the code above. If successful, you’ll be able to see your tables in the table editor. At this point, you can tell Bolt to integrate whatever you want using the project URL and ANON API key, or you can do it yourself. I prefer doing it myself, as it tends to run into fewer errors in my experience:
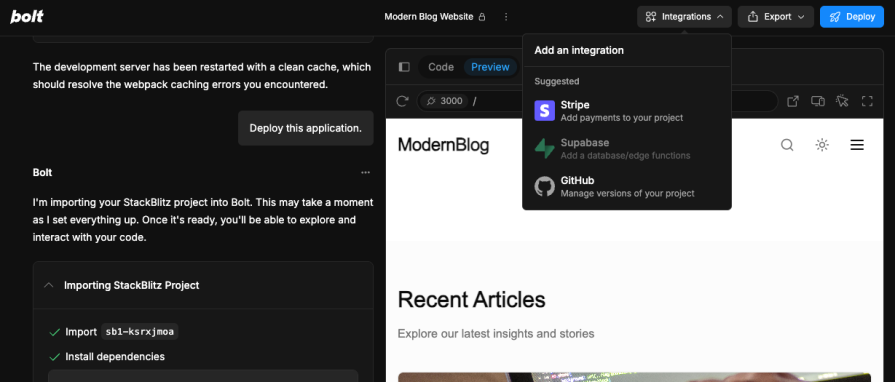
Bolt.new is a web coding editor, meaning you can integrate GitHub and payment services like Stripe:
When coding, you can highlight a section and ask Bolt to explain it, just like you would in an AI-powered editor. It responds with explanations, so you’re never lost in the code:
We can easily deploy our application by clicking the Deploy button at the top right corner of our screen. This will be a smooth process if there are no build errors.
As you can see, our application has been successfully deployed to Netlify.
Bolt offers multiple pricing tiers:
While Bolt has unique functionality, it doesn’t stand completely alone in this space:
Lovable stands out as a beginner-friendly AI coding tool. It functions as a full product builder powered by collaborative AI agents that generate working prototypes involving design, functionality, and some backend logic.
Lovable’s Supabase integration is more mature, with more capabilities than Bolt’s. It offers built-in deployment features with web hosting to publish finished projects without switching tools.
Lovable offers a Free plan at $0/month with up to 30 credits monthly, a Pro plan at $25/month with 100 credits and private projects, and a Teams plan at $30/month with centralized billing and 20 seats.
v0 is another competitor that allows users to publish blocks directly and host instantly with one-click deployment. It’s particularly efficient for generating UI components with Tailwind CSS and Shadcn.
v0 provides natural language to code functionality where users describe UI in plain English to generate React and Tailwind CSS code. The platform features CLI integration for installing components directly into projects via the Blocks feature, which uses npx commands and Figma integration that imports designs directly with exact colors and design tokens.
v0 offers a Free plan for exploration, Premium for higher limits and power users, Team plans for collaboration, and Enterprise for large companies with custom pricing based on token usage.
These tools are solid alternatives. v0 particularly has great UI designs and will be more beneficial for React developers. With Lovable AI, you can do amazing work on both backend and frontend—the choice is yours.
With Bolt, frontend developers can build professional apps more easily than ever.
What matters most with Bolt.new is being deliberate, not just using the tool carelessly. If you spend time early on building detailed and well-structured prompts, you’ll get much better results overall.
Whether you need to validate your business idea, create an MVP, or build your application completely, Bolt.new ensures you can make your ideas a reality as fast as you can prompt them.
Moving forward, development will depend increasingly on conversations. With Bolt.new, the question stops being “Can I build this?” It’s now, “What should I create next?”

Memory leaks in React don’t crash your app instantly, they quietly slow it down. Learn how to spot them, what causes them, and how to fix them before they impact performance.

Build agent-ready websites with Google Web MCP. Learn how to expose reliable site actions for AI agents with HTML and JavaScript.
Build a CRUD REST API with Node.js, Express, and PostgreSQL, then modernize it with ES modules, async/await, built-in Express middleware, and safer config handling.
Discover what’s new in The Replay, LogRocket’s newsletter for dev and engineering leaders, in the March 25th issue.
Hey there, want to help make our blog better?
Join LogRocket’s Content Advisory Board. You’ll help inform the type of content we create and get access to exclusive meetups, social accreditation, and swag.
Sign up now

