
The ability to bring native mobile and desktop experiences to users on the web is closer to becoming reality thanks to efforts like Project Fugu, an ambitious initiative that would make developing web applications with native functionality easier for developers. In this article, we’ll explore some of the most recent additions to this project and create several simple examples to better understand how they work.

The Replay is a weekly newsletter for dev and engineering leaders.
Delivered once a week, it's your curated guide to the most important conversations around frontend dev, emerging AI tools, and the state of modern software.
Project Fugu is a cross-company effort by Microsoft, Intel, and Google. Its focus is on bringing functionalities that are native to mobile and desktop platforms to the web while ensuring that its core tenets like security, privacy, trust, etc. are maintained.
For example, on mobile devices, a native app like WhatsApp can have access to your contact list and allow you to share a contact with others. However, this feature isn’t native to the web and may require a developer to build out a mobile application to access that functionality. Project Fugu aims to solve problems like this with a set of new web APIs.
According to Google:
“We want to close the capability gap between the web and native and make it easy for developers to build great experiences on the open web. We strongly believe that every developer should have access to the capabilities they need to make a great web experience, and we are committed to a more capable web.”
Interestingly, the name Fugu is derived from the Japanese fish that is said to be delicious when prepared correctly but deadly when not. The Chromium team chose this name as a metaphor for how powerful these web capabilities APIs can be if developed correctly but how deadly a failure can be, as they can compromise some or all of the core tenets of the web.
Previously, developers would have needed to develop mobile and desktop applications to access native APIs, but Project Fugu brings a number of these native functionalities to the web. It works by serving as an additional layer of abstraction on top of native APIs that allows you access regardless of what device or OS a user has.
While some of the APIs are still in the experimental phase or not yet fully supported by browsers, there are currently many APIs available for us to play with and explore. It’s important to take a look at the updated list of supported devices and operating systems before using the APIs in your production application.
Let’s begin exploring some of the APIs and building out some demos with them.
To follow along with the code examples, you’ll need some foundational knowledge of HTML, JavaScript and Progressive Web Apps (PWA).The examples in this article were run on Chrome 89.
The APIs we will demo in this article have graduated from origin trial and are now fully supported in the latest versions of Chrome/Chromium-based browsers.
To demonstrate the APIs, we’ll need to create a Progressive Web App (PWA) that users can install in their browser.
We’ll be using the live server extension in VS Code to run our application on localhost:5500.
First, create a new directory. We’ll call ours gwc-demo. Create an index.html and a manifest.webmanifest file in the root of this directory.
In the manifest.webmanifest file, we need to provide some information about our app and how we want it to be displayed in the browser. You can read more on web manifests here.
{
    "name": "Google Web Capabilities Demo",
    "short_name": "GWC Demo",
    "description": "This app demonstrates some of the coolest features of Project Fugu!",
    "scope": "/",
    "display": "standalone",
    "background_color": "#ffff",
    "theme_color": "#3367D6",
    "start_url": "/",
    "icons": [
        {
            "src": "/images/icon-192x192.png",
            "sizes": "192x192",
            "type": "image/png"
        },
        {
            "src": "/images/icon-512x512.png",
            "sizes": "512x512",
            "type": "image/png"
        }
    ]
}
We will also need an image icon for our app that will appear in the status bar of the user’s operating system. I’ve created a simple icon below. Create an images folder in the root directory of your project and copy this image into it. Make sure to create two copies of the image and to rename them icon-192x192.png and icon-512x512.png, respectively.
![]()
With that out of the way, we’ll need to create a service worker. Service workers are used to tell a browser how an application should perform during specific events. This can be when the app is installed, activated, or offline.
Create a file sw.js in your root directory. This file will house the code that runs our service worker. Add the following piece of code:
const urlsToCache = [
  "/images/icon-192x192.png",
  "/images/icon-512x512.png",
  "/index.html",
  "/offline.html",
];

// caches all our files when the app is first installed
self.addEventListener("install", function (event) {
  event.waitUntil(
    caches.open("gwc").then(function (cache) {
      console.log("Opened cache");
      return cache.addAll(urlsToCache);
    })
  );
});


self.addEventListener("fetch", function (event) {
  event.respondWith(
    caches.match(event.request).then(function (response) {
      if (response) return response;
      return fetch(event.request).catch((err) => {
// serves an offline.html file if the app is offline
        return caches.match("offline.html");
      });
    })
  );
});

self.addEventListener("activate", (event) => {});
Chrome 89 added the ability to run simulated offline requests through the service worker. We will use this feature to serve a resource to the browser that informs a user when they’re offline. One way we can achieve this is by caching a file that will be served when the user is offline and then serving that file once our app detects that the user is indeed offline.
To start, create an offline.html file in your root directory. Now, add the following code to the offline.html file:
<!doctype html>
<html lang="en">
  <head>
    <title>GWC Demo App</title>
    <meta name="description" content="This app demonstrates some of the coolest features of Project Fugu!">
    <meta name="viewport" content="width=device-width, initial-scale=1">
    <link rel="manifest" href="manifest.webmanifest">
    <link rel="icon" sizes="192x192" href="/images/icon-192x192.png">
    <meta name="theme-color" content="#3367D6">
    <meta property="og:title" content="GWC Demo App">
    <meta property="og:type" content="website">
    <meta property="og:description" content="This app demonstrates some of the coolest features of Project Fugu!">
  </head>
  <body>

    <main>
      <h1>Hey there 👋, you're offline.</h1>
    </main>
  </body>
</html>
Next, head into the index.html file and include the following piece of code:
<!doctype html>
<html lang="en">
  <head>
    <title>GWC Demo App</title>
    <meta name="description" content="This app demonstrates some of the coolest features of Project Fugu!">
    <meta name="viewport" content="width=device-width, initial-scale=1">
    <link rel="manifest" href="manifest.webmanifest">
    <link rel="icon" sizes="192x192" href="/images/icon-192x192.png">
    <meta name="theme-color" content="#CA623D">
    <meta property="og:title" content="GWC Demo App">
    <meta property="og:type" content="website">
    <meta property="og:description" content="This app demonstrates some of the coolest features of Project Fugu!">
  </head>
  <body>

    <main>
      <h1>Google Web Capabilities Demo</h1>
    </main>
    <script>
      if('serviceWorker' in navigator) {
        navigator.serviceWorker.register('/sw.js', { scope: '/' }).then((registration) => {
          console.log('Service Worker Registered');
        });
        navigator.serviceWorker.ready.then((registration) => {
          console.log('Service Worker Ready');
        });
      }
    </script>
  </body>
</html>
Now that we have everything set up, let’s install our app to check that everything works correctly.
In the top right corner of your browser, you should now see an Install icon within the address bar. Click to install our Google Web Capabilities (GWC) demo app.
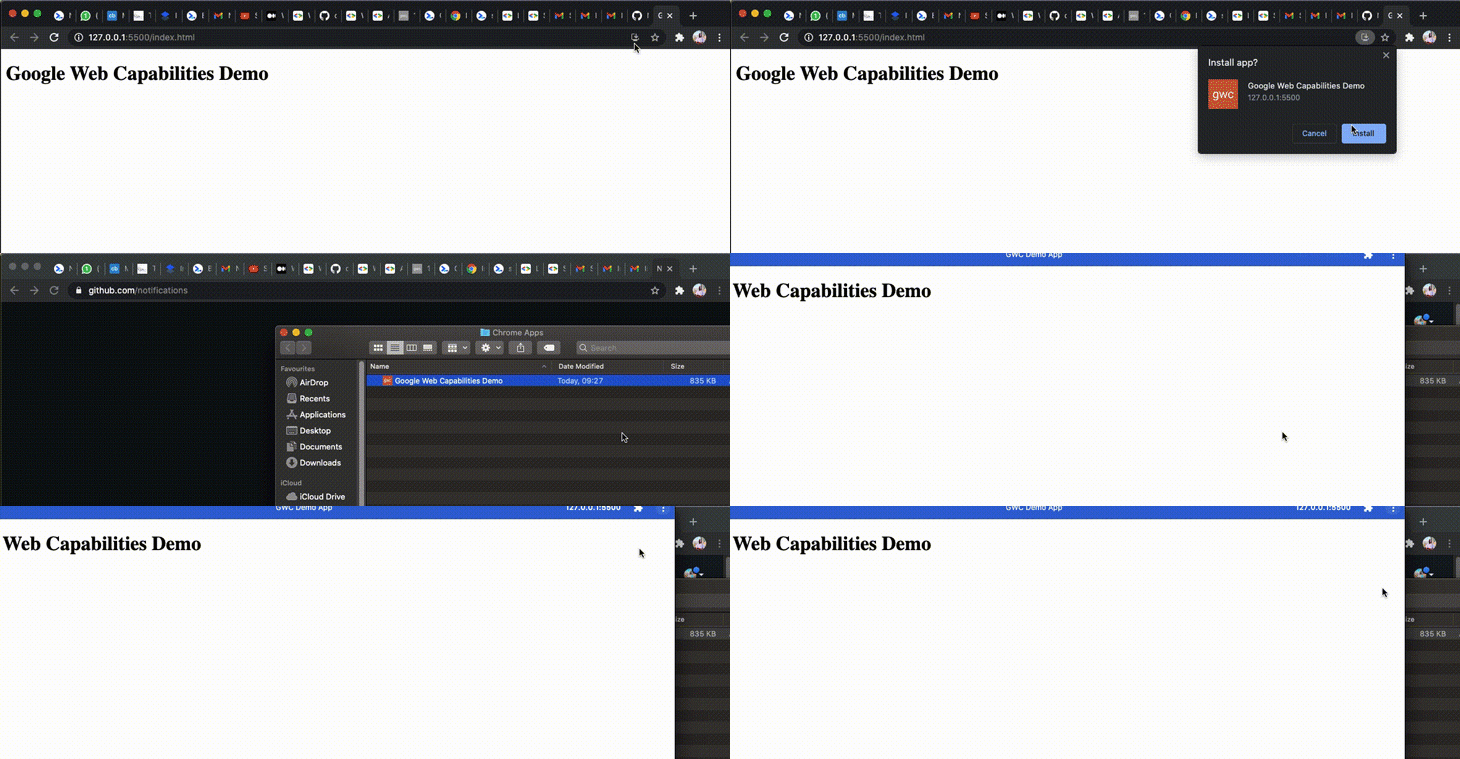
Now, if you look in your dock, you should see our Google Web Capabilities application installed.

The first API we’ll explore is the Badging API. Badging allows us to notify users of our application about activities that may require their attention. We can display a small, non-interruptive amount of information that informs a user of events within the app in a way that is specific to the operating system.
For example, badging can show users a count of how many new messages they’ve received in a chat or email application. Badging can also be used to subtly notify a user when it’s their turn in a gaming application.
The styles in the following code examples will be written using Tailwind CSS, but you can visit the repo to see the style classes.
Create a new folder called scripts and include a badging.js file. Add the following code into the badging.js file:
let count = 0;
document.getElementById("new-message").addEventListener("click", () => {
  navigator.setAppBadge(++count);
});
document.getElementById("clear-messages").addEventListener("click", () => {
  navigator.clearAppBadge();
});
Next, in your index.html file, add the following code for the Badging API within the <main> tag:
      <!-- Badging API -->
      <button id="new-message">New message</button>
      <button id="clear-messages">Clear messages!</button>
Now, when we click the New message button, we’ll get a new notification on our app’s icon badge.
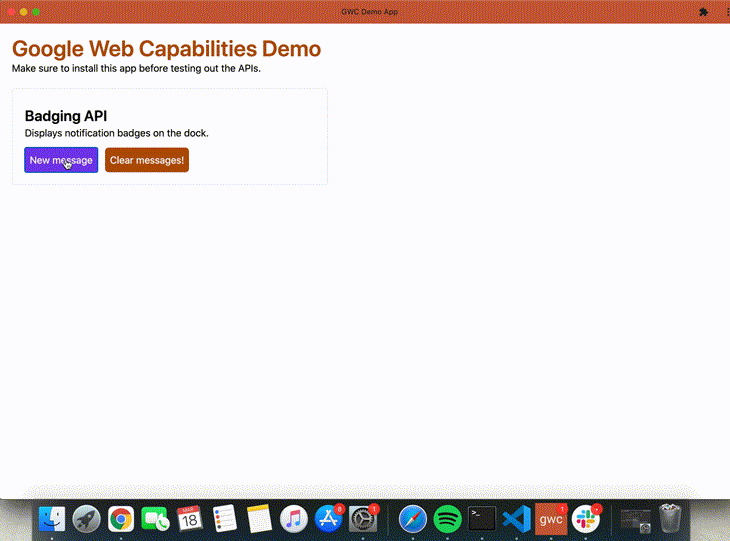
As you can see, each time we click the New message button, the count on our GWC badge (in the dock) increases. When we hit the Clear messages! button, it resets.
The File System Access API allows users to interact with files on their local devices. We can read and write to files directly on a user’s device in the same way text editors, IDEs, and video editors do. Let’s explore this API in more detail.
For our first example, we will read a file from a user’s directory and display the content inside a textarea tag.
Update your index.html file with the following block of code:
      <!-- Native File System API -->
      <div>
        <h1>File system access API</h1>
        <p>A simple text editor that can read and save content to a file.</p>

        <textarea id="textarea" cols="30" rows="10"></textarea>
        <div>
          <button id="open-file-picker">Open and read file</button>
          <button id="save-as">Save as</button>
          <button id="save">Save</button>
        </div>
      </div>
Next, within the scripts folder, create a file-system.js file and add the following code:
let fileHandle;
const textarea = document.getElementById('textarea');
document.getElementById('open-file-picker').addEventListener('click', async () => {
    [fileHandle] = await window.showOpenFilePicker();
    // read a file from the file system
    const file = await fileHandle.getFile();
    // reads the text content in the file
    const contents = await file.text();
    // updates the textarea with the text contents
    textarea.value = contents;
});
We need to keep a reference to the selected file using the fileHandle variable. This will allow us to save changes or perform other operations on the file.
The showOpenFilePicker method returns an array of handles that have all the properties and methods we need when interacting with a file.
We can now test that our file is correctly read and displayed. Let’s create a .txt file and add some text to it. We’ll achieve this using the terminal:
touch test.txt
echo "Hello World" >> test.txt
Now, head back into the GWC app to check that our app can load content from the text file.

Another powerful feature of the File System Access API is the ability to write to files in our file system. The createWritable() method from the File System Access API creates a stream that you can use to pipe text, either Blobs or a BufferSource. The createWritable() method will also request permission from a user before writing to the disk.
In a regular text editor, users will usually have save and save as options. While the save option writes changes to the same file, the save as option allows you to write changes to a new file.
First, we’ll explore the save as functionality. When a user clicks the Save as button, we’ll open up the file picker and allow the user to create a new file or document to save their changes to. We’ll then write the content from the text area into this file.
We’ll update our scripts/file-system.js with the following block of code:
const getNewFileHandle = async () =>{
    // additional options for the file picker to use
    const options = {
        types: [
            {
                description: "Text Files",
                accept: {
                    "text/plain": [".txt"],
                },
            },
        ],
    };
  const handle = await window.showSaveFilePicker(options);
  return handle;
}

document.getElementById("save-as").addEventListener("click", async () => {
    const newFileHandle = await getNewFileHandle();

    const contents = document.getElementById('textarea').value

    const writable = await newFileHandle.createWritable();

    await writable.write(contents);

    await writable.close();
});
In the getNewFileHandle() method, we specify the type of file we’d like to save: a text/txt file. We then display a file picker to the user, allowing them select where they’d like the file to be saved. This method returns a new handle. We can then bind to the methods on this handle to save the contents from the textarea to the file.
Let’s test this out.
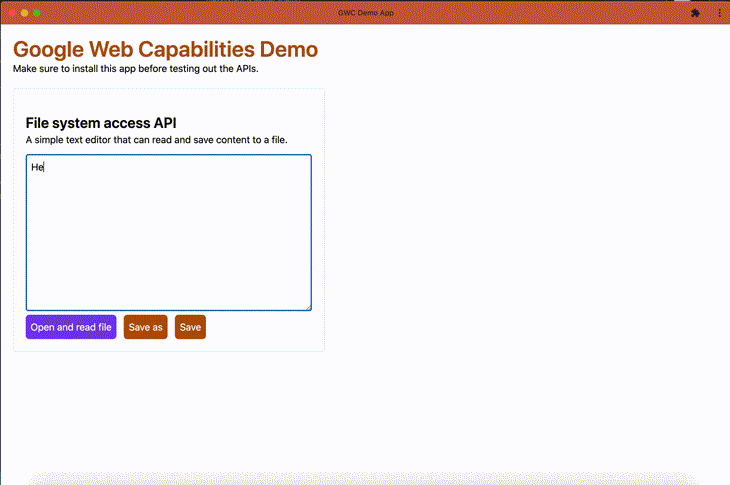
Let’s demonstrate overwriting files using the Save button. For this functionality, we’ll need to make sure to keep a reference to the fileHandle when a user opens a file. By doing this, we can easily bind to the methods on the fileHandle to overwrite the contents of the file.
We’ll update our scripts/file-system.js with the following block of code:
document.getElementById("save").addEventListener("click", async () => {
    const contents = document.getElementById('textarea').value

    const writable = await fileHandle.createWritable();

    await writable.write(contents);

    await writable.close();
})
Now, let’s test it out!
We’ll load some content from the test.txt file we created earlier, update it, then save it.
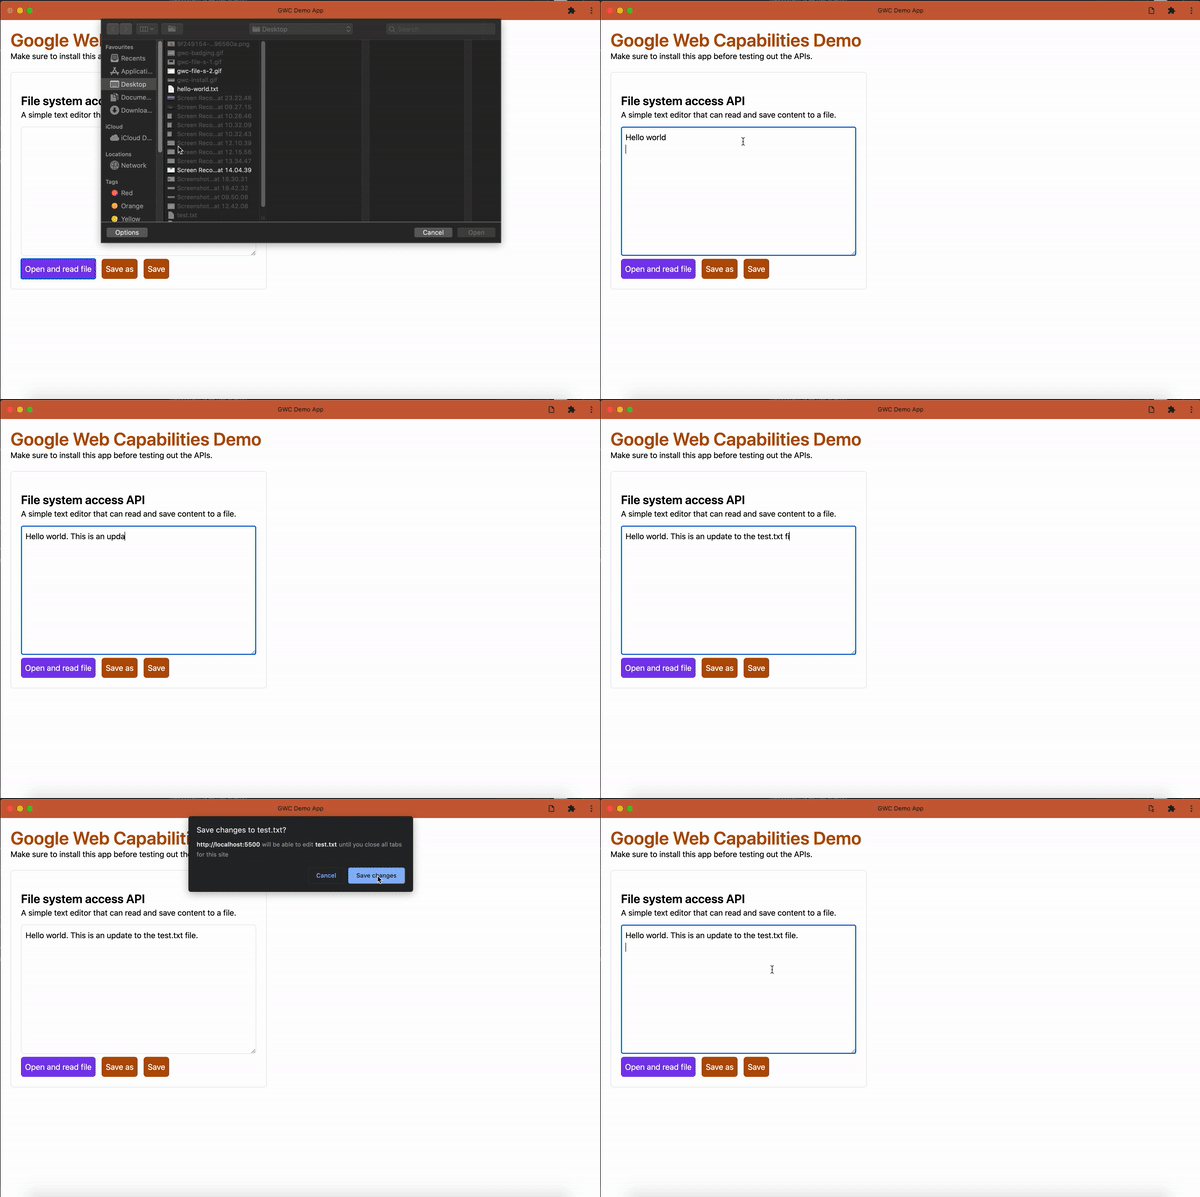
The final API we’ll explore in this article is the Contact Picker API. This functionality has been native to mobile OS for a long time, and with Project Fugu, we can now access a user’s contact list on the web.
The Contact Picker API is currently only available by running Chrome 80 or later on an Android device. For this API, we’ll write the code and then use ngrok to create a public URL that will tunnel through to our localhost. By doing this, we’ll be able to continue writing the code on our machine while testing with our mobile device.
Download and install ngrok on your machine to follow along with this part. Launch ngrok on localhost:5500 (or whichever port your live server extension is running on).
./ngrok http 5500
Navigate to the URL provided by ngrok on an Android device to see our application. If you’re unable to access the app on your Android device, ensure that ngrok is running on the same port that your live server VS Code extension is running on.

To confirm, check the address bar in the browser. For example, in this example, live server runs on port 5500.
Now, in your scripts directory, create a contacts-picker.js file. Make sure to include this script in your index.html file.
Update the index.html file with the following code:
<section>
        <h1>Contacts Picker API</h1>
        <h2 class="hidden not-supported-message">Your browser does not support the Contacts Picker API</h2>
        <h2 class="hidden not-supported-message">Please try again on an Android device with Chrome 80+ </h2>
        <button id="select-contact">Select a contact</button>
        <div id="contacts" class="hidden">
          <p>Your contacts will only be displayed on this page for Demo purposes and are not stored anywhere else.</p>x
        </div>
        <ul id="results"></ul>
      </section>
We have added a hidden class from Tailwind CSS that hides the message that appears by default, reading, “Your browser does not support the Contacts Picker API.” We will remove this class using JavaScript if we detect that the user’s browser supports the Contacts Picker API.
We can now update the contacts-picker.js file with this block of code:
const supported = ('contacts' in navigator && 'ContactsManager' in window);
if (!supported){
    selectContactBtn.classList.add('hidden')
    const messages = document.querySelectorAll('.not-supported-message')
    messages.forEach((message)=> message.classList.remove('hidden'))
}
If the user’s browser does not support the Contacts Picker API, we will show the message.
Let’s continue to update the contacts-picker.js file with the rest of the code we need:
const selectContactBtn = document.getElementById('select-contact')
// details we wish to get about a contact
const props = ['name', 'email', 'tel'];
// allows a user select multiple contacts
const opts = {multiple: true};
const ul = document.getElementById('results')

selectContactBtn.addEventListener('click', async ()=>{
    try {
        const contacts = await navigator.contacts.select(props, opts);
        renderResults(contacts);
      } catch (ex) {
        // Handle any errors here.
      }
})

function renderResults(contacts){
    contacts.forEach(contact =>{
        const li = document.createElement('li')
        if(contact.name) li.innerHTML += `<b>Name</b>: ${contact.name} <br />`
        if(contact.email) li.innerHTML += `<b>E-mail</b>: ${contact.email.join(', ')} <br />`
        if(contact.tel) li.innerHTML += `<b>Tel</b>: ${contact.tel.join(', ')} <br />`

        li.classList.add('mt-3')
        ul.appendChild(li)
    })
}
We have a renderResults function that will take in an array of contacts selected by the user and append them to our <ul> tag so they can be displayed on the screen.
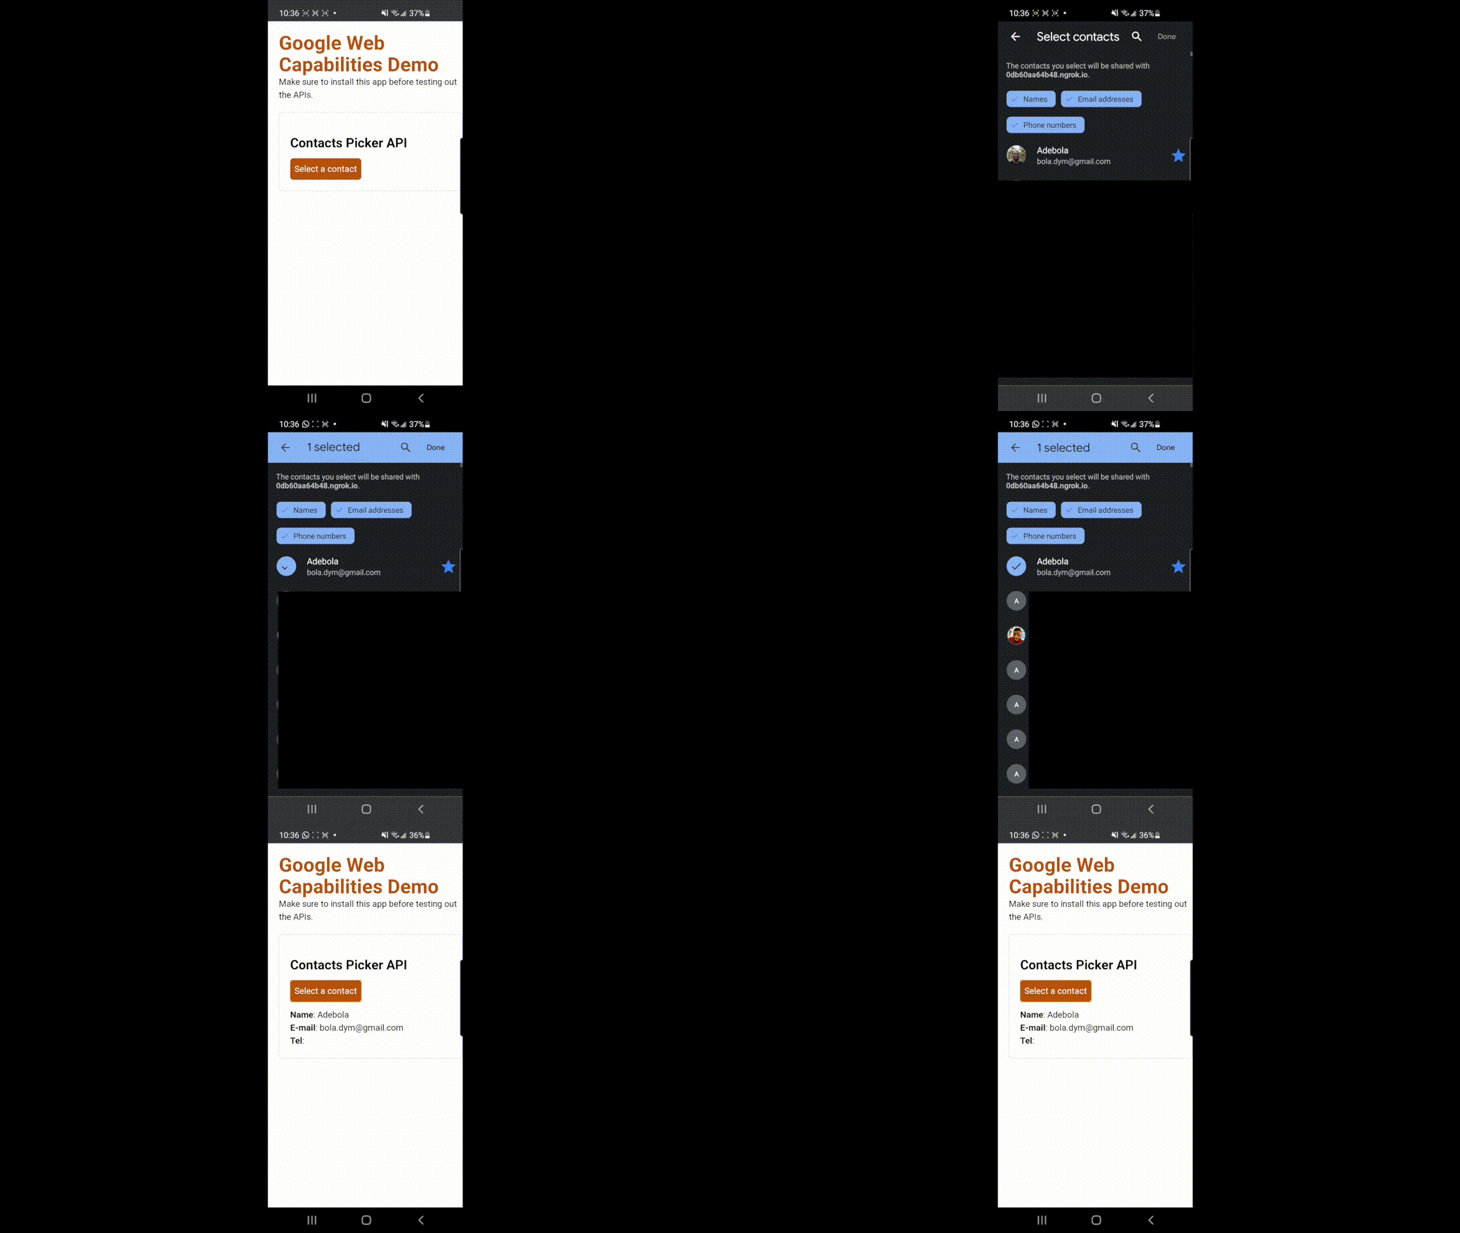
Now, you can test out the Contacts Picker API on an Android device running Chrome 80 (again, note that this is the only browser that supports the API at the time of writing). Please refer to the updated list here to see when support arrives for more browsers.
You can see the live version of the demo here and see the complete source code, including the styles we have used, here.
Project Fugu is working towards expanding possibilities for developers on the web. Eventually, developers will be able to access the native APIs on a user’s mobile device without having to know anything about how those APIs work. Developers will also be able to easily build features with these APIs using the core web languages they’re already familiar with!
You can see the most up to date list of the APIs here as well as which browsers support which APIs. Anyone can suggest what APIs to be added to the project. You can add your suggestions to the list here.
Install LogRocket via npm or script tag. LogRocket.init() must be called client-side, not
server-side
$ npm i --save logrocket

// Code:

import LogRocket from 'logrocket';
LogRocket.init('app/id');
// Add to your HTML:

<script src="https://cdn.lr-ingest.com/LogRocket.min.js"></script>
<script>window.LogRocket && window.LogRocket.init('app/id');</script>

@container scroll-state: Replace JS scroll listeners nowCSS @container scroll-state lets you build sticky headers, snapping carousels, and scroll indicators without JavaScript. Here’s how to replace scroll listeners with clean, declarative state queries.

Russ Miles, a software development expert and educator, joins the show to unpack why “developer productivity” platforms so often disappoint.

Discover what’s new in The Replay, LogRocket’s newsletter for dev and engineering leaders, in the February 18th issue.

Learn how to recreate Claude Skills–style workflows in GitHub Copilot using custom instruction files and smarter context management.
Would you be interested in joining LogRocket's developer community?
Join LogRocket’s Content Advisory Board. You’ll help inform the type of content we create and get access to exclusive meetups, social accreditation, and swag.
Sign up now