
Firebase helps you develop, measure, improve, and grow your mobile app. It’s backed by Google and covers a wide range of services, including real-time database, authentication, crash monitoring, analytics, push notifications, and more. Firebase provides all these backend, platform-related tools as a service so you can focus more on building the app’s core features.

FlutterFire is a set of official plugins that enable you to implement Firebase services in your Flutter app. The stable version already offers a variety of critical plugins and more are expected to become available in the near future.
In this tutorial, we’ll demonstrate how to integrate some of the most useful FlutterFire plugins, including:
We’ll also walk through some practical examples so you can see these FlutterFire plugins in action.
Before we begin our tutorial, let’s break down how we’ll use each FlutterFire plugin in our example app:
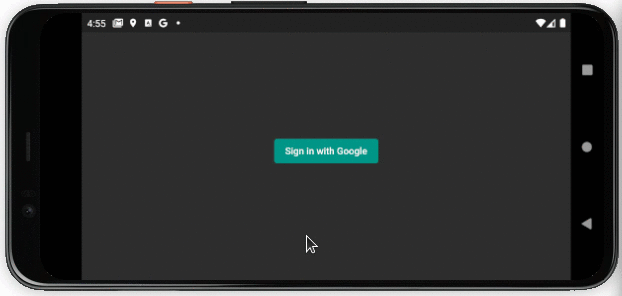
We’re going to build a virtual playground game in which users authenticated via the Authentication plugin control a character jumping on a trampoline. The jump count will be synced to Cloud Firestore. We’ll use Remote Config to change the background without pushing the app update. Finally, we’ll handle important events and crashes using the Analytics and Crashlytics plugins, respectively.
The Replay is a weekly newsletter for dev and engineering leaders.
Delivered once a week, it's your curated guide to the most important conversations around frontend dev, emerging AI tools, and the state of modern software.
The first step is to create a project in the Firebase console and configure the native Android/iOS and Flutter app to use the Firebase services.
To create a project in the Firebase console:
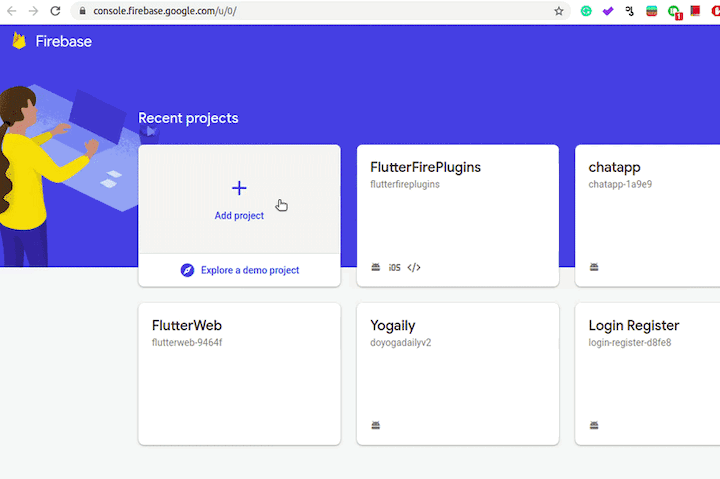
Once the project is created, you should be able to see the project dashboard. To set up the Android project:
google-services.json file and put it in the Android app directory. It should look like this: android/app/google-services.json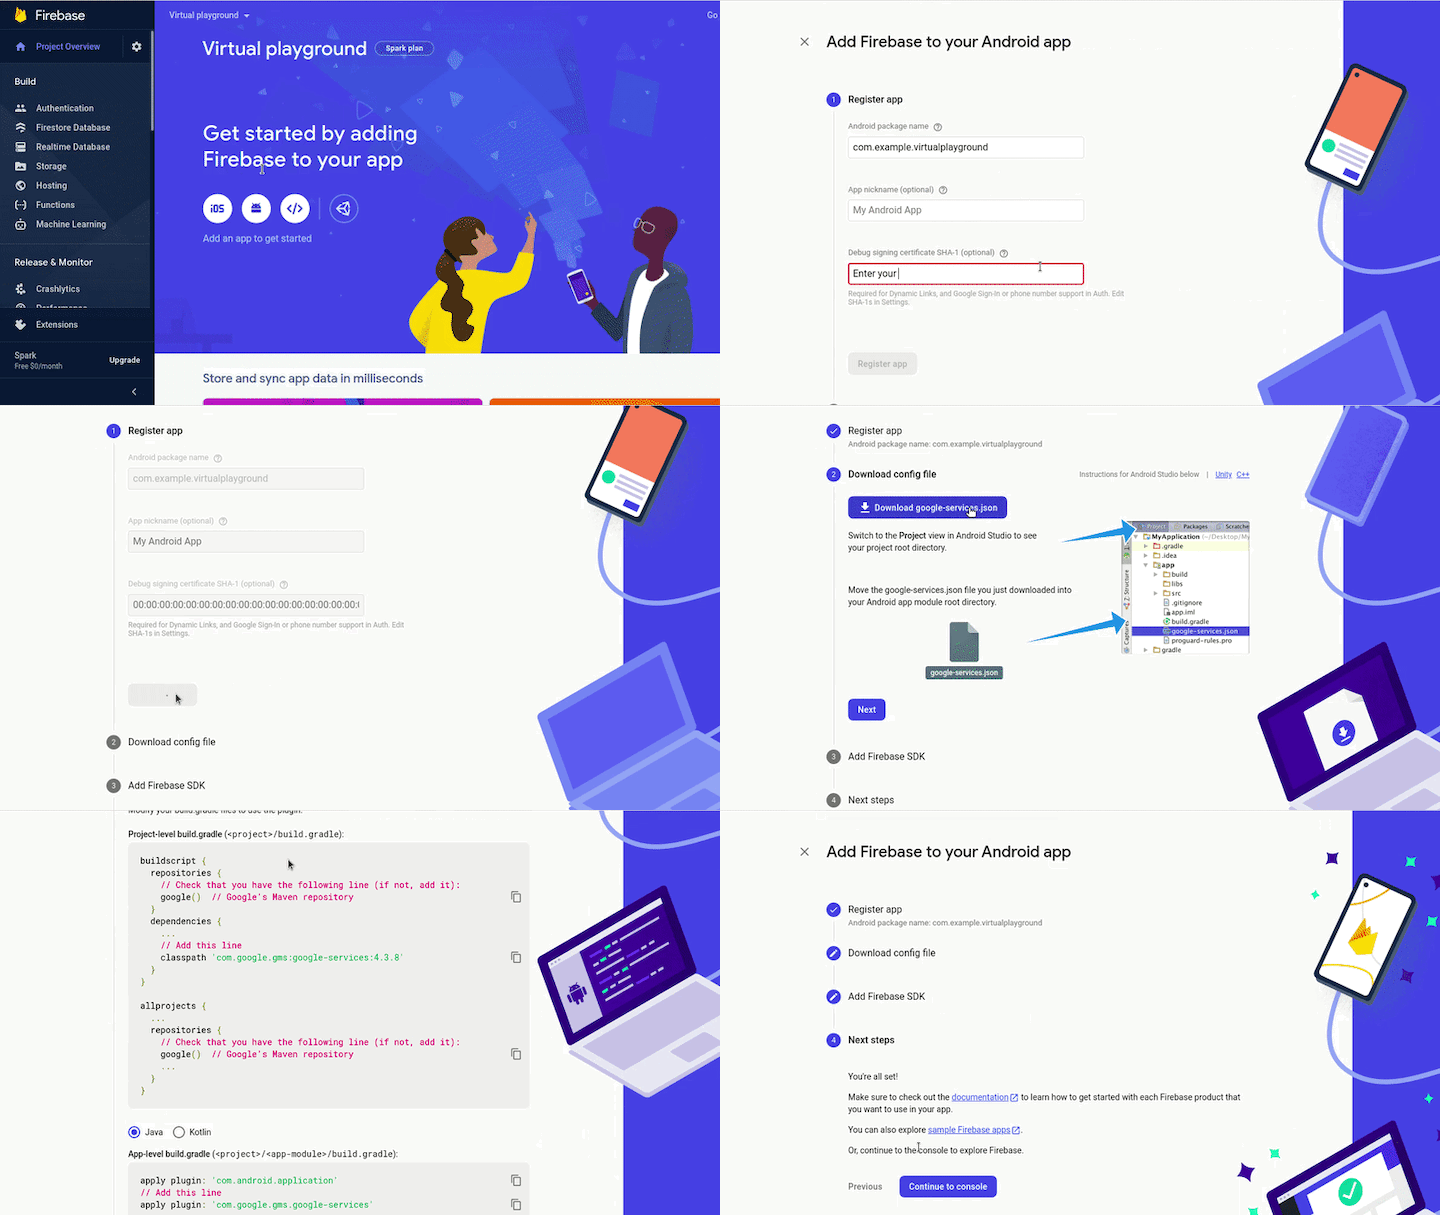
Since Flutter is designed for cross-platform app development, let’s configure it for the native iOS app as well:
GoogleService-Info.plist file, and drag and drop into the Runner subfolder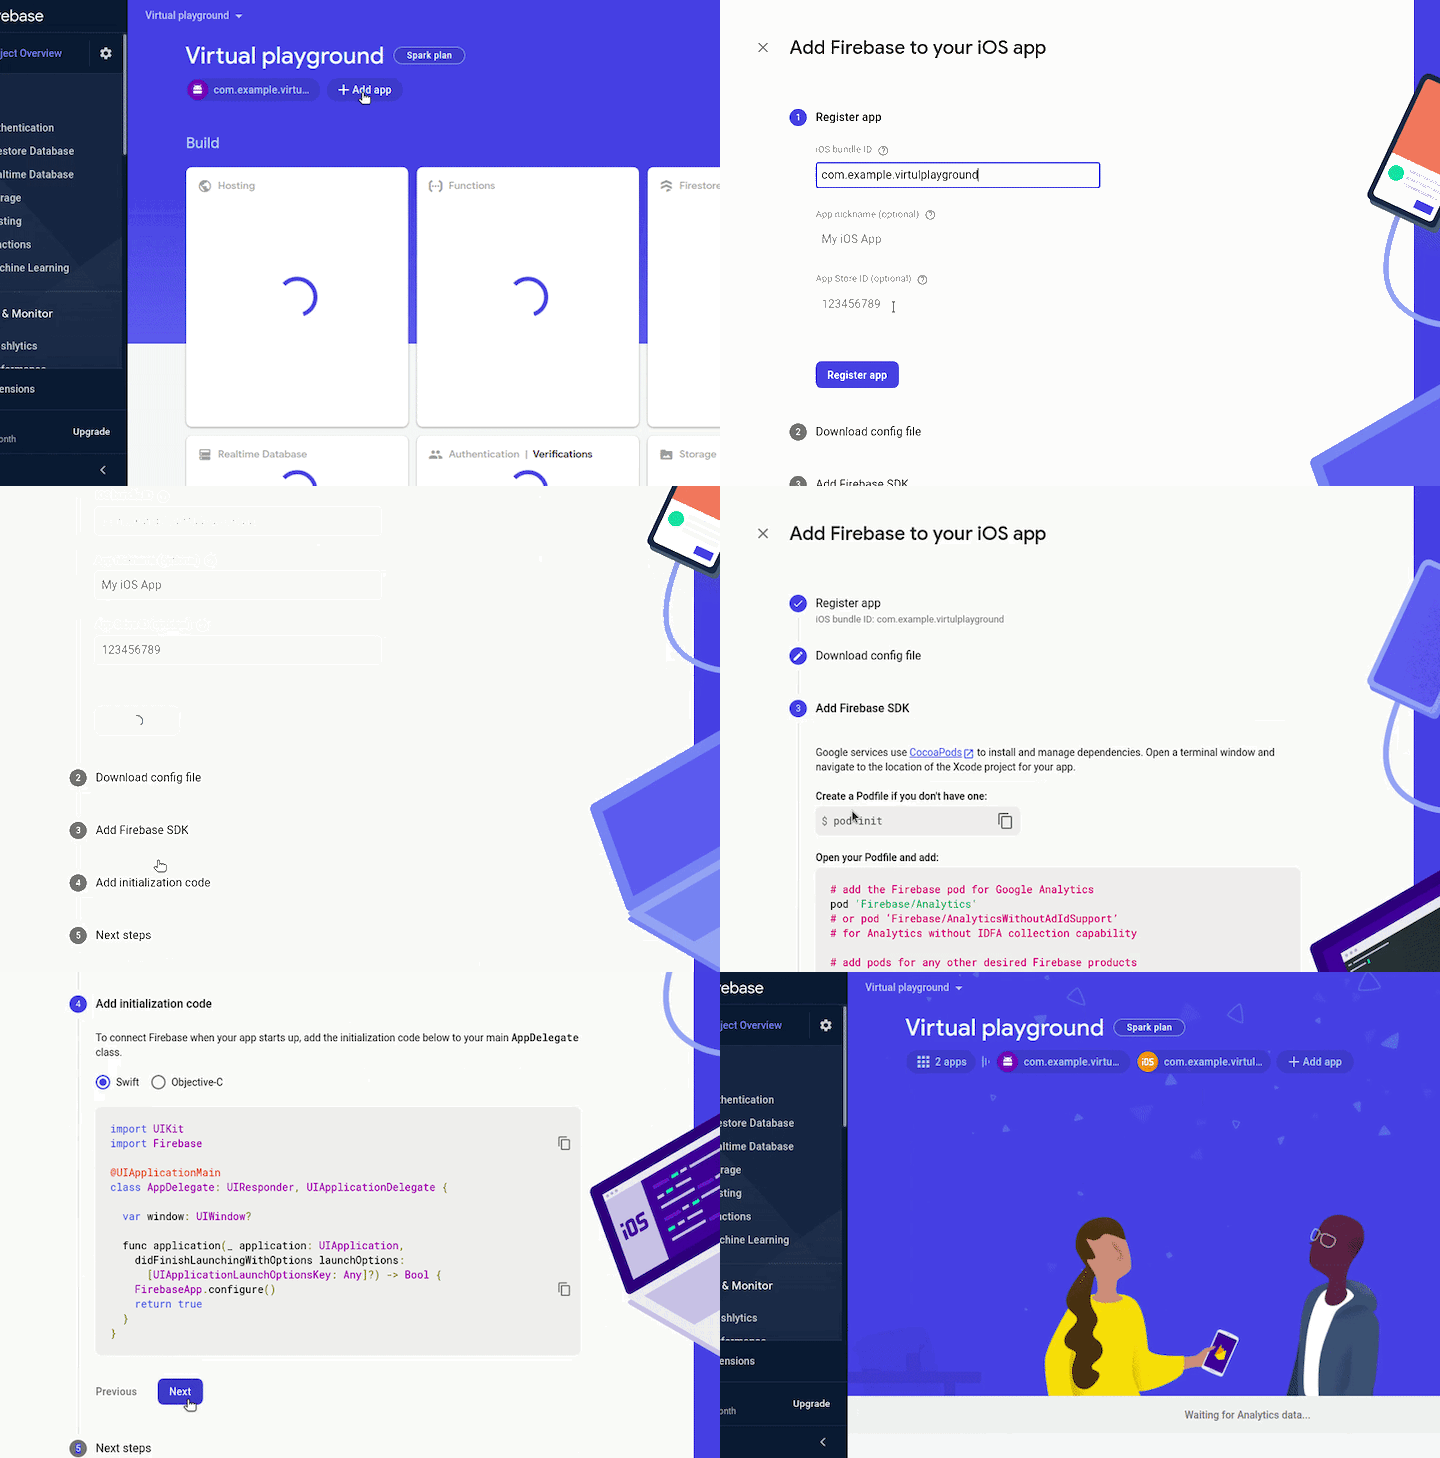
To use any Firebase service, the most important plugin you will first need to install is firebase_core, which enables the app to communicate with Firebase.
dependencies:
  flutter:
    sdk: flutter
  cupertino_icons: ^1.0.2
  firebase_core: ^1.0.1
Add the firebase_core dependency as shown above in the pubspec.yaml file and enter the pub get command:
flutter pub get
Authentication is a very important feature for any mobile app. Users may upload personal and potentially sensitive information to your app, so being able to verify the user’s identity is paramount.
Firebase Authentication provides backend services and easy-to-use SDKs to authenticate the users of your app. It supports authentication using passwords, phone numbers, and via third-party platforms such as Google, Facebook, Twitter, GitHub, and Apple. We’ll use the firebase_auth plugin to implement authentication in our app.
Before we start integrating the firebase_auth plugin in our app, we first need to enable the authentication in the Firebase console:
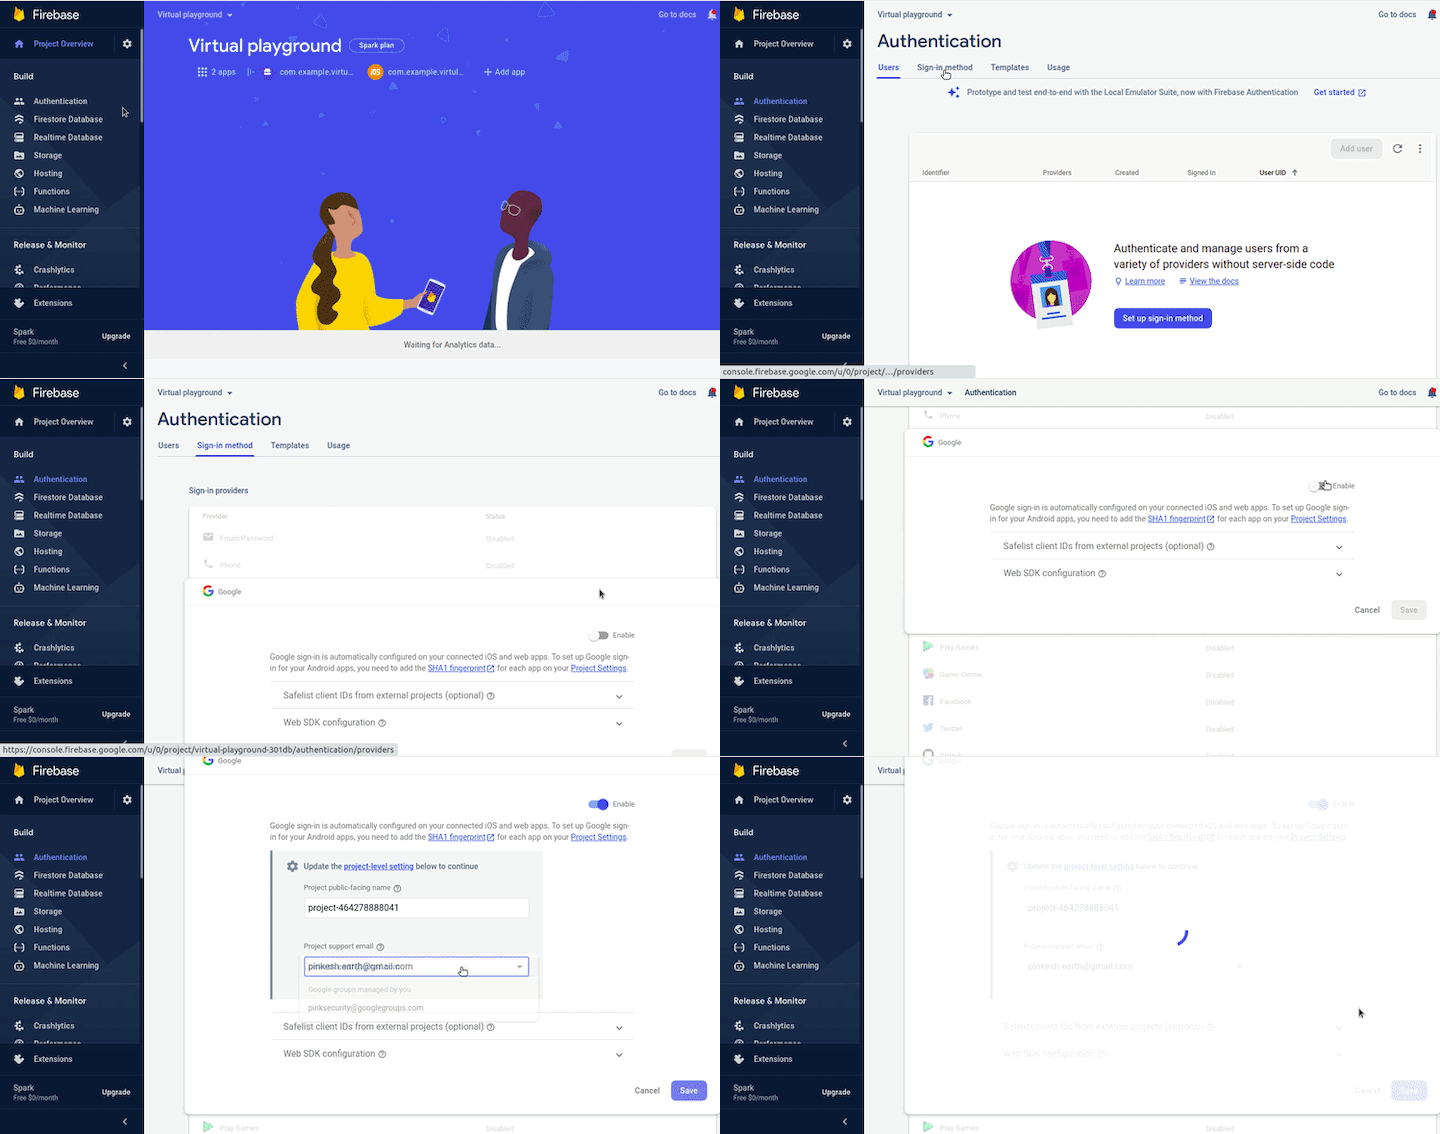
After enabling the authentication, you will need to download google-services.json and GoogleService-Info.plist again. You can find both files as shown below:
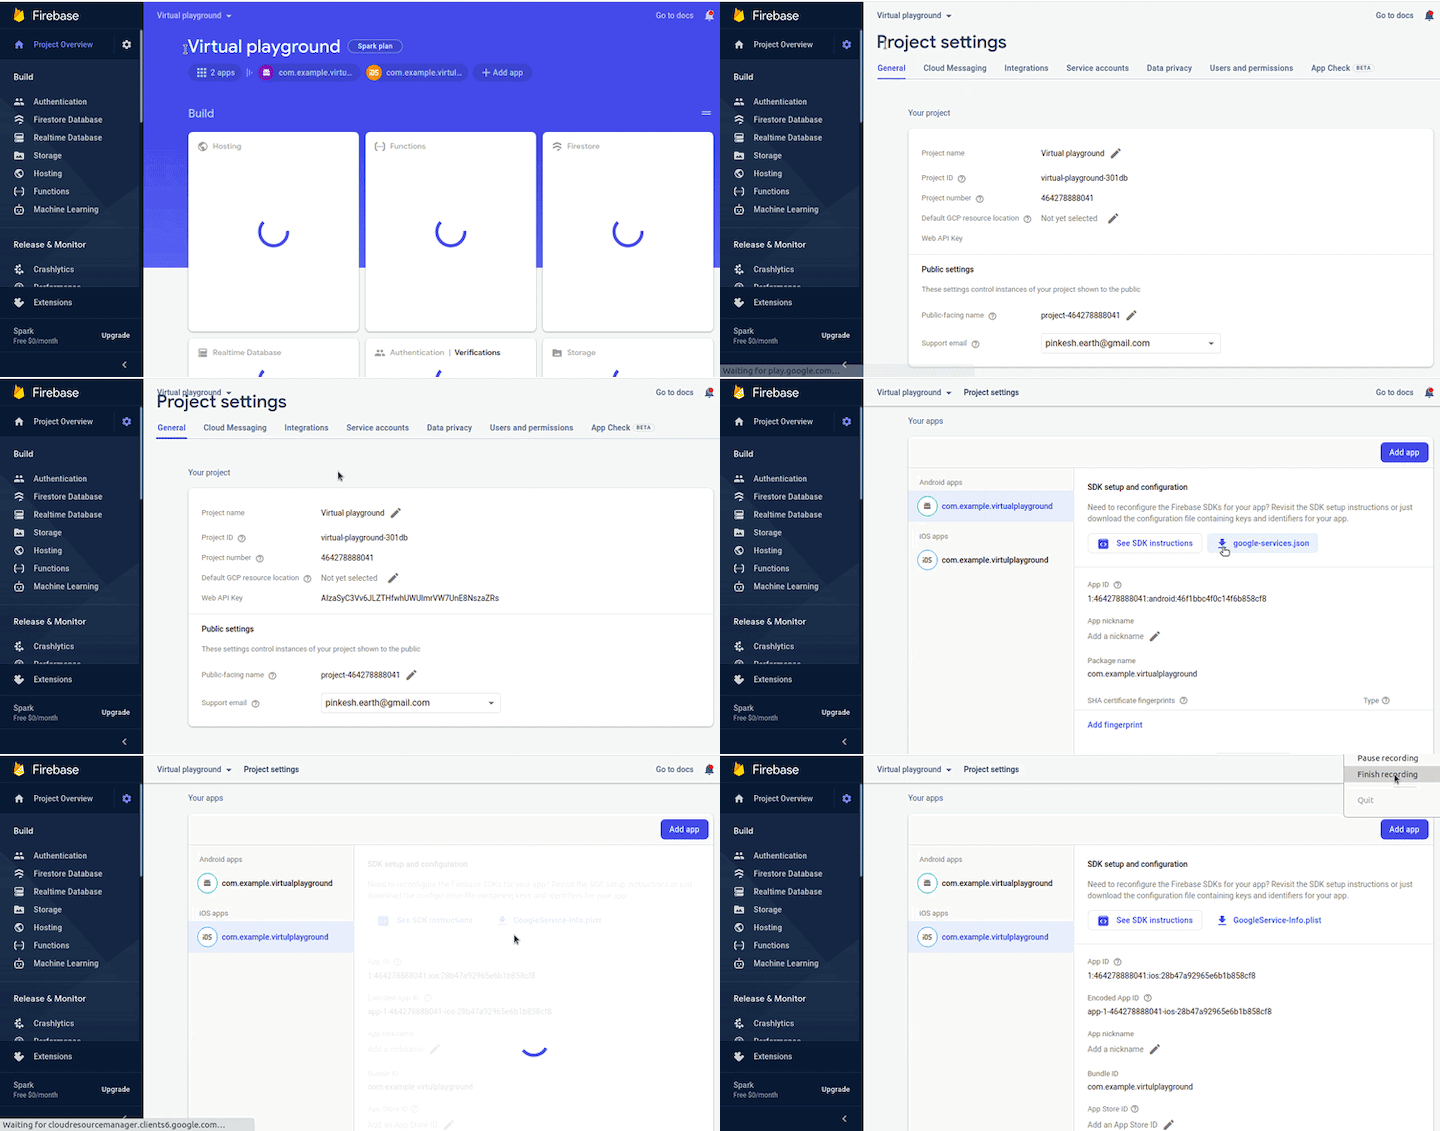
Add the firebase_auth and google_sign_in dependencies in the pubspec.yaml, as shown below:
dependencies:
  flutter:
    sdk: flutter
  cupertino_icons: ^1.0.2
  firebase_core: ^1.0.1
  firebase_auth: ^1.0.1 #new
  google_sign_in: ^5.0.0 #new
Initialize the Firebase services at the start of the app, like this:
void main() async {
  WidgetsFlutterBinding.ensureInitialized();
  await Firebase.initializeApp();
  runApp(MyApp()),
}
Add the method to sign in via Google:
static Future<User?> signInWithGoogle() async {
  FirebaseAuth _auth = FirebaseAuth.instance;
  try {
    UserCredential userCredential;

    if (kIsWeb) {
      var googleProvider = GoogleAuthProvider();
      userCredential = await _auth.signInWithPopup(googleProvider);
    } else {
      final GoogleSignInAccount googleUser = (await GoogleSignIn().signIn())!;
      final GoogleSignInAuthentication googleAuth =
          await googleUser.authentication;
      final googleAuthCredential = GoogleAuthProvider.credential(
        accessToken: googleAuth.accessToken,
        idToken: googleAuth.idToken,
      );
      userCredential = await _auth.signInWithCredential(googleAuthCredential);
    }

    final user = userCredential.user;
    return user;
  } catch (e) {
    print(e);
  }
}
We’ll also need to build in a sign-out method:
static Future<void> signOut({required BuildContext context}) async {
  final GoogleSignIn googleSignIn = GoogleSignIn();

  try {
    if (!kIsWeb) {
      await googleSignIn.signOut();
    }
    await FirebaseAuth.instance.signOut();
  } catch (e) {
    print(e);
  }
}
How it all works together:
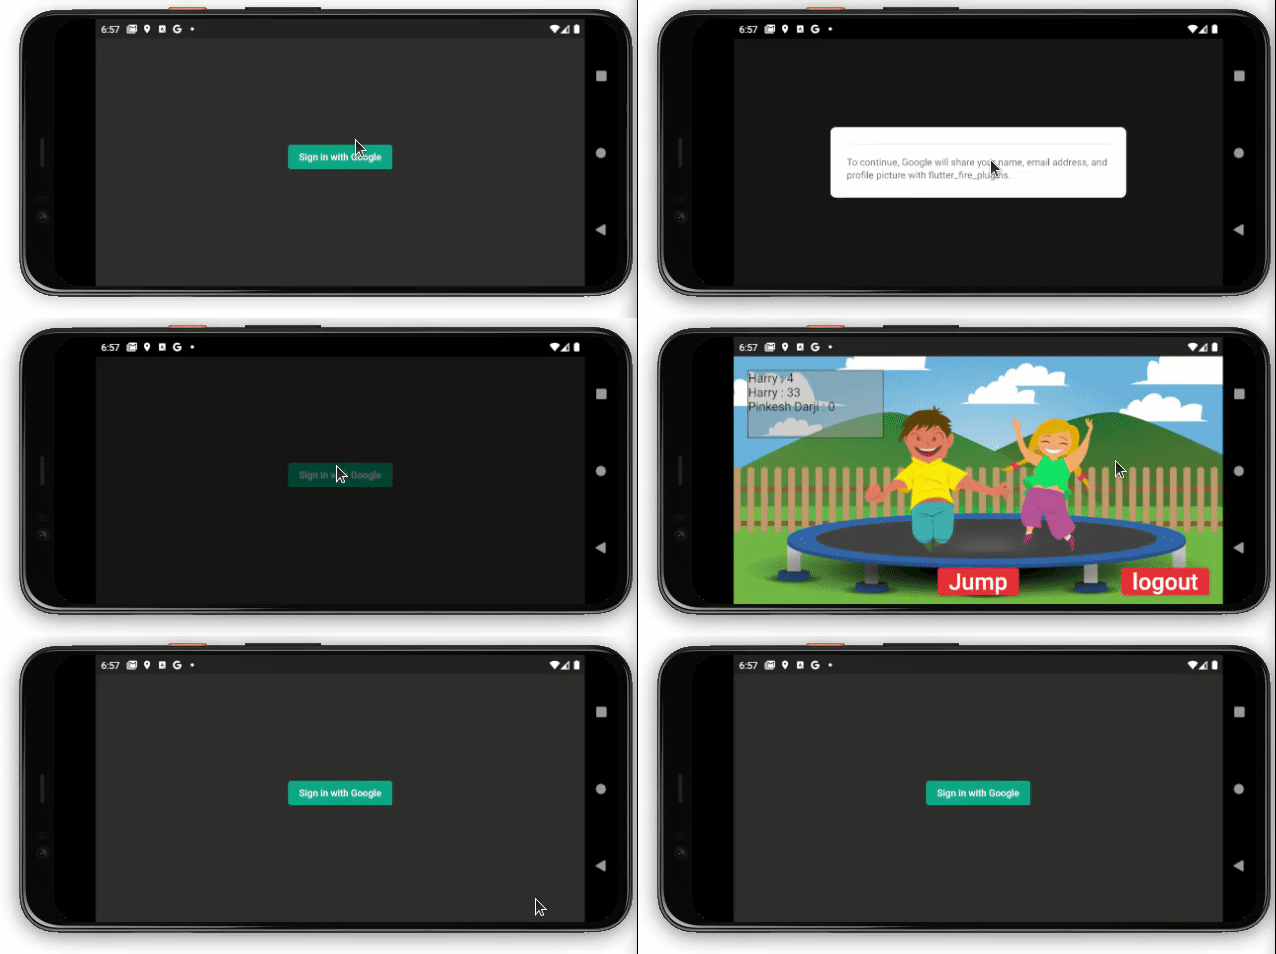
Cloud Firestore is a flexible, scalable NoSQL cloud database that stores and syncs data in real time. The cloud_firestore plugin offers real-time listeners and offline support for mobile and web. It works well in all situations regardless of your internet connectivity. It’s also known as the Firestore database.
Creating a database in the Firebase console
To create a database in the Firebase console of our project:
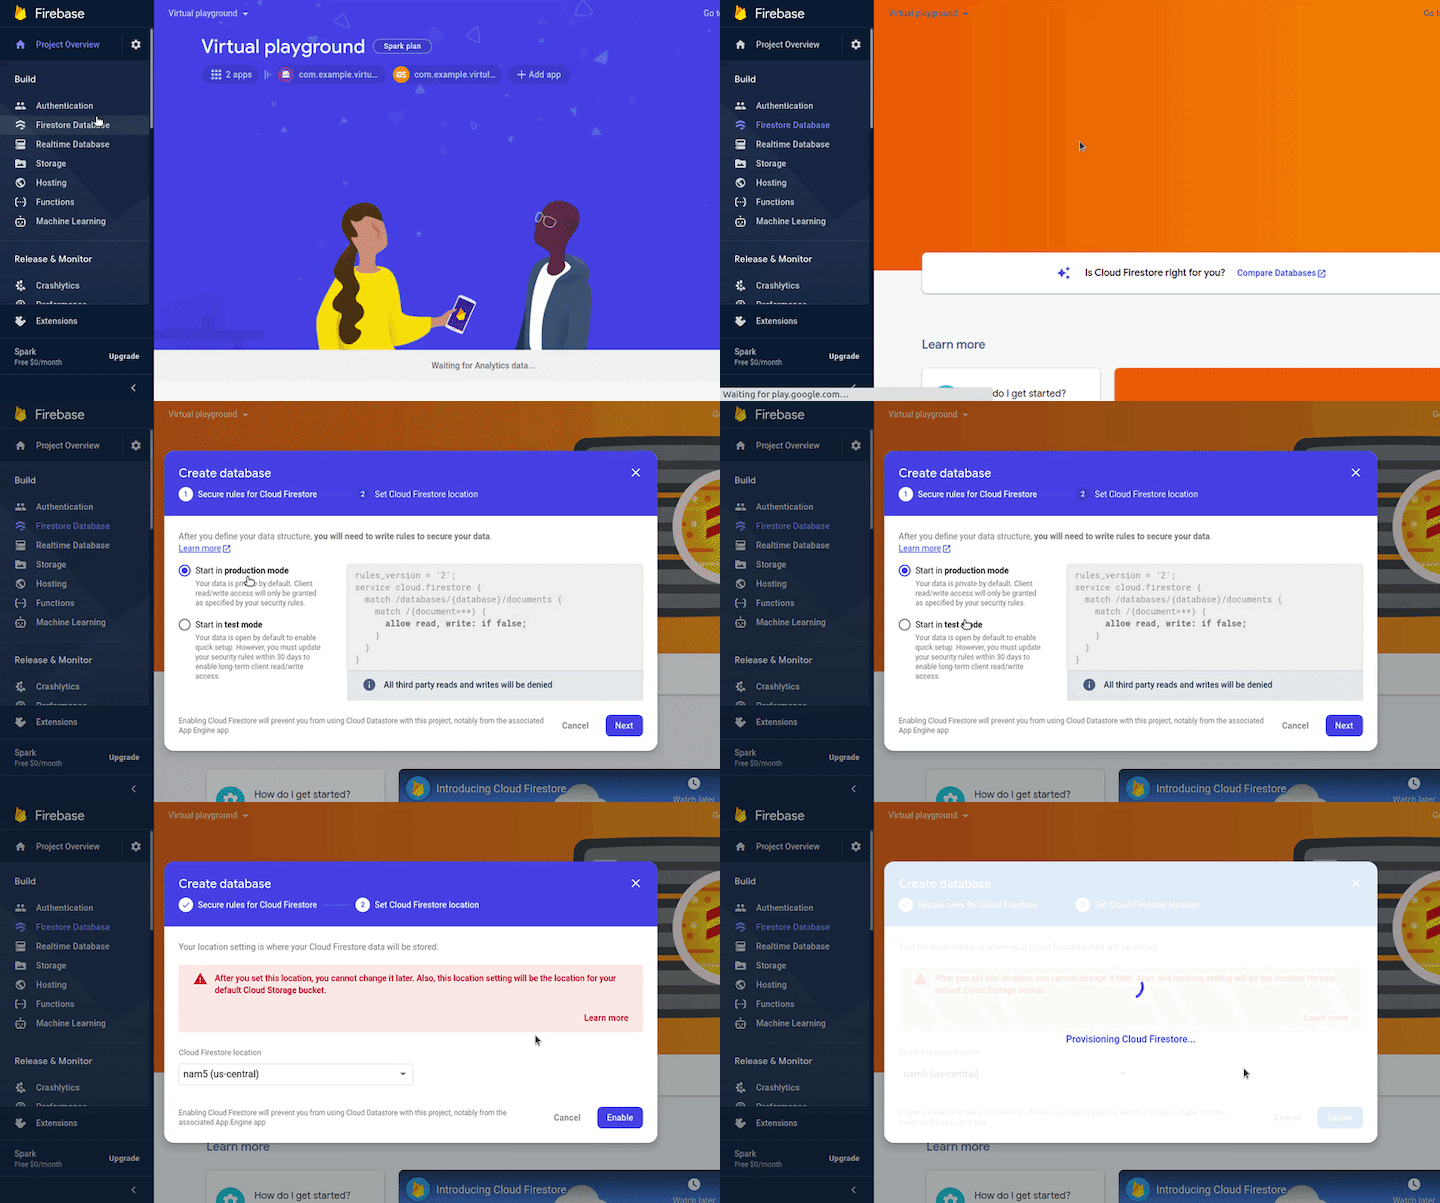
Setting up rules for accessing the database
We don’t want to leave the database open, so let’s restrict the database access to only authenticated users by setting the following rule:
rules_version = ‘2’;
service cloud.firestore {
 match /databases/{database}/documents {
 match /{document=**} {
 allow read, write: if request.auth != null;
  }
 }
}
Add the cloude_firestore dependency in the pubspec.yaml, as shown below:
dependencies:
  flutter:
    sdk: flutter
  cupertino_icons: ^1.0.2
  firebase_core: ^1.0.1
  firebase_auth: ^1.0.1
  google_sign_in: ^5.0.0
  cloud_firestore: ^2.2.0 #new
In the demo app, as soon as the user is logged in, we’ll store the user data in Cloud Firestore as shown below.
User? user = await Authentication.signInWithGoogle();

if (user != null) {
  database.storeUserData(user: user);
  Navigator.of(context).pushReplacement(
    MaterialPageRoute(
      builder: (context) => Home(
        user: user,
      ),
    ),
  );
}
//----------------------------------------------------
storeUserData({required User user}) async {
  AppUser appUser = AppUser(uid: user.uid, name: user.displayName, jumps: 0);

  await userCollection
      .doc(user.uid)
      .set(appUser.toJson())
      .then((value) => print("User Added"))
      .catchError((error) => print("Failed to add user: $error"));
}
We’ll store and sync the logged-in users’ jump count into the Firestore database using the method below:
ElevatedButton(
  style: ElevatedButton.styleFrom(primary: Colors.red),
  onPressed: () async {
    _jumpCount++;
    _datebase.updateJumpCount(
        user: _user, jumpCount: _jumpCount);
  },
  child: Text(
    'Jump',
    style: TextStyle(fontSize: 34),
  ),
),
//---------------
updateJumpCount({required User user, required int jumpCount}) async {
  await userCollection
      .doc(user.uid)
      .update({'jumps': jumpCount})
      .then((value) => print("User Added"))
      .catchError((error) => print("Failed to add user: $error"));
}
Now let’s add the code to show the jump count in the dashboard using real-time listeners:
Container(
  width: 200,
  height: 100,
  decoration: BoxDecoration(
      color: Colors.grey.withOpacity(0.5),
      border: Border.all(width: 1, color: Colors.black)),
  child: StreamBuilder<QuerySnapshot>(
    stream: _usersStream,
    builder: (BuildContext context,
        AsyncSnapshot<QuerySnapshot> snapshot) {
      if (snapshot.hasError) {
        return Text('Something went wrong');
      }

      if (snapshot.connectionState == ConnectionState.waiting) {
        return Text("Loading");
      }

      return Expanded(
        child: new ListView(
          children: snapshot.data!.docs
              .map((DocumentSnapshot document) {
            return Text(
              '${(document.data() as Map)['name']} : ${(document.data() as Map)['jumps']}',
              style:
                  TextStyle(fontSize: 18, color: Colors.black),
            );
          }).toList(),
        ),
      );
    },
  ),
)
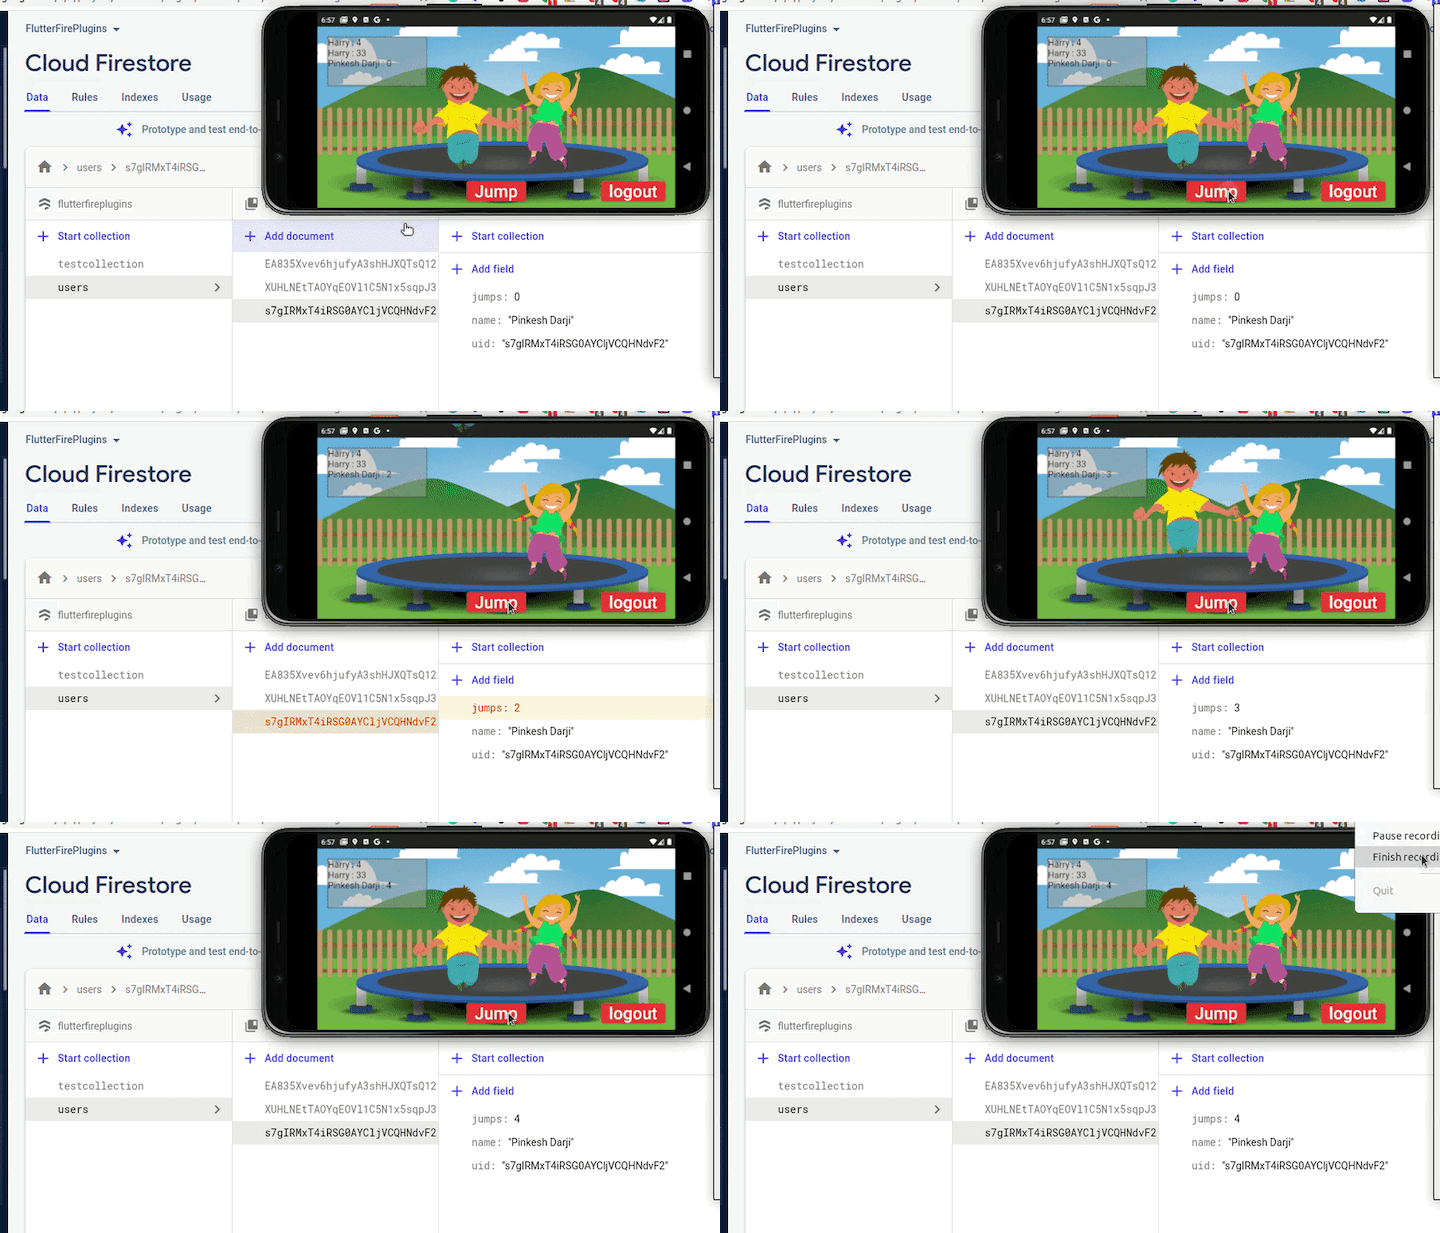
As you can see above, the jump count updates in the Firestore database and displays in the dashboard in real time.
The Remote Config plugin allows you to change the behavior and appearance of your mobile app on the fly. That means you can change almost anything inside the app without publishing the new app update.
Initially, the app will read the default values from the remote config available in the app. Later, it can fetch the new value from the remote config when needed. You can control what needs to be changed and the changes are applied to either all or a specific segment of users.
In our demo app, we’ll control the background using Remote Config. Here are the steps to set the values:
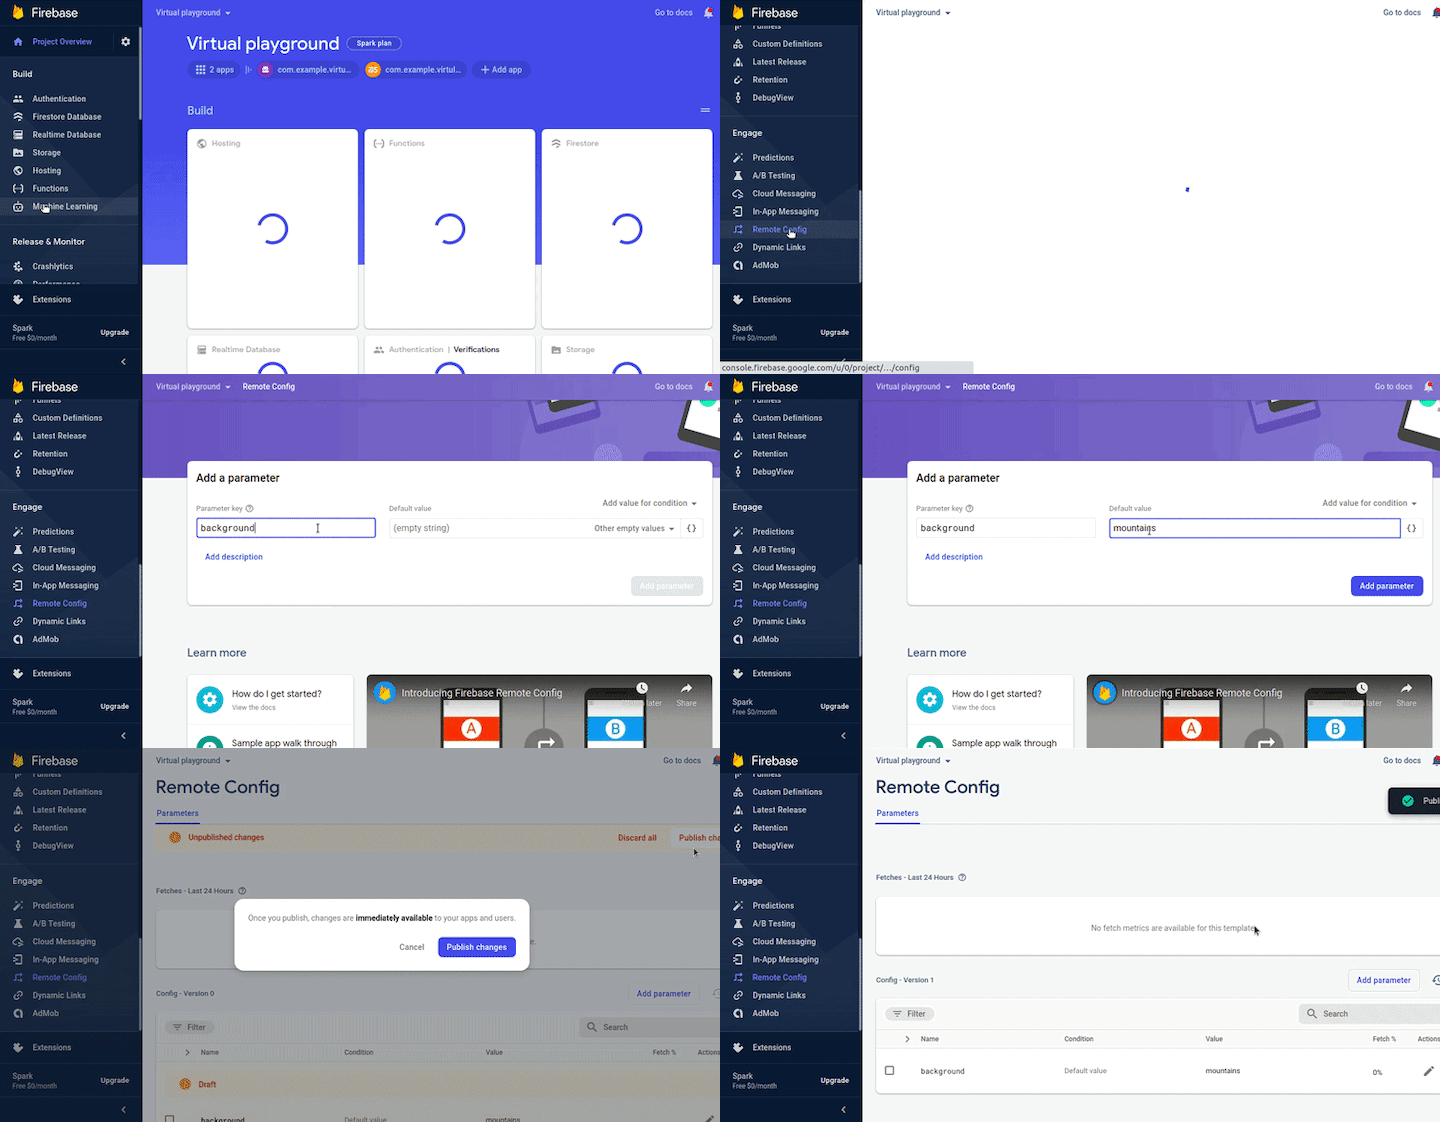
Add the firebase_remote_config dependency in the pubspec.yaml, as shown below:
dependencies:
  flutter:
    sdk: flutter
  cupertino_icons: ^1.0.2
  firebase_core: ^1.0.1
  firebase_auth: ^1.0.1
  google_sign_in: ^5.0.0
  cloud_firestore: ^2.2.0
  firebase_remote_config: ^0.10.0+2 #new
Now let’s write some code to set up Remote Config in the app. The below code also sets the defaults so the app can read and behave on first launch:
Future<RemoteConfig> setupRemoteConfig() async {
  await Firebase.initializeApp();
  final RemoteConfig remoteConfig = RemoteConfig.instance;
  await remoteConfig.setConfigSettings(RemoteConfigSettings(
    fetchTimeout: const Duration(seconds: 10),
    minimumFetchInterval: Duration.zero,
  ));
  await remoteConfig
      .setDefaults(<String, dynamic>{'background': 'mountains'});
  RemoteConfigValue(null, ValueSource.valueStatic);
  return remoteConfig;
}
Add the following code to fetch and load the new value for the key background. The UI is reflected accordingly.
FutureBuilder<RemoteConfig>(
  future: _datebase.setupRemoteConfig(),
  builder: (BuildContext context,
      AsyncSnapshot<RemoteConfig> snapshot) {
    if (snapshot.hasData) {
      _fetchLatestRemoteConfig(snapshot.requireData);
      return Image.asset(
        snapshot.requireData.getString('background') ==
                'mountains'
            ? 'assets/images/green_background.png'
            : 'assets/images/beach.png',
        fit: BoxFit.fill,
      );
    } else {
      return Image.asset(
        'assets/images/green_background.png',
        fit: BoxFit.fill,
      );
    }
  },
),
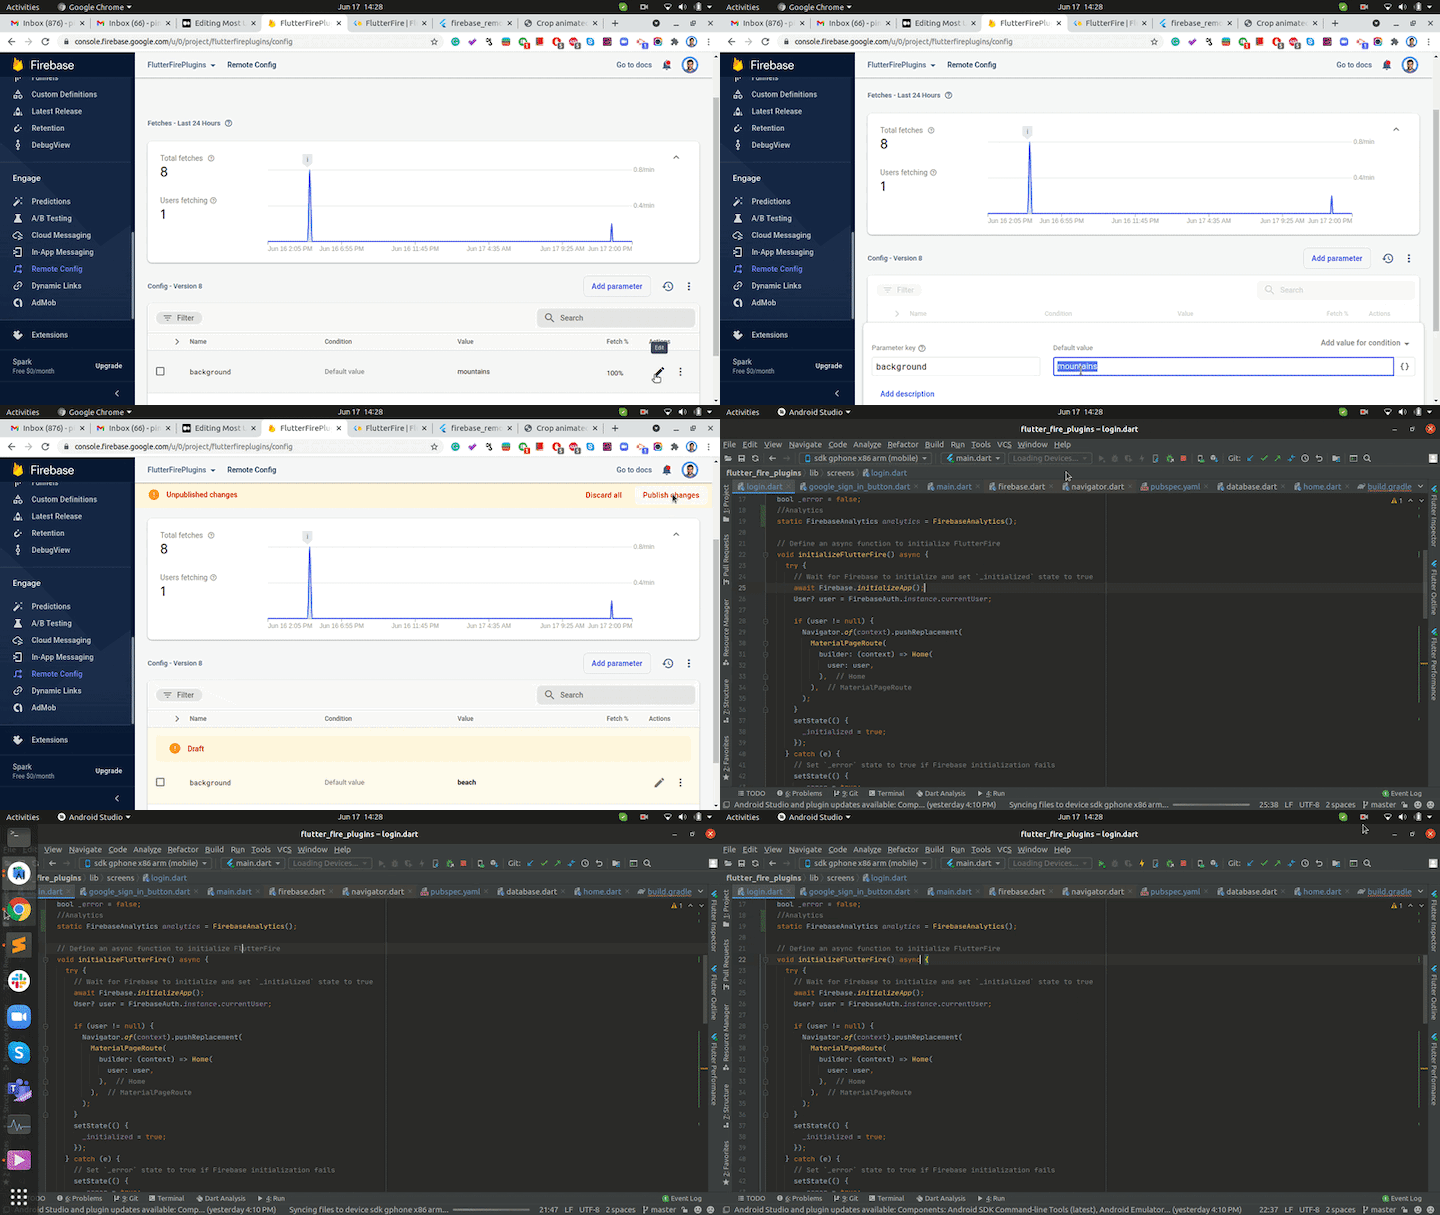
As seen above, this changes the background from mountains to the beach and also changes the image background in the app on restart.
You can’t catch all the errors while developing mobile apps, which is where a crash monitoring system comes in. The Crashlytics plugin helps you catch fatal errors in real time.
From the left-hand menu, click Crashlytics and then click the Enable button.
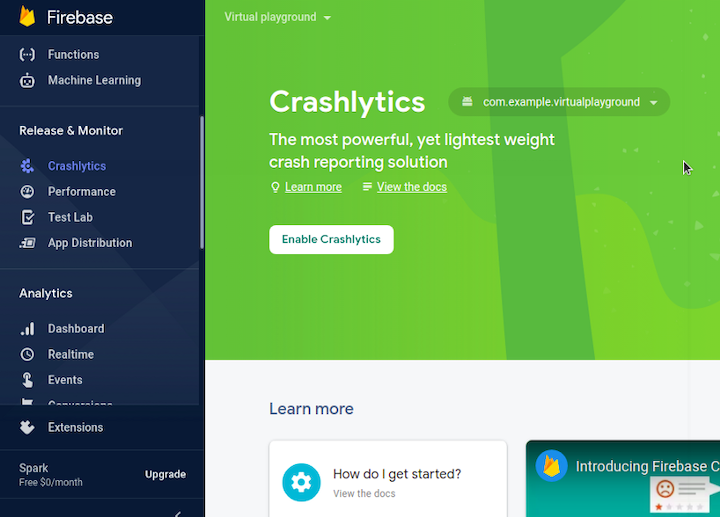
Add the firebase_crashlytics dependency in the pubspec.yaml, as shown below:
dependencies:
  flutter:
    sdk: flutter
  cupertino_icons: ^1.0.2
  firebase_core: ^1.0.1
  firebase_auth: ^1.0.1
  google_sign_in: ^5.0.0
  cloud_firestore: ^2.2.0
  firebase_remote_config: ^0.10.0+2
  firebase_crashlytics: ^2.0.6 #new
Below is the code to initialize Crashlytics and catch any uncaught errors:
//Crashlytics
await FirebaseCrashlytics.instance.setCrashlyticsCollectionEnabled(true);
// Pass all uncaught errors to Crashlytics.
Function originalOnError = FlutterError.onError as Function;
FlutterError.onError = (FlutterErrorDetails errorDetails) async {
  await FirebaseCrashlytics.instance.recordFlutterError(errorDetails);
  // Forward to original handler.
  originalOnError(errorDetails);
};
You can test the error catching by simply writing the below code anywhere:
//Force crash
FirebaseCrashlytics.instance.crash();
It would look something like this in your Firebase Console:
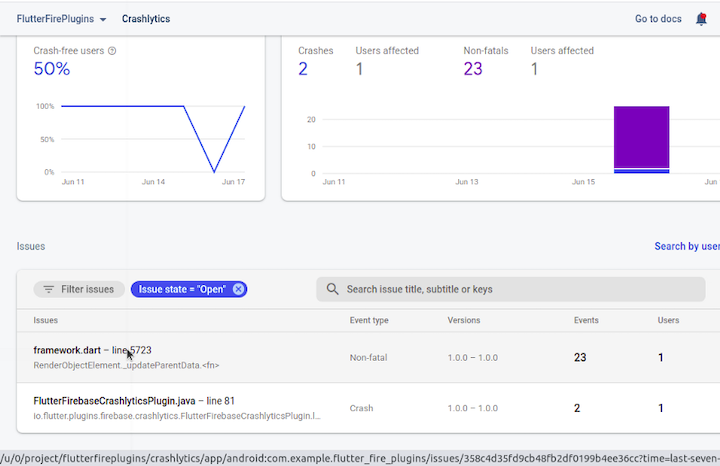
The Analytics plugin helps you discover how users are actually using your app and provides data you can use to improve the user experience. The plugin delivers unlimited reporting for up to 500 distinct events.
We already chose to enable to analytics for our demo app so we will start integration in our app.
Adding the dependency
Add the firebase_anlytics dependency in the pubspec.yaml, as shown below:
dependencies:
  flutter:
    sdk: flutter
  cupertino_icons: ^1.0.2
  firebase_core: ^1.0.1
  firebase_auth: ^1.0.1
  google_sign_in: ^5.0.0
  cloud_firestore: ^2.2.0
  firebase_remote_config: ^0.10.0+2
  firebase_crashlytics: ^2.0.6
  firebase_analytics: ^8.1.2 #new
There are a lot of predefined events to log, such as buy, add to cart, login, etc. For our example, let’s try to add a login event:
ElevatedButton(
  onPressed: () async {
    User? user = await Authentication.signInWithGoogle();

    if (user != null) {
      database.storeUserData(user: user);
      Navigator.of(context).pushReplacement(
        MaterialPageRoute(
          builder: (context) => Home(
            user: user,
          ),
        ),
      );
      await analytics.logLogin();
    }
  },
  child: Text('Sign in with Google'),
)
You can also log the custom event like so:
Future<void> _testSetCurrentScreen() async {
  await analytics.setCurrentScreen(
    screenName: 'Analytics Demo',
    screenClassOverride: 'AnalyticsDemo',
  );
}
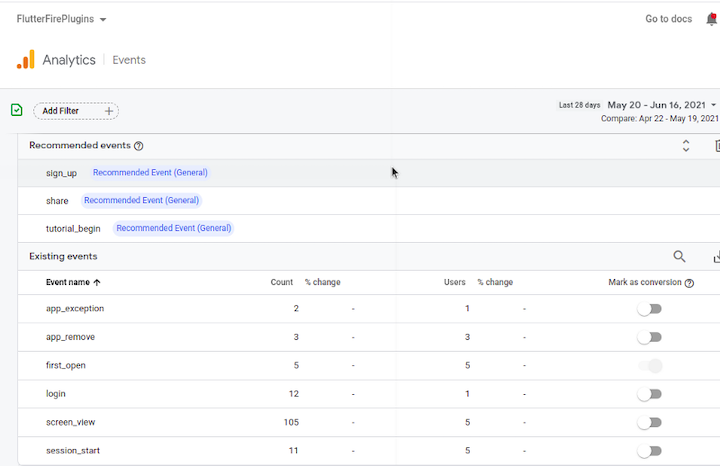
Here’s how you can see the all logged events:
The full source code is available on GitHub.
In this tutorial, we learned how to integrate the FlutterFire plugins Authentication, Cloud Firestore, Remote Config, Crashlytics, and Analytics in a Flutter app. We then built an example app to show how these FlutterFire plugins work together in a practical application. Finally, we demonstrated how to use FlutterFire plugins to test your app for errors and gather data to help you improve the user experience.
Install LogRocket via npm or script tag. LogRocket.init() must be called client-side, not
server-side
$ npm i --save logrocket

// Code:

import LogRocket from 'logrocket';
LogRocket.init('app/id');
// Add to your HTML:

<script src="https://cdn.lr-ingest.com/LogRocket.min.js"></script>
<script>window.LogRocket && window.LogRocket.init('app/id');</script>

@container scroll-state: Replace JS scroll listeners nowCSS @container scroll-state lets you build sticky headers, snapping carousels, and scroll indicators without JavaScript. Here’s how to replace scroll listeners with clean, declarative state queries.

Explore 10 Web APIs that replace common JavaScript libraries and reduce npm dependencies, bundle size, and performance overhead.

Russ Miles, a software development expert and educator, joins the show to unpack why “developer productivity” platforms so often disappoint.

Discover what’s new in The Replay, LogRocket’s newsletter for dev and engineering leaders, in the February 18th issue.
Hey there, want to help make our blog better?
Join LogRocket’s Content Advisory Board. You’ll help inform the type of content we create and get access to exclusive meetups, social accreditation, and swag.
Sign up now