vue-loader to create single-page applications
Single-page applications are all the rave now. These applications react to users dynamically by changing page content as users interact rather than loading new pages with new data. They have grown in popularity because of their speed, performance, and cross-platform functionality.

Vue.js is one of several JavaScript frameworks that can build single-page applications. In this tutorial, we will explore setting up a Vue.js single-page application using vue-loader.
What is vue-loader, you ask? It’s a webpack loader that supports defining Vue.js components in single files known as single-file components (SFCs). These files have the extension .vue and the vue-loader transpiles them into JavaScript so the browser can understand.
To understand how to use vue-loader, we’ll build a simple to-do list app.
The Replay is a weekly newsletter for dev and engineering leaders.
Delivered once a week, it's your curated guide to the most important conversations around frontend dev, emerging AI tools, and the state of modern software.
To follow along you’ll need to install the following:
To start our project, create a project directory by running the following:
~$ mkdir todo-list
Next, go into the project directory to initialize npm using npm init and follow the prompts. This creates our package.json file, which stores project metadata and keeps track of our project’s dependencies.
Now that we have our package.json, we must install our dependencies. We’ll start with our main dependency, Vue, by running the following:
# ~/todo-list

$ yarn add vue
Then, we must run our development dependencies:
# ~/todo-list

$ yarn add -D vue-loader babel-loader @babel/core @babel/preset-env css-loader vue-style-loader vue-template-compiler webpack webpack-cli webpack-dev-server
Note that we added the -D flag to our yarn add command to indicate that these libraries should be installed as development dependencies. We only need them for development to transpile our code into a single JavaScript bundle.
Now, let’s take a moment to understand our dependencies and their importance in our project.
vue-loader and vue-template-compiler transpile Vue files into JavaScriptbabel-loader converts ES6 code to browser-friendly ES5 code
@babel/preset-env and @babel/core polyfills that extend browser Javascript featurescss-loader interprets and resolves @import and url() CSS importsvue-style-loader injects CSS into SFCs as the style tagswebpack transforms and bundles JavaScript files to use in browserswebpack-cli is the CLI that runs commands for webpack projectswebpack-dev-server provides a basic web server and the ability to use live reloadingNow that we have our dependencies installed, we can configure our webpack project in the webpack.config.js configuration file:
# ~/todo-list
$ touch webpack.config.js
In our webpack.config.js we must set all our installed plugins and configure them to build our Vue project. The configuration is how we set what files we want our plugins to work on and how we want our final JavaScript build to be outputted:
# ~/todo-list/webpack.config.js

const path = require("path");
const { VueLoaderPlugin } = require('vue-loader')

module.exports = {
    mode: 'development',
    entry: './src/main.js',
    module: {
      rules: [
        {
          test: /\.vue$/,
          loader: 'vue-loader'
        },
        // this will apply to both plain `.js` files
        // AND `<script>` blocks in `.vue` files
        {
          test: /\.js$/,
          exclude: /node_modules/,
          loader: 'babel-loader',
          options: {
            presets: [
              ['@babel/preset-env', { targets: "defaults" }]
            ]
          }
        },
        // this will apply to both plain `.css` files
        // AND `<style>` blocks in `.vue` files
        {
          test: /\.css$/,
          use: [
            'vue-style-loader',
            'css-loader'
          ]
        }
      ]
    },
    // Where to compile the bundle
    // By default the output directory is `dist`
    output: {
        path: path.join(__dirname, "dist"),
        filename: "bundle.js",
        publicPath: '/dist/'
    },
    devServer: {
        static: {
            directory: path.join(__dirname, 'public'),
            watch: true,
        },
        port: 3000,
        compress: true,
    },
    plugins: [
        // make sure to include the plugin for the magic
        new VueLoaderPlugin()
    ]
  }
In the webpack.config.js file, we referenced a dist directory for our bundled JavaScript and a public directory as our project entry point. We’ll create these directories as we go along in the article.
At this point, we have our project dependencies installed so we can set up our directories.
We must create three directories, src, dist, and public, to hold our Vue components’ code, built JavaScript files, and project entry (index.html), respectively:
$ mkdir src
$ mkdir dist
$ mkdir public
In our src directory, create main.js as our project’s starting point. In it, initialize Vue and register our parent component:
// main.js

import Vue from 'vue'
import App from './App.vue'

Vue.config.productionTip = false

new Vue({
  render: h => h(App),
}).$mount('#app')
Our parent component is the top-level component, App.vue. Through this, other components can be added to the page based on our user’s interactions. Next, create our entry HTML page in the public directory, which loads our Vue application:
// public/index.html

<html>
  <head>
    <title>Iby's Todo App</title>
  </head>
  <body>
    <div id="app"></div>
    <script src="../dist/bundle.js" type="text/javascript"></script>
  </body>
</html>
By placing our index.html in the public directory, we can serve our app from it without exposing our Vue code.
With our app skeleton in place, we can add some build commands to our package.json to run and view the application in a browser. In the scripts section of package.json, add the following:
// package.json

...
"scripts": {
    "build": "webpack --mode production",
    "start": "webpack-dev-server --mode development"
},
Now we can run our app using yarn run start and visit it on a browser using http://localhost:3000/.
Note that our start script runs our app in development mode, which provides hot reload, our application’s ability to reload when we edit our code without needing to restart it.
We now have a skeleton Vue.js single-page application that we can visit in our browser. But, what’s the fun in stopping there? Instead, let’s turn this skeleton into a simple to-do list application.
A to-do list is simply a list of text that often contains checkboxes to indicate which items have been completed. Since our to-do list will have several text and checkbox items, we will create a component for each item.
Let’s create a components directory in src and create our TodoItem component:
// src/components/TodoItem.vue

<template>
    <li class="list-group-item">
        <div class="d-flex form-check pt-2">
            <input class="form-check-input" type="checkbox" v-model="isChecked" />
            <p class="px-3">{{text}}</p>

            <!-- Button to delete item -->
            <span class="btn align-right" @click="$emit('removeTodo', index)">
                <i class="fa fa-trash"></i>
            </span>
        </div>
    </li>
</template>
<script>
export default {
    name: 'TodoItem',
    props: {
        index: Number,
        text: String,
        checked: Boolean,
    },
    data: () => {
        return {
            isChecked: false
        }
    },
    watch: {
        isChecked(value) {
            this.$emit('updateTodo', {value, index: this.index})
        }
    },
    mounted() {
        this.isChecked = this.checked
    },
    updated() {
        this.isChecked = this.checked
    }
}
</script>
Here, our TodoItem SFC has the functionality to display, check as done or delete the to-do content.
Remember that when using vue-loader, we can create a single file to house our component’s functionality, and through our plugins, we can build our component into simple JavaScript that browsers can understand.
Next, let’s add the TodoItem component to our page through our parent component, App.vue:
// src/App.vue

<template>
    <div class="container pt-5 text-center">
        <div class="row">
            <div class="col-md-8">
                <p class="d-inline-block">Today's Todos!</p>
                <!-- Button to add new todo -->
                <button class="btn btn-sm btn-primary mx-5" @click="addTodo">Add to list</button>
            </div>
        </div>
        <div class="row">
            <div class="col-md-8">
                <div class="justify-content-md-center pt-5">
                    <ul class="list-group">
                        <todo-item v-for="(todo, index) in todos"
                            :key="index" :index="index" :checked="todo.checked"
                            :text="todo.text" @removeTodo="removeTodo" @updateTodo="updateTodo"/>
                    </ul>
                </div>
            </div>
        </div>

        <!-- Using our modal component -->
        <modal name="new-todo-modal">
            <div class="container">
                <div class="row mt-5">
                    <div class="col-md-12">
                        <form @submit.prevent="" autocomplete="off">
                            <div class="mb-3">
                                <label for="newTodoText" class="form-label">Type your todo</label>
                                <input type="text" class="form-control" id="newTodoText" v-model="newTodo">
                            </div>
                            <button @click="saveTodo" class="btn btn-primary">Save</button>
                        </form>
                    </div>
                </div>
            </div>
        </modal>
    </div>
</template>
<script>
import TodoItem from './components/TodoItem.vue'
export default {
    name: 'App',
    components: { TodoItem },
    data: () => {
        return {
            todos: [{text: 'Buy an apple', checked: false}, {text: 'Go to the bank', checked: true}],
            newTodo: '',
        }
    },
    methods: {
        removeTodo(index) {
            this.todos.splice(index, 1)
        },
        updateTodo({index, value}) {
            const updatedTodo = this.todos[index]
            updatedTodo.checked = value
            this.todos.splice(index, 1, updatedTodo)
        },
        addTodo() {
            this.$modal.show('new-todo-modal')
        },
        saveTodo() {
            this.todos.push({ text: this.newTodo, checked: false })
            this.newTodo = ''
            this.$modal.hide('new-todo-modal')
        }
    }
}
</script>
To implement our modal for typing in new to-do items, we will install vue-js-modal, which gives us the VModal component. Then, we must register VModal as a global component in our main.js by adding the following:
import Vue from 'vue'
...
import VModal from 'vue-js-modal'

Vue.use(VModal)
...
This gives us a VModal global component that we use to enter new to-do items.
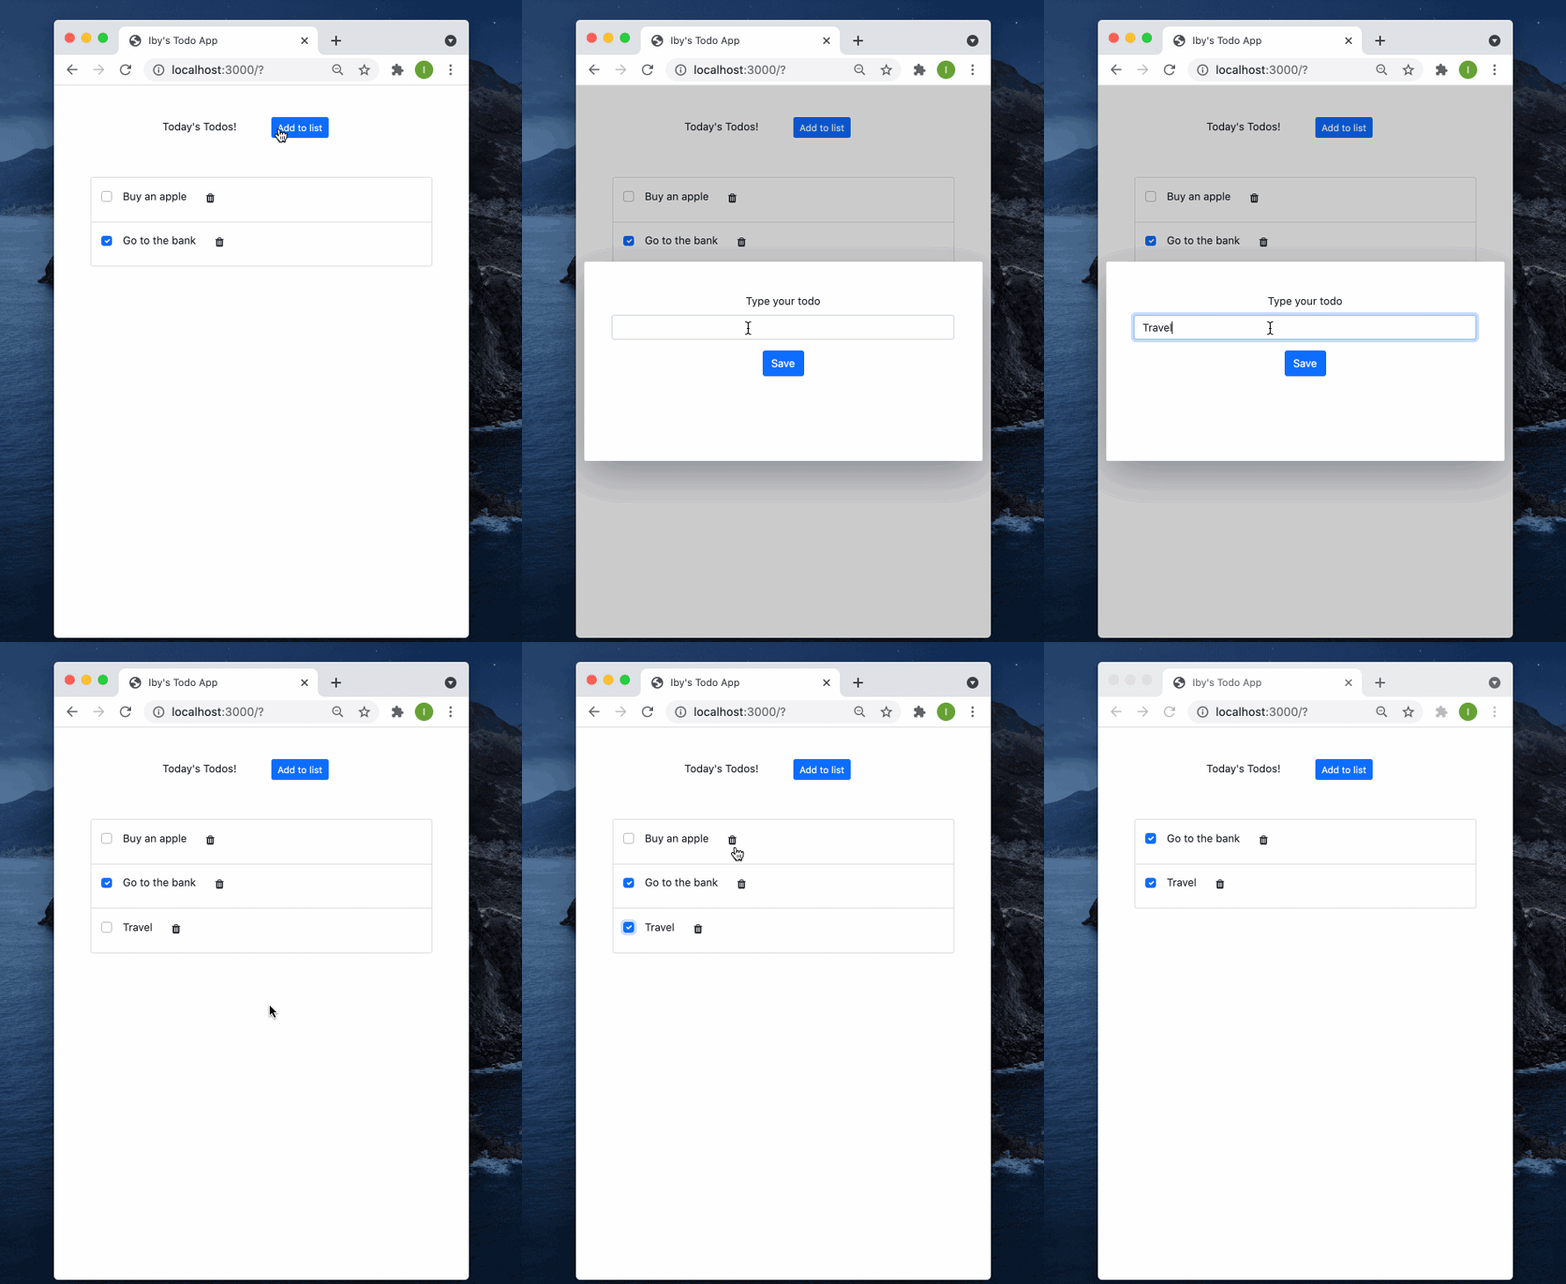
And when we run our app, we’ll see our fully functional to-do checklist that we built using vue-loader!

In this article, we have walked through setting up a Vue app from scratch with webpack and registering our loaders. This gives us a clearer understanding of how Vue.js apps are transpiled to JavaScript and served to users on browsers via vue-loader.
You can find the entire code from this article here.
I hope you found this article useful. Please share any thoughts or questions you might have in the comment section!
Debugging Vue.js applications can be difficult, especially when users experience issues that are difficult to reproduce. If you’re interested in monitoring and tracking Vue mutations and actions for all of your users in production, try LogRocket.

LogRocket lets you replay user sessions, eliminating guesswork by showing exactly what users experienced. It captures console logs, errors, network requests, and pixel-perfect DOM recordings — compatible with all frameworks.
With Galileo AI, you can instantly identify and explain user struggles with automated monitoring of your entire product experience.
Modernize how you debug your Vue apps — start monitoring for free.

@container scroll-state: Replace JS scroll listeners nowCSS @container scroll-state lets you build sticky headers, snapping carousels, and scroll indicators without JavaScript. Here’s how to replace scroll listeners with clean, declarative state queries.

Explore 10 Web APIs that replace common JavaScript libraries and reduce npm dependencies, bundle size, and performance overhead.

Russ Miles, a software development expert and educator, joins the show to unpack why “developer productivity” platforms so often disappoint.

Discover what’s new in The Replay, LogRocket’s newsletter for dev and engineering leaders, in the February 18th issue.
Would you be interested in joining LogRocket's developer community?
Join LogRocket’s Content Advisory Board. You’ll help inform the type of content we create and get access to exclusive meetups, social accreditation, and swag.
Sign up now
One Reply to "Using <code>vue-loader</code> to create single-page applications"
Hi there
Thank you so much for breaking this down so well – I’m a Django developer who is new to Vue and have so far struggled to figure out how to manually bundle/compile vue apps so that i can import them into my Django templates.
I managed to get your example working perfectly, but I’d like to be able to compile/bundle a set of assets for *multiple, separate* Vue apps at once (each under “/front-end/pages/app-name-goes-here/”. Can you please advise on how your webpack (or other config file) can be changed to look for several entrypoints at once and compile/bundle them all into the same output folder (each js file will have a different name, of course)? I know that one could in theory just duplicate the above settings per every app’s directory and manually run through the build process within each folder, but I’m sure there must be a way to automated these all in one go at the top level directory? I can provide my current dir structure etc if you need further clarification.
Thank you so much in advance!