Do you need to use the complicated method when there is a better and simpler alternative? Why always stick to command-line interfaces when doing the most basic things?
Yes, understanding how things work under the hood tends to have its benefits, but not always. You do not have to overcomplicate things, and besides, even geeks are tending to favor using a graphical user interface these days.
In this tutorial, look at how to use GraphiQL to aid GraphQL development. Let’s jump right in!
Before we talk about GraphiQL, let talk about what it helps — GraphQL.
GraphQL is an open-source data query and manipulation language for application programming interfaces (API), and a runtime for fulfilling queries with existing data.
GraphQL was developed internally by Facebook in 2012 before being released to the public in 2015.
Developers tend to prefer it to the REpresentational State Transfer (REST) approach of interacting with APIs, but we will be careful not to fall into making this article about the pros and cons of the RESTful approach and GraphQL — we’ll leave that for another article.
Now, if you are familiar with RESTful APIs, you will probably be aware of tools like Postman and Insomnia, because not only do they help us with our API development in terms of visualizing things quickly, but they also help us get things done faster.
Now, I want you to think of GraphiQL as Postman or Insomnia. GraphiQL is the GraphQL integrated development environment (IDE).
It’s a powerful tool; a tool that helps you structure GraphQL queries visually.
Before we go further, it is important that we note the knowledge required to better understand this topic:
We are building an express.js server, which is a Node.js application — we will create a folder to house our project files.
Once you are in your newly created or desired folder, run this on your command-line interface (CLI):
npm init -y
This will create a package.json file in the folder that you are in.
The next thing to do is to install the necessary packages that we need for our project. For that, run: npm install graphql express-graphql express.
You should add "dev": "node app.js" to your script object in package.json file.
After they are all installed, your package.json file should look like this:
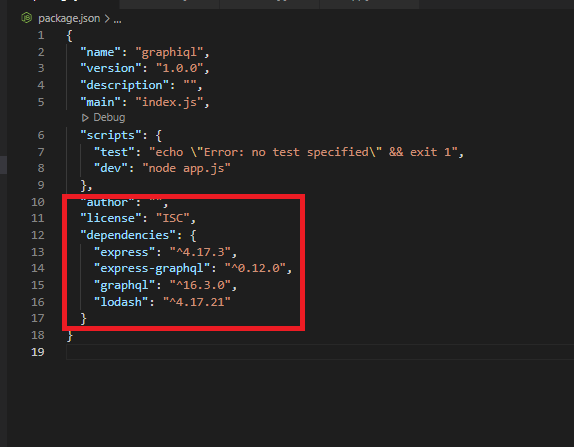
Now let me explain what the following packages do.
We need graphql, because that is what we are building on and this package in itself provides us with all the methods needed — except that we want to run on an express.js server and, out of the box, express.js does not know how to communicate with graphql.
Because of this, we need another package; express-graphql.
Note that when you installed these packages, it created the node_modules folder, where all the necessary files and dependencies are being stored. Whenever we require a package, it looks at this folder.
In your folder, create a file called “app.js” and paste the following code:
//js
const express = require('express');
const { graphqlHTTP } = require('express-graphql');
const schema = require('./schema/schema');
const app = express();
// bind express with graphql
app.use('/graphql', graphqlHTTP({
    schema,
    graphiql: true
}));
app.listen(2020, () => {
    console.log('now listening at port 2020');
});
This is our entry point. On line 2, we required express and put in a variable; express. On line 3, we did similar thing for express-graphql; the only difference being that we used destructuring to get a particular method, graphqlHTTP — that is a property in express-graphql.
On line 4, we required a custom path schema.js. This will soon be created.
Then line 5 is where we instantiated the express function and put it in a variable; app.
From lines 7 to 10, we started by invoking the app.use(), which allows us to register middleware in express.js. Whenever we hit the route /graphql, we want it to always invoke the graphqlHTTP() which will be adding objects to (GraphiQL and schema).
We gave GraphiQL a value of “true”, as that is the whole point of this tutorial — we want to be able to see what is happening graphically (visually ☺️ ).
Then from lines 11 to 13, if everything goes well in the preceding code, we are going to listen at port 2020 and console log “now listening at port 2020”.
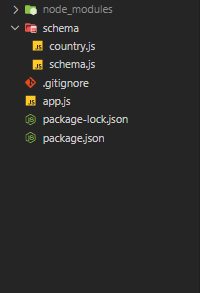
Now, create a folder in your project’s folder. Call the folder schema, then inside the just created folder (schema), create a file called “schema.js”. You should know that the folder and file names we decided to use for this project are just personal choice — you are not confined to them.
Paste the following code in your schema.js file:
//js
const graphql = require("graphql");
const _ = require("lodash");
const { countries } = require("./country");
const { GraphQLObjectType, GraphQLString, GraphQLSchema, GraphQLID } = graphql;
const CountryType = new GraphQLObjectType({
  name: "Country",
  fields: () => ({
    id: { type: GraphQLID },
    name: { type: GraphQLString },
    capital: { type: GraphQLString },
  }),
});
const RootQuery = new GraphQLObjectType({
  name: "RootQueryType",
  fields: {
    country: {
      type: CountryType,
      args: { id: { type: GraphQLID } },
      resolve(parent, args) {
        return _.find(countries, { id: args.id });
      },
    },
  },
});
module.exports = new GraphQLSchema({
  query: RootQuery,
});
One of the packages that I used here which was not installed before is Loadash, so just go ahead and run: npm intsall loadash.
In the schema folder, create another file called country.js and paste the following code:
var countries = [
    { name: 'Portugal', capital: 'Libson', id: '1' },
    { name: 'Canada', capital: 'Ontario', id: '2' },
    { name: 'Nigeria', capital: 'Abuja', id: '3' },
];
module.exports = {countries};
At the end, your project’s folder should look like this:
Now, back to what is happening in schema/schema.js. From lines 2 to 5, this is where we require and import everything that we need to successfully create a GraphQL server that is in accordance with the structure that is in schema/country.js.
From lines 6 to 13, the variable CountryType is instantiated by GraphQLObjectType() method, which is coming from graphql. Within it are two properties: name and fields.
name has a value of “Country”, where fields as a property is also a method that implicitly returns an object (id; name capital).
From lines 14 to 25, we have a new instance of GraphQLObjectType(), which is put in the variable RootQuery. We see that we are using Loadash to return countries by id.
If everything is done correctly, you should be able to run your GraphQL in the GraphiQL interface.
Run npm run dev:

Then, in your browser, go to http://localhost:2020/graphql, and you should see this:
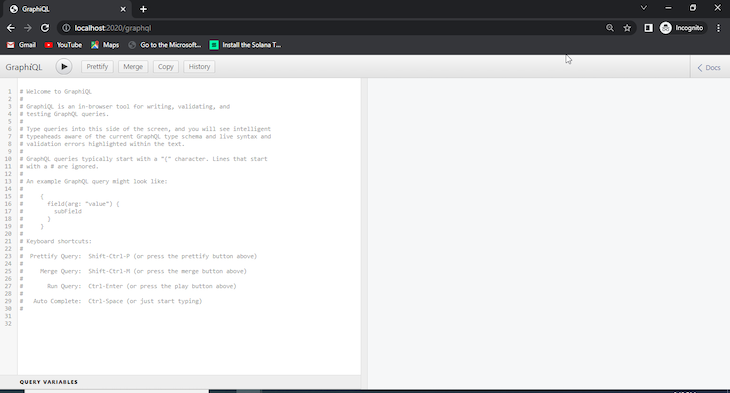
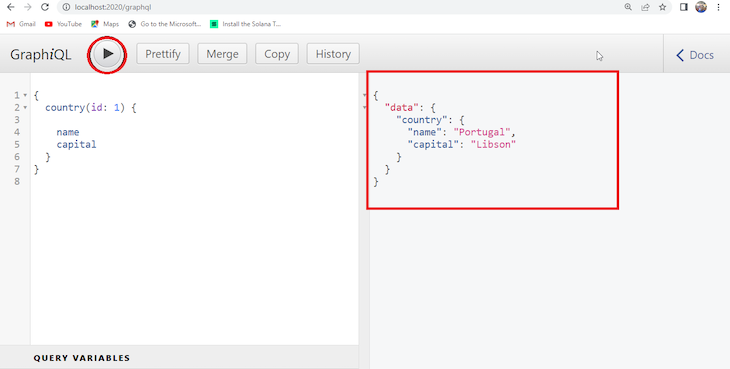
Yes, now you can test your API using the GraphiQL interface. You can try to get the name and capital of the country with the id of one in our country.js by pasting this in your browser:
{
  country(id: 1) {
    name
    capital
  }
}
After you do that, hit the “Play” icon, and you should see a response on the other side of your screen like so:
This project is located at this github repository.
We have finished this tutorial on how to visualize your GraphQL schema with GraphiQL, the default visualizer for GraghQL.
We started by setting up a new project and installing the necessary packages, then explored the usefulness of each package.
We have seen that GraphQL offers a nice way to query certain things in an API and still minimize as few resources as possible — that is, you can target a particular resource from a much bigger resource.

 https://logrocket.com/signup/
LogRocket is like a DVR for web and mobile apps, recording literally everything that happens on your site. Instead of guessing why problems happen, you can aggregate and report on problematic GraphQL requests to quickly understand the root cause. In addition, you can track Apollo client state and inspect GraphQL queries' key-value pairs.
LogRocket instruments your app to record baseline performance timings such as page load time, time to first byte, slow network requests, and also logs Redux, NgRx, and Vuex actions/state. Start monitoring for free.Would you be interested in joining LogRocket's developer community?
Join LogRocket’s Content Advisory Board. You’ll help inform the type of content we create and get access to exclusive meetups, social accreditation, and swag.
Sign up now
Get to know RxJS features, benefits, and more to help you understand what it is, how it works, and why you should use it.

Explore how to effectively break down a monolithic application into microservices using feature flags and Flagsmith.

Native dialog and popover elements have their own well-defined roles in modern-day frontend web development. Dialog elements are known to […]

LlamaIndex provides tools for ingesting, processing, and implementing complex query workflows that combine data access with LLM prompting.