
WebGL is a powerful technology that makes various website capabilities possible. However, it isn’t very clear to frontend developers how we can use WebGL to render hardware-accelerated graphics in the HTML canvas.

In this guide, we’ll break down WebGL into simpler terms and see how to use it with TypeScript to render web graphics. To follow along, you’ll need to know HTML Canvas and TypeScript, have Node.js and the TypeScript compiler installed, and have an IDE and a browser that supports WebGL to work with.
The Replay is a weekly newsletter for dev and engineering leaders.
Delivered once a week, it's your curated guide to the most important conversations around frontend dev, emerging AI tools, and the state of modern software.
WebGL, short for Web Graphics Library, is a JavaScript API for creating hardware-accelerated 2D and 3D graphics in a web browser. It involves creating code that directly uses the user’s GPU to render 2D or 3D graphics on HTML canvas elements.
WebGL is based on the Open Graphics Library for Embedded Systems (OpenGL ES 2.0), an API for rendering graphics in embedded systems. These could include mobile phones and other resource-constrained devices.
Let’s take a look at an example to get a practical understanding of WebGL.
For this example, you’ll need to have blank index.html and script.ts files. You’ll also need to initialize your project for TypeScript with the tsc --init command.
First, create a canvas element in your HTML code:
<!-- index.html -->

<canvas id="canvaselement" width="500" height="500"></canvas>
Although we’re using TypeScript with WebGL, remember that the browser doesn’t run TypeScript code directly. You need to compile it to JavaScript to run it. So, next, add a script tag with its source as script.js:
<!-- index.html -->

<script src="script.js">  </script>
After that, get a DOM reference to the canvas element in script.ts:
// script.ts

const canvas = document.getElementById("canvaselement") as HTMLCanvasElement | null;
if (canvas === null) throw new Error("Could not find canvas element");

const gl = canvas.getContext("webgl");
if (gl === null) throw new Error("Could not get WebGL context");
Make sure you cast the DOM reference to HTMLCanvasElement | null. Otherwise, TypeScript will think that its type is HTMLElement | null. This will cause problems when you try to call methods that are just in the HTMLCanvasElement.
You also need to handle the possibility of a null value or else the code won’t compile. You can make the compiler less strict by setting compilerOptions.strict to false in the tsconfig.json file.
Next, set the WebGL viewport to the canvas size:
// script.ts

gl.viewport(0, 0, canvas.width, canvas.height);
Finally, clear the canvas view with a gray color:
gl.clearColor(0.5, 0.5, 0.5, 1.0);
gl.enable(gl.DEPTH_TEST);
gl.clear(gl.COLOR_BUFFER_BIT);
You may be unfamiliar with functions like gl.clearColor, gl.enable, and others. I’ve set up a “References” section later in this article to define the various WebGL methods and constants we’ll use throughout this tutorial. You can refer to this section whenever you need to see what a function does.
WebGL is actively used in many different practical and business cases. Let’s explore some example use cases for WebGL in modern web apps:
Of course, there are many other ways you may be able to use WebGL. The use cases mentioned above are just some of the most common ways.
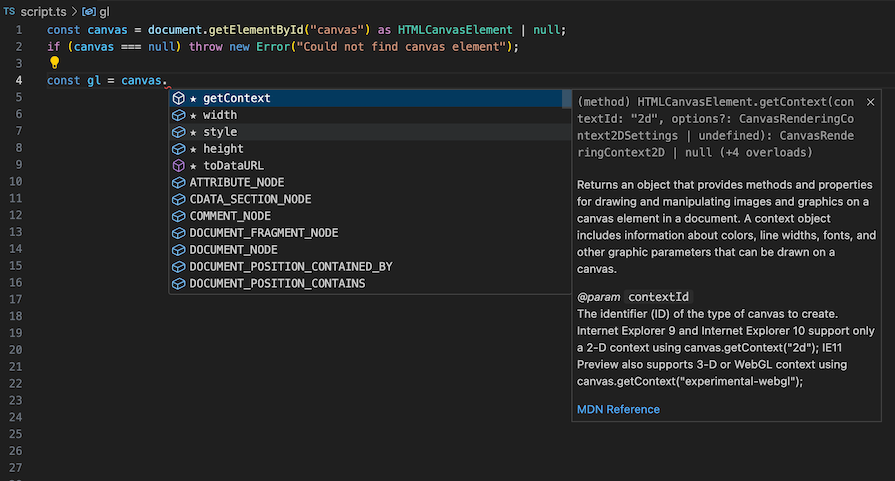
Using TypeScript instead of JavaScript may not change the way you code WebGL applications, but its compiler and type system make it easier for you and your IDE to understand the code you’re writing.
When your IDE understands your code, you get better IntelliSense, meaning you have better code completion and suggestions, allowing you to write code faster. You also get better error-catching as you’re writing or compiling your code, making debugging significantly easier compared to when you’re using JavaScript:
Combining WebGL and TypeScript means that you now need to follow the best practices that apply to both of them while you’re building your project. For example:
any type: WebGL applications can get very complex, even for seemingly simple operations. Using the any type in your code would mean that you won’t get assistance from your IDE. Mistakes made with an object of type any are challenging to resolvenull values: null possibilities exist because a function can run into unexpected results. When a function runs into unexpected results, it returns a null value. If you ignore the possibility of a function returning a null value, other parts of the code that relies on the function’s result may failThe following best practices specifically have to do with rendering models:
#ifdef GL_ES: #ifdef works the same way in WebGL as it does in C. It’s a preprocessor that checks if a macro is defined. Specifically, #ifdef GL_ES checks if the GL_ES macro is defined. This macro will be defined if the code is compiling for a shader. Since the code you’ll be compiling is always going to be for a shader, you don’t need to use it and should avoid using itWhen it comes to accounting for system limitations, systems that support WebGL must meet these requirements to be on the safe side:
MAX_CUBE_MAP_TEXTURE_SIZE: 4096
MAX_RENDERBUFFER_SIZE: 4096
MAX_TEXTURE_SIZE: 4096
MAX_VIEWPORT_DIMS: [4096,4096]
MAX_VERTEX_TEXTURE_IMAGE_UNITS: 4
MAX_TEXTURE_IMAGE_UNITS: 8
MAX_COMBINED_TEXTURE_IMAGE_UNITS: 8
MAX_VERTEX_ATTRIBS: 16
MAX_VARYING_VECTORS: 8
MAX_VERTEX_UNIFORM_VECTORS: 128
MAX_FRAGMENT_UNIFORM_VECTORS: 64
ALIASED_POINT_SIZE_RANGE: [1,100]
Note that WebGL has its drawbacks, especially when compared to WebGPU. For example, WebGL is generally considered to be slower and more outdated than WebGPU, which uses a more modern API and supports better resource management, concurrency, and compute shaders.
However, WebGL has better browser support, a larger community, and more resources available, while WebGPU has very limited browser support. WebGL also offers a more straightforward development experience for basic 2D and 3D graphics or less complex rendering needs.
It’s worth knowing how to use WebGL, especially if you’re working with older hardware, concerned about reaching a wide audience without being limited by browser compatibility, or joining a project built with WebGL and don’t need or want to deal with migrating to WebGPU.
There are some important terms that you should know to get the most out of this guide. You may be familiar with some of them already, but let’s define and explore them now.
You can think of vertices as the corners of a shape. They are points that outline how a shape looks when you put them together.
To put it in context, a square has four corners — top-left, top-right, bottom-left, and bottom-right. When each corner is an equal distance from its adjacent corners, they form a square. If you widen them horizontally, they form a rectangle.
The number of vertices — and the space between each vertex — describe the shape of an object. While four points could make a square or rectangle, three points make up a triangle. You can move any of the three vertices around, but they would form a different-looking triangle.
WebGL allows you to describe the location of each point using vertices. It does this using x, y, and z coordinates.
Triangles are the fundamental building blocks of models in WebGL. You can combine multiple triangles to create any other shape or structure.
Using vertices alone to create triangles, which then create the shape of a model, can get very tedious for you and inefficient for the computer. Indices are a better way to render complex models.
How do indices help with this? Indices are an array of data that helps with connecting three vertices to form triangles. In other words, you can draw the model’s shape using vertices and then use indices to connect groups of three vertices into triangles.
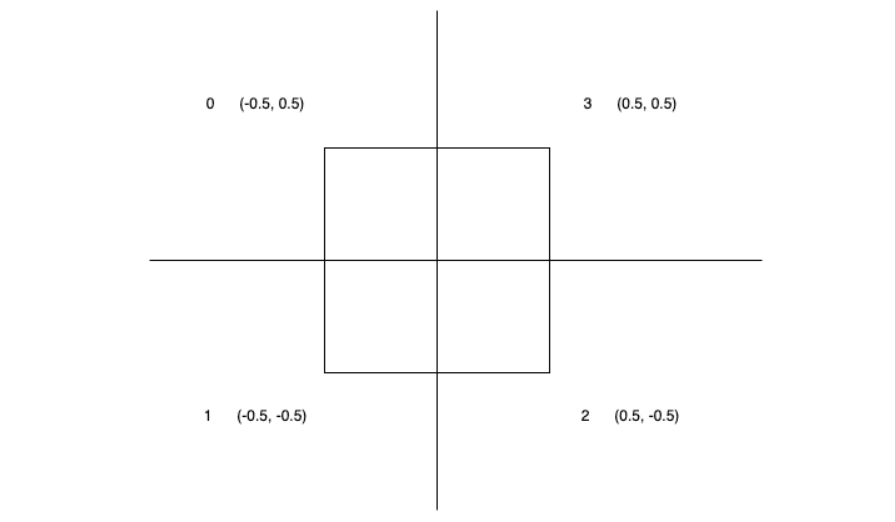
Let’s take a look at this array of vertices:
[
  -0.5,  0.5,  // 0
  -0.5, -0.5,  // 1
   0.5, -0.5,  // 2
   0.5,  0.5,  // 3
]
Visually, we want it to be something like this:
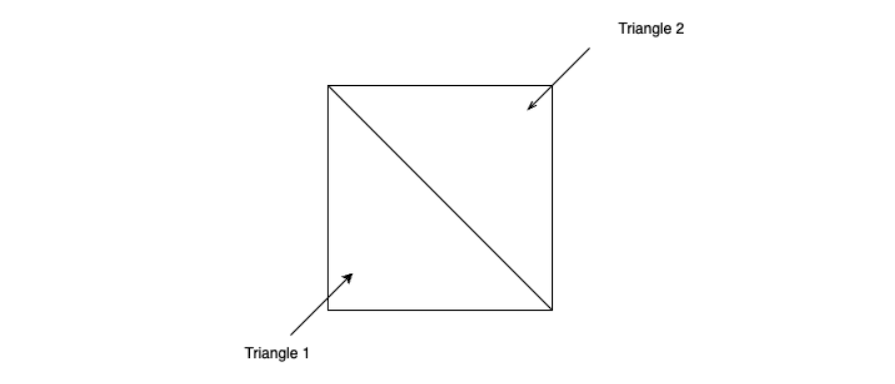
We can create an array of indices that will connect groups of three vertices to form triangles that help us render the shape:
[
  // Triangle 1
  0, 1, 2,

  // Triangle 2
  0, 2, 3
];
This will form two triangles that together form a square:
Shaders are simple declarative programs that are executed per pixel for fragment shaders and per vertex for vertex shaders. They are part of the graphics rendering pipeline that describe the traits and attributes of vertices and pixels. All shaders in WebGL are written in OpenGL Shading Language (GLSL).
Let’s take a closer look at the two types of shaders.
The GPU runs a vertex shader for every vertex. Vertex shaders handle the position, texture coordinates, and color of each vertex. They allow you to transform and modify the geometry of an object.
This is an example of a simple vertex shader:
attribute vec3 coordinates;

void main(void) {
  gl_Position = vec4( coordinates, 1.0 );
}
While this vertex shader is simple, it has various components we should pay attention to.
First, line one defines an attribute for the vertex shader. An attribute is an entry point where you can pass vertices, colors, and other per-vertex data. You can have multiple attributes in a vertex shader. For example:
attribute vec3 coordinates;
attribute vec4 colors;
Next, let’s discuss the main function. Remember, shaders are written in GLSL, which has a similar structure to the C programming language. Shaders start running from the main function.
Then there is gl_Position, which indicates the final position to place each vertex. The vertex shader above isn’t transforming the vertex in any way. It’s only taking in the current position of the vertex and passing it to gl_Position without making any changes.
Finally, let’s go over the three vector types in GLSL:
vec2 is for storing a two-coordinate vectorvec3 is for storing a three-coordinate vectorvec4 is for storing a four-coordinate vectorIn the example above, we used vec3 and vec4, which tells us we’re working with three- and four-coordinate vectors.
Fragment shaders are executed per pixel and handle the color, z-depth, and transparency of each pixel. While vertex shaders transform and place the points for an object, fragment shaders change the appearance of the pixels that render the object.
The outputs of the vertex shaders go to two other stages in the graphics rendering pipeline —primitive assembly, then rasterization — before getting to the fragment shader. Developers don’t usually interact with these stages, but let’s quickly review what happens in them.
The primitive assembly stage is where WebGL connects three vertices at a time to form the triangles that make up all other shapes in WebGL:
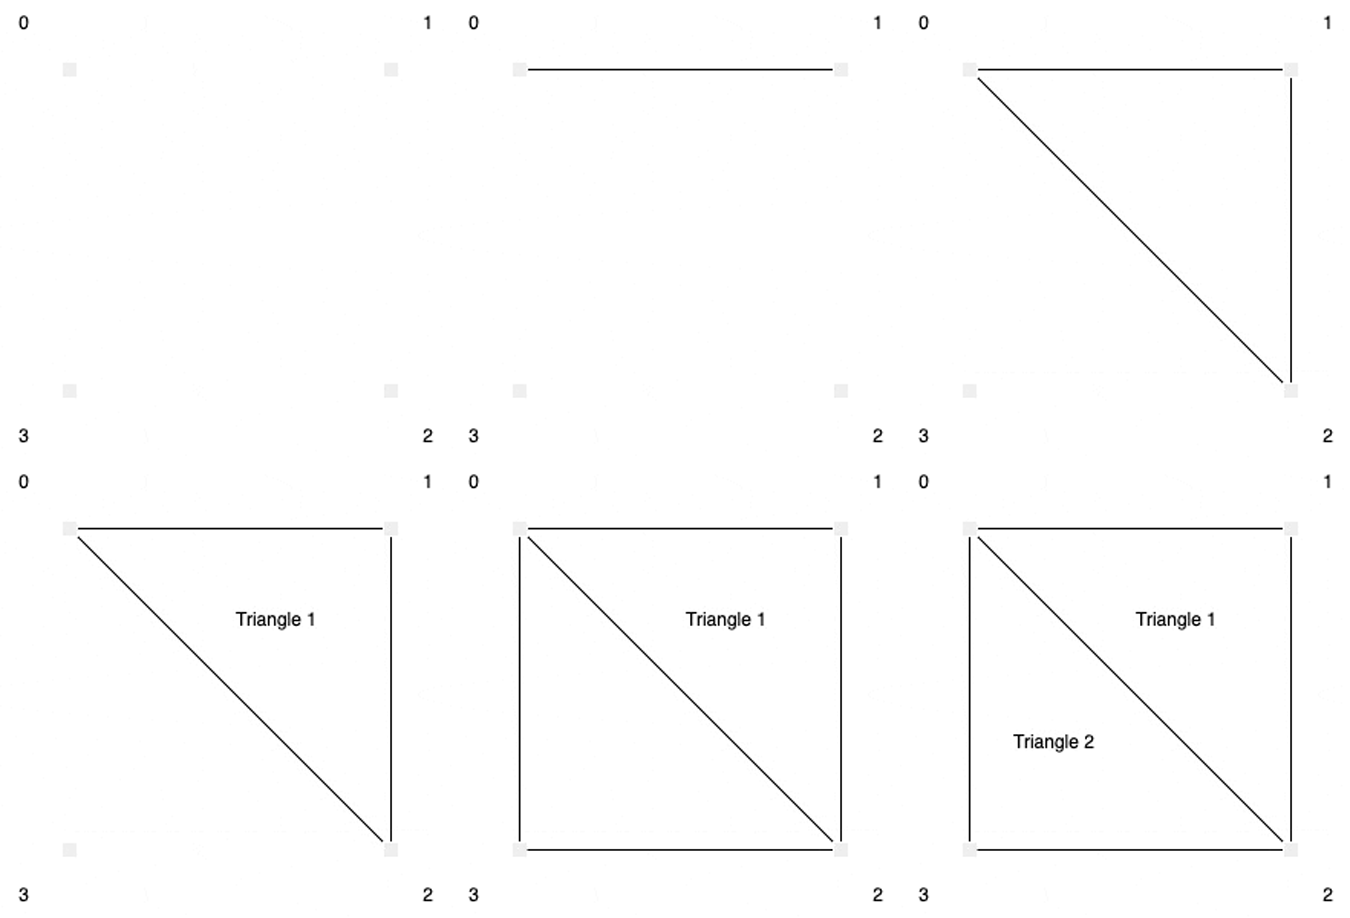
Then, in the rasterization stage, WebGL determines which pixels the triangles should be rendered on. The fragment shader then colors the pixels determined during the rasterization stage.
Fragment shaders are written in GLSL, just like vertex shaders. For example:
void main(void) {
  gl_FragColor = vec4(1.0, 1.0, 1.0, 1.0);
}
In the code above, gl_FragColor is the fragment shader’s output. Since the fragment shader is run per pixel, gl_FragColor represents the color for each pixel.
gl_FragColor uses the RGBA format to represent colors. To represent this format in GLSL, you need to use a vec4 data structure. In this data structure, the four values represent, in order, the intensity of the colors red, green, and blue, along with the alpha transparency of the color.
A buffer is a block of memory that the GPU uses to store all kinds of data that are relevant to rendering items on the display. It stores data as a single-dimensional array of continuous data.
There are different kinds of arrays for storing different kinds of data. For now, the ones you need to know are:
Now, let’s look at how we can render models in WebGL. To keep things simple, I’ll take you through rendering a 2D triangle and square.
As we discussed before, a triangle is the fundamental building block of any model in WebGL. Let’s go ahead and create one.
First, we need to get the canvas element and its WebGL context:
// script.ts

const canvas = document.getElementById("canvaselement") as HTMLCanvasElement | null;
if (canvas === null) throw new Error("Could not find canvas element");

const gl = canvas.getContext("webgl");
if (gl === null) throw new Error("Could not get WebGL context");
Next, we need to set up the shaders, starting with the vertex shader:
// script.ts

// Step 1: Create a vertex shader object
const vertexShader = gl.createShader(gl.VERTEX_SHADER);

if (vertexShader === null)
  throw new Error("Could not establish vertex shader"); // handle possibility of null

// Step 2: Write the vertex shader code
const vertexShaderCode = `
  attribute vec2 coordinates;

  void main(void) {
    gl_Position = vec4(coordinates, 0.0, 1.0);
  }
`;

// Step 3: Attach the shader code to the vertex shader
gl.shaderSource(vertexShader, vertexShaderCode);

// Step 4: Compile the vertex shader
gl.compileShader(vertexShader);
Now, let’s move to the fragment shader. It follows a similar process to the vertex shader:
// script.ts

// Step 1: Create a fragment shader object
const fragmentShader = gl.createShader(gl.FRAGMENT_SHADER);
if (fragmentShader === null)
  throw new Error("Could not establish fragment shader"); // handle possibility of null

// Step 2: Write the fragment shader code
const fragmentShaderCode = `
  void main(void) {
    gl_FragColor = vec4(1.0, 1.0, 1.0, 1.0);
  }
`;
// Step 3: Attach the shader code to the fragment shader
gl.shaderSource(fragmentShader, fragmentShaderCode);

// Step 4: Compile the fragment shader
gl.compileShader(fragmentShader);
After this, the next step is to link the vertex and fragment shaders into a WebGL program and enable the WebGL program as part of the rendering pipeline:
// script.ts

// Step 1: Create a WebGL program instance
const shaderProgram = gl.createProgram();
if (shaderProgram === null) throw new Error("Could not create shader program");

// Step 2: Attach the vertex and fragment shaders to the program
gl.attachShader(shaderProgram, vertexShader);
gl.attachShader(shaderProgram, fragmentShader);
gl.linkProgram(shaderProgram);

// Step 3: Activate the program as part of the rendering pipeline
gl.useProgram(shaderProgram);
Next, we create our array of vertices for our triangle, store it in a vertex buffer, and enable the coordinates attribute of the vertex shader to receive vertices from the vertex buffer:
// script.ts

// Step 1: Initialize the array of vertices for our triangle
const vertices = new Float32Array([0.5, -0.5, -0.5, -0.5, 0.0, 0.5]);

// Step 2: Create a new buffer object
const vertex_buffer = gl.createBuffer();

// Step 3: Bind the object to `gl.ARRAY_BUFFER`
gl.bindBuffer(gl.ARRAY_BUFFER, vertex_buffer);

// Step 4: Pass the array of vertices to `gl.ARRAY_BUFFER
gl.bufferData(gl.ARRAY_BUFFER, vertices, gl.STATIC_DRAW);

// Step 5: Get the location of the `coordinates` attribute of the vertex shader
const coordinates = gl.getAttribLocation(shaderProgram, "coordinates");
gl.vertexAttribPointer(coordinates, 2, gl.FLOAT, false, 0, 0);

// Step 6: Enable the attribute to receive vertices from the vertex buffer
gl.enableVertexAttribArray(coordinates);
All the vertices need to be in the range of -1 to 1 to be rendered on the canvas. The origin point — x = 0 and y = 0 — is the center of the canvas, both horizontally and vertically.
Finally, we write the last lines we need to render the triangle:
// script.ts

// Step 1: Set the viewport for WebGL in the canvas
gl.viewport(0, 0, canvas.width, canvas.height);

// Step 2: Clear the canvas with gray color
gl.clearColor(0.5, 0.5, 0.5, 1);
gl.clear(gl.COLOR_BUFFER_BIT);

// Step 3: Draw the model on the canvas
gl.drawArrays(gl.TRIANGLES, 0, 3);
If everything works out well, then the canvas should look like this:

Drawing a square in WebGL follows similar processes to drawing a triangle. Remember, since triangles are the fundamental building blocks of models in WebGL, you can draw a square by putting two triangles together:

So, let’s look at the changes we can make to our code so that we can render a square. First, let’s go to the vertices array we set up for our triangle:
const vertices = new Float32Array([0.5, -0.5, -0.5, -0.5, 0.0, 0.5]);
We can modify the array to contain the vertices of two triangles:
[
  // Triangle 1
  0.5, -0.5,
  -0.5, -0.5,
  -0.5, 0.5,

  // Triangle 2
  -0.5, 0.5,
  0.5, 0.5,
  0.5, -0.5,
]
However, if you run this modification, you’ll get just one right-angled triangle:

This is because WebGL is only passing in three vertices instead of the six that we have. To make sure WebGL renders all six vertices, we need to modify the drawArrays method call at the last line of the script.ts file, which looks like this:
gl.drawArrays(gl.TRIANGLES, 0, 3);
We’ll change the value of its last argument from 3 to 6:
gl.drawArrays(gl.TRIANGLES, 0, 6);
Now, you should get something like this:

Another way of building a square — which is especially recommended when you’re building more complex structures — is through indices.
If you want to use indices to create the square, we just need to make a few modifications and additions. You don’t need to change any part of the code other than the following.
The first thing to do is modify the vertices array to just have the four vertices of the square:
const vertices = new Float32Array([
  -0.5,  0.5,  // 0
  -0.5, -0.5,  // 1
   0.5, -0.5,  // 2
   0.5,  0.5,  // 3
]);
Next, add in the array of indices to group three of the vertices to draw a triangle between:
const indices = new Uint16Array([
  // Triangle 1
  0, 1, 2,

  // Triangle 2
  0, 2, 3
]);
After that, prepare an index buffer and pass the indices array into the buffer:
// Step 1: Create a new buffer object
const index_buffer = gl.createBuffer();

// Step 2: Bind the buffer object to `gl.ELEMENT_ARRAY_BUFFER`
gl.bindBuffer(gl.ELEMENT_ARRAY_BUFFER, index_buffer);

// Step 3: Pass the buffer data to `gl.ELEMENT_ARRAY_BUFFER`
gl.bufferData(
  gl.ELEMENT_ARRAY_BUFFER,
  indices,
  gl.STATIC_DRAW
);
You have to place these two previous additions anywhere above the line where you’re enabling the coordinates vertex attribute, which should look like this:
const coordinates = gl.getAttribLocation(shaderProgram, "coordinates");
gl.vertexAttribPointer(coordinates, 2, gl.FLOAT, false, 0, 0);

gl.enableVertexAttribArray(coordinates);
Then, the final modification you need to make is to remove the drawArrays method call on the last line and replace it with this function call instead:
gl.drawElements(gl.TRIANGLES, indices.length, gl.UNSIGNED_SHORT, 0);
You should see a white square inside a gray canvas, just like before. However, this method is better for building more complex models because you can define a vertex once and then use indices to reference that vertex multiple times. In complex models, this method makes it easier to make changes in the model.
Throughout this tutorial, you might encounter some unfamiliar methods and constants. To help you follow along more easily, I’ve put together a table of all the methods and constants you should know for this tutorial:
| Method | Description |
|---|---|
| gl.viewport( x: number, y: number, width: number, height: number ): void |
Sets the size of the display area that WebGL can use to render graphics |
| gl.vertexAttribPointer( index: number, size: number, normalized: boolean, stride: number, offset: number ): void |
Lets you specify the layout of the shader attribute value you’re passing to the shader attribute associated with the given index:– index specifies the shader attribute that you want to work with– size specifies the number of components each vertex should have– type specifies the data type of each vertex’s components– normalized specifies whether the data values should be normalized to a range from -1 to 1– stride sets the distance in bytes between the start of one vertex attribute to the next one– offset tells WebGL where the first element in the vertex attribute array starts in bytes |
| gl.clearColor( red: number, green: number, blue: number, alpha: number ): void |
Lets you specify which color WebGL should use to clear the canvas, with the intensity of the color or transparency represented by a value between 0 and 1:– red represents the intensity of the color red visible in the final color combination– green represents the intensity of green– blue represents the intensity of blue– alpha represents the transparency of the final color combination |
| gl.clear( mask: number ): void |
Lets you clear the canvas. Passing gl.COLOR_BUFFER_BIT as mask makes the method use the color that we set to clear the screen |
| gl.createShader( type: number ): WebGLShader | null |
Lets you create a new shader instance of a specified type — gl.VERTEX_SHADER (a vertex shader) or gl.FRAGMENT_SHADER (a fragment shader) |
| gl.shaderSource( shader: WebGLShader, shaderCode: string ): void |
Lets you attach a source code to a shader instance. shader holds a reference to the shader instance while shaderCode |
| gl.compileShader( shader: WebGLShader, ): void |
Compiles the shader into binary data that WebGL can use |
| gl.createProgram() : WebGLProgram | null |
Lets you create a WebGL program object |
| gl.attachShader( program: WebGLProgram, shader: WebGLShader ): void |
Lets you attach a shader to a WebGL program object |
| gl.linkProgram( program: WebGLProgram ): void |
Completes the process of setting up the WebGL program |
| gl.useProgram( program: WebGLProgram ): void |
Sets a WebGL program to be part of the rendering process |
| gl.createBuffer() : WebGLBuffer | null |
Helps you create a new buffer object |
| gl.bindBuffer( target: number, buffer: WebGLBuffer ): void |
Lets you bind a buffer object to a buffer target. target is the buffer target and could either be gl.ARRAY_BUFFER for vertex buffers or gl.ELEMENT_ARRAY_BUFFER for index buffers. buffer is the buffer object that you want to bind |
| gl.bufferData( target: number, data: BufferSource | null, usage: number ): void |
Initializes the data storage of a buffer object with the data you pass into the data argument.
All data passed through this function goes to the buffer object that is bound to In this tutorial, we use
|
| gl.getAttribLocation( program: WebGLProgram, attribute: string ): number |
Gets the location of the vertex shader attribute. In the triangle-rendering example we explored earlier, we’re trying to get the location of a coordinates attribute. If you look at the first line of vertexShaderCode — the vertex shader source code — you’ll see the following line, which declares the coordinates attribute: attribute vec2 coordinates; |
| gl.enableVertexAttribArray( index: number ): void |
Lets you enable a vertex shader attribute for rendering, which tells WebGL that you want to use the attribute in the rendering process. This important step allows the vertex shader attribute to receive vertex data and index from the vertex buffer and index buffer, respectively |
| gl.drawArrays( mode: number, first: number, count, number ): void |
Lets you render the vertices stored in the buffer to the canvas.
With With With |
| gl.drawElements( mode: number, count: number, type: number, offset: number ): void |
If you’re rendering your vertices with indices, you need to use this function instead of the drawArrays method:– mode does the same thing it does in the drawArrays method.– count represents the number of elements in the index buffer that you are rendering– type specifies the type of value in the index buffer– offset specifies the byte offset in the index buffer. It determines which element would be the starting point for fetching indices |
In this guide, we explored the benefits of WebGL for frontend development, delving into its use cases and why you should use TypeScript with WebGL. We also covered the basics of working with WebGL, including important terms and functions to know as well as examples of how to render some simple models.
I hope this guide has improved your understanding of WebGL and its potential in the frontend development landscape. Once you’ve mastered its basics, you can go on to create more complex 2D and 3D models according to your use case and project requirements.

LogRocket lets you replay user sessions, eliminating guesswork by showing exactly what users experienced. It captures console logs, errors, network requests, and pixel-perfect DOM recordings — compatible with all frameworks, and with plugins to log additional context from Redux, Vuex, and @ngrx/store.
With Galileo AI, you can instantly identify and explain user struggles with automated monitoring of your entire product experience.
Modernize how you understand your web and mobile apps — start monitoring for free.

@container scroll-state: Replace JS scroll listeners nowCSS @container scroll-state lets you build sticky headers, snapping carousels, and scroll indicators without JavaScript. Here’s how to replace scroll listeners with clean, declarative state queries.

Explore 10 Web APIs that replace common JavaScript libraries and reduce npm dependencies, bundle size, and performance overhead.

Russ Miles, a software development expert and educator, joins the show to unpack why “developer productivity” platforms so often disappoint.

Discover what’s new in The Replay, LogRocket’s newsletter for dev and engineering leaders, in the February 18th issue.
Would you be interested in joining LogRocket's developer community?
Join LogRocket’s Content Advisory Board. You’ll help inform the type of content we create and get access to exclusive meetups, social accreditation, and swag.
Sign up now