I know what you’re thinking: why on Earth would you use JavaScript to develop games? I thought the same thing when I discovered that you could use JavaScript and HTML5 to develop 3D games. The truth is, since the introduction of the JavaScript WebGL API, modern browsers have intuitive capabilities that enable them to render more complex and sophisticated 2D and 3D graphics without relying on third-party plugins.
You could start your web game development journey with pure JavaScript, which is probably the best way to learn if you’re a beginner. But why reinvent the wheel when there are so many widely adopted game engines to choose from?
If you didn’t know, an HTML5 game engine is a software framework designed to help you build browser-based games with HTML5 technologies, primarily JavaScript, along with HTML and CSS. Most HTML5 game engines are built for running directly in modern web browsers without the need for plugins, This makes them ideal for creating cross-platform, mobile-friendly experiences.
This guide ranks the top 10 JavaScript/HTML5 game engines by popularity, capability, and use case. Whether you’re a solo indie developer, mobile-focused creator, rapid prototyper, or part of a small team, there’s something here for you. These engines power everything from lightweight browser games to full-featured cross-platform apps.
We’ll highlight each engine’s strengths, learning curve, and ideal scenarios—plus provide an easy-to-follow demo (web-based) to get you started.
We’ll cover:
Editor’s note: This article was updated by Saleh Mubashar in May 2025 to cover four additional HTML5 game engines: GDevelop, Defold, Godot Web Build, and Construct.
Before we start, here are a few important factors to consider when selecting a JavaScript/HTML5 game engine. The right choice depends on your project type, experience level, and deployment goals:
Decide whether your game will be 2D, 3D, or a mix. Some engines (like Pixi.js) are built for 2D, while others (like Three.js or Babylon.js) excel at 3D rendering.
Engines like Phaser and Construct are beginner-friendly, while others may require solid JavaScript or game dev experience.
Some engines come with visual editors or online sandboxes that help speed up development (e.g., Godot Web, PlayCanvas, Construct), while others are code-only.
If you’re targeting mobile browsers or devices, performance is key. While all modern engines support mobile browsers, solutions like Phaser with Cordova or Defold’s native export options provide better performance for app store distribution. With web-only engines, a lot of tedious optimization is needed, especially for lower-end devices.
Licensing affects what you can build and publish. Most engines in this guide are open source (MIT, Apache), but others, like Construct, use a freemium model that may limit commercial use without a paid plan. Make sure the license works for your use case.
Popular engines like Phaser, Three.js, and Babylon have large, active communities, frequent updates, extensive tutorials, GitHub repositories, and Stack Overflow threads. On the other hand, newer or more niche engines may offer unique features but might lack community support, making them harder to work with for solo developers or beginners.
To help you decide faster, here’s a side-by-side comparison of the top engines based on the criteria above:
| Engine | Type | License / Cost | Mobile Support | Editor Support | Community & Resources |
Best For |
|---|---|---|---|---|---|---|
| Three.js | 3D | MIT (free and open source) | Web browsers only | Online editor present on the three.js website | Large community with complete documentation and large number of examples | 3D rendering, WebGL projects, visualizations |
| Pixi.js | 2D | MIT (free and open source) | Web browsers + native via 3rd party apps | No editor but it has a code playground on its site | Extensive documentation and a large number of examples | Fast 2D rendering, UI-heavy games, interactive apps |
| Phaser | 2D | MIT (free and open source). Phaser Editor is a paid product | Web browsers + native via 3rd party apps | Visual editor available | Large and active community, excellent docs and a plugin ecosystem | 2D browser and mobile games with rapid development needs |
| Babylon.js | 3D | Apache 2.0 (free and open source) | Excellent – via Web (PWA), Ionic, React Native, or Babylon Native for custom apps | Online playground for real-time coding and testing | Very active forum, large dev base, backed by Microsoft and extensive tutorials | High-end 3D browser games, mobile/desktop experiences, cross-platform |
| Matter.js | 2D (Physics) | MIT (free and open source) | Web browsers only | No dedicated editor, but includes tools like Inspector and Demo GUI | Decent community, large number of examples and experimental MatterTools available | Adding realistic 2D physics to web games and visualizations |
| PlayCanvas | 3D | MIT (engine), proprietary cloud editor; Free (public projects) | Mobile-first, runs in all modern browsers | Full-featured online visual editor with real-time collaboration | Excellent documentation and a large number of tutorials and examples | Browser-based 3D games and WebGL rendering |
| GDevelop | 2D, 3D | MIT (free and open source); Paid cloud services available | Native export to Android and iOS | Full-featured editor (desktop, web) | Active community, asset store and extensive documentation | 2D/3D no-code games for beginners, educators, indie devs |
| Defold | 2D, 3D | Source-available (Defold License, free forever, no royalties) | Full support for Android and iOS | Full-featured downloadable IDE with visual editor | Strong documentation, active extension portal, supported by Defold Foundation | Lightweight 2D and 3D games, mobile and HTML5 games, cross-platform releases |
| Godot | 2D, 3D | MIT (free and open source) | Native export to Android and iOS | Full-featured downloadable editor | Very large and growing community, excellent docs, asset store, lots of tutorials | Full 2D/3D games, mobile, desktop, and even console projects |
| Construct | 2D | Limited free version; paid subscription for full use | Full export to Android, iOS via Cordova and HTML5 | Full-featured visual editor (browser-based, works offline too) | Strong and active community, official tutorials, asset store, marketplace | No-code/low-code 2D games, quick prototyping, educational uses |
Three.js is one of the most popular JavaScript libraries for creating and animating 3D computer graphics in a web browser using WebGL. It’s also a great tool for creating 3D games for web browsers.
Because Three.js is based on JavaScript, it’s relatively easy to add any interactivity between 3D objects and user interfaces, such as keyboard and mouse. This makes the library perfectly suitable for making 3D games on the web.
If you’re looking to delve into creating simple or complex 3D objects on the web, Three.js is the go-to library. Its top advantages include a vast community of talented users and abundant examples and resources.
Three.js is the first 3D animated library I worked with, and I’d recommend it to anyone starting out with game development.
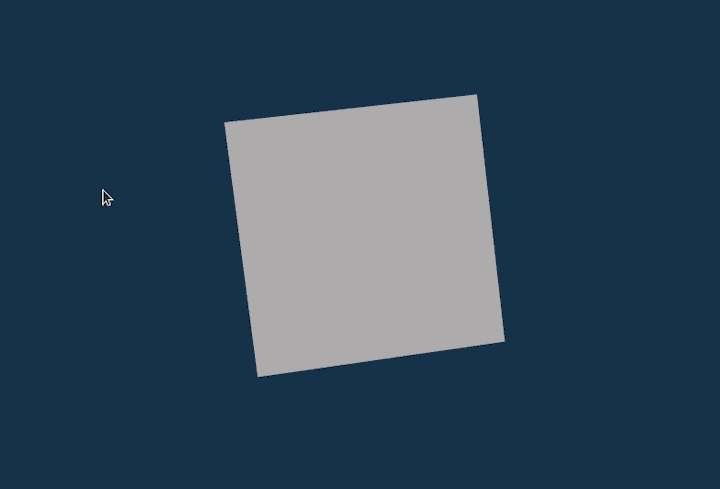
Let’s create a simple rotating geometry to demonstrate what Three.js can do:
import * as THREE from 'js/three.module.js';
var camera, scene, renderer;
var geometry, material, mesh;
animate();
Create an init function to set up everything we need to run our demo animation with Three.js:
function init() {
  const camera = new THREE.PerspectiveCamera( 60, window.innerWidth / window.innerHeight, .01, 20 );
  camera.position.z = 1;
  const scene = new THREE.Scene();
  const geometry = new THREE.BoxGeometry( 0.5, 0.5, 0.5 );
  const material = new THREE.MeshNormalMaterial();
  const mesh = new THREE.Mesh( geometry, material );
  scene.add( mesh );
  const renderer = new THREE.WebGLRenderer( { antialias: true } );
  renderer.setSize( window.innerWidth, window.innerHeight );
  document.body.appendChild( renderer.domElement );
}
Next, create an animate function to animate the object with your desired motion type:
function animate() {
    init();
    requestAnimationFrame( animate );
    mesh.rotation.x += .01;
    mesh.rotation.y += .02;
    renderer.render( scene, camera );
}
The finished result should look like this:
Refer to the repo and official documentation to learn more about Three.js.
If you’re looking for a JS library to create rich and interactive 2D graphics with support for cross-platform applications, look no further than Pixi.js. This HTML5 creation engine enables you to develop animations and games without prior knowledge of the WebGL API.
Pixi is a strong choice in most scenarios, especially if you’re creating performance-oriented 3D interactive graphics with device compatibility in mind. Pixi’s support for Canvas fallback in cases where WebGL fails is a particularly enticing feature.
Let’s build a simple demo to see Pixi.js in action. Use the following command to add Pixi.js to your project:
npm install pixi.js
Or CDN:
<script src="https://cdnjs.cloudflare.com/ajax/libs/pixi.js/5.1.3/pixi.min.js" ></script>
Create a script file and add the following code:
import * as PIXI from 'pixi.js';
const app = new PIXI.Application();
document.body.appendChild(app.view);
app.loader.add('jumper', 'jumper.png').load((loader, resources) => {
    const bunny = new PIXI.Sprite(resources.bunny.texture);
    bunny.x = app.renderer.width / 2;
    bunny.y = app.renderer.height / 2;
    bunny.anchor.x = .5;
    bunny.anchor.y = .5;
    app.stage.addChild(bunny);
    app.ticker.add(() => {
        bunny.rotation += .01;
    });
});
The result should look something like this:
Refer to the repo and official documentation to learn more about Pixi.js.
Phaser is a cross-platform game engine that enables you to create JavaScript and HTML5-based games and compile them for many platforms. For example, you might decide to compile your game to iOS, Android, and other native apps using third-party tools.
Phaser 4 is a full rewrite (smaller bundle, modern TypeScript, WebGPU focus) and is currently in beta. It is expected to be released at the end of 2025.
Phaser is good for developing cross-platform game applications. Its support for a wide range of plugins and the large community of developers building games with Phaser make it easy to get started with the framework.
Let’s build a basic application with Phaser. First, install Phaser as a Node module or via CDN:
npm install phaser
OR:
<script src="//cdn.jsdelivr.net/npm/[email protected]/dist/phaser.min.js"></script>
Next, pass in some default configurations to your Phaser engine:
const config = {
  type: Phaser.AUTO,
  width: 800,
  height: 600,
  physics: {
    default: "arcade",
    arcade: {
      gravity: { y: 200 },
    },
  },
  scene: {
    preload: preload,
    create: create,
  },
};
const game = new Phaser.Game(config);
Create a preload function to load in your default static files:
function preload() {
  this.load.setBaseURL("https://labs.phaser.io");
  this.load.image("sky", "assets/skies/space3.png");
  this.load.image("plane", "assets/sprites/ww2plane.png");
  this.load.image("green", "assets/particles/green.png");
  this.load.image("astroid", "assets/games/asteroids/asteroid1.png");
  this.load.image("astroid2", "assets/games/asteroids/asteroid1.png");
  this.load.image("astroid3", "assets/games/asteroids/asteroid1.png");
}
Finally, define a create function to display your newly created game:
function create() {
  this.add.image(400, 300, "sky");
  this.add.image(700, 300, "astroid");
  this.add.image(100, 200, "astroid2");
  this.add.image(400, 40, "astroid3");
  const particles = this.add.particles("green");
  const emitter = particles.createEmitter({
    speed: 100,
    scale: { start: 1, end: 0 },
    blendMode: "ADD",
  });
  const plane = this.physics.add.image(400, 100, "plane");
  plane.setVelocity(100, 200);
  plane.setBounce(1, 1);
  plane.setCollideWorldBounds(true);
  emitter.startFollow(plane);
}
Refer to the repo and official documentation to learn more about Phaser.js.
Babylon.js is a powerful, simple, open game and rendering engine packed into a friendly JavaScript framework.
Many large brands trust Babylon.js as their game development engine of choice. The Babylon Playground, a thriving hub of code samples, is a great tool to help you get started with the framework.
Babylon and its modules are published on npm. To install it, run the following command in your command line tool:
npm install babylonjs --save
Alternatively, you can integrate the library into your project via CDN. To do so, create an index.html file and add the following code:
<canvas id="renderCanvas"></canvas>
<script src="https://cdn.babylonjs.com/babylon.js"></script>
<script src="script.js"></script>
After installation, you can start using the library by importing the global object or destructuring the scene and engine methods like so:
import * as BABYLON from 'babylonjs'
  // OR
  import { Scene, Engine } from 'babylonjs'
Next, create a script.js file and include the following code:
 const { createScene } = require('scene.js')
  window.addEventListener('DOMContentLoaded', function(){
      const canvas = document.getElementById('renderCanvas');
      const engine = new BABYLON.Engine(canvas, true);
      const scene = createScene();
      engine.runRenderLoop(function(){
          scene.render();
      });
      window.addEventListener('resize', function(){
          engine.resize();
      });
  });
Create a scene.js file and add the following code:
export function(){
    const scene = new BABYLON.Scene(engine);
    const camera = new BABYLON.FreeCamera('camera', new BABYLON.Vector3(0, 5,-10), scene);
    camera.setTarget(BABYLON.Vector3.Zero());
    camera.attachControl(canvas, false);
    const light = new BABYLON.HemisphericLight('light', new BABYLON.Vector3(0,1,0), scene);
    const sphere = BABYLON.Mesh.CreateSphere('sphere', 16, 2, scene);
    sphere.position.y = 1;
    const ground = BABYLON.Mesh.CreateGround('ground', 6, 6, 2, scene);
    return scene;
}
Below is a preview of what your animation should look like:

Refer to the repo and official documentation to learn more about Babylon.js.
Matter.js is a JavaScript 2D, rigid-body physics engine for the web. Even though it’s a JavaScript physics engine, you can combine it with various packages and plugins to create interesting web games.
Matter.js is subjectively the best library for creating simple, moving animation objects. Matter.js is a physics library that focuses more on 2D objects. However, you can combine it with third-party solutions to create dynamic games.
To get started with Matter.js in a vanilla project, download the matter.js or matter.min.js package file from the official GitHub repo and add it to the HTML file with the following code:
<script src="matter.js"></script>
However, if you’re using a bundler, such as Parcel, you can install the package as a Node module via npm or yarn using the following commands:
npm install matter-js
//OR
yarn add matter-js
The following is a minimal example using the built-in renderer and runner to get you started:
// module aliases
const Engine = Matter.Engine;
const Render = Matter.Render;
const World = Matter.World;
const Bodies = Matter.Bodies;
// create an engine
const engine = Engine.create();
// instantiating the renderer
const render = Render.create({
  element: document.body,
  engine: engine,
  options: {
    wireframes: false,
    showAngleIndicator: false,
    background: "white",
  },
});
// create two boxes and a ground
const boxA = Bodies.rectangle(300, 300, 70, 70);
const boxB = Bodies.rectangle(400, 10, 60, 60);
const ground = Bodies.rectangle(300, 510, 910, 10, { isStatic: true });
// add all bodies to the world
World.add(engine.world, [boxA, boxB, ground]);
// run the engine
Matter.Runner.run(engine);
// run the renderer
Render.run(render);
Include the above script in a page that has Matter.js installed, and then open the page in your browser. Ensure the script is at the bottom of the page (or called on the window load event or after the DOM is ready).
You should see two rectangular bodies fall and then hit each other as they land on the ground. If you don’t, check the browser console to see if there are any errors:
Refer to the repo and official documentation to learn more about Matter.js.
PlayCanvas uses HTML5 and WebGL to run games and other interactive 3D content in any mobile or desktop browser. Though it’s free and open sourced, PlayCanvas focuses more on the game engine than the rendering engine. Therefore, it’s more suitable for creating
3D games that use WebGL and HTML5 Canvas.
PlayCanvas is great for creating small public projects or school projects — at least, that’s what I’ve used it for. If you need more features and more control over your game development, you might want to consider subscribing for premium features.
For now, let’s do some basic rendering with the engine. As a first step, download the package file from the GitHub repository and add it to your project using the following code:
<script src='https://code.playcanvas.com/playcanvas-stable.min.js'>
Next, create a script.js file and link it to the HTML file using the following code:
<canvas id='canvas'></canvas>
<script src='/script.js'>
Now, open the script.js file and add the following code to instantiate a new PlayCanvas application:
 const canvas = document.getElementById('canvas');
  const app = new pc.Application(canvas);
  window.addEventListener('resize', () => app.resizeCanvas());
  const box = new pc.Entity('cube');
  box.addComponent('model', {
      type: 'box'
  });
  app.root.addChild(box);
To create the camera and light for the object, add the following code:
 const camera = new pc.Entity('camera');
  camera.addComponent('camera', {
      clearColor: new pc.Color(.1, .1, .1)
  });
  app.root.addChild(camera);
  camera.setPosition(0, 0, 3);
  const light = new pc.Entity('light');
  light.addComponent('light');
  app.root.addChild(light);
  light.setEulerAngles(46, 0, 0);
  app.on('update', dt => box.rotate(10 * dt, 20 * dt, 30 * dt));
  app.start();
The code above should produce the following result:
Refer to the repo and official documentation to learn more about PlayCanvas.
GDevelop is a free, open-source no-code game engine ideal for creating 2D and lightweight 3D games. It features a powerful visual editor, an active community, detailed documentation, and an extensive asset store. With export options for Android, iOS, desktop, and the web, you can deploy your game almost anywhere.
To get started with GDevelop, download it from gdevelop.io/download — it’s available for Windows, macOS, Linux, Android, iOS, and even runs in the browser. Installation steps vary slightly by platform but are beginner-friendly. Once installed, you can either customize a game template or start a new project from scratch:
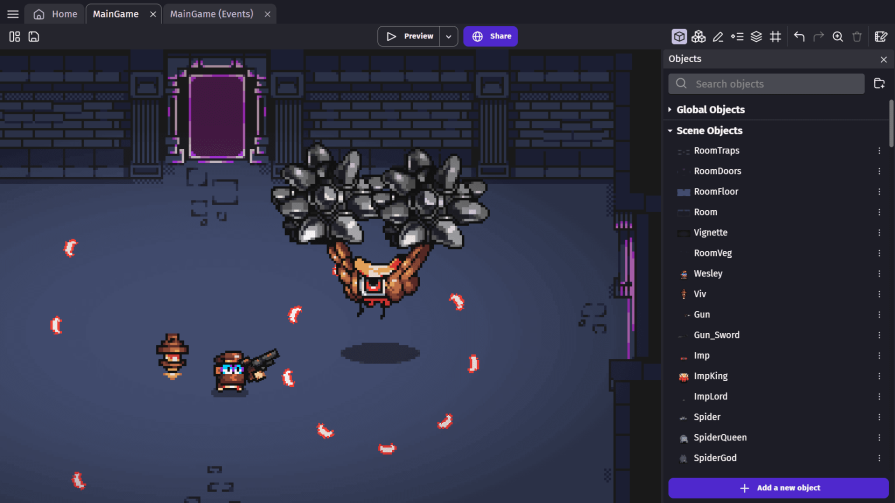
Refer to the repo and official documentation to learn more about GDevelop.
Defold is a source-available, cross-platform game engine ideal for creating lightweight 2D and 3D games. It comes with a full-featured IDE that includes both a visual editor and a Lua-based code editor, offering flexibility for both no-code and code-first developers. Similar to GDevelop, it has cross-platform support for all major web, desktop, and mobile platforms.
To get started, download Defold from defold.com/download. It runs on Windows, macOS, and Linux. There’s nothing else to install. Just open the editor, start a new project or use a template, and you’re ready to go:
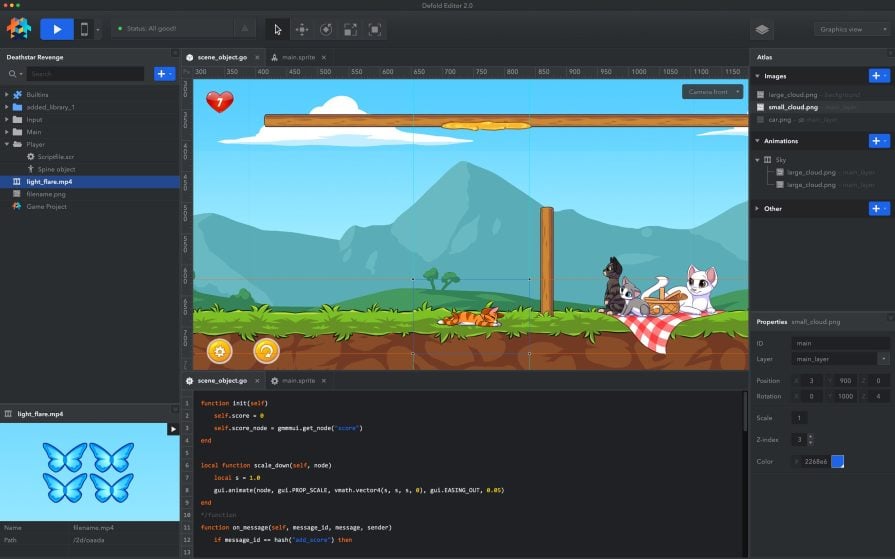
Refer to the repo and official documentation to learn more about Defold.
Godot is a powerful, open-source game engine designed for both 2D and 3D game development. It supports GDScript (its own Python-like language), C#, and C++, making it accessible for beginners and flexible for experienced developers. Godot’s node-based architecture encourages a modular approach to game development. It is one of the most popular game engines out there, comparable to Unreal and Unity in terms of popularity.
To get started, download Godot from defold.com/download — it runs on Windows, macOS, Linux, and Android. You can also work on the online editor:
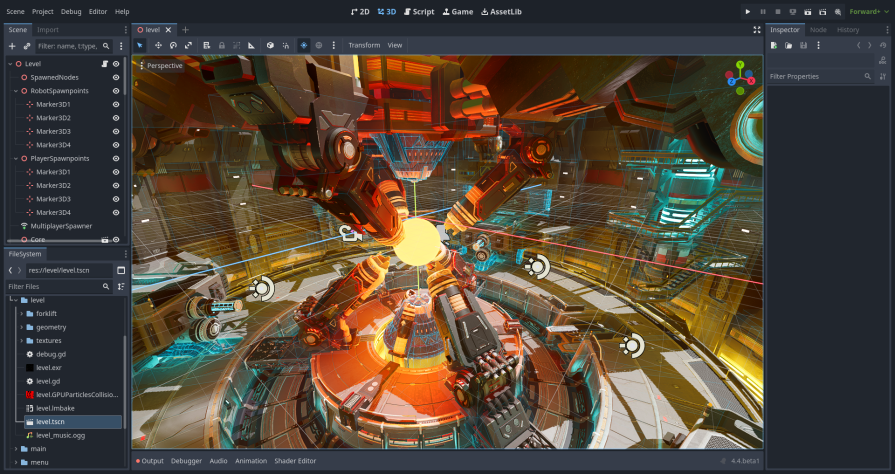
Refer to the repo and official documentation to learn more about Godot.
Construct is a browser-based, no-code/low-code 2D game engine designed for rapid prototyping and educational use. It has a fully visual editor, eliminating the need for any coding. This makes it excellent for beginners. Construct runs entirely in the browser, works offline, and offers export options for HTML5, Android, iOS, desktop, and more.
Refer to the official documentation to learn more about Construct.
By breaking down the pros, cons, and use cases associated with each game engine listed above, I hope you gained some insight into which one best suits the type of game or animation you want to create.
If you’re primarily looking for a powerful rendering tool for the web, Three.js is a top choice. But if you want an all-in-one game engine with a visual editor, tools like Godot, Defold, or GDevelop offer an excellent balance between usability and capability for both 2D and 3D development.
Each engine has its own strengths — the best one ultimately depends on your experience level, goals, and the type of game you want to build.
What game engine do you use in your game development projects? Let us know in the comments!
Debugging code is always a tedious task. But the more you understand your errors, the easier it is to fix them.
LogRocket allows you to understand these errors in new and unique ways. Our frontend monitoring solution tracks user engagement with your JavaScript frontends to give you the ability to see exactly what the user did that led to an error.

LogRocket records console logs, page load times, stack traces, slow network requests/responses with headers + bodies, browser metadata, and custom logs. Understanding the impact of your JavaScript code will never be easier!

Debug RSC hydration mismatches in production with Next.js instrumentation, Suspense isolation, HTML diffing, and CI smoke tests.

Explore why npm dependencies are a major supply chain security risk and how to protect JavaScript apps from compromised packages and transitive threats.

Enabled React Compiler v1.0 on a production Next.js app. Here’s every warning, breakage, and silent opt-out I documented — and what actually worked.

We built the same app in TanStack Start RSC and Next.js RSC. TanStack shipped 40% less JS and built 4x faster — but Next.js is still the safer production bet.
Hey there, want to help make our blog better?
Join LogRocket’s Content Advisory Board. You’ll help inform the type of content we create and get access to exclusive meetups, social accreditation, and swag.
Sign up now


