pointerEvents in React NativeReact Native pointerEvents are one of many View responder props that determine how a View interacts with touch events. In this article, we will be looking at how to use pointerEvents to handle different events in our React Native applications.

Jump ahead:
pointerEvents prop?pointerEvents properties in React NativepointerEvents
pointerEvents in a TextInput formTo follow this tutorial, you will need to have React Native installed on your computer and an understanding of how React Native works.
Years ago, computers were primarily designed for mouse inputs. As a result, web apps only had to listen for and interact with mouse events, which made things easy and simple for developers too, who only had to write logic for those mouse events.
Mouse events are events that are triggered on an action or movement of the mouse. They fire when a user uses the mouse to interact with a web app’s DOM elements. Examples of mouse events include onMouseEnter, onMouseLeave, onDoubleClick, onDrag, onDragEnter, and so on.
As years passed, innovation and modernization led to newer devices — including mobile devices — that incorporated other forms of inputs, like touch inputs and pen inputs. Hence, different event types were designed to handle these new events, including touch events.
Touch events are events that are triggered when a user interacts with touchable components on a touchscreen device. Examples of touch events include onTouchCancel, onTouchEnd, onTouchMove, onTouchStart, and so on.
However, writing and duplicating the same logic for different events and different devices was a bit unnecessary and ambiguous, to say the least. There was also the issue of compatibility, since the logic for mouse events wouldn’t work for touchscreens and vice versa.
A new form of input called a pointer input was built to solve this issue. A pointer can be any form of contact made by the user and encompasses touch inputs, pen inputs, multi-touch, and mouse inputs.
Similarly, the pointerEvents prop was designed to handle this input form and combine the events above; i.e., touch events, mouse events, and pen support.
pointerEvents prop?In React Native, the View is the most fundamental component for building a user interface. pointerEvents controls whether the View can be the target of a touch event or not — events that are triggered when a user makes a point or touch contact with the device surface.
These events includes pointerDown, pointerUp, and so on.
Let’s look at the example below:
{/* App.js */}

 <View style={styles.app} pointerEvents="none">
      <View style={styles.header}>
        <Text style={styles.title}>React Native for Web</Text>
      </View>
      <Button onPress={() => console.log("test")} title="Example button" />
</View>
In the example above, we added pointerEvents to the root View and set it to none. What this means is that the View — with its corresponding children — is deactivated from being the target of any pointer event. In other words, if you try to click on the child Button, it will not be clickable.
The none property is one of three pointerEvents properties in React Native. Let’s learn more about these properties and how they affect the View.
pointerEvents properties in React NativeIn React Native, pointerEvents have four properties:
autononebox-onlybox-noneThe default value of pointerEvents in React Native is auto. Setting pointerEvents to auto means that the View and its corresponding children can be the target of touch events. Copy the code in the example below and try clicking on the resulting button:
{/* App.js */}

 <View style={styles.app} pointerEvents="auto">
      <View style={styles.header}>
        <Text style={styles.title}>React Native for Web</Text>
      </View>
      <Button onPress={() => console.log("test")} title="Example button" />
</View>
Since pointerEvents is set to auto, the button should be clickable.
In contrast, as we saw earlier, the none property value means that neither the View nor its corresponding children will ever be the target of touch events.
However, setting the pointerEvents prop to box-none means that while the View is never the target of the touch events, its children can be. Let’s look at the following example View set to box-none:
{/* App.js */}

 <View style={styles.app} pointerEvents="box-none">
      <View style={styles.header}>
        <Text style={styles.title}>React Native for Web</Text>
      </View>
      <Button onPress={() => console.log("test")} title="Example button" />
</View>
In the example above, the View is not the target of touch events, but its subviews can still be the targets, which is why the child Button can be clicked in this case.
Lastly, setting the pointerEvents prop to box-only means that the View can be the target of the touch events, but its children cannot be. Let’s look at the following example View set to box-only:
{/* App.js */}

 <View style={styles.app} pointerEvents="box-only">
      <View style={styles.header}>
        <Text style={styles.title}>React Native for Web</Text>
      </View>
      <Button onPress={() => console.log("test")} title="Example button" />
</View>
In the example above, the Button cannot be clicked because it is not a target of touch event; only the parent View is.
pointerEventsIn the brief history section above, we reviewed the purpose of pointerEvents in React Native. Now, let’s go over their benefits — in other words, the reasons why the pointerEvents prop is important.
The pointerEvents prop makes compatibility possible across devices with different input forms, unifying mouse, touch, and pen events.
This means instead of rewriting the logic for separate event listeners, you can apply the same logic for all input types at the same time using pointerEvent listeners. Take a look at the example code blocks below.
Instead of doing this:
/* TouchScreen devices */
something.addEventListener("touchdown", () => {
    // write your logic
});

/* Mouse devices */
something.addEventListener("mousedown", () => {
    // write your logic
});
You can do this instead:
/* TouchScreen and Mouse devices */
something.addEventListener("pointerdown", () => {
    // write your logic
});
Besides making compatibility possible across input types, applying the same logic for all input types using the pointerEvents prop can help with some of the heavy lifting for your code.
Look back at the code example above. Instead of writing the same logic for different devices — touch and mouse devices — we simply used pointerEvents to combine the two into one. pointerdown will always work for mousedown, touchdown, and other events.
Since you don’t have to duplicate your code to listen to different events for different device inputs, you can cut down some of the code ambiguity, which helps improve or optimize the application’s performance.
Another benefit of the pointerEvent prop is that it can distinguish between input types if necessary. This means that it can detect when the user is using a touch, mouse, or pen input device.
/* TouchScreen and Mouse devices */
something.addEventListener("pointerdown", (e) => {
    // write your logic
    console.log(e.pointerType)
});
In the above code, we are listening for the mousedown and the touchdown events using the pointerdown event. When you click the mouse on the web or make a touch contact on a mobile device, you can check the console logs to see the type of event that was called.
Let’s look at the code below to understand this benefit better:
/* App.js */
import React from "react";
import { Button, StyleSheet, Text, View } from "react-native";

function App() {
  const getDeviceType = (e) => {
    console.log(e);
  };

  return (
    <View style={styles.app} pointerEvents="box-none">
      <View style={styles.header}>
        <Text style={styles.title}>React Native for Web</Text>
      </View>
      <Button onPress={getDeviceType} title="Example button" />
    </View>
  );
}

const styles = StyleSheet.create({
  app: {
    marginHorizontal: "auto",
    maxWidth: 500
  },
  header: {
    padding: 20
  },
  title: {
    fontWeight: "bold",
    fontSize: "1.5rem",
    marginVertical: "1em",
    textAlign: "center"
  }
});
export default App;
In the code above, we expanded on the example we’ve been using. When we click on the resulting button, we can again check the developer console to see what event or events we triggered.
Open up your developer console in your browser to see what we are talking about. You should see something that looks like the image below:
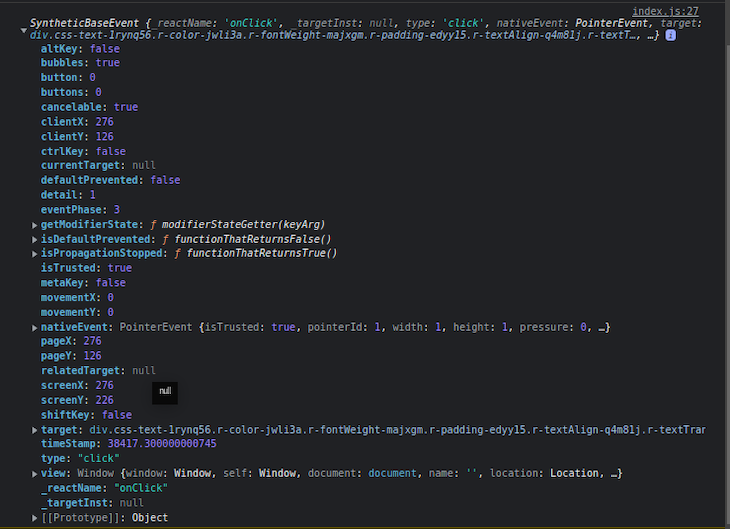
If you look at the nativeEvent, you can see the pointerEvent object showing the pointerId, width, height, and other properties.
One pointerEvent object property is the pointerType, which shows the device input. With this type, we can determine if the device is a mouse, pen, or touchscreen device.
Inside the getDeviceType function in our App.js file, let’s change the console.log method to the following:
/* App.js */

const getDeviceType = (e) => {
  console.log(e.nativeEvent.pointerType); // "touch" for touchscreen devices
};
Tap on the button after modifying your code, and you will see touch logged to the console as the device type, which shows that we are on a touchscreen device. It will show mouse if we are running our application on a mouse input device like a computer.
If you like, you can use this and do whatever you want based on the device the user is using.
/* App.js */

const getDeviceType = (e) => {
   if (e.nativeEvent.pointerType === "touch") {
     // do something
   } else if (e.nativeEvent.pointerType === "mouse") {
     // do something different
   } else {
     // do something else entirely
   }
};
For example, if you are building a particular feature for mobile devices only and do not want that feature to run on the web, you can alert the user when the user tries the feature on the web.
/* App.js */
useEffect(() => {
    window.addEventListener("pointerdown", (e) => {
      if (e.nativeEvent.pointerType === "touch") {
        console.log(e.pointerType);
      } else if (e.nativeEvent.pointerType === "mouse") {
        alert("Web feature is not supported");
      }
    });
  }, []);
pointerEvents in a TextInput formWe can use the pointerEvent in many situations — like adding a drag feature to graphic creator like Canva, creating a drag and fast forward feature for video players, and in many other scenario. In this example, we will see how we can use it in a text input form.
Imagine that we are building a dating application and we want to offer users the ability to use their Google or Facebook account to log in.
Let’s say the user logs in with the Google account. Their Google login information provides us some details like the user’s name, email address, and image. After the user is logged in, we want the user to fill out the other details that the application requires, like age, nationality, sex, occupation, and so on.
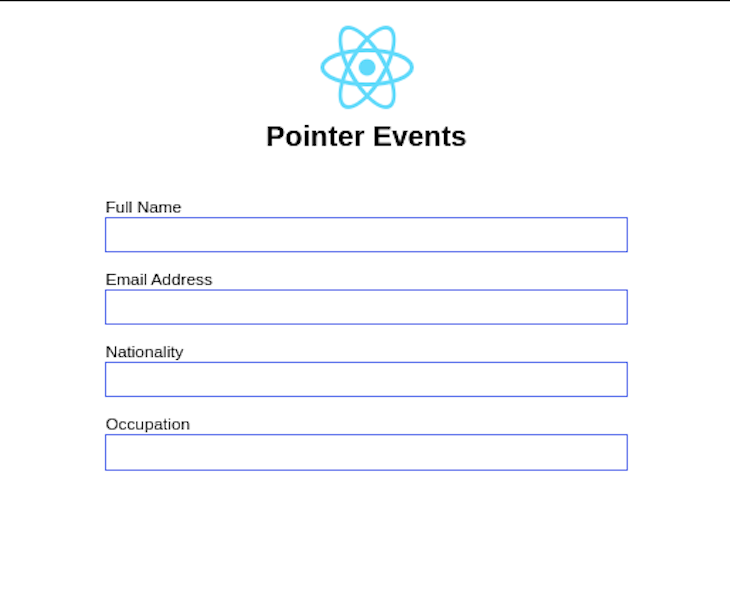
In this scenario, we will have a simple form that looks like this:
/* App.js */

import React from "react";
import { TextInput, Image, StyleSheet, Text, View } from "react-native";
const logoUri =
  "https://d33wubrfki0l68.cloudfront.net/554c3b0e09cf167f0281fda839a5433f2040b349/ecfc9/img/header_logo.svg";
function App() {
  return (
    <View style={styles.app}>
      <View style={styles.header}>
        <Image
          accessibilityLabel="React logo"
          source={{ uri: logoUri }}
          resizeMode="contain"
          style={styles.logo}
        />
        <Text style={styles.title}>Pointer Events</Text>
      </View>
      <View>
        <View style={styles.textInputParent}>
          <Text>Full Name </Text>
          <TextInput style={styles.textInput} />
        </View>
        <View style={styles.textInputParent}>
          <Text>Email Address </Text>
          <TextInput style={styles.textInput} />
        </View>
        <View style={styles.textInputParent}>
          <Text>Nationality </Text>
          <TextInput style={styles.textInput} />
        </View>
        <View style={styles.textInputParent}>
          <Text>Occupation</Text>
          <TextInput style={styles.textInput} />
        </View>
      </View>
    </View>
  );
}
const styles = StyleSheet.create({
  app: {
    marginHorizontal: 100,
    maxWidth: 500
  },
  logo: {
    height: 70
  },
  header: {
    padding: 20
  },
  textInputParent: {
    marginVertical: 7
  },
  textInput: {
    backgroundColor: "transparent",
    borderWidth: 2,
    borderColor: "#516beb",
    width: "100%",
    height: 30
  },
  title: {
    fontWeight: "bold",
    fontSize: "1.5rem",
    marginVertical: ".4em",
    textAlign: "center"
  }
});
export default App;
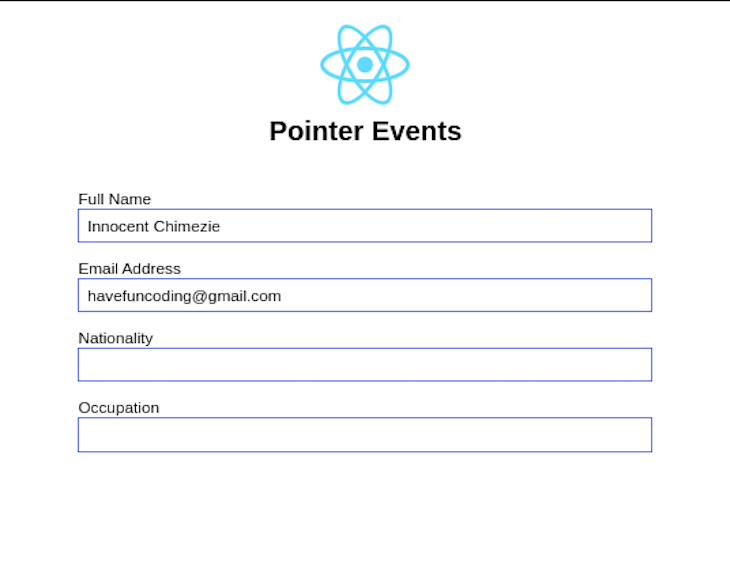
Since the user is logging into the application using their Google login information, it means we already have access to their email address and name. We can autofill this information to optimize the user’s experience and use pointerEvents to disable the autofilled text inputs so that the user can’t edit them.
To do this, we will add the pointerEvent props to the View that contains our text input so that it works only for that View and its children:
/* App.js */

 <View
          style={styles.textInputParent}
          pointerEvents={userDetails.name ? "none" : "auto"}
        >
          <Text>Full Name </Text>
          <TextInput style={styles.textInput} value={userDetails.name} />
        </View>
        <View
          style={styles.textInputParent}
          pointerEvents={userDetails.email ? "none" : "auto"}
        >
          <Text>Email Address </Text>
          <TextInput style={styles.textInput} value={userDetails.email} />
        </View>
We are using a conditional statement to check if the user’s email and name exist. If this information exists, then we autofill the appropriate fields and deactivate the View. Otherwise, the user can fill these fields themselves.
This works really well because you can use the same form for both Google and Facebook logins, as well as for Apple logins and the normal login form, too. You only deactivate the form input when the necessary details are already available.
Take a look at the full code and output below:
/* App.js */

import React, { useState } from "react";
import { TextInput, Image, StyleSheet, Text, View } from "react-native";
const logoUri =
  "https://d33wubrfki0l68.cloudfront.net/554c3b0e09cf167f0281fda839a5433f2040b349/ecfc9/img/header_logo.svg";
function App() {
  const [userDetails, setUserDetails] = useState({
    name: "Innocent Chimezie",
    email: "[email protected]",
    nationality: "",
    occupation: ""
  });
  return (
    <View style={styles.app}>
      <View style={styles.header}>
        <Image
          accessibilityLabel="React logo"
          source={{ uri: logoUri }}
          resizeMode="contain"
          style={styles.logo}
        />
        <Text style={styles.title}>Pointer Events</Text>
      </View>
      <View>
        <View
          style={styles.textInputParent}
          pointerEvents={userDetails.name ? "none" : "auto"}
        >
          <Text>Full Name </Text>
          <TextInput style={styles.textInput} value={userDetails.name} />
        </View>
        <View
          style={styles.textInputParent}
          pointerEvents={userDetails.email ? "none" : "auto"}
        >
          <Text>Email Address </Text>
          <TextInput style={styles.textInput} value={userDetails.email} />
        </View>
        <View style={styles.textInputParent}>
          <Text>Nationality </Text>
          <TextInput style={styles.textInput} />
        </View>
        <View style={styles.textInputParent}>
          <Text>Occupation</Text>
          <TextInput style={styles.textInput} />
        </View>
      </View>
    </View>
  );
}
const styles = StyleSheet.create({
  app: {
    marginHorizontal: 100,
    maxWidth: 500
  },
  logo: {
    height: 70
  },
  header: {
    padding: 20
  },
  textInputParent: {
    marginVertical: 7
  },
  textInput: {
    backgroundColor: "transparent",
    borderWidth: 2,
    borderColor: "#516beb",
    width: "100%",
    height: 30,
    paddingLeft: 6
  },
  title: {
    fontWeight: "bold",
    fontSize: "1.5rem",
    marginVertical: ".4em",
    textAlign: "center"
  }
});
export default App;
In this article, we went over what the React Native pointerEvents prop is and looked at some of its properties and benefits. We also went over an example showing how pointerEvents works in the practical scenario of detecting input types, along with an example use case for pointerEvents in a TextInput form.
I hope this article about React Native pointerEvents has been helpful for you. If you have comments or questions, let me know in the comments section below.

LogRocket's Galileo AI watches sessions for you and and surfaces the technical and usability issues holding back your React Native apps.
LogRocket also helps you increase conversion rates and product usage by showing you exactly how users are interacting with your app. LogRocket's product analytics features surface the reasons why users don't complete a particular flow or don't adopt a new feature.
Start proactively monitoring your React Native apps — try LogRocket for free.

I migrated 20 production-style components from Tailwind to StyleX. Here’s what the data showed about LOC, CSS bundle size, build time, and type safety.

A guide for using JWT authentication to prevent basic security issues while understanding the shortcomings of JWTs.

Discover how to build, render, and automate product demo videos with Remotion, replacing traditional screen recordings with reusable React code.

Chrome’s Modern Web Guidance embeds modern web platform skills into AI coding agents, helping them choose native HTML, CSS, and browser APIs over legacy patterns.
Would you be interested in joining LogRocket's developer community?
Join LogRocket’s Content Advisory Board. You’ll help inform the type of content we create and get access to exclusive meetups, social accreditation, and swag.
Sign up now

