Editor’s note: This article was updated by Chimezie Innocent on 7 February 2024 to include information about integrating Google OAuth login into React components, as well as to incorporate information about handling authentication responses in a React app.

There are times when users want immediate access to an application without the hassle of creating and logging into a new account. At the same time, app owners want to know how many users their application has and require user registration for tracking and feedback purposes. To get these statistics, they need users to sign up with their emails.
These two situations put both the users and the app owners in a bit of a pickle. This is where having a Google login feature plays a very vital role.
Because Google (Gmail) is the most popular email platform in the world, allowing users to use Google login with your React app eliminates the friction between users and app owners. Users can begin using an application almost immediately without having to create a completely new account.
In this article, we’ll learn how Google login works and how we can add it to our React app using the new Google Identity Services SDK called @react-oauth/google.
To follow along with this tutorial, you should have:
To use the Google login, we’ll need to install the @react-oauth/google package. This is Google’s new Identity Services SDK; it allows us to integrate the Google login feature into our React app.
Additionally, @react-oauth/google allows us to obtain the access tokens we need to access all Google APIs quickly and safely.
But, before we install and begin integrating the Google login into our React app, we’ll first need to get a Google client ID.
A client ID is a unique identifier associated with an application that assists with client and server OAuth 2.0 authentication.
To get a client ID from Google, go to your Google Cloud Console and create a new project. For this article, I’ve named the project “Google Sign In,” but you can name it whatever you like:
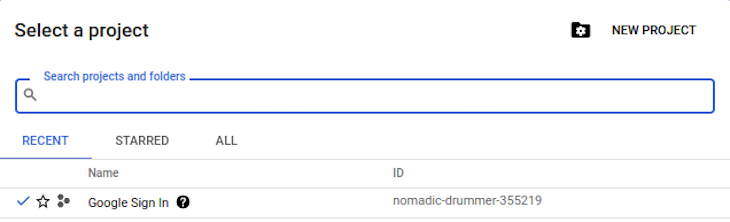
After creating a project, click on the project name and you’ll see a dashboard that looks like the one shown below. Your current project name should be visible at the top left of the dashboard, next to the Google Cloud logo:
Now, let’s review how to configure your consent screen before creating your credentials.
A consent screen, as the name suggests, is a consent page that prompts the user to use an external or third-party library to log in. This step alerts the user that they are leaving your app’s root page and allows access to a third-party page.
Simply put, when you use OAuth 2.0 for authorization, your app requests that the user authorize one or more scopes of access from a Google account. Scopes of access include any information or activities your app is allowed to access or exercise on the user’s account.
The Google login consent screen your app displays to the user may include a brief description of your project, its policies, and the requested scopes of access.
A simple consent page can look like this:
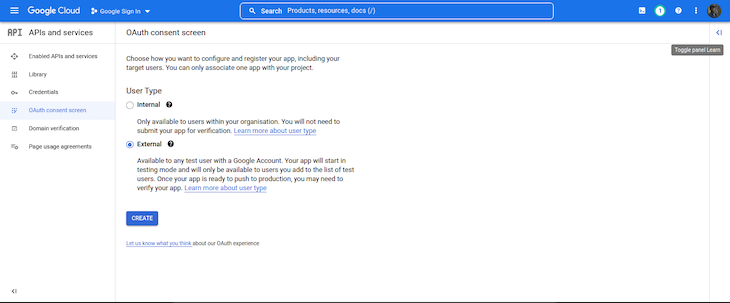
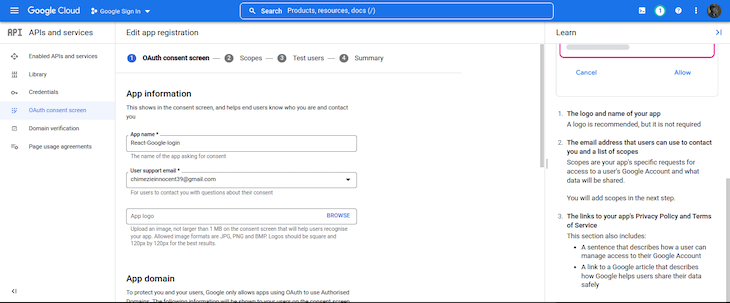
To configure the Google consent page for your React app, go to the “OAuth consent screen” tab on the left-side menu of your Google Cloud Console.
Once you are in this tab, choose external — which is the only option you can choose unless you are using a Google-verified organization or application — and click the Create button to create your consent screen:
Next, in the same tab, choose a name for your application and an email address to get notifications about any changes to your project.
You can keep the other requirements and options empty for now but if you have the details ready, you can add them during this step:
You can also skip the rest of the registration sections for now. Just scroll down in each section, and click Save and continue until you are returned to the dashboard after completion.
After creating the OAuth consent screen, we need to publish the app before we can test it or before the authentication works. By default, its status is Testing and after publishing, it gets pushed to Production:
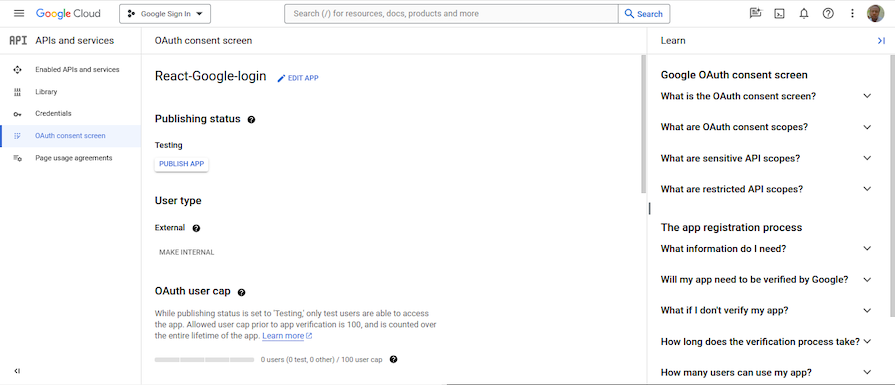
Once you have set your app status as “In production,” your app will be available to anyone with a Google Account.
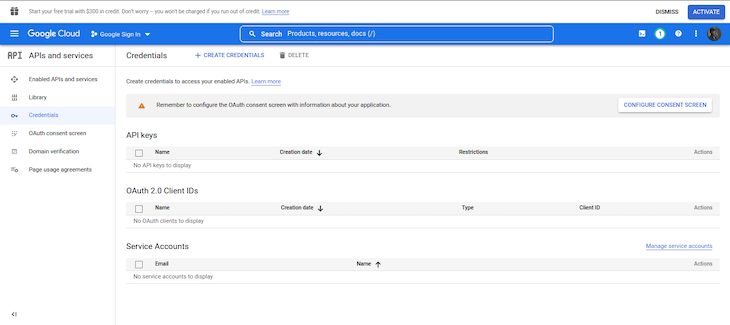
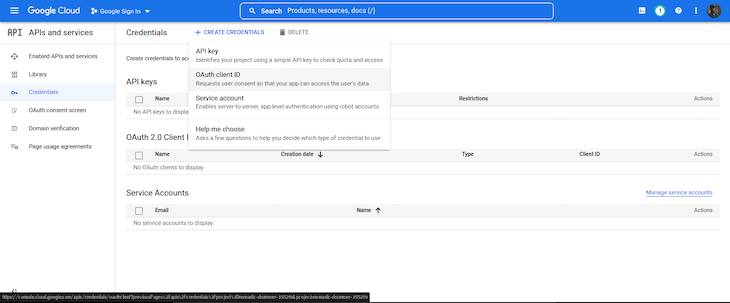
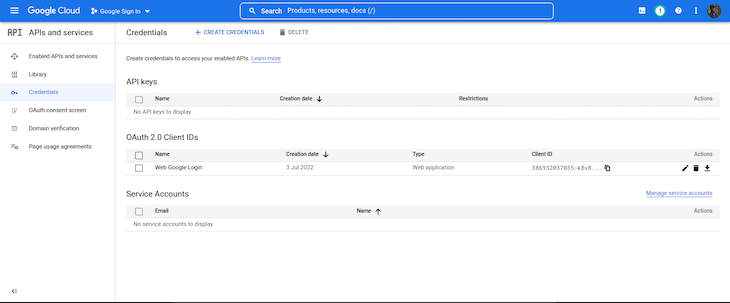
Next, on the left-side menu, click the Credentials tab to go to the page where you can create your web client ID.
On this page, click on CREATE CREDENTIALS at the top of the page, and then select the OAuth client ID option:
You will be prompted to select an application type, as shown below. If you are following these steps for a React app, choose Web application (because we’re using the Google client ID for the web):

If you are integrating it in a React Native, Flutter, or Swift application, you can choose the Android or iOS options for the two respective operating systems.
Next, we will choose a name for our client ID. This name is used to note or define the particular ID we are creating. So for example, if we are creating web, iOS, and Android IDs, we can include “Web ID,” “Android ID,” “iOS ID,” and so on in their naming convention to differentiate them:
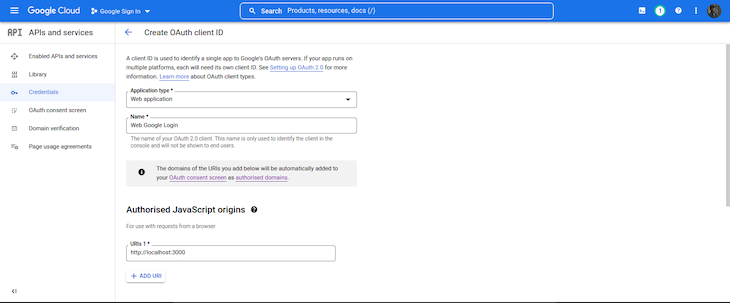
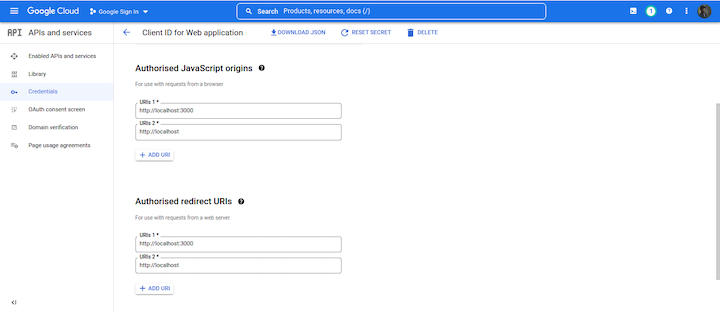
Next, we’ll also be adding two types of URLs: Authorized JavaScript origins and Authorized redirect URLs.
The Authorized JavaScript origins URL is the URL from which your application is originating the login; i.e., localhost and localhost:3000 for React developers, or your hosted URL if you’ve hosted your application.
The Authorized redirect URL is the link that Google will redirect the user to after the successful login. For example, you may want to take the user back to your original link, or maybe redirect the user to another link. Either way, you have to include the URL here.
For the Authorized JavaScript origins and Authorized redirect URLs, add the localhost URLs: http://localhost:3000 and http://localhost, like so:
Finally, click the Create button to create your web client ID. You’ll be taken back to the homepage, where you’ll see your newly created credentials. Click the copy icon to copy your new web client ID:
Now that we have successfully created our web client ID, let’s go into our React app, install it, and then integrate the Google login into our React application.
To use the Google login package, we first need to install it. Run either of the following commands to install the package:
//Npm
npm install @react-oauth/google@latest

//Yarn
yarn add @react-oauth/google@latest
After installation, we’ll wrap our application with GoogleOAuthProvider and then supply our Google web client ID. This is so that our whole React app can access the Google Auth Provider once.
Inside our index.js file, we’ll wrap the application like so:
/*index.js*/

import React from 'react';
import ReactDOM from 'react-dom';
import { GoogleOAuthProvider } from '@react-oauth/google';
import App from './App';

ReactDOM.render(
    <GoogleOAuthProvider clientId="386932037035-k8v833noqjk7m4***********.apps.googleusercontent.com">
        <React.StrictMode>
            <App />
        </React.StrictMode>
    </GoogleOAuthProvider>,
    document.getElementById('root')
);
Just like with every installed package in React, we must first import the module before we can use it. So inside your React app, go to the App.js file and copy the following code:
/*App.js*/

import React from 'react';
import { GoogleLogin } from '@react-oauth/google';

function App() {
    const responseMessage = (response) => {
        console.log(response);
    };
    const errorMessage = (error) => {
        console.log(error);
    };
    return (
        <div>
            <h2>React Google Login</h2>
            <br />
            <br />
            <GoogleLogin onSuccess={responseMessage} onError={errorMessage} />
        </div>
    )
}
export default App;
The above code is a very simple way to showcase how to use the Google login. We imported the GoogleLogin module from @react-oauth/google and called it in our component. Next, we created two functions that log a response if the login was successful and an error if it wasn’t successful.
You can also combine the two functions into one and use a conditional to render it.
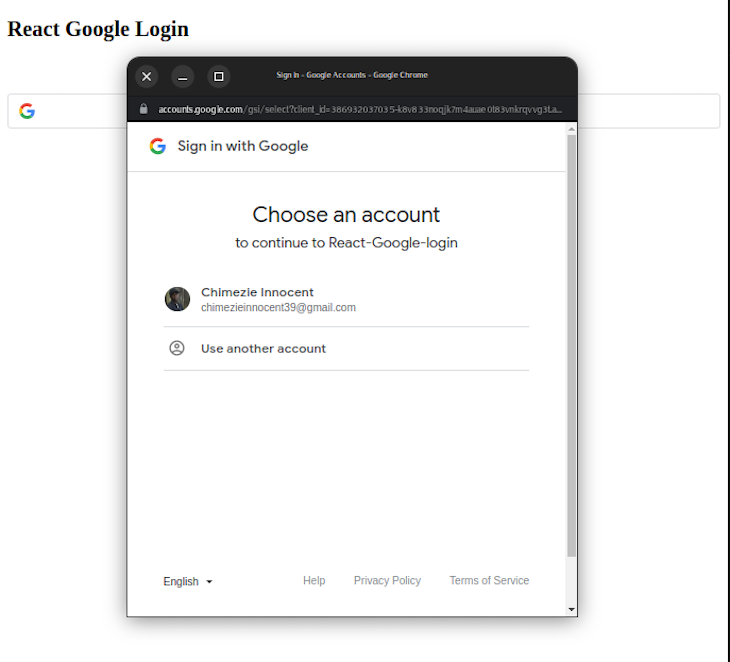
Here’s how the above code looks when we test it in the browser:

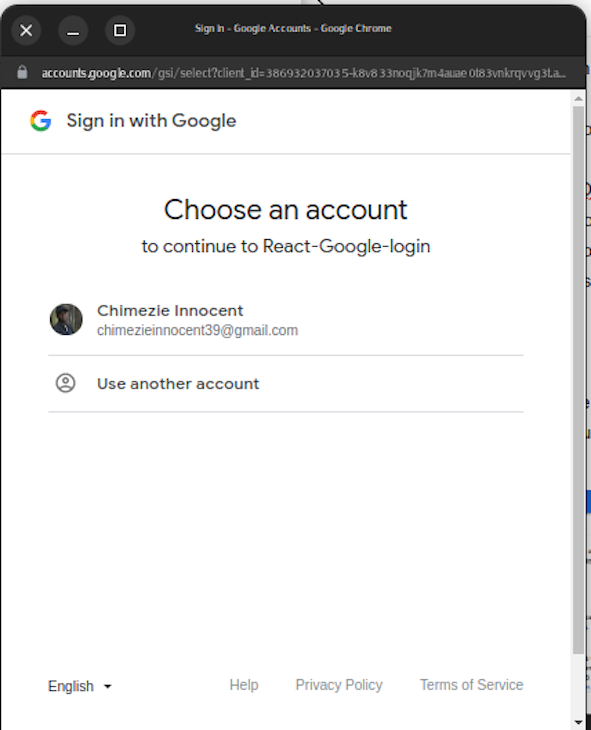
Clicking the Sign in with Google button will prompt a consent screen or modal that will look like this:
Now that we have seen how to add the Google login to our React app, let’s take it a step further and get the user’s details to create a user profile in our app. We will only redirect the user to a homepage and then get the user’s email, name, and image.
Integrating Google login with our app gives us access to the user’s profile, which includes the user’s name, email address, image, accessToken, and so on. We’ll use this information to create our user profile.
Still in our App.js component, let’s replace our existing code with the following:
/*App.js*/

import React, { useState, useEffect } from 'react';
import { googleLogout, useGoogleLogin } from '@react-oauth/google';
import axios from 'axios';

function App() {
    const [ user, setUser ] = useState([]);
    const [ profile, setProfile ] = useState([]);

    const login = useGoogleLogin({
        onSuccess: (codeResponse) => setUser(codeResponse),
        onError: (error) => console.log('Login Failed:', error)
    });

    useEffect(
        () => {
            if (user) {
                axios
                    .get(`https://www.googleapis.com/oauth2/v1/userinfo?access_token=${user.access_token}`, {
                        headers: {
                            Authorization: `Bearer ${user.access_token}`,
                            Accept: 'application/json'
                        }
                    })
                    .then((res) => {
                        setProfile(res.data);
                    })
                    .catch((err) => console.log(err));
            }
        },
        [ user ]
    );

    // log out function to log the user out of google and set the profile array to null
    const logOut = () => {
        googleLogout();
        setProfile(null);
    };

    return (
        <div>
            <h2>React Google Login</h2>
            <br />
            <br />
            {profile ? (
                <div>
                    <img src={profile.picture} alt="user image" />
                    <h3>User Logged in</h3>
                    <p>Name: {profile.name}</p>
                    <p>Email Address: {profile.email}</p>
                    <br />
                    <br />
                    <button onClick={logOut}>Log out</button>
                </div>
            ) : (
                <button onClick={login}>Sign in with Google 🚀 </button>
            )}
        </div>
    );
}
export default App;
In our code above, we imported googleLogout and useGoogleLogin from @react-oauth/google.
The useGoogleLogin API allows us to sign in to Google with a custom button. If we don’t want to use the GoogleLogin button that @react-oauth/google provides, we can style our preferred button and then use the useGoogleLogin API instead to make a login request to the clientId that we provided.
Handling authentication responses effectively is crucial for providing a seamless user experience in React applications. Whether the authentication fails or succeeds, you should handle it to inform users of the state of their requests.
If the request call is successful, we handle it in our onSuccess function that useGoogleLogin still provides, but if the request fails, we handle the error in our onFailure function.
Upon successful authentication, you may want to store the user data and redirect the user to a protected route. Conversely, in the case where authentication fails, we may want to notify the user that the login failed and then provide an alternative option for authentication.
From our example above, you can observe that inside our login function, we have two props: onSuccess and onError. In our onSuccess function, we set our profile state with the returned data. This data contains the user’s details, like google_id, access_token, email, name, and so on.
See the code snippet below:
const login = useGoogleLogin({
   onSuccess: (codeResponse) => setUser(codeResponse),
   onError: (error) => alert('Login Failed:', error)
});
Similarly, on any change in the user array, our useEffect Hook will run and get the user details using the access token returned from Google login. We added user as a dependency in our useEffect function to ensure that on any change in the user array i.e., from null array to when we get the response from Google login, useEffect will be watching and then trigger accordingly.
Finally, we are using a conditional to change our UI: if the profile is true, the UI will show us the profile of the logged-in user with their image, name, and email. If the profile becomes null (i.e., when the user has logged out using the GoogleLogout button), it will show us the login button:
Google login is an important feature to include in our applications to save time and improve user experience. Another great reason to add this feature is that it is fast and easy to implement and use.
In this tutorial, we reviewed how to add a Google login to our React application with @react-oauth/google. For another approach, learn about how you can use Firebase to handle Google authentication and signin for your React apps.
I hope you found this article easy to understand and helpful for your projects.
Install LogRocket via npm or script tag. LogRocket.init() must be called client-side, not
server-side
$ npm i --save logrocket

// Code:

import LogRocket from 'logrocket';
LogRocket.init('app/id');
// Add to your HTML:

<script src="https://cdn.lr-ingest.com/LogRocket.min.js"></script>
<script>window.LogRocket && window.LogRocket.init('app/id');</script>

A guide for using JWT authentication to prevent basic security issues while understanding the shortcomings of JWTs.

Discover how to build, render, and automate product demo videos with Remotion, replacing traditional screen recordings with reusable React code.

Chrome’s Modern Web Guidance embeds modern web platform skills into AI coding agents, helping them choose native HTML, CSS, and browser APIs over legacy patterns.

Learn how to use Fallow to analyze AI-generated code, detect dead code, duplicate logic, and complexity issues, and integrate automated code quality checks into your AI-assisted development workflow.
Hey there, want to help make our blog better?
Join LogRocket’s Content Advisory Board. You’ll help inform the type of content we create and get access to exclusive meetups, social accreditation, and swag.
Sign up now

