Publishing content across multiple platforms offers a number of advantages for content creators. Third-party platforms provide authors a wider reach and access to a dedicated user base. Publishing content on a personal website gives the author complete creative control over their content and its presentation.

Synchronizing the content across platforms is crucial, as discrepancies can cause confusion for the readers and harm the writer’s credibility.
Ensuring synchronicity across platforms can be laborious, time-consuming, and prone to human error. It requires careful attention to detail, an efficient workflow, and a commitment to maintaining consistency and accuracy across all published platforms.
This article will demonstrate an optimized workflow for creating and publishing synchronized blog content across the web. For additional context, the final solution is available on GitHub and deployed on Vercel.
The approach primarily uses Notion and the Notion API to create a single source of truth for the content. It also integrates the Incremental Static Regeneration feature into a Next.js website to ensure effortless synchronization of each article across the platforms.
Jump ahead:
The Replay is a weekly newsletter for dev and engineering leaders.
Delivered once a week, it's your curated guide to the most important conversations around frontend dev, emerging AI tools, and the state of modern software.
Notion is a powerful productivity tool that caters to both individual users and large enterprise teams. This article uses Notion to create a small database of technical blog posts, along with a custom integration that will allow our Next.js website to retrieve the content from a personal workspace.
To get started, create a new page in your Notion workspace and select the Table template. With the table created, selecting the “+ New Database” option from the Data Source menu creates a blank table on the page. Each row on the table will contain the following information:
|
Column
|
Description
|
|
Published
|
Control whether or not the page displays on the personal website
|
|
Page
|
A link to a subpage containing the article’s content
|
|
Canonical
|
The preferred URL of a web page for search engine rankings
|
|
Date
|
The date the article was published
|
|
Tags
|
An array of tags that can be used to filter the articles on the personal site
|
|
Abstract
|
A short description of the article. Useful for meta tags and SEO.
|
|
Slug
|
A unique identifier for each post, used for the URL routing on the website
|
The “Published” column allows the Next.js website to filter any unfinished articles. This also allows a grace period for the article to be published on a third-party platform before it goes live on the personal website.
The “Page” column links to a subpage in Notion with the respective article’s content. We’ll use this subpage later to retrieve the content blocks for each article in the Next.js website.
The “Canonical” column helps specify the preferred URL of the content when multiple versions exist across various platforms. Where the Notion article can be considered the source of truth for the content, the canonical URL is considered the source of truth for search engine rankings.
|
Published
|
Page
|
Canonical
|
|
[ ]
|
Using Notion and ISR to synchro…
|
|
|
[ x ]
|
Building an Accessible Menubar…
|
|
The remaining columns contain frontmatter for each article:
|
Date
|
Tags
|
Abstract
|
Slug
|
|
04/01/2021
|
react, a11y
|
How to create an accessible menubar…
|
accessible-menubar
|
|
09/27/2021
|
react, dev rel
|
Synchronize content across multiple plat…
|
synchronize-content
|
Let’s now create the integration that will allow the Next.js website to make authenticated requests to the database in the workspace.
In Notion, open the My Integrations page and select “Create New Integration.” Since this integration will be private, choose “Internal Integration.”
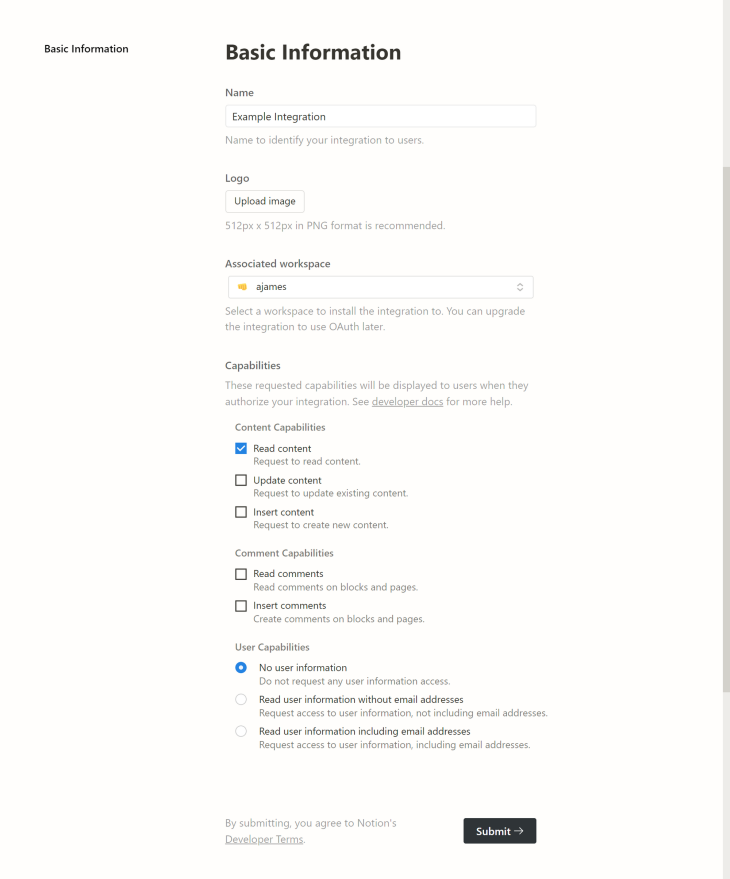
Give the integration a name and associate it with your workspace. Then, select “Read Content” from the Content Capabilities and check the “No User Information” radio button in User Capabilities.
You can leave all Comment Capabilities unchecked. This will permit the website to retrieve the content without assigning any unnecessary permissions.
You should end up with something like the following:

Previously, publishing articles on my personal website was a manual, error-prone task that involved copying, pasting, and refining content into separate markdown files. This process was tedious and made it difficult to maintain consistency across the platforms.
Fortunately, with the help of the Notion API, this task can now be automated!
Let’s configure a Next.js project that retrieves all of the content from the database we created earlier. To accomplish this, we’ll create a custom client to fetch the posts and use our custom integration from Notion to authenticate the requests.
There are two environment variables required to authenticate and retrieve the database content.
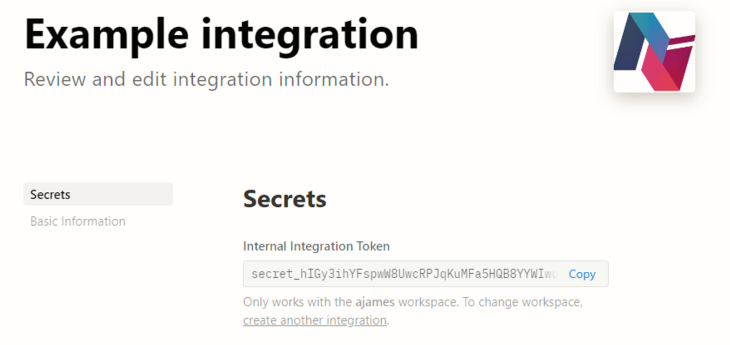
The first is the Internal Integration Token, which can be found in the “Secrets” menu after creating the integration:

The second is the Database ID. You can find this in the Notion URL between the workspace and the View ID, shown in bold below:
https://www.notion.so/<WORKSPACE>/<DATABASE_ID>?<VIEW_ID> https://www.notion.so/phunkren/9d7344da8c66c9a7487577735b83141c?129sj7...
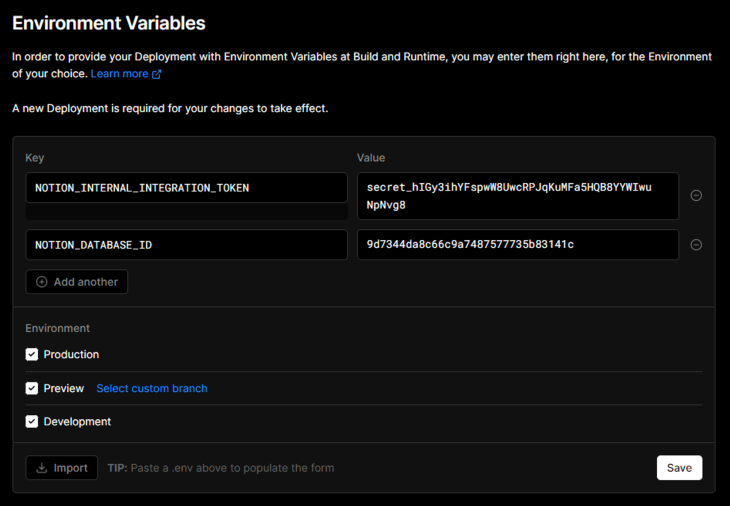
Let’s add these variables to the Next.js application’s local environment and the project dashboard. Paste the following code into the .env.local file, using your own variables in place of the dummy values:
NOTION_INTERNAL_INTEGRATION_TOKEN=secret_hIGy3ihYFsp...
NOTION_DATABASE_ID=9d7344da8c66c9a7487577735b83141c
The Environment Variables section in the Settings menu on the Vercel project dashboard should look something like the image below:

Note that the token and database ID values presented above are invalid and for demonstration purposes only. You should never share these values outside of your Vercel project dashboard and environment files.
With the Notion integration successfully configured, the next step is to create a client that fetches the posts from the Notion database and stores the result in Markdown files.
To achieve this, we’ll start by creating a new Client instance using the notionhq/client library. We’ll also use the NOTION_INTERNAL_INTEGRATION_TOKEN environment variable to authenticate the requests. Add the following code to the lib/notion.ts file:
import { Client } from "@notionhq/client";

const notionClient = new Client({
  auth: process.env.NOTION_INTERNAL_INTEGRATION_TOKEN,
});
With the authenticated client, we can now make requests to retrieve the content from the Notion database using the NOTION_DATABASE_ID environment variable in the same file:
import { BlogPost } from "../types/notion";
****
async function getPosts(databaseId: string): BlogPost[] {
  const response = await notionClient.databases.query({
    database_id: databaseId,
  });

  return response.results;
};
In the code above, we declared an asynchronous function getPosts with a single argument of databaseId. We used the await keyword to pause the function’s execution until the notionClient.databases.query promise resolves and returns the collection of blog posts from the requested database.
If we inspect the response.results, each chunk of content in Notion is parsed as a block, which is an object containing the raw content and metadata for each chunk. See the following example content block from Notion:
{
    "object": "block",
    "id": "c02fc1d3-db8b-45c5-a222-27595b15aea7",
    "parent": {
        "type": "page_id",
        "page_id": "59833787-2cf9-4fdf-8782-e53db20768a5"
    },
    "created_time": "2022-03-01T19:05:00.000Z",
    "last_edited_time": "2022-07-06T19:41:00.000Z",
    "created_by": {
        "object": "user",
        "id": "ee5f0f84-409a-440f-983a-a5315961c6e4"
    },
    "last_edited_by": {
        "object": "user",
        "id": "ee5f0f84-409a-440f-983a-a5315961c6e4"
    },
    "has_children": false,
    "archived": false,
    "type": "heading_2",
    "heading_2": {
        "rich_text": [ ... ],
        "color": "default",
    "is_toggleable": false
    }
}
Although it’s possible to serialize each block manually, we’ll use a third-party wrapper — notion-to-md — for brevity. The package is somewhat literal, in that it will take a collection of Notion blocks and convert them into a single Markdown file.
To convert the Notion content blocks to a Markdown file, we’ll create an n2m client by passing the notionClient we created earlier to the NotionToMarkdown function from the notion-to-md package.
Add the following code to the lib/notion.ts file:
import { NotionToMarkdown } from "notion-to-md";

const n2m = new NotionToMarkdown({ notionClient });
We can then define a createPosts function that takes the results of the getPosts function and generates a Markdown file for each result.
Initially, the n2m client will convert the Notion content blocks into Markdown blocks. We’ll then reuse the client to format those blocks into a Markdown string.
Finally, we can create a Markdown file for each post using the “Slug” column property as the filename and populating it with the newly-created Markdown string:
const POSTS_DIR = path.join(process.cwd(), "posts");

export async function createPosts(posts) {
  for (const post of posts) {
    const uuid = post.id;
    const slug = post.properties.slug.rich_text[0].plain_text;
    const mdblocks = await n2m.pageToMarkdown(uuid);
    const mdString = n2m.toMarkdownString(mdblocks);
    const filename = `${POSTS_DIR}/${slug}.mdx`;

    fs.writeFile(filename, mdString, (err) => {
      err !== null && console.log(err);
    });
  }
}
To prevent any unpublished articles from appearing on the site, and to mitigate any potentially unnecessary computational cycles when we generate the markdown files, we’ll also create a filterPosts utility function that uses the “Published” column property from earlier to remove any unwanted results.
We can consider an article published if its published checkbox is checked, which we can determine if the post’s properties.published.checkbox property is true:
export function filterPosts(posts: BlogPost[]) {
  const publishedPosts = posts.filter(
    (post) => post.properties.published.checkbox
  );

  return publishedPosts;
}
With the published blog posts retrieved from Notion, formatted into Markdown, and serialized in their respective files, let’s create a dynamic route for each blog post to be pre-rendered at build time.
We’ll start by exporting a getPostIds function from lib/notion.ts. This function will return a collection of unique identifiers for each post, derived from the filenames in the posts directory.
import * as fs from "fs";
import path from "path";

const POSTS_DIR = path.join(process.cwd(), "posts");

export function getPostIds() {
  if (!fs.existsSync(POSTS_DIR)) {
    fs.mkdirSync(POSTS_DIR);
  }

  const fileNames = fs.readdirSync(POSTS_DIR);

  return fileNames.map((fileName) => {
    return {
      params: {
        id: fileName.replace(/\.mdx$/, ""),
      },
    };
  });
}
Finally, we’ll use the getStaticPaths function in the pages/[id].tsx file to execute our getPosts, filterPosts, createPosts, and getPostIds functions to generate the Markdown files and return a collection of paths that will enable Next.js to statically pre-render the respective routes.
It’s important that we call these methods inside the getStaticPaths function. getStaticPaths will run once during the production build, whereas getStaticProps will run once for each dynamic route:
import { GetStaticProps } from "next";
import { getPosts } from "../lib/notion";

export const getStaticPaths: GetStaticPaths = async () => {
  const posts = await getPosts(process.env.NOTION_DATABASE_ID);
  const publishedPosts = filterPosts(posts);

  await createPosts(publishedPosts);

  const paths = getPostsIds();

  return {
    paths: paths,
    fallback: false,
  };
};
To parse the Markdown content from each file into HTML, we’ll create a getPostData function in the util/notion.ts file that uses the IDs generated from the getPostsIds function and the remark npm package to convert the respective Markdown content to a string:
import * as fs from "fs";
import { remark } from "remark";
import mdx from "remark-mdx";

const POSTS_DIR = path.join(process.cwd(), "posts");

export async function getPostData(id: string) {
  const fullPath = path.join(POSTS_DIR, `${id}.mdx`);
  const fileContents = fs.readFileSync(fullPath, "utf8");
  const processedContent = await remark().use(mdx).process(fileContents);
  const contentHtml = processedContent.toString();

  return contentHtml;
}
Finally, in the pages/[id].tsx file, we’ll use the ReactMarkdown component from the react-markdown library and the remarkMdx plugin to render the Markdown string as HTML on the BlogPost page 💥:
import { GetStaticProps } from "next";
import ReactMarkdown from "react-markdown";
import remarkMdx from "remark-mdx";

export const getStaticProps: GetStaticProps = async ({ params }) => {
  const postId = params.id as string;
  const postData = await getPostData(postId);

  return {
    props: {
      postData,
    },
  };
};

export default function BlogPost({ postData }: Props) {
  return (
    <article>
      <ReactMarkdown remarkPlugins={[remarkMdx]}>
        {postData}
      </ReactMarkdown>
    </article>
  );
}
Now that each article has its own individual page in the Next.js project, we’ll present a list of them on the homepage. Each list item will display the article’s title, frontmatter, and a link to the corresponding page on the website.
We’ll start by creating a sortPosts utility function that sorts the posts chronologically:
import { BlogPost } from "../types/notion";

// Sort posts in chronological order (newest first)
export function sortPosts(posts: BlogPost[]) {
  return posts.sort((a, b) => {
    let dateA = new Date(a.properties.date.date.start).getTime();
    let dateB = new Date(b.properties.date.date.start).getTime();

    return dateB - dateA;
  });
}
We then use the getStaticProps function in the index.tsx file to fetch the data with getPosts, filter any unpublished articles with filterPosts, sort the published posts chronologically with sortPosts, and then return the result as the posts prop for the Home component.
Add the following to your pages/index.tsx file:
import { GetStaticProps } from "next";

export const getStaticProps: GetStaticProps = async () => {
  const posts = await getPosts(process.env.NOTION_DATABASE_ID);
  const publishedPosts = filterPosts(posts);
  const sortedPosts = sortPosts(publishedPosts);

  return {
    props: {
      posts: sortedPosts,
    },
  };
};
In the same file, using a map function, we render the collection of posts on the homepage. For each post, we display the title, the abstract as a description, the publish date, relevant tags, and a link to the dynamic routes that we created earlier:
type Props = {
  posts: BlogPost[];
};

export default function Home({ posts }: Props) {
  return (
    <main>
      <h1>ISR Notion Example</h1>

      <section>
        <h2>Blog posts</h2>

        {posts.map((post) => {
          const title = post.properties.page.title[0].plain_text;
          const description = post.properties.abstract.rich_text[0].plain_text;
          const publishDate = post.properties.date.date.start;
          const url = `/${post.properties.slug.rich_text[0].plain_text}`;
          const tags = post.properties.tags.multi_select
            .map(({ name }) => name)
            .join(", ");

          return (
            <article key={post.id}>
              <a href={url}>
                <h3>{title}</h3>
              </a>

              <p>{description}</p>

              <ul>
                <li>Published: {publishDate}</li>
                <li>Tags: {tags}</li>
              </ul>
            </article>
          );
        })}
      </section>
    </main>
  );
}
Currently, the Next.js project is statically generated at build time, allowing the resulting content to be cached. This approach, known as static site generation (SSG), is known for having great performance and SEO.
However, updating the fetched content requires a new build and site deployment. This can be problematic for syncing our content with Notion, as the site will continue to serve cached versions of the articles until a new build is deployed, regardless of whether or not the content has been updated.
Server-side rendering (SSR) potentially solves this problem, but it can impact performance as each page is now rendered on every request. This leads to an increase in server load and longer page load times, diminishing the overall user experience.
A relatively newer method in Next.js called Incremental Static Regeneration (ISR) is a perfect compromise between the two, as it allows static content to be updated over time without requiring a complete rebuild of the website.
When users access the page within the revalidation window, they are served a cached version, regardless of whether or not the content has since been updated. The first user to access the page after the revalidation window has expired will also be served the cached version.
Then, on any subsequent visits to the page, Next.js will re-fetch and cache the latest data on the fly without rebuilding the entire site!
We’ll start by exporting a ONE_MINUTE_IN_SECONDS constant in the util/constants.ts file to represent a time interval of one minute:
export const ONE_MINUTE_IN_SECONDS = 60;
To enable ISR for the homepage and the dynamic routes, we need to return the desired revalidation period as the revalidate key on the object returned from getStaticProps.
Add the following code to the pages/index.tsx file:
import { ONE_MINUTE_IN_SECONDS } from "../constants";

export const getStaticProps: GetStaticProps = async () => {
  const posts = await getPosts(process.env.NOTION_DATABASE_ID);
  const publishedPosts = filterPosts(posts);
  const sortedPosts = sortPosts(publishedPosts);

  return {
    props: {
      posts: sortedPosts,
    },
    revalidate: ONE_MINUTE_IN_SECONDS,
  };
};
And finally, add the following to the pages/[id].tsx file:
import { ONE_MINUTE_IN_SECONDS } from "../constants";

export const getStaticProps: GetStaticProps = async ({ params }) => {
  const postId = params.id as string;
  const postData = await getPostData(postId);

  return {
    props: {
      postData,
    },
    revalidate: ONE_MINUTE_IN_SECONDS,
  };
};
With that, we’re done. The application will now periodically check to see if any content in Notion has been updated, and update any pages with changes without having to rebuild the entire site!
By using Incremental Static Regeneration with the Notion API, content creators can now confidently define a single source of truth that synchronizes content across multiple online platforms.
Whenever new articles are created or existing articles are updated, the latest version is immediately available to third-party platforms. The author’s personal website will also periodically update the content on a per-page basis after a given period of time.
This approach will continue to benefit the author as their collection of articles scales without significantly compromising the overall build times for their personal website.
Ultimately, this solution provides an optimized workflow for synchronizing content while also supporting long-term content creation goals.
Debugging Next applications can be difficult, especially when users experience issues that are difficult to reproduce. If you’re interested in monitoring and tracking state, automatically surfacing JavaScript errors, and tracking slow network requests and component load time, try LogRocket.
LogRocket captures console logs, errors, network requests, and pixel-perfect DOM recordings from user sessions and lets you replay them as users saw it, eliminating guesswork around why bugs happen — compatible with all frameworks.
LogRocket's Galileo AI watches sessions for you, instantly identifying and explaining user struggles with automated monitoring of your entire product experience.
The LogRocket Redux middleware package adds an extra layer of visibility into your user sessions. LogRocket logs all actions and state from your Redux stores.


Modernize how you debug your Next.js apps — start monitoring for free.

Compare the top AI development tools and models of February 2026. View updated rankings, feature breakdowns, and find the best fit for you.

Broken npm packages often fail due to small packaging mistakes. This guide shows how to use Publint to validate exports, entry points, and module formats before publishing.

Discover what’s new in The Replay, LogRocket’s newsletter for dev and engineering leaders, in the February 11th issue.

Cut React LCP from 28s to ~1s with a four-phase framework covering bundle analysis, React optimizations, SSR, and asset/image tuning.
Hey there, want to help make our blog better?
Join LogRocket’s Content Advisory Board. You’ll help inform the type of content we create and get access to exclusive meetups, social accreditation, and swag.
Sign up now