
Firebase Cloud Messaging (FCM) is primarily known for simplifying the process of sending a notification to client devices. In this post, we are going learn how to use Firebase Cloud Messaging as a push notification service and a pub/sub service in a React application.
The Replay is a weekly newsletter for dev and engineering leaders.
Delivered once a week, it's your curated guide to the most important conversations around frontend dev, emerging AI tools, and the state of modern software.
A publish/subscribe system consists of two parties: the publisher responsible for sending out a message to the system, and a subscriber, who actively listens to that notification from the system and can decide to further act on the message.
A use case for a pub/sub system is stateless communication from a server. When verifying card payments, it is almost impossible for a server to let the client know it has verified the payment and granted the service requested by the user. We can easily do this using a pub/sub system.
With a pub/sub system, the browser listens to a particular topic while the server sends a message to the topic. Immediately the browser receives the message, and it can continue with the rest of the client-side processing.
In this tutorial, we will learn the following:
Let’s get started!
For this part, a Google account is required.
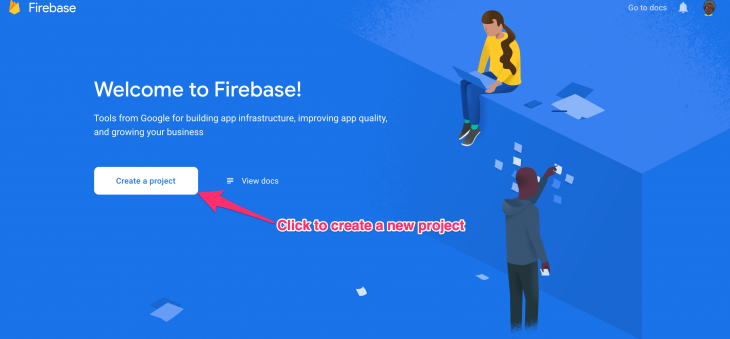
Start by heading over to https://console.firebase.google.com/ and log in with your Google account. Click on the big white Create a project button.
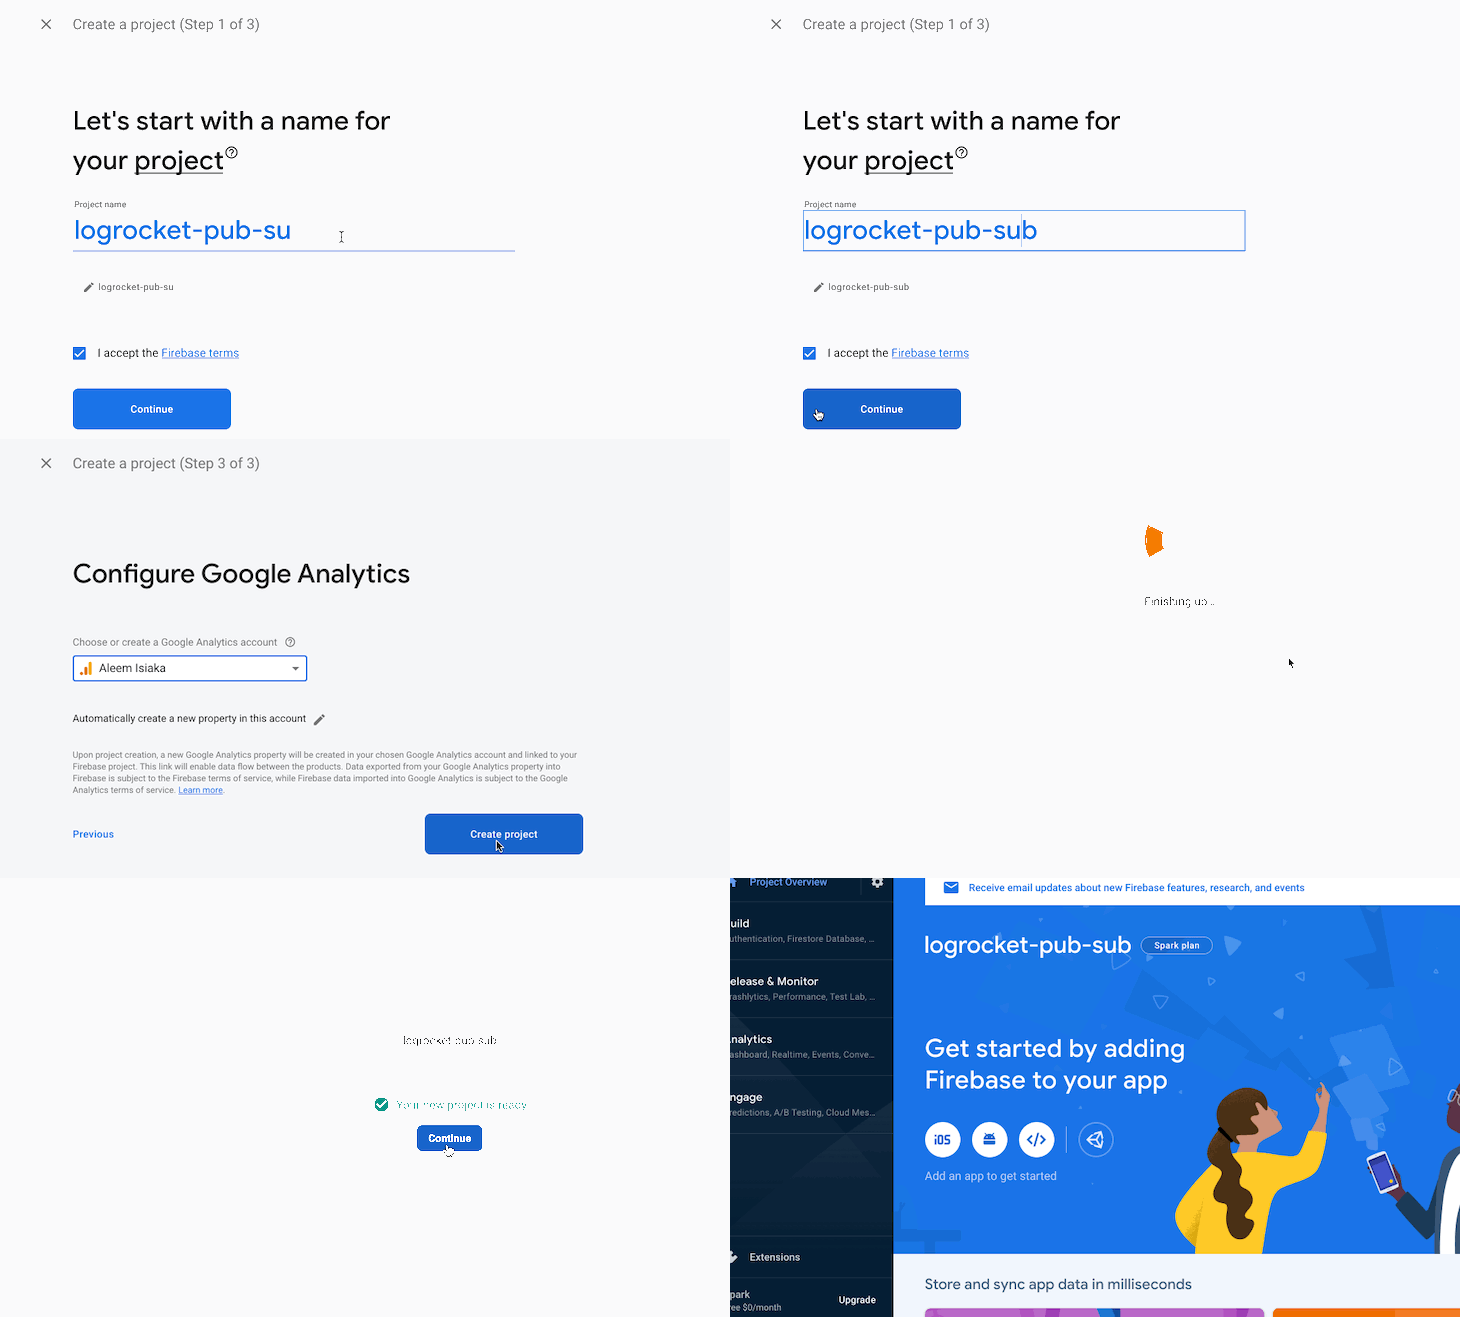
Enter the name of the project, accept the terms, then click on Continue. Select the account to which you want the project to be attached.
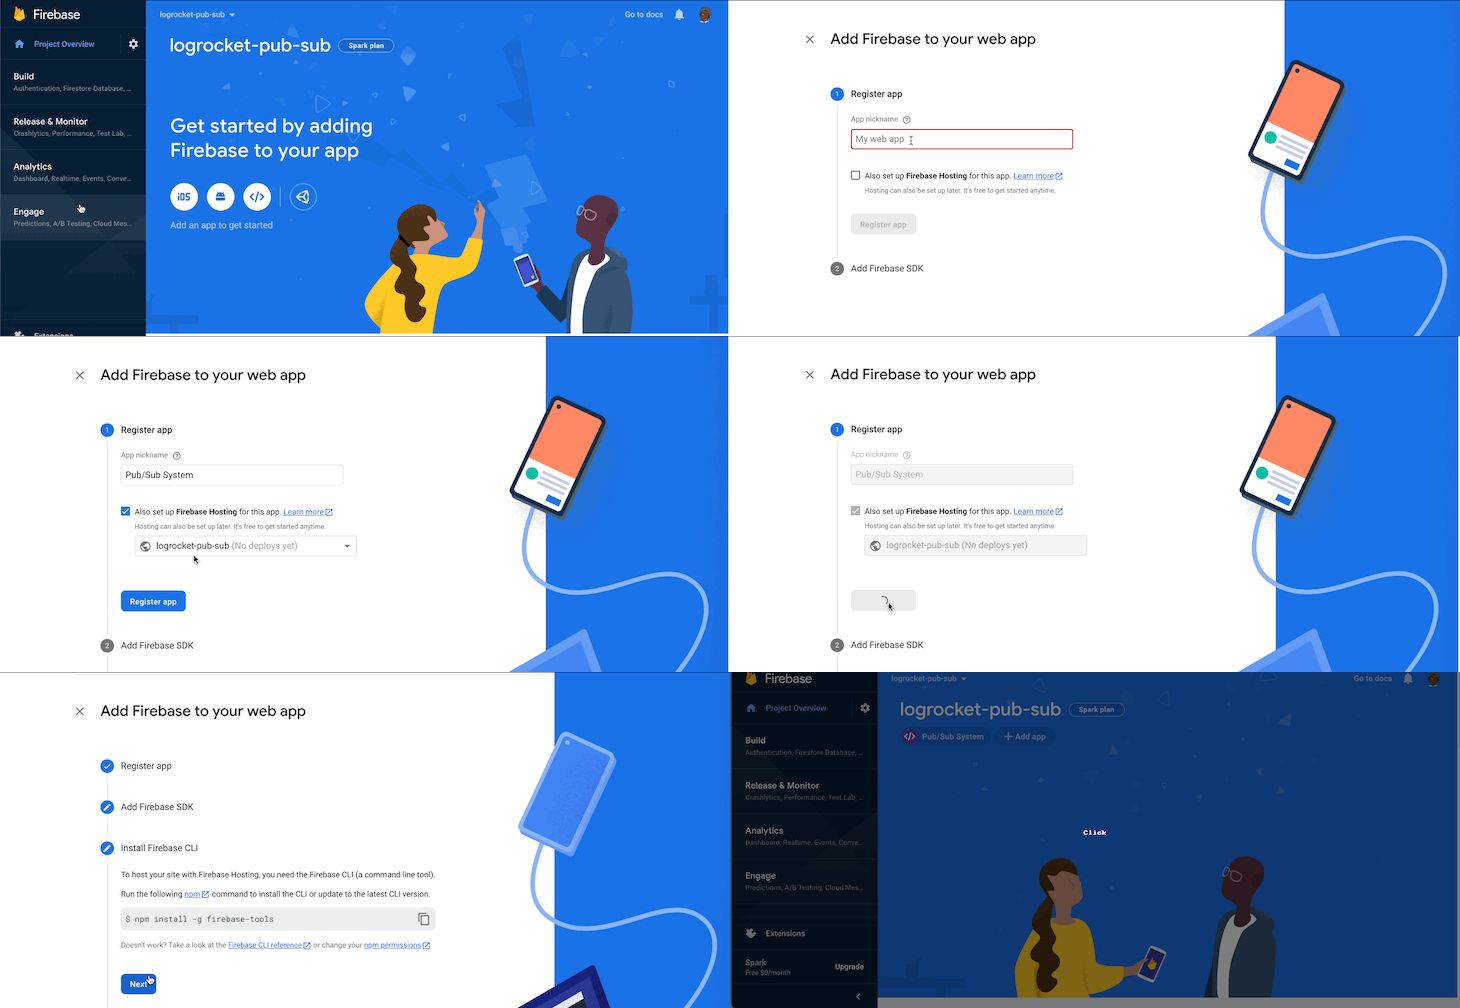
On the Firebase console, click on the code icon (</>) in the white circle, enter the name of the app, select setting up Firebase Hosting, then click on Register app. This will take some time to provision the app before it will prompt you for the next step.
At the Add Firebase SDK and Install Firebase CLI steps, scan through the instructions, then click Continue to console to finalize the setup.
Let’s get the Firebase API key that gives browsers the power to authenticate requests to the Firebase API and the Firebase JSON file.
From the dashboard, click on your new app’s name, then click on the gear icon to access the settings.
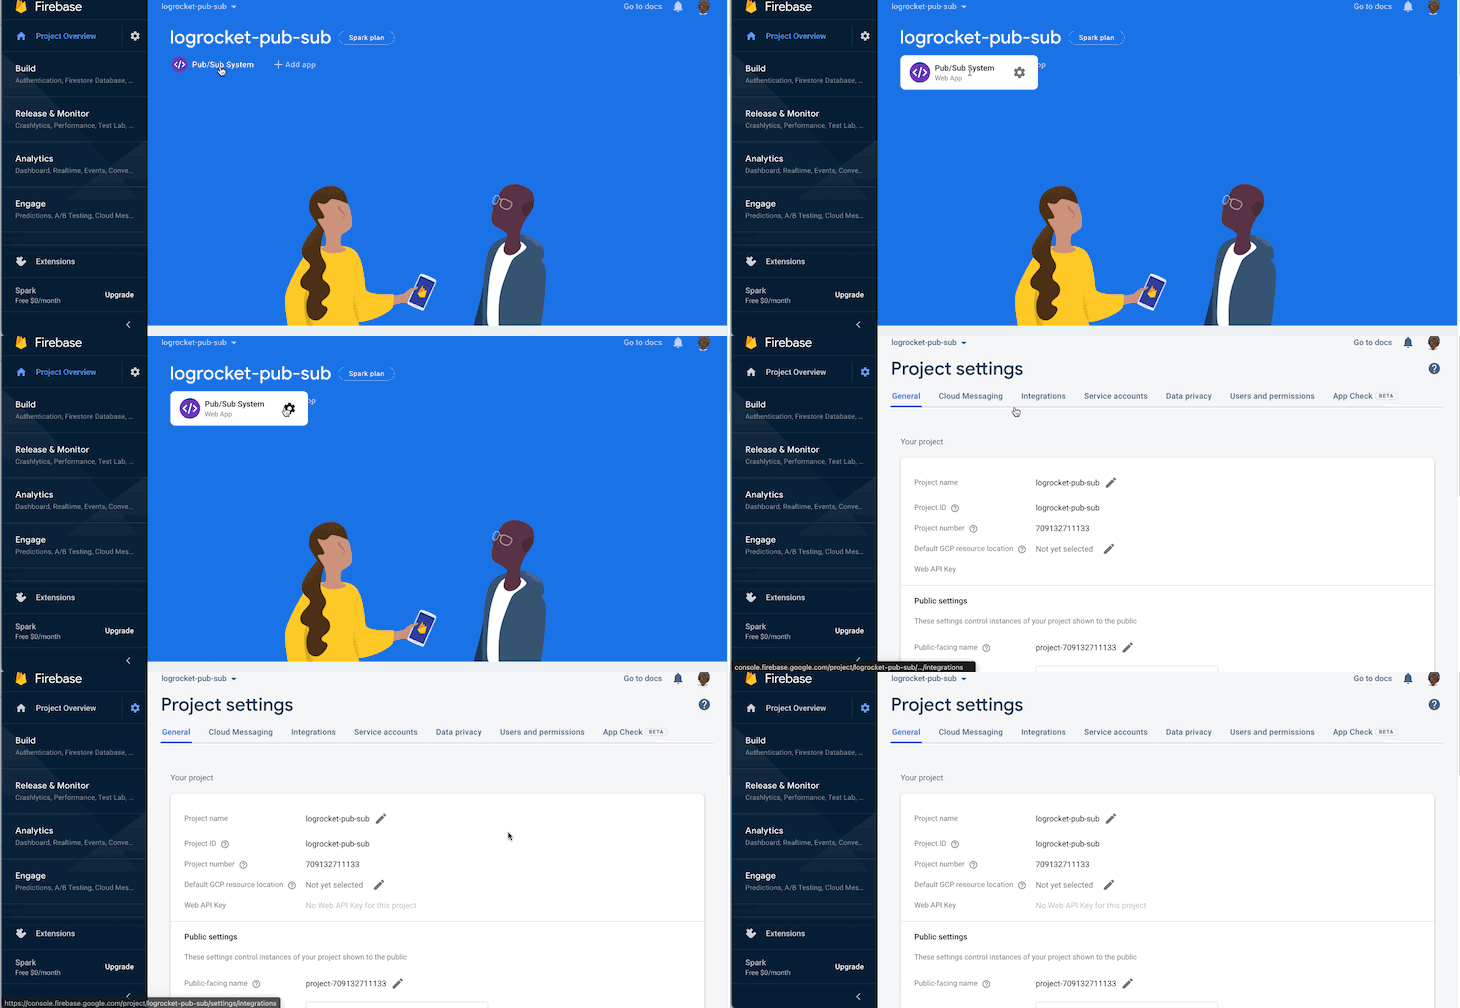
Next, scroll down to the bottom of the tab; under the SDK setup and configuration section, click on the Config button to unveil the web push configuration. Make sure to copy that and save it somewhere safe.
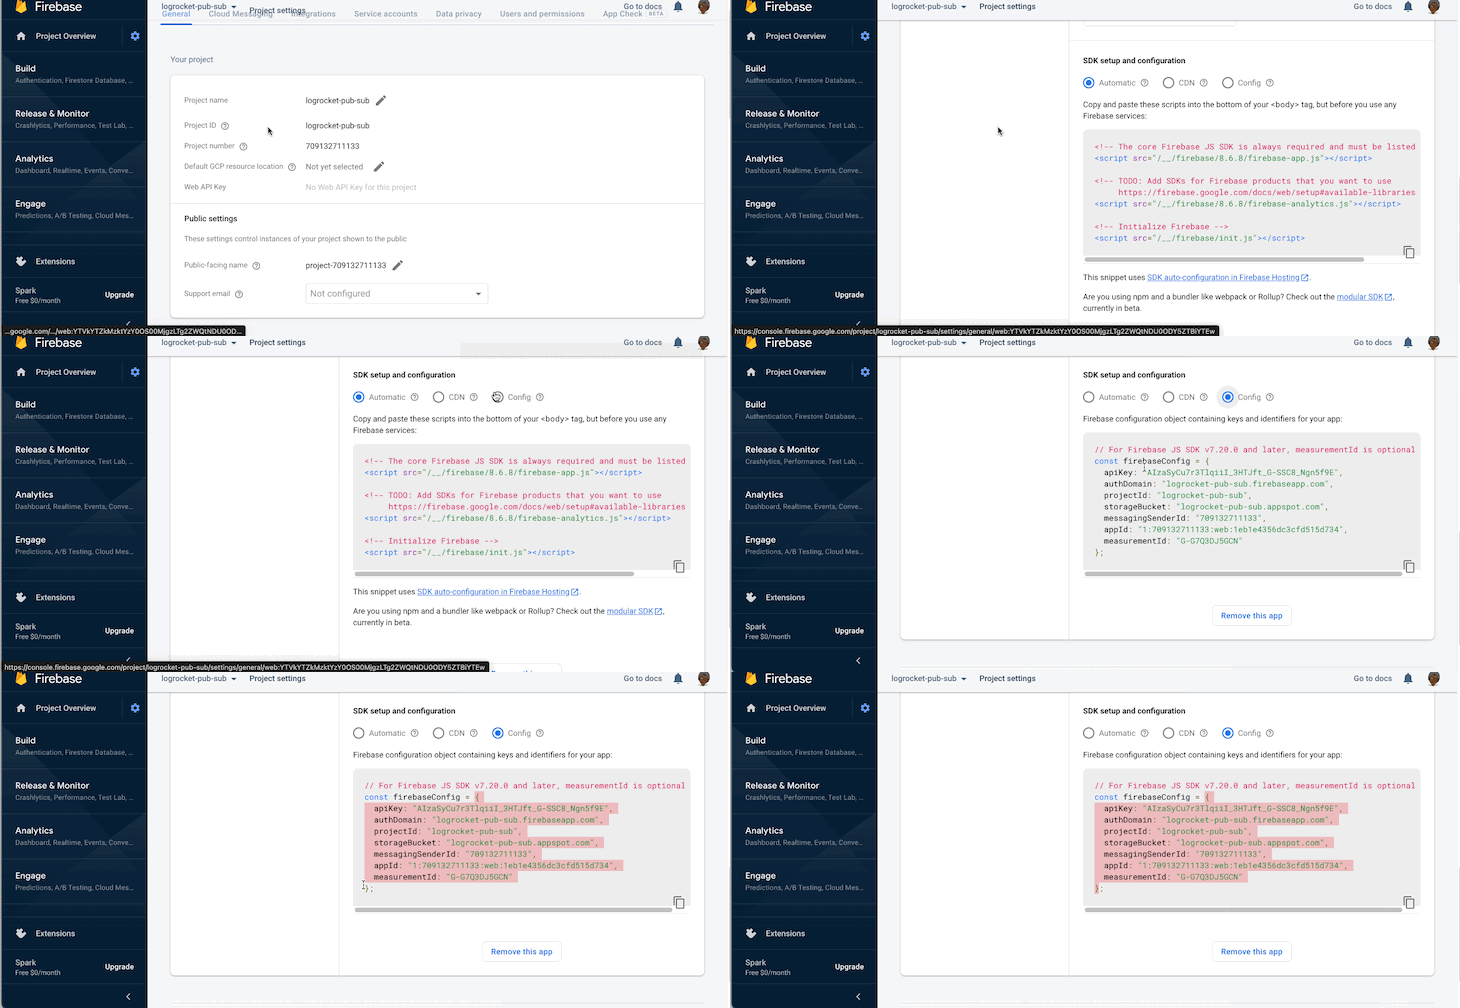
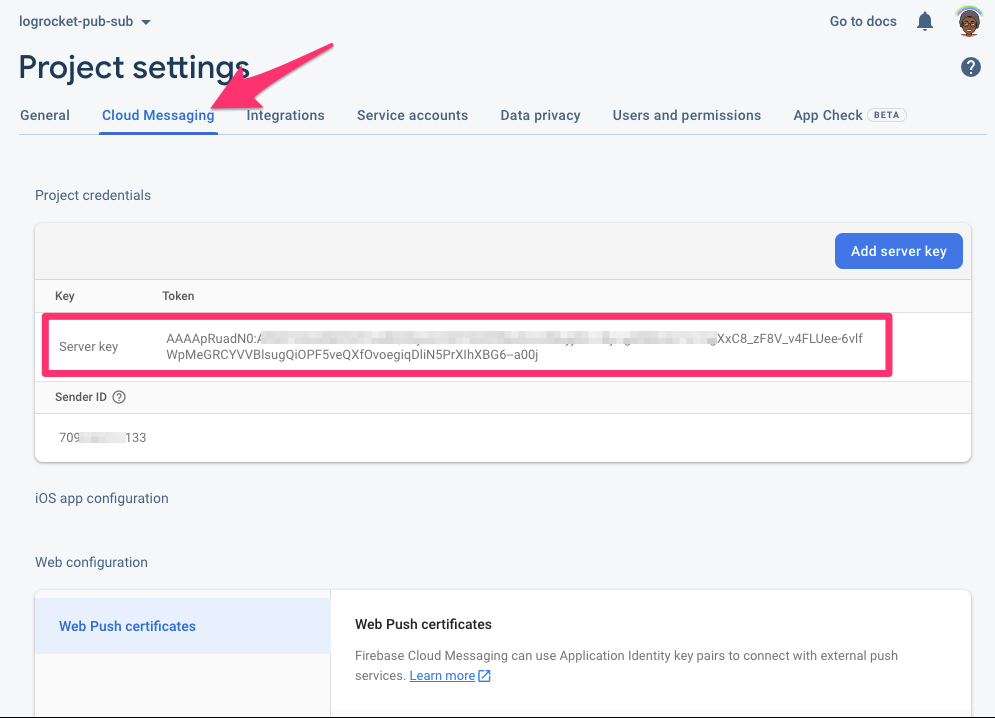
A server key is required to perform authorized actions through the Google Firebase APIs. To get this, go to the Cloud Messaging tab under Project Settings and scroll down to Project credentials. Copy and save the server key somewhere safe.
In this section, we will create a React app and with it, set up Firebase.
Enter the following in your terminal:
$ npx create-react-app pub-sub && cd pub-sub && code .
The command above will create a new React application into a pub-sub folder of the current directory. Then, change the current directory to the React application’s directory, and open the project in Visual Studio Code for editing.
Also, from the terminal in the pub-sub project directory, you can run npm start to open the development folder.
In your terminal, run npm i firebase --save from the project root folder to install Firebase.
Create a new folder at path-to-project/src/utils and add a new file, firebaseConfig.json, to the folder. This file should have all the JSON values from the Firebase web push settings page.
The content of the file should look like this:
{
  apiKey: "***",
  authDomain: "logrocket-pub-sub.firebaseapp.com",
  projectId: "logrocket-pub-sub",
  storageBucket: "logrocket-pub-sub.appspot.com",
  messagingSenderId: "***",
  appId: "1:***:web:***",
  measurementId: "G-G7Q3DJ5GCN"
}
Inside of the /src/utils folder, create a file called firebase.js with the below content:
import firebase from "firebase/app";
// eslint-disable-next-line
import _messaging from "firebase/messaging";
import firebaseConfig from "./firebaseConfig";

const app = firebase.initializeApp(firebaseConfig);
export const fMessaging = app.messaging();
The first line imports the Firebase app. Firebase messaging is imported to add and initialize the Firebase messaging SDK on the Firebase app. The fourth line imports the Firebase config file that you created above.
Line six initializes the Firebase app using the firebaseConfig JSON details. And the last line initializes cloud messaging on the Firebase application that was initialized on the line above it.
firebase-messaging-sw.jsTo complete the Firebase integration, you have to add a firebase-messaging-sw.js file at a publicly accessible path of your app, in this case, in the path-to-project/public.
The content of the file should be the following:
// Give the service worker access to Firebase Messaging.
// Note that you can only use Firebase Messaging here. Other Firebase libraries
// are not available in the service worker.
// eslint-disable-next-line
importScripts("https://www.gstatic.com/firebasejs/8.6.7/firebase-app.js");
// eslint-disable-next-line
importScripts("https://www.gstatic.com/firebasejs/8.6.7/firebase-messaging.js");

// Initialize the Firebase app in the service worker by passing in
// your app's Firebase config object.
// https://firebase.google.com/docs/web/setup#config-object
// eslint-disable-next-line
firebase.initializeApp({
  apiKey: "AIzaSyCu7r3TlqiiI_3HTJft_G-SSC8_*******",
  authDomain: "logrocket-pub-sub.firebaseapp.com",
  projectId: "logrocket-pub-sub",
  storageBucket: "logrocket-pub-sub.appspot.com",
  messagingSenderId: "*************",
  appId: "1:709132711133:web:***********************",
  measurementId: "G-*********",
});

// Retrieve an instance of Firebase Messaging so that it can handle background
// messages.
// eslint-disable-next-line
const messaging = firebase.messaging();

messaging.onBackgroundMessage((message) => {
  return self.showNotification(
    message.notification.title,
    message.notification
  );
});
The first few lines should be familiar; the Firebase app and messaging scripts are imported into the service worker context. Next, initialize the Firebase application before initializing Firebase messaging.
The onBackgroundMessage method on the Firebase messaging SDK captures any messages delivered to a client application (browser, in this case) while the browser, webpage, or app is not active.
Here, the notification badge is triggered to keep the user informed about the new information that was received in the background.
To fully have a hand in the integration, you should understand these essential Firebase Cloud Messaging concepts.
These are messages that are received by the client when the browser is active (e.g., the user is on the page/browser tab). This is available through the .onMessage((message) => message) method on the Firebase messaging SDK, and cannot be called in a service worker context.
These messages are delivered to a client browser while inactive. This is available through the .onBackgroundMessage((message) => message) method on the Firebase messaging SDK and can be called only in a service worker context.
Subscribers are a targeted group where messages are sent. Mobile apps can subscribe to receive messages, while browsers cannot subscribe to any issue using the browser SDK. We will learn how to subscribe to a topic from a browser later in this article.
By default, all messages received by a client should be an object that looks like the following:
{
  "notification": {
      "title": "This is the title",
    "body": "This is the body",
    "priority": "high|normal"
  },
  data: {
    anExtra: "Something",
    size: "has a size limit to avoid failure"
  }
}
The notification object must have a minimum of title and body to be successfully sent, while the data can be an arbitrary object, and according to FCM docs, should not be more than 4000 bytes.
The notification object is used to display native notification based on the client device, and we don’t want that in our case. Later, we will see learn to prevent the notification from popping up when there is a new message from FCM.
A pub/sub system mostly deals with topics. A topic is a group of a users or clients that can get a particular set of messages.
The Firebase web JavaScript SDK does not support topic subscription, but it is achievable through an HTTP request to https://iid.googleapis.com/iid/v1/' + accessToken + '/rel/topics/' + topic.
The accessToken is the current access token of the client that needs to be subscribed. The topic is a string holding the name of the topic.
To implement topic subscription, you need the accessToken as specified above. In your React application, open the Firebase utility helper and add the code below:
export const subscribeToTopic = (topicName, handler = () => {}) =>
  fMessaging.getToken().then((currentToken) => {
    if (currentToken) {
      const FIREBASE_API_KEY = `AAAA*******:********************************************************************************************************************************************`;
      // Subscribe to the topic
      const topicURL = `https://iid.googleapis.com/iid/v1/${currentToken}/rel/topics/`;
      return fetch({
        url: topicURL,
        method: "POST",
        headers: {
          Authorization: `key=${FIREBASE_API_KEY}`,
        },
      })
        .then((response) => {
          fMessaging.onMessage(
            (payload) => {
              handler(payload);
            },
            (error) => {
              console.log(error);
            }
          );
        })
        .catch(() => {
          console.error(`Can't subscribe to ${topicName} topic`);
        });
    }
  });
Here, the getToken function on the messaging SDK returns the current token of a client; sometimes, it fails if the user has not given the required permission for push notifications.
Next, an HTTP request is made for a topic subscription; once this is successful, messaging().onMessage is used to listen to messages for the client.
To implement subscribeToTopic in your React application, replace the App.js file in the app to contain the content below:
import React, { useEffect } from "react";
import "./App.css";
import { subscribeToTopic } from "./utils/firebase";

function App() {
  function topicOnMessageHandler(message) {
    console.log(message);
  }

  useEffect(() => {
    subscribeToTopic("LOGROCKET_PUB_SUB_TOPICS", topicOnMessageHandler).then();
  }, []);

  return <div className="App">Firebase Pub / Sub System</div>;
}

export default App;
First, the function topicOnMessageHandler is defined to handle any messages coming to the topic and process them; it is only logged to the console.
The subscribeToTopic function is called in a useEffect hook, and it receives the name of the topic as LOGROCKET_PUB_SUB_TOPICS and the topicOnMessageHandler as the handler.
Whenever there is a message sent to the LOGROCKET_PUB_SUB_TOPICS topic, your React app will receive it and log it to the console.
The service worker file firebase-messaging-sw.js has implemented the onBackgroundMessage method of the Firebase messaging SDK. In that function, the message is logged to the console, which is suitable for this use case.
In a pub/sub system, there should be a publisher of messages; the React app we just built has been the subscriber.
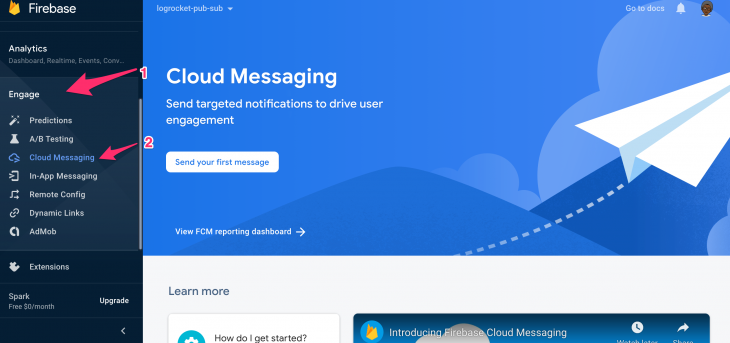
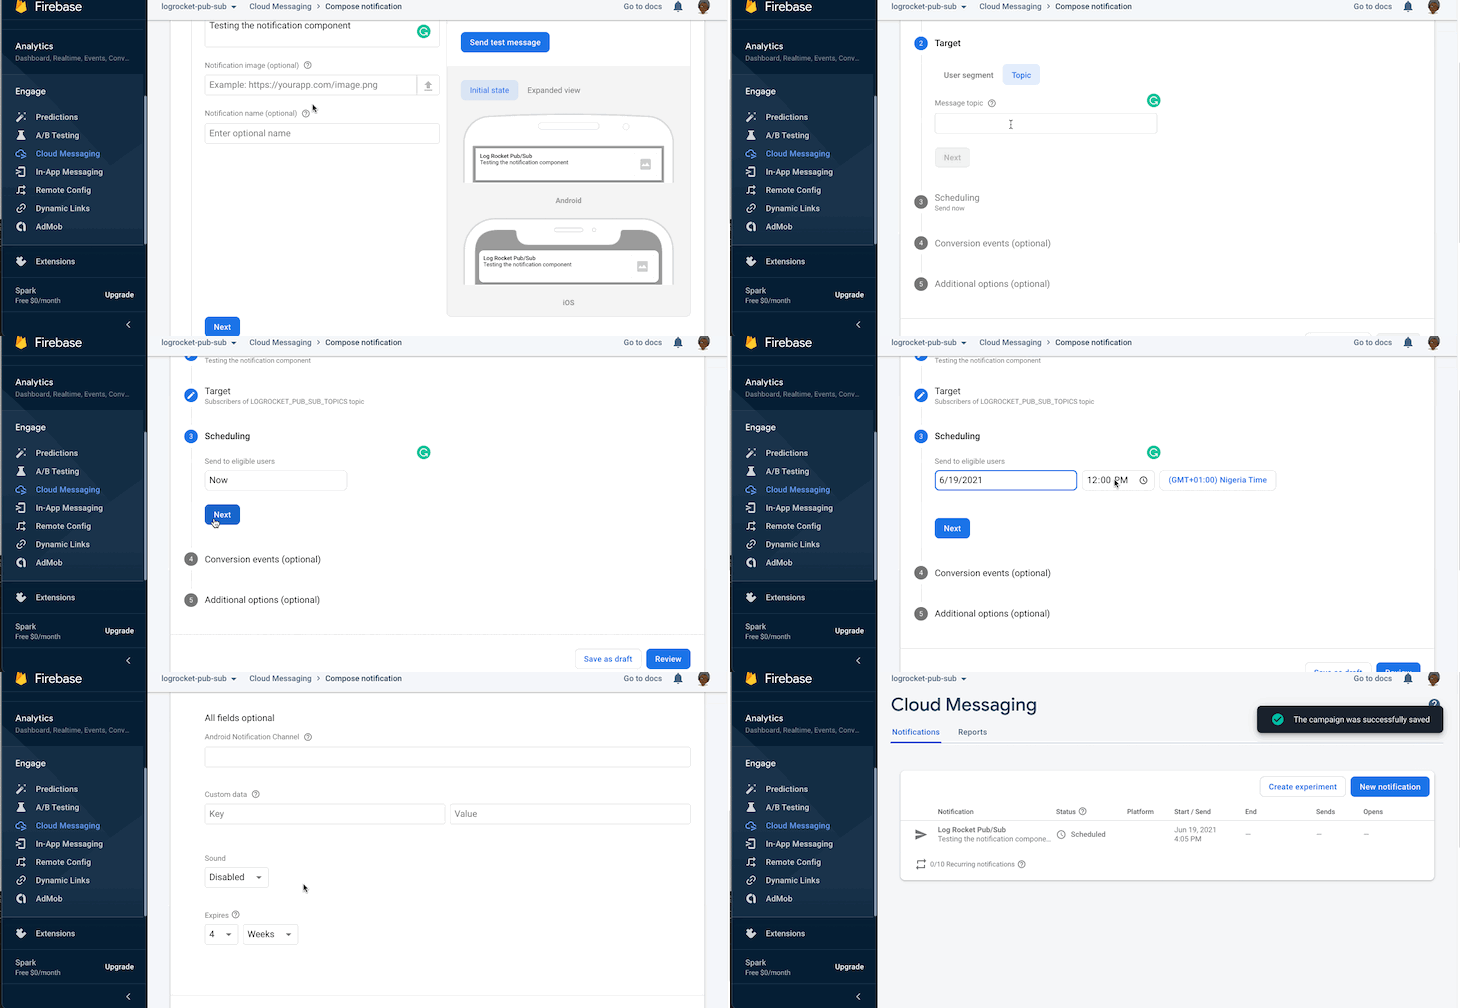
To test this implementation, go to the Firebase console, expand the Engage sidebar menu, then click on Cloud Messaging to access the cloud messaging dashboard. Then click on the Send your first message button.
In the Compose notification tool, enter the title of the notification and the body, then click Next. On the Target section, select a topic and enter the topic you used when subscribing. You can schedule the message for a later, or send it immediately. Click Review to finalize the process.
Once the notification is dispatched, you should see a notification badge like so:
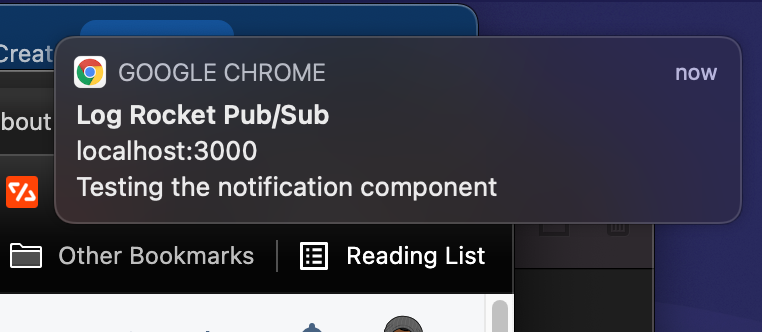
Along with a console log for the received message:

Aside from the dashboard, you can send messages using HTTP requests to https://fcm.googleapis.com/fcm/send with a body containing the notification object and an authorization header: key=FIREBASE_API_KEY.
The body of the request should look like this:
{
    "data": {"Holla": "True"},
    "to": "/topics/LOGROCKET_PUB_SUB_TOPICS",
    "notification": {
        "title": "This is from Postman",
        "body": "hello there"
    }
}
And an authorization header described as Authorization: "key=API_KEY":
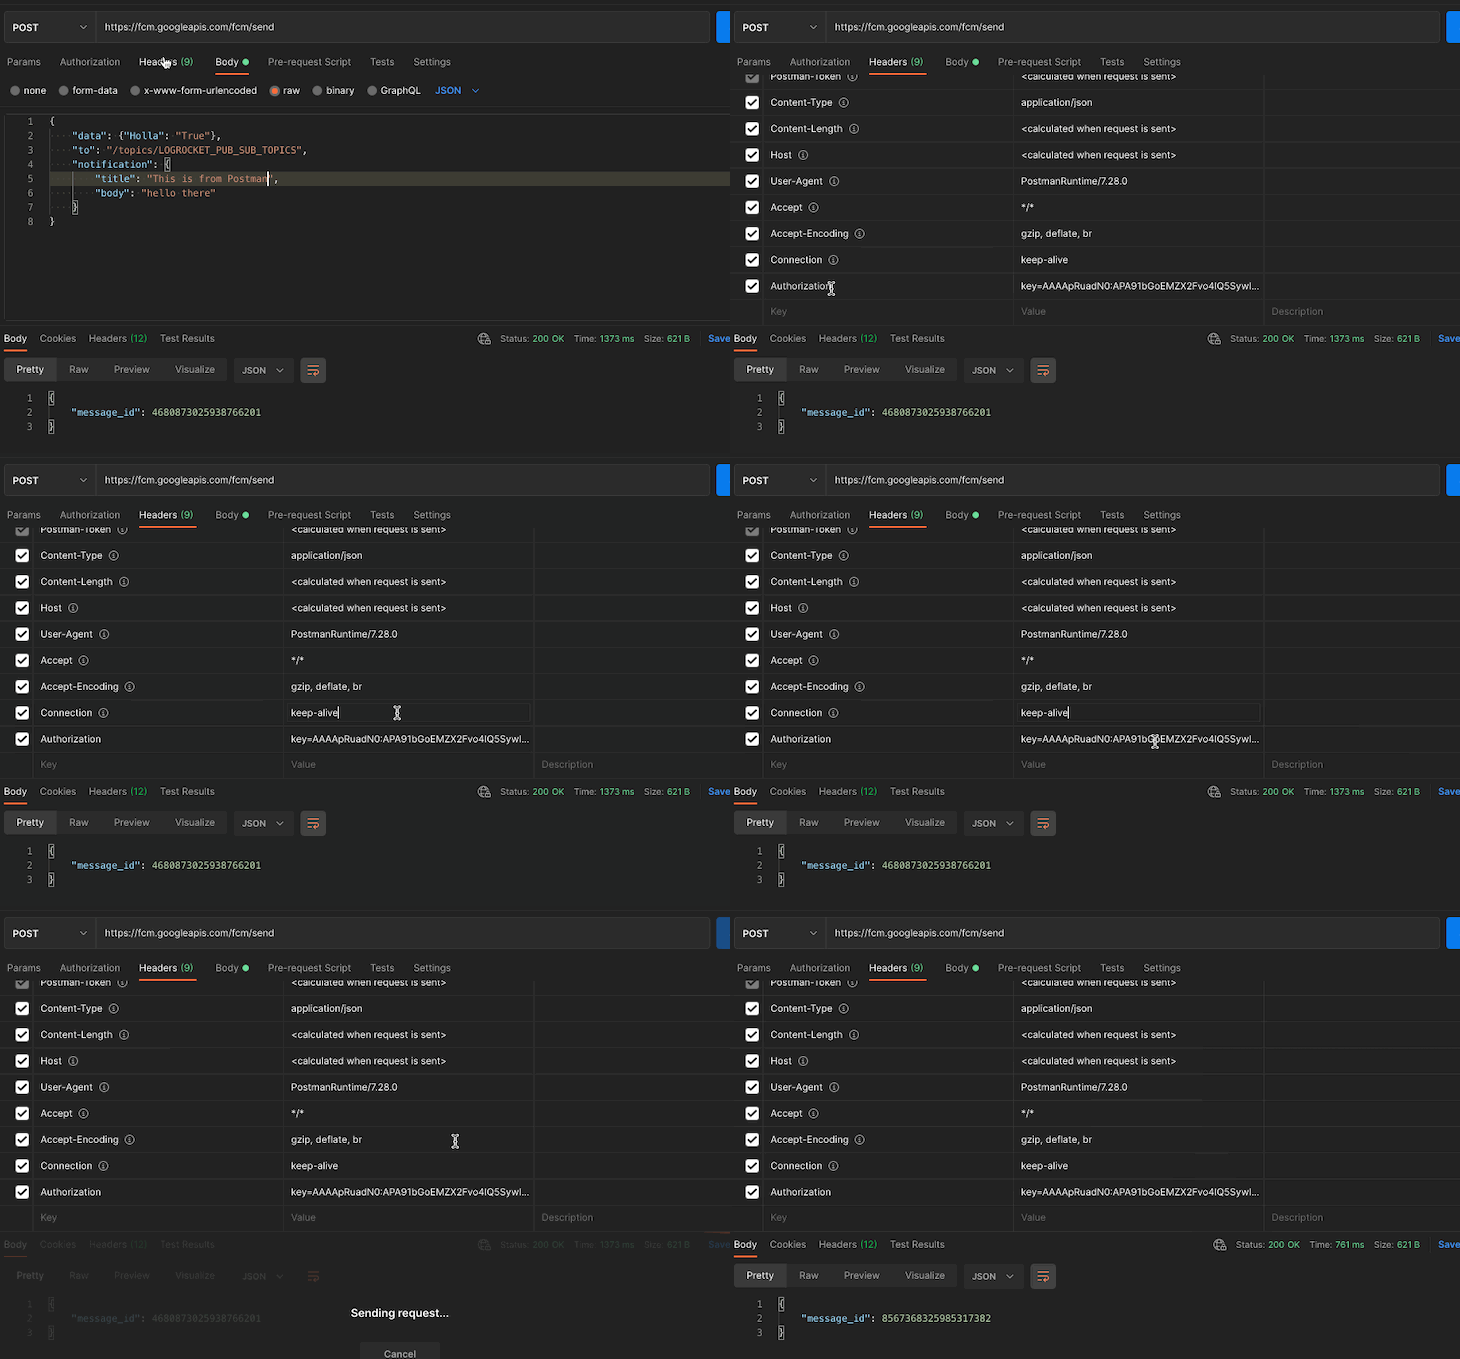
How is this useful? With this HTTP approach, it is possible for a remote operation on a server to send a notification to a particular topic that certain clients have subscribed to.
Just as it exists in a pub/sub system, the client browser is already serving as a subscriber; the remote server can act as publisher of the notification.
FCM is known for notifications. If it should serve as a pub/sub service, the notification is usually unnecessary.
Our approach in this article to publishing messages will always cause the popup notification badge. You can prevent that by omitting the notification object from the payload you are sending when publishing a new message, like so:
{
    "data": {"Holla": "True"},
    "to": "/topics/LOGROCKET_PUB_SUB_TOPICS"
}
This way, the messages are delivered, the notification badge won’t pop out, and the message handlers can handle the message effectively.
When a background message is received, the onBackgroundMessage is called in a service worker context.
You can send a message from the service worker thread to the main browser thread with self.postMessage({}), then receive the message on the main thread with window.addEventListener("onmessage", message => console.log(message)).
The above solution would work, but is not maintainable in this case where messages can arrive in two places: through the onMessage and the onBackgroundMessage.
The more manageable and maintainable way would be to push both messages to an event system that can be subscribed to, which would handle the messages regardless of where the message is coming from.
The BroadcastChannel API can be useful in this case, as this post suggests.
Inside of the onBackgroundMessage function, instead of consoling, you can post the message to a channel:
messaging.onBackgroundMessage((message) => {
  // if the sent data does not contain notification,
  // no notification would be shown to the user
  const fcmChannel = new BroadcastChannel("fcm-channel");
  fcmChannel.postMessage(message);
});
Also, inside of the handler for the subscribeToTopic, replace the console log with the following:
const fcmChannel = new BroadcastChannel("fcm-channel");
fcmChannel.postMessage(message);
To consume this message, anywhere inside of test React app, create another useEffect hook inside of the App.js file and implement the onmessage event of the BroadcastChannel API like below:
useEffect(() => {
    const fcmChannel = new BroadCastChannel("fcm-channel");
  fcmChannel.onmessage = (message) => console.log(message);
}, [])
With this change, the onmessage handler handles all the messages coming from FCM, which is logging them to the console.
As an effective push notification service, FCM can also serve as a Pub/Sub system and still leverage the existing available infrastructure.
This post has also shared how to use the Google APIs to make working with FCM easier instead of relying on the SDK and making some edge-case usage possible.
Using BroadcastChannel as an event is useful in synchronizing the data across the different FCM message delivery modes.
With the instructions in this post, you can do server-client communication seamlessly without interrupting the user with a notification badge.
Install LogRocket via npm or script tag. LogRocket.init() must be called client-side, not
server-side
$ npm i --save logrocket

// Code:

import LogRocket from 'logrocket';
LogRocket.init('app/id');
// Add to your HTML:

<script src="https://cdn.lr-ingest.com/LogRocket.min.js"></script>
<script>window.LogRocket && window.LogRocket.init('app/id');</script>

Compare the top AI development tools and models of February 2026. View updated rankings, feature breakdowns, and find the best fit for you.

Broken npm packages often fail due to small packaging mistakes. This guide shows how to use Publint to validate exports, entry points, and module formats before publishing.

Discover what’s new in The Replay, LogRocket’s newsletter for dev and engineering leaders, in the February 11th issue.

Cut React LCP from 28s to ~1s with a four-phase framework covering bundle analysis, React optimizations, SSR, and asset/image tuning.
Would you be interested in joining LogRocket's developer community?
Join LogRocket’s Content Advisory Board. You’ll help inform the type of content we create and get access to exclusive meetups, social accreditation, and swag.
Sign up now
One Reply to "Using Firebase Cloud Messaging as a pub/sub service"
Exactly what I have been looking for. Thank you for great documentation.