
Most of the time, there’s no sense in procrastinating. If you can do something now, then you should probably do so and stop putting it off. However, in software development, the reverse is typically true, which is why we use a strategy called lazy loading.

Angular 17 introduced a new defer block that lets you lazy load content based on specific conditions or events. In this tutorial, we will discuss why this is important and how to implement lazy loading strategically in our Angular applications.
We’ll build a simple app to get a hands-on look at what makes defer so great. The complete code for the demo is available on GitHub. Let’s get started!
The Replay is a weekly newsletter for dev and engineering leaders.
Delivered once a week, it's your curated guide to the most important conversations around frontend dev, emerging AI tools, and the state of modern software.
We can load our entire application in one hit, but is it going to lead to an excellent UX? Probably not. Loading only the parts of your app that the user is actually going to use, then loading other parts of your application later, is a win for everybody.
So, we should try to split up larger applications and deliver only the required parts of the application to the user. Why, though? There are a few reasons:
Normally, splitting an app up into smaller pieces which are then dynamically loaded at runtime is not an easy task. After all, we are producing the main entry point for our app, and then loading specific parts of the app at a later point in time.
With Angular 17, this all becomes far easier and more ergonomic. But to understand the value, we need to get into the nitty-gritty of how Angular builds and packages applications.
Honestly, it can get a little dry — I’d rather be building cool apps than digging through a minified JavaScript file! But if we robustly understand the value of @defer, then we can really understand what it can bring to our app.
deferNormally, when you fire off the ng build command, your entire app gets built into a few different files. The result of this process looks like the below:

As you can see, we have here:
index.html file for our browser to loadThen, we have the actual JavaScript and CSS that form our application:
main.js — The Angular framework and our code put together to form what is run on the client sidepolyfills.js — If a browser lacks a certain feature, the given polyfills will help your app to still runstyles.css — The styles for your web appWhile the polyfills and styles files are quite small, our main.js file is fairly big by comparison. This is for a simple app, so it’s not hard to imagine how large some Angular applications could become.
Faced with this, there are only really two options. The first is that we expect our users to deal with ever-increasing bundle sizes, as well as to wait longer and longer for the app to load the first time. Our second option is to split up our application into smaller chunks.
To demonstrate this, let’s make a simple app called “Rate My Ducks” in Angular with Angular Material. The idea is that the user will be presented with a simple list of ducks and can open each duck’s details to rate them. Optionally, the user can sign up for a newsletter.
Our simple app will look something like this:

Clicking on DETAILS will open up the chosen duck, give the user a suggested action to do with the duck, and allow them to rate the given duck:

At the moment, this app doesn’t use deferred views. So, let’s go ahead and run ng build --stats-json. This will produce a stats.json file which we can send to the esbuild Bundle Size Analyzer for analysis. In our case, the result looks like this:
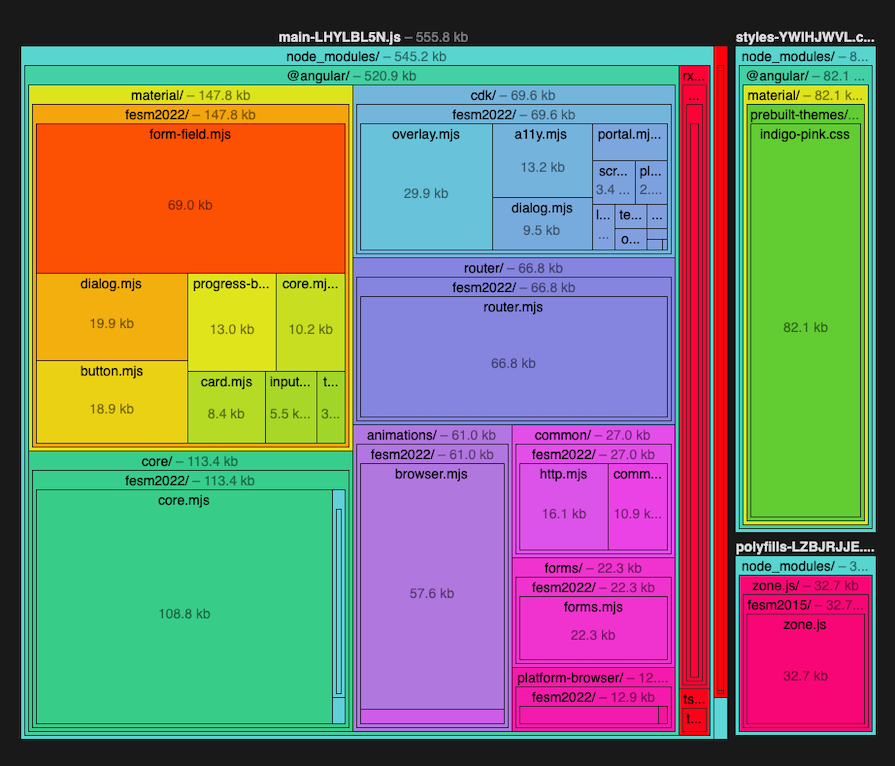
What on earth are we looking at? Well, we’re looking at all the various parts of our simple application, and how big each component is. At the top left, we can see that our app has only imported the parts of Angular Material that are needed, like form-field, dialog, and so on.
In all of this, however, where is our actual application code? Well, it’s the very thin red rectangle towards the right of the picture. When we click on that rectangle, we can see our application in a format that makes more sense to us:
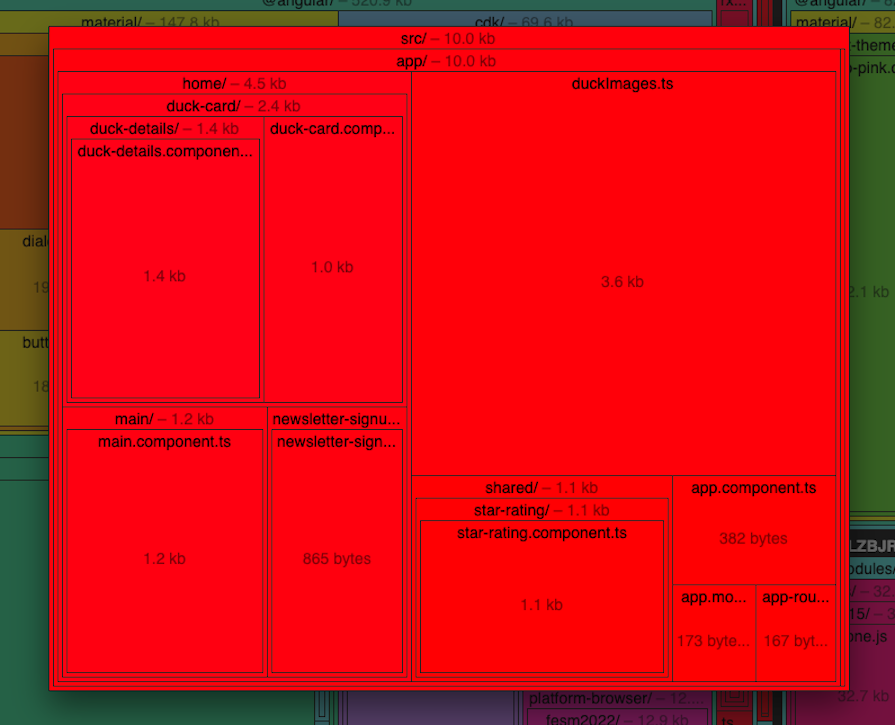
Every single person who visits the soon-to-be internet sensation of “Rate My Ducks” will get everything that I’ve made for the app.
The people who click into a duck will, of course, get the duck viewer and the ability to rate. However, the users who don’t click into a duck will also get all of the same files as well, even if they never actually view the information.
Within the context of this app, this might not be a significant problem. It’s not so hard to apply this logic to a much bigger application, though.
For example, if your app has an administrative control panel that only one percent of your user base would see, all of that code would get bundled and sent to everyone by default. That leads to bigger payloads for the end user, which can increase memory usage and wait times, with no benefit to them.
There’s no sense in bringing in parts of an application that the user is never going to make use of. So, there’s a benefit in breaking our app into smaller pieces, and only loading those pieces when the user requests them.
But how on earth would we dynamically load new pieces of our app just in time for users to view without disrupting the experience? And how would we do that in a way that was maintainable and scalable?
If we were doing this manually, it would not be easy. But with Angular 17 and defer, it becomes surprisingly doable.
Without defer, our main.component.html file looks like this:
<div class="main-container">
  <div class="newsletter">
      <app-newsletter-signup></app-newsletter-signup>
  </div>
  <div class="flex-container">
    @for (duck of this.ducks;track duck.file) {
        <app-duck-card [duck]="duck" class="flex-item"></app-duck-card>
    }
  </div>
</div>
Cleverly, the Angular compiler sees our use of the app-newsletter-signup and app-duck-card components and bundles them into our final payload. What happens if we surround the app-duck-card with @defer? Let’s try it out:
<div class="main-container">
  <div class="newsletter">
      <app-newsletter-signup></app-newsletter-signup>
  </div>
  <div class="flex-container">
    @for (duck of this.ducks;track duck.file) {
      @defer{
        <app-duck-card [duck]="duck" class="flex-item"></app-duck-card>
      }
    }
  </div>
</div>
Now, let’s re-run the build process. However, this time, let’s run the command like so:
ng build --stats-json --named-chunks
The --named-chunks option will give our output more understandable names, so we can easily identify what component is going into which file. We receive this output:

What does the esbuild analyzer make of this? Let’s see:
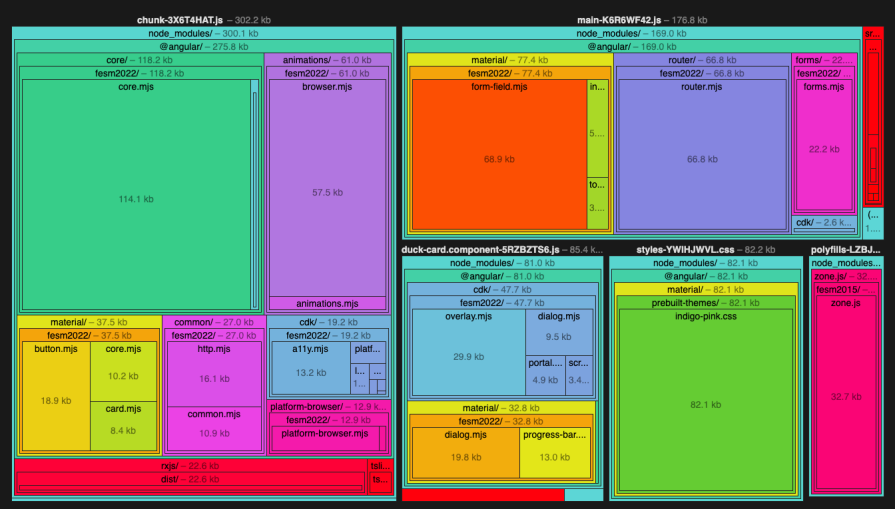
We have our existing chunks, and everything looks familiar here. However, we now have a new duck-card-component JavaScript file. This file contains our standalone duck card component, which is loaded after our initial application startup, courtesy of the @defer functionality.
If we hosted this application now, we would see our initial bundle load followed by our separate duck component, which would then load in our duck images. In Chrome DevTools, it looks like this:
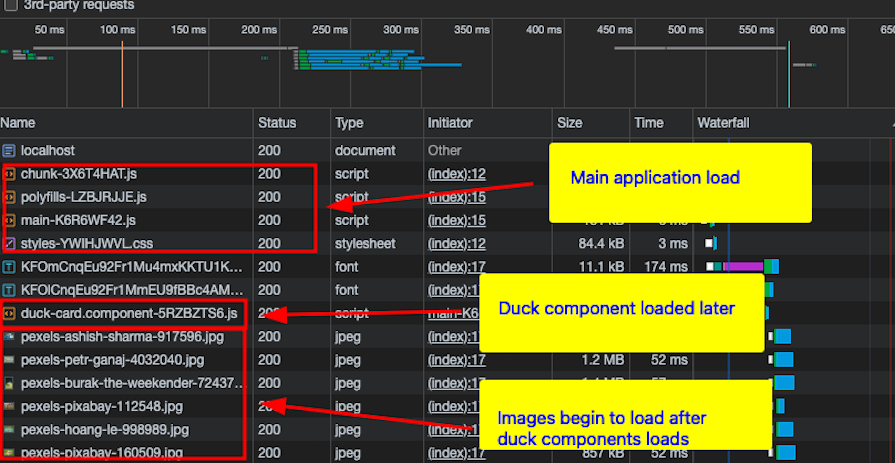
Just adding this @defer statement breaks up our app into two separate pieces. The application load process now looks a bit like this:
At this stage, instead of loading our entire app immediately, we’re loading a part of our app first, and then almost immediately loading the rest of it. That’s not necessarily a bad thing, but if we’re here to optimize, then we want to be a little bit cleverer about this.
The next step in this journey is defining when we want our component to actually load. By default, they will load during the parent’s component template execution. But we can be very precise about when we want the deferred component to actually load.
We can load components:
on idle — When the browser has become idle, and has stopped processing other tasks. We can achieve this by using the requestIdleCallback APIon viewport — When the content is scrolled into viewon interaction — When the user clicks on the placeholder or another specified elementon hover — When the user hovers over the placeholder element, or another specific elementon immediate — Retrieve the deferred chunk immediatelyon timer — Wait a predefined amount of time before fetching the componentSince we are now making a decision about something that will happen in the future, we need to tell Angular what to render at these various stages:
Within our template, this basically boils down to the following:
  @defer {
        <large-component />
      } @placeholder {
        Placeholder
      } @loading {
        Loading...
      } @error {
        Something went wrong :(
      }
If we wanted to load the component once it had scrolled into the user’s viewport, our @defer statement would change to @defer (on viewport).
Better still, we don’t have to commit to just one particular condition. For example, if we wanted to load a component after two seconds, or if we wanted to skip the wait once it enters the viewport, we could write our @defer block like so:
@defer (on viewport; on timer(2s))
Even with the @placeholder element, we can specify a minimum amount of time for it to display before the loaded component is shown. This is to prevent a placeholder from flickering quickly at page load time and possibly changing the page layout.
Gradually, we begin to see how ergonomic this API is, and how simple it could be to carry out otherwise complex deferred loading operations.
There’s one last thing to consider. As well as being able to load a component in response to a certain browser event or timer, we can also instruct Angular to load the component when a given variable becomes truthy.
For example, if we wanted to load large-component after two seconds, or after the user has completed a form, we could write the following:
@defer (on timer(2s); when formComplete)
Whichever happens first — the timer running out or the condition becoming true — will make the component render. However, the component will not disappear if the condition becomes false again — it’s a one-way switch.
If we explored every single permutation of using the on and when statements, this article would probably be overly long. Instead, let’s take more of a practical approach in showing how this works so you can apply it in your own apps. We’ll use these statements to streamline the load of our Rate My Ducks app.
The template for our main duck page shows a list of ducks and also has a component where a user can sign up for a newsletter. Let’s go ahead and make a change to defer the load of the newsletter component to when the user scrolls far enough for the component to appear in the viewport:
<div class="flex-container">
  @for (duck of this.ducks;track duck.file) {
      <app-duck-card [duck]="duck" class="flex-item"></app-duck-card>
  }
</div>
<div style="padding: 50px; max-width: 1024px">
  @defer (on viewport){
    <app-newsletter-signup></app-newsletter-signup>
  } @placeholder (minimum 2000ms) {
    <div>Loading..</div>
  }
</div>
If we build our app and then host it locally, we get the following result. Note Chrome DevTools open to show network requests on the right-hand side:
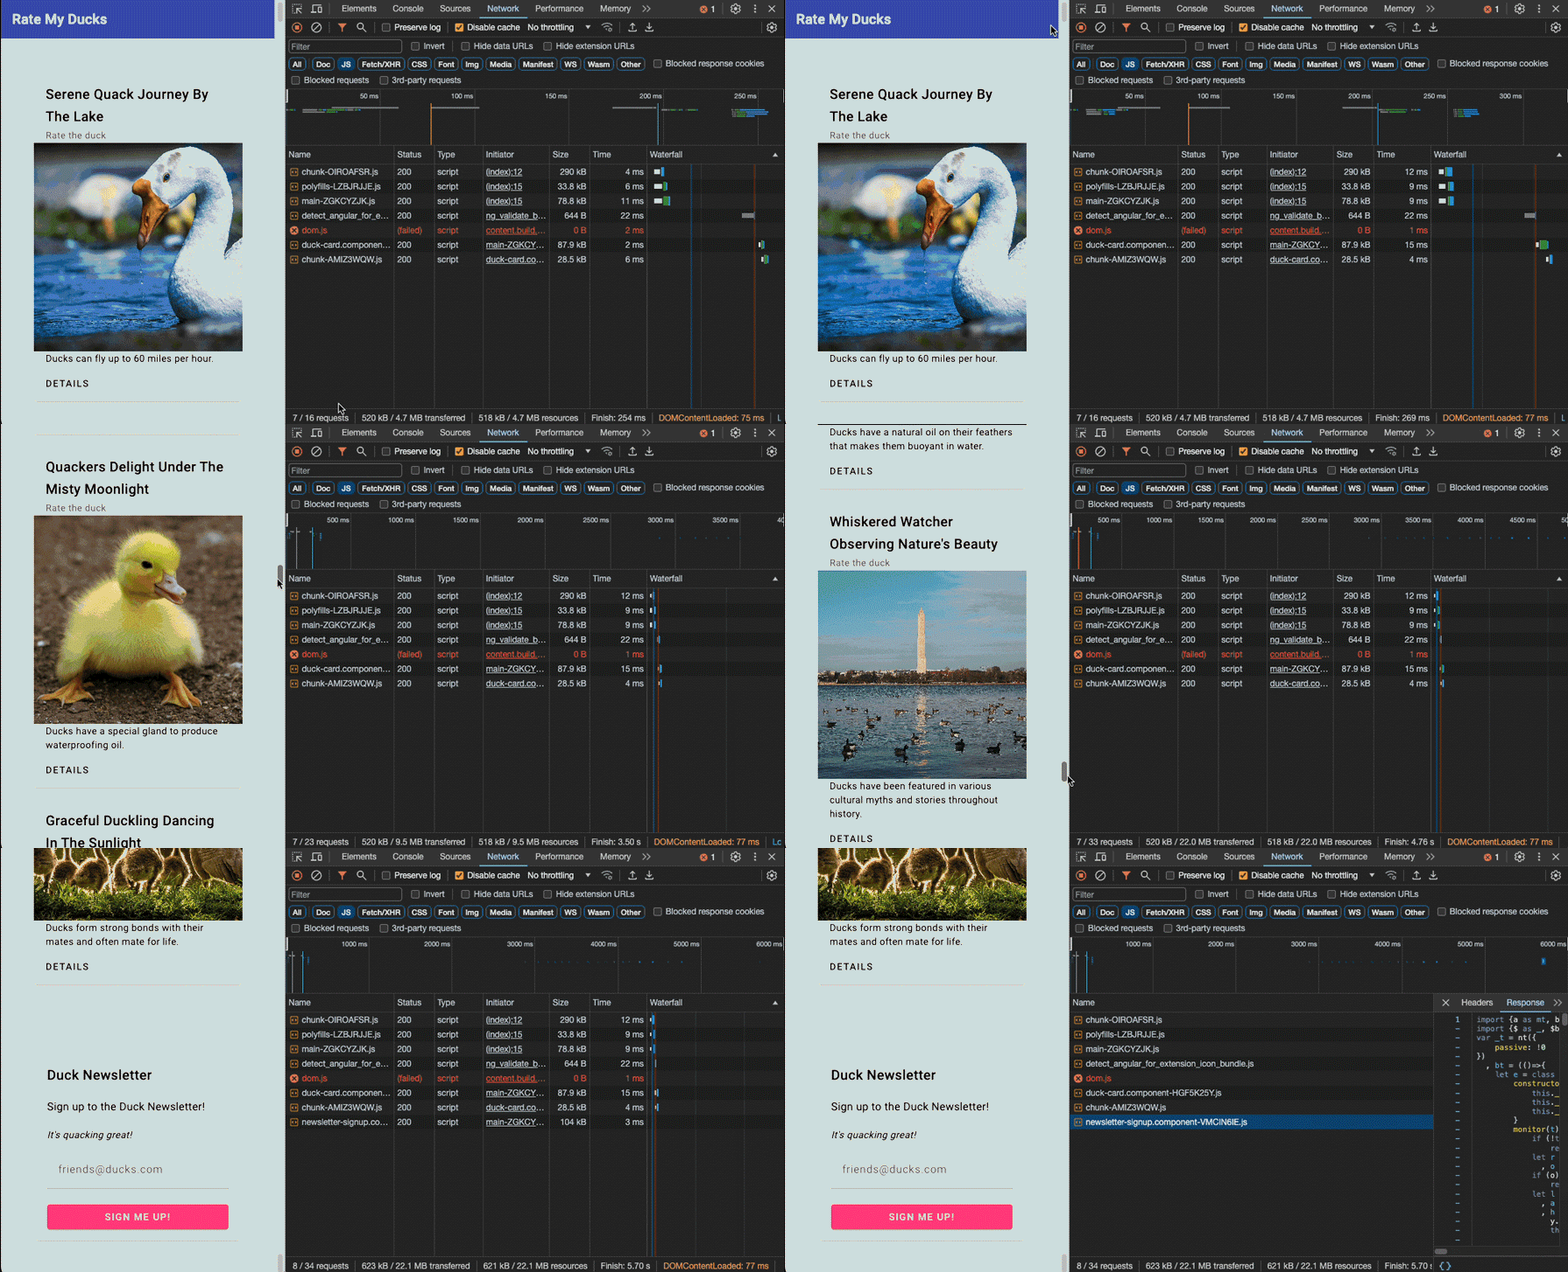
When we begin scrolling through our app, most of the app loads normally. However, the required Angular module for the newsletter component is only loaded and displayed when we get to the bottom, where our newsletter component is.
If we were to check this loaded component via the esbuild analyzer, we can see that this individual JavaScript file only contains the code for our text field and our component code:
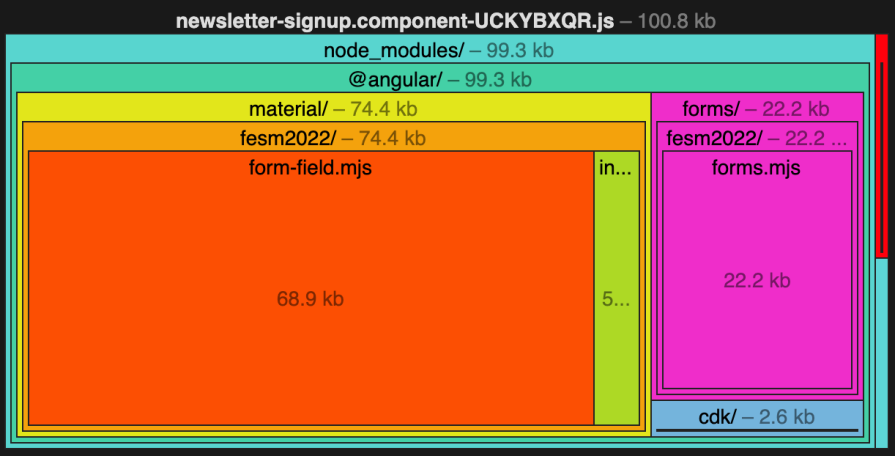
The newsletter component will never load for users who never scroll all the way down to it, so we’re not wasting resources or bandwidth unnecessarily.
Another option we have is to defer component loads until an element is hovered over or clicked on. So, within our list of ducks, let’s defer our duck card component load and wait until the user hovers over the element before loading the specific component.
We don’t want the page to reflow dramatically when the image loads, so our placeholder should roughly be the same size as our component will be when it loads:
@for (duck of this.ducks;track duck.file) {
  @defer (on hover) {
    <app-duck-card [duck]="duck" class="flex-item"></app-duck-card>
  } @placeholder {
    <div style="height: 300px; width: 300px;">Wait for the duck...</div>
  }
}
If we build and serve our app, our application now looks like this:
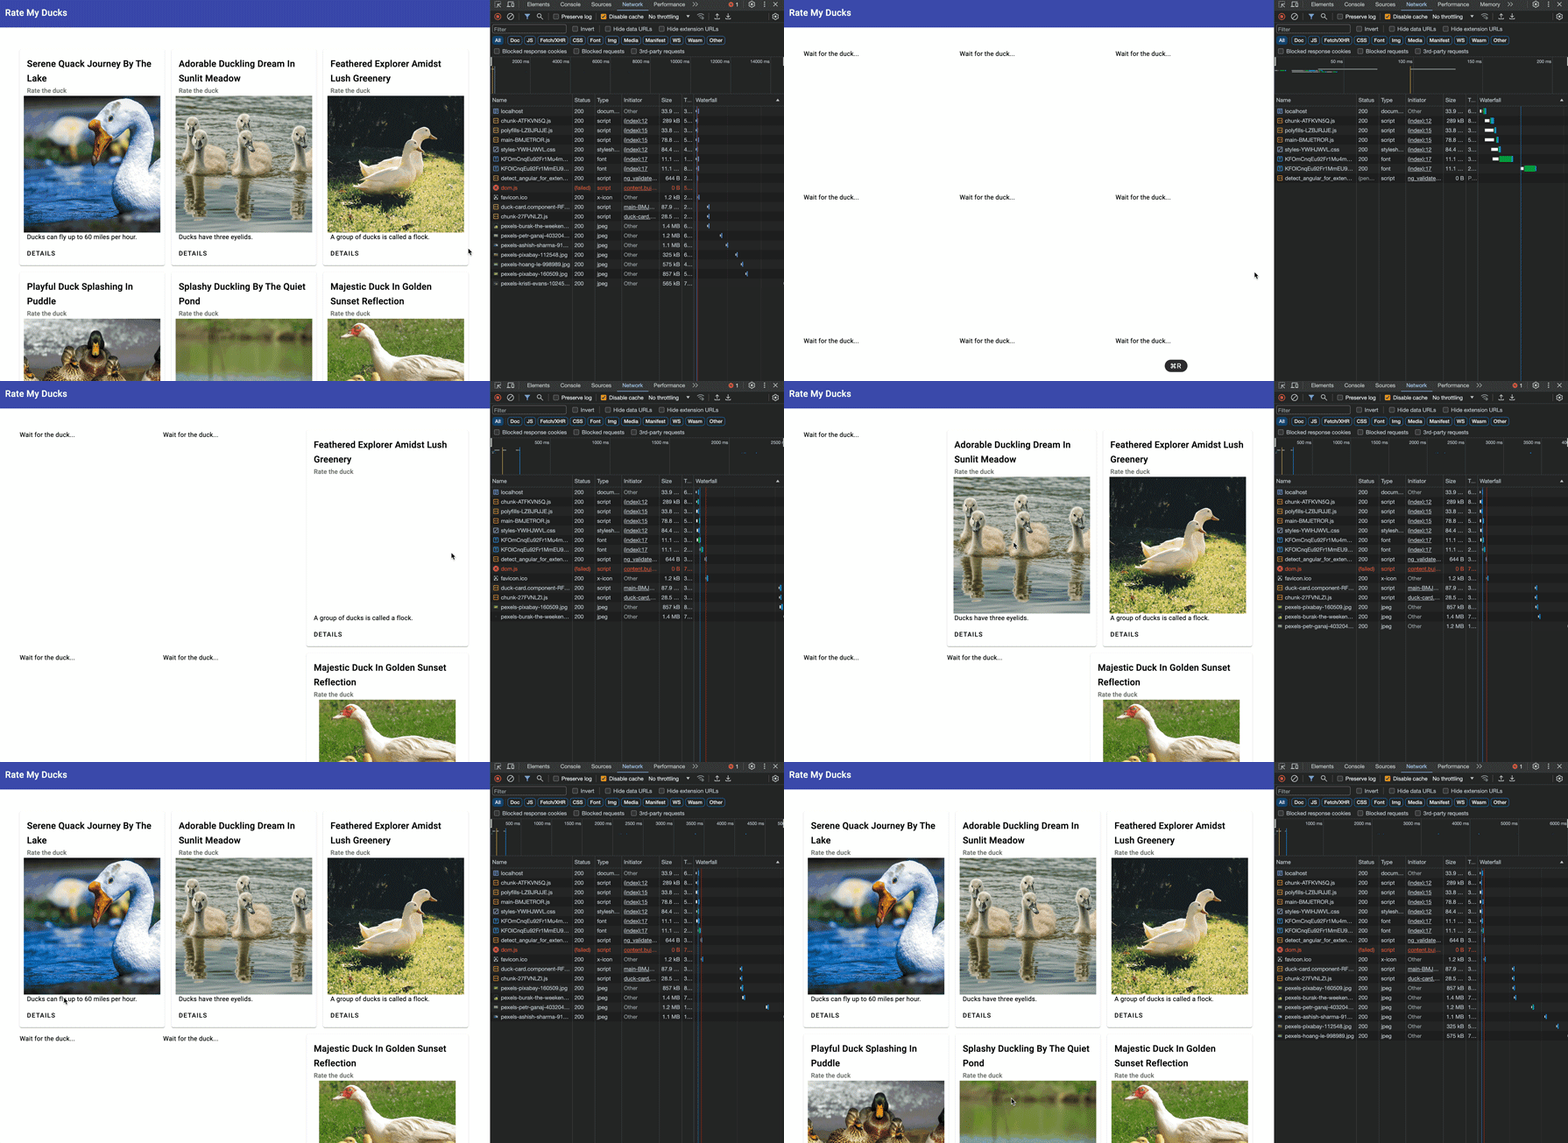
The first time our duck component is hovered over, the appropriate component is retrieved from the server. On subsequent hovers, the same component — which has already been downloaded — is re-used. Finally, images are only retrieved once the component is loaded, which can further reduce the download of unused resources.
defer in AngularDeferred views are a powerful and ergonomic extension of existing Angular functionality, so it becomes tempting to surround every component with @defer. But there are a few things to think about before we do that.
First, if we re-use components throughout our application — as we should — we might wind up with nested deferred views.
That’s not a bad thing outright, as parts of our app are streamed in as needed. However, if we use timers or other long-running operations to describe when our views should appear, these can quickly add up.
For example, imagine we had a component nested three components deep, and every component was inside a defer block with a timer of two seconds. Our final component would render after a total of six seconds.
As applications become more complex, it could be easy to end up waiting too long for a page to load completely.
Secondly, our loaded component could be a completely different size from our placeholder. This could cause the page to re-flow or dramatic layout changes, which Angular considers a bad practice.
Where this occurs, it would make sense to make our placeholder the same size as our loaded component. We did this earlier when deferring the duck card component from loading until the user hovers over it.
Finally, Angular also gives you the option to prefetch your components based on similar conditions, such as time or viewport visibility.
Prefetching a component means downloading the component, but delaying execution until it’s actually called in a @defer statement. For example, you can prefetch a large component on browser idle before it’s executed at a later stage.
Combining prefetching with defer blocks can help improve performance, particularly for larger components. Once the component is finally rendered, having it prefetched can reduce the load time from the user’s perspective.
Deferrable views within Angular make the overall framework a much more compelling option for modern web apps. The defer feature can help us optimize the delivery of our apps to end users.
Whether you are new to Angular or are a seasoned developer, learning how to use deferred views is very useful. Bringing in larger dependencies isn’t as big of a deal when you know they’ll only be loaded when a particular component uses them.
At any rate, if you already have an Angular app, it’s definitely never been a better time to cast an eye over it and see if you can improve the load times of your app by using deferred views. If you just want an easy sandbox to download and play around in, feel free to clone the sample app so you can see how it all goes together.
Debugging Angular applications can be difficult, especially when users experience issues that are difficult to reproduce. If you’re interested in monitoring and tracking Angular state and actions for all of your users in production, try LogRocket.
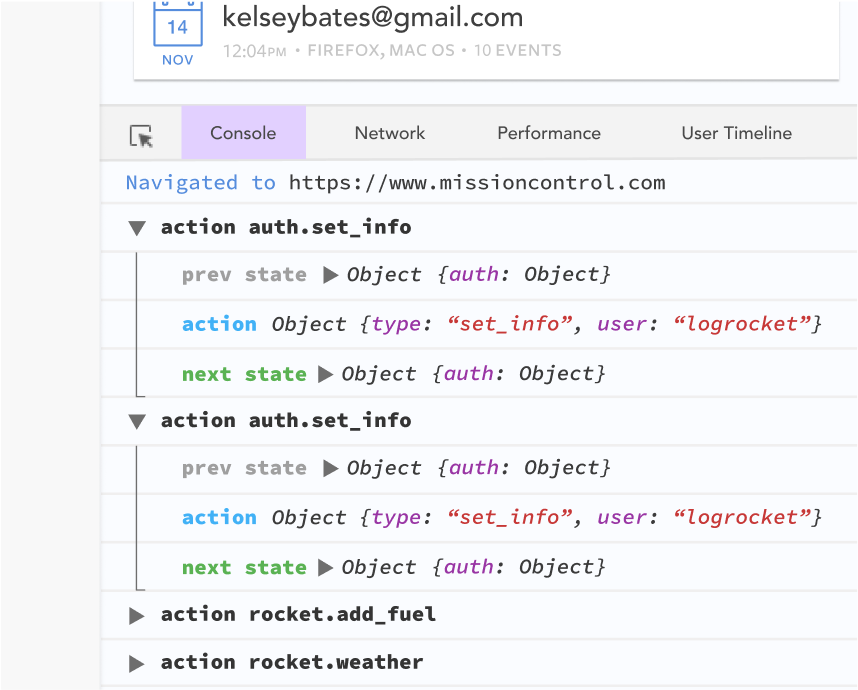
LogRocket lets you replay user sessions, eliminating guesswork by showing exactly what users experienced. It captures console logs, errors, network requests, and pixel-perfect DOM recordings—compatible with all frameworks.
With Galileo AI, you can instantly identify and explain user struggles with automated monitoring of your entire product experience.
The LogRocket NgRx plugin logs Angular state and actions to the LogRocket console, giving you context around what led to an error, and what state the application was in when an issue occurred.
Modernize how you debug your Angular apps — start monitoring for free.

Compare the top AI development tools and models of February 2026. View updated rankings, feature breakdowns, and find the best fit for you.

Broken npm packages often fail due to small packaging mistakes. This guide shows how to use Publint to validate exports, entry points, and module formats before publishing.

Discover what’s new in The Replay, LogRocket’s newsletter for dev and engineering leaders, in the February 11th issue.

Cut React LCP from 28s to ~1s with a four-phase framework covering bundle analysis, React optimizations, SSR, and asset/image tuning.
Would you be interested in joining LogRocket's developer community?
Join LogRocket’s Content Advisory Board. You’ll help inform the type of content we create and get access to exclusive meetups, social accreditation, and swag.
Sign up now