Using formats like JSON and XML for serialization becomes inefficient when objects are large and complex. One of the reasons for this is that these formats store the structure of the object alongside the data it contains.
This approach allows you to directly serialize and deserialize an object without a schema. However, when the object is very complex, it becomes inefficient in terms of space taken and the process of encoding and decoding.
Cap’n Proto is a data serializer, just like JSON and XML. But unlike JSON and XML, it uses a schema for both encoding and decoding objects.
The use of a schema eliminates the need to store the structure of the object while encoding it. Since the structure of the object isn’t stored, encoding and decoding is very efficient.
In this article, you’ll learn about Cap’n Proto, how it works, and how to use it in your Rust project. We will cover:
In order to follow this article, you’ll need these prerequisites:
Cap’n Proto is a data interchange format just like JSON, XML, and so on.
Data interchange formats allow you to perform serialization and deserialization. Serialization is when you encode an object to bytes. Deserializiation is when you decode the bytes back to an object.
These tools help developers exchange objects between different computer programs.
Unlike JSON and many other data interchange formats, Cap’n Proto requires a schema for most of its operations. This schema includes encoding, decoding, and creating objects.
A schema is a program that describes the structure of an object. There is usually a dedicated language for writing schemas, even in Cap’n Proto. After writing a schema in Cap’n Proto, you need to compile the schema to the programming language you want to use it in.
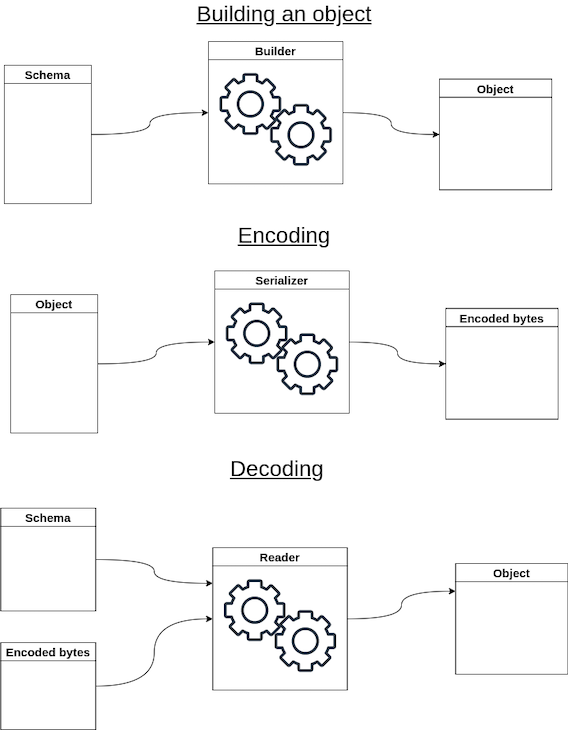
Cap’n Proto has a builder for creating objects from a schema, a serializer for encoding an object into bytes, and a reader for decoding bytes into an object. The diagram below provides an overview of these three components:
Aside from using Cap’n Proto as a data serializer, you can also use it for RPC systems, database systems, and so on. In this article, we will focus on serialization and deserialization with Cap’n Proto in Rust.
In this section, I’ll guide you through defining the necessary dependencies, creating a schema, and compiling the schema for using Cap’n Proto for your Rust project.
But before you get started, you need to initialize a project. Run the command below to initialize a new project:
$ cargo new --bin cap-n-proto-project
Now, open your project’s Cargo.toml file and add the following to define the dependencies for using Cap’n Proto in your Rust project:
[dependencies]
capnp  = "0.14"

[build-dependencies]
capnpc = "0.14"
Your next step is to create a schema. To do this, first create a folder named schemas. Then, create a person_schema.capnp file inside the schemas folder. Finally, write the following into your person_schema.capnp file:
@0x8512a370fcfefa23;

struct Person {
 name @0 :Text;
 age @1 :UInt8;
}
In the schema, the first line is a unique file identifier. You can generate a new one by running capnp id in the terminal.
The struct under the file ID is a data structure named Person with two fields: name and age.
To allow encoded objects to be compatible with updated schemas, Cap’n Proto requires you to include an ID after each field. Each ID begins with an @ symbol followed by a whole number. The first number you should use is 0.
When adding new fields, you should put a new number label. For example:
 name @0 :Text;
 age @1 :UInt8;
 new_field @2 :DataType;
After creating the schema, follow the below steps to set up its compilation.
First, install the Cap’n Proto executable file. The executable file is required for compiling schemas.
Next, create a build.rs file in the src folder. Then, write this code into your build.rs file:
extern crate capnpc;

fn main () {
  capnpc::CompilerCommand::new()
    .output_path("src/")
    .src_prefix("schemas/")
    .file("schemas/person_schema.capnp")
    .run().unwrap();
Let’s pause for a moment to understand what is happening in the build.rs file. The code above first initializes a compiler with the CompilerCommand. Then, it registers an output_path or directory for where the compiled code will go.
Next, .src_prefix sets a prefix so that the compiler can know which characters to ignore when naming the compiled code. Then, it provides a .file() path to the schema that you want to compile. Finally, it executes the compiler.
Now, let’s return to setting up the schema compilation. Open your Cargo.toml file and register src/build.rs to be executed when you run cargo build:
[package]
name = "proto-dev"
version = "0.1.0"
edition = "2021"
build = "src/build.rs"    # <-- this line
With the addition of the code above, anytime you run cargo build, cargo will compile the schema while building the project. Finish up by running the cargo build command in your terminal.
When the project is built, you’ll see a person_schema_capnp.rs file in src.
Now that you have everything set up, its time to actually do something with Cap’n Proto. In this section, I’ll show you how to create an object with your schema as well as how to serialize the object.
The following is the code for creating and serializing an object. Clear the main.rs file and paste this into it:
use capnp::message::Builder;
use capnp::serialize;

pub mod person_schema_capnp;

fn main() {
   let mut message = Builder::new_default();

   let mut person = message.init_root::<person_schema_capnp::person::Builder>();
   person.set_name("John");
   person.set_age(23);

   let data = serialize::write_message_to_words(&message);
   println!("{:?}", data);
}
In the first two lines of the code above, we imported Builder and serialize from capnp. Builder allows you to build an object with the schema, while serialize allows you to serialize that object.
We then imported the schema from person_schema_capnp.rs and then initialized a message builder.
Under fn main(), in the ninth line of code, we set up a person object inside message with the schema’s Builder. In the following two lines, we saved two values in the object: name and age.
Finally, we serialized the object into a vector, then printed out the vector on the line after.
Now that you’ve seen how to create and serialize an object to a vector in Rust with Cap’n Proto, it’s time to deserialize the vector into an object. In this section, I’ll show you how.
First, you’ll need to import ReaderOptions from capnp:
use capnp::message::ReaderOptions;
Next, create a reader with serialize:
let reader = serialize::read_message(
       data.as_slice(),
       ReaderOptions::new()
   ).unwrap();
In the above, data is the vector into which we serialized the person object earlier. You need to convert the vector to a slice before passing it to serialize::read_message(). That’s why we used data.as_slice().
Finally, use the reader variable and the person_schema_capnp.rs schema’s Reader to assemble the object, like so:
let person = reader.get_root::<person_schema_capnp::person::Reader>().unwrap();
To verify that assembling the object worked, you can add this line below to print out the name that we stored in the object:
let name = person.get_name().unwrap();
println!("Name: {name}");
Combining what we did in the last section and this section, we will have the following in our main.rs file:
use capnp::message::Builder;
use capnp::message::ReaderOptions;
use capnp::serialize;

pub mod person_schema_capnp;

fn main() {

   // Creating object
   let mut message = Builder::new_default();
   let mut person = message.init_root::<person_schema_capnp::person::Builder>();
   person.set_name("John");
   person.set_age(23);

   // Serializing object
   let data = serialize::write_message_to_words(&message);
   println!("{:?}", data);

   // Deserializing object
   let reader = serialize::read_message(
       data.as_slice(),
       ReaderOptions::new()
   ).unwrap();

   let person = reader.get_root::<person_schema_capnp::person::Reader>().unwrap();
   let name = person.get_name().unwrap();
   println!("Name: {name}");
}
Once you run the cargo run command below in your terminal, you’ll get the output that follows:
$ cargo run
   Compiling cap-n-proto-project v0.1.0 (/path/to/project)
    Finished dev [unoptimized + debuginfo] target(s) in 2.55s
     Running `target/debug/cap-n-proto-project`
[0, 0, 0, 0, 4, 0, 0, 0, 0, 0, 0, 0, 1, 0, 1, 0, 23, 0, 0, 0, 0, 0, 0, 0, 1, 0, 0, 0, 42, 0, 0, 0, 74, 111, 104, 110, 0, 0, 0, 0]
Name: John
The output shows the serialized object and the printed Name value, which verifies that we successfully serialized and deserialized our object in Rust with Cap’n Proto.
In this article, you learned about Cap’n Proto and how to use it in Rust as an object serializer.
To further your knowledge, be sure to check out Cap’n Proto on GitHub as well as reviewing the Rust documentation.
Debugging Rust applications can be difficult, especially when users experience issues that are hard to reproduce. If you’re interested in monitoring and tracking the performance of your Rust apps, automatically surfacing errors, and tracking slow network requests and load time, try LogRocket.
LogRocket lets you replay user sessions, eliminating guesswork around why bugs happen by showing exactly what users experienced. It captures console logs, errors, network requests, and pixel-perfect DOM recordings — compatible with all frameworks.
LogRocket's Galileo AI watches sessions for you, instantly identifying and explaining user struggles with automated monitoring of your entire product experience.

Modernize how you debug your Rust apps — start monitoring for free.

Learn how to set up Meilisearch, index documents, and build keyword, semantic, and hybrid search with AI-powered retrieval.

Compare pnpm and npm across security defaults, disk usage, dependency strictness, and workspace policy to decide which package manager fits your project.

I migrated 20 production-style components from Tailwind to StyleX. Here’s what the data showed about LOC, CSS bundle size, build time, and type safety.

A guide for using JWT authentication to prevent basic security issues while understanding the shortcomings of JWTs.
Would you be interested in joining LogRocket's developer community?
Join LogRocket’s Content Advisory Board. You’ll help inform the type of content we create and get access to exclusive meetups, social accreditation, and swag.
Sign up now

