Remix — the full-stack, React-based framework for building server-side rendering applications — has been making waves lately, especially since it was open-sourced. As the new kid on the block, Remix is coming in hot with some cool inbuilt features aimed at building better websites that deliver fast, slick, and resilient user experiences, while also providing a great developer experience by positioning web fundamentals at its backbone.

Among the inbuilt features of Remix is its unique routing system. As with everything new, its nested routing concepts can be tricky and somewhat confusing to understand at first — especially for newer developers. In this post, we’ll be looking at Remix’s unique routing system in order to understand it and its concept of nested routing more thoroughly.
The Replay is a weekly newsletter for dev and engineering leaders.
Delivered once a week, it's your curated guide to the most important conversations around frontend dev, emerging AI tools, and the state of modern software.
When building traditional React applications with multiple page routes, you might be used to using something like React Router to manually set up these routes for your application.
However, Remix uses a file-based routing system for its routes.
In other words, a route is automatically associated with any file that is created within its designated routes directory. This designated routes directory is located in the root App folder of your application.
📦app
┣ 📂routes
┃ ┣ 📂blog
┃ ┃ ┗ 📜index.jsx
┃ ┗ 📜index.jsx
┗ 📜root.jsx
Furthermore, Remix also supports indexed file-routing based on folder structure, i.e., files will automatically be routed the same way as they appear in the routes directory.
routes/index.js → /routes/blog.js → /blogroutes/blog/index.js → /blogBut just defining your routes doesn’t trigger Remix to load up these routes when a user visits any of the related URLs. Instead, Remix uses the root.jsx file found in the app directory as the default base entry file for rendering every route; you can think of the root.jsx file as your app’s global container, which Remix then uses to load or render corresponding routes.
However, an outlet component is required within the root.jsx file in order for Remix to be able to figure out what route to load.
outlet component and how it worksThe outlet component is the key to nested routing in Remix. It enables a component to nest and render a matched child route within it, i.e., it is used to tell a parent route or component where to drop a nested child route.
Let’s see how this works in practice. We’ll start by importing and placing the outlet component in our root.jsx file:
import {Outlet} from "remix";

export default function App() {
  return (
    <html>
      <head>{/* title, meta info, etc. */}</head>
      <body>
        <h2>Global App Container</h2>
        <Outlet />
      </body>
    </html>
  );
}
Now that we have placed the outlet component inside this component, it will be responsible for figuring out what route to load in this component depending on the URL visited. If we visited any URL that matches a route, this outlet component would figure that out and load up the corresponding route.
Let’s consider the following example routes to see this in action:
routes/index.js → /routes/blog.js → /blogroutes/blog/index.js → /blogWe’ll return a simple “Hello, World!” text from the routes/index.jsx file and try visiting the route for it, which is the homepage (/) of our application:
export default function Index() {
  return <h1>Hello World</h1>;
}
The output would be:

As expected, our global root.jsx file was rendered to the DOM and, through the use of the outlet component, the corresponding route visited was mounted (nested) within it.
The same would happen for any other route visited: the root.jsx file acts as the base container for our routes, while the outlet component figures out what route should be loaded depending on the URL visited.
One of Remix’s most powerful inbuilt features is its nested routing mechanism; you can use the outlet component to build out a hierarchy of nested routes to form what could be best described as a nested layout. We used a little nested routing in the above example, when we nested the index.js file in the root.jsx component, but that is just scratching the surface of its capabilities.
Imagine for a second that we were building a sales dashboard of some sort, and in our routes directory we created a dashboard.jsx file.
📦routes
 ┣ 📜dashboard.jsx
 ┗ 📜index.jsx
By default, if we visited the /dashboard route, Remix would render this file. Now, imagine we created a new directory with the same name as our dashboard file and, in this new dashboard directory, we created another new file called sales.jsx.
📦routes
 ┣ 📂dashboard
 ┃ ┗ 📜sales.jsx
 ┣ 📜dashboard.jsx
 ┗ 📜index.jsx
Remix would automatically associate this new /dashboard folder route to the existing dashboard.jsx file route and attempt to nest every route placed inside this /dashboard folder within the dashboard.jsx layout.
For this to work, you’d have to place the <Outlet/> component where you want Remix to drop the nested child routes within the dashboard.jsx layout.
Let’s see this in action by returning a simple dashboard template using the dashboard.jsx file:
import { Outlet } from "remix";

export default function dashboard() {
  return (
    <div>
      <h1>Dashboard</h1>
      <Outlet />
    </div>
  );
}
Notice that we placed the outlet component where we want our nesting done.
Now, let’s create a simple template in the sales.jsx file found in the dashboard directory.
export default function Sales() {
  return (
    <div>
      <h3>Nested Sales route</h3>
    </div>
  );
}
Now if we attempted to visit just the /dashboard URL, Remix would render the routes/dashboard.jsx file.

If we attempted to visit the /dashboard/sales route, Remix would nest this sales route within the dashboard.jsx layout as a child route (like a nested component). This creates what can be described as a nested layout of both the parent dashboard and the nested sales route.

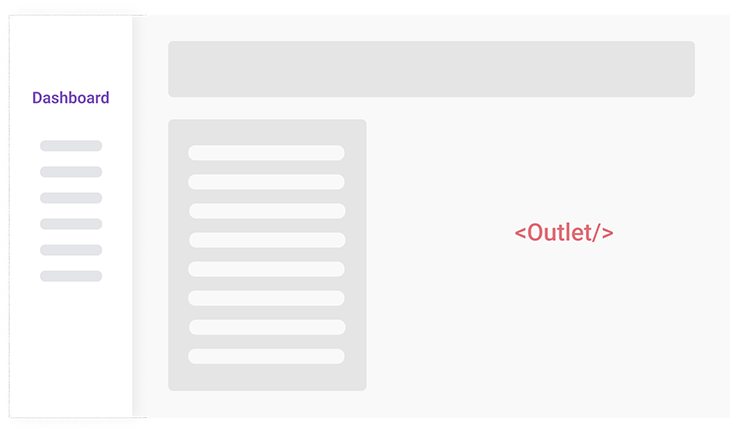
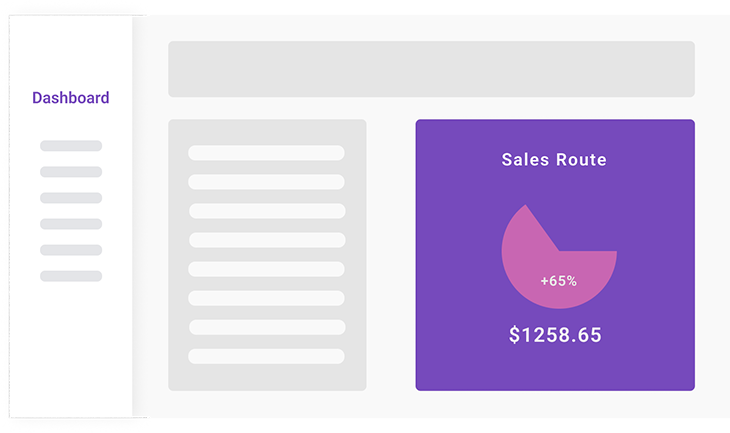
Still confused? Let’s reiterate by looking at a visual representation of what we just did above, using an illustration of an actual dashboard.
If we visited just the /dashboard URL, we’d get just the initial dashboard.jsx layout without the nested route:

But once we hit the /dashboard/sales route, the outlet component would automatically render the nested /dashboard/sales.jsx route within the dashboard layout, creating the nested layout seen below:

Having the ability to create nested layouts through the outlet component is pretty awesome, but we might not always want to do this. Sometimes, we may only need to create a nested route, without having it nested as a layout hierarchy — i.e., the nested route should be rendered as a stand-alone route.
Looking at our previous example again, let’s say we wanted the /routes/dashboard/sales.jsx route to be an independent route that is simply rendered as a standalone page route at /dashboard/sales. To do this, instead of creating the sales.jsx file inside the /dashboard directory, we simply create it in the routes directory as its own standalone file, but with a . naming convention.
📦routes
 ┣ 📜dashboard.jsx
 ┣ 📜dashboard.sales.jsx
 ┗ 📜index.jsx
The routing would look like:
routes/index.jsx → /routes/dashboard.jsx → /dashboardroutes/dashboard.sales.jsx → /dashboard/sales (standalone route)If we visit the /dashboard/sales route now, it would render as a standalone route:

As you can see, the sales route no longer gets nested within the dashboard’s layout, but as a nested standalone route in our global root wrapper.
When building complex applications, it may not be the best idea to have only static, predefined routes. We may want to have a dynamic route (also considered a wildcard) that is used to render different routes, depending on the URL param or slug visited.
For example, we may have several blog posts in a database that we wish to have individual routes for, but it would be impractical to create a static route for each of these blog posts. This is where a dynamic route comes into play. We can create a single dynamic route that is responsible for loading all the blog posts, depending on the URL visited by the user.
To create a dynamic route in Remix, the naming convention begins the route’s name with a dollar sign ( $ ), i.e., $filename.jsx. Let’s do just that and create a sample blog directory with a dynamic postId route inside it that will be responsible for loading our imaginary blog posts from our imaginary database.
📦routes
┣ 📂blog
┃ ┗ 📜$postid.jsx
┗ 📜index.jsx
We’ll then return a simple text from this $postid.jsx dynamic route:
export default function Postid() {
  return (
    <div>
      <h2>A Blog Post</h2>
    </div>
  );
}
Now, if we attempted to visit any URL in the /blog directory, i.e., /blog/randomPost1, Remix checks the /blog directory to see if an explicitly defined route matches this path. When it fails to find one, it then uses the dynamic route to match this route, as shown below:

As seen above, visiting /blog/randomPost1 brings us to the same place as routes/blog/$postid.jsx.
useParams HookWhen we create a dynamic route, we also want to get access to the dynamic paths (also called parameters or params) from the URL loaded by the dynamic route. Because Remix is built on React Router, we have access to most of React Router’s Hooks, and amongst them is the useParams Hook, which returns an object of the params for the route rendered.
Let’s refactor our dynamic route to use this Hook:
import { useParams } from "remix";

export default function Postid() {
  const params = useParams();
  return (
    <div>
      <h2>A Blog Post titled {params.postid}</h2>
    </div>
  );
}
The output would be:

When it comes to handling errors in routes, Remix uses the concept of React’s ErrorBoundary component that is used to catch errors during either rendering or data loading, and to display a fallback UI instead of the actual component.
This means that when something goes wrong in a route and an error occurs, Remix allows us to create ErrorBoundaries, which will render instead. Think of it as having two UI component templates in one route: one is the default component that renders if everything goes as expected, and the second is a fallback component that renders when there is an error.
Let’s see how this works by creating another “Hello, World!” template in our index route, but inside of this template, we will simulate an actual error by manually throwing one ourselves to trigger the ErrorBoundary.
export default function Index() {
  throw new Error("Fake Error");
  return <h1>Hello World</h1>;
}

export function ErrorBoundary({ error }) {
  return (
    <div>
      <h2>An Error Occurred</h2>
      <p>There was a {error.message}</p>
    </div>
  );
}
As shown above, we can implement an error boundary by adding a ErrorBoundary function to our route components.
As you’d expect, the default “Hello, World!” component no longer renders due to the error we threw, as shown below:

What makes ErrorBoundaries interesting is that they bubble up to the nearest error boundary. As a result, we don’t have to manually set one up for every route — having one in a root parent route is enough to catch every potential error that occurs in either a child or a nested route because they’d bubble up until they reached the parent’s ErrorBoundary.
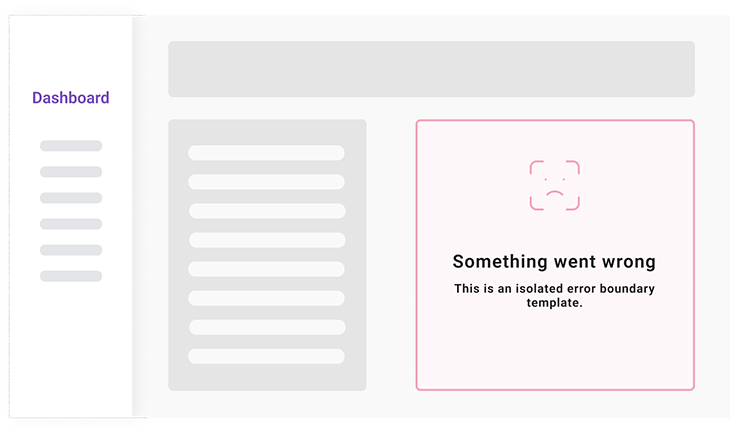
An interesting thing about error handling in Remix is that errors are handled in isolation when they occur. An error in a nested child route would not break the whole page or layout, but will only affect that specific route.
To visualize this, let’s suppose the /dashboard/sales route in the dashboard we created earlier had an error when we visited its route. This error would not affect the whole dashboard, but only the nested sales route, as shown below.

As we have seen, Remix provides a very interesting, new approach to building a routing system for fully dynamic applications. The ability to nest routes as if they were components lets you create advanced layouts that change based on route — and is a powerful feature only Remix supports right now.

@container scroll-state: Replace JS scroll listeners nowCSS @container scroll-state lets you build sticky headers, snapping carousels, and scroll indicators without JavaScript. Here’s how to replace scroll listeners with clean, declarative state queries.

Explore 10 Web APIs that replace common JavaScript libraries and reduce npm dependencies, bundle size, and performance overhead.

Russ Miles, a software development expert and educator, joins the show to unpack why “developer productivity” platforms so often disappoint.

Discover what’s new in The Replay, LogRocket’s newsletter for dev and engineering leaders, in the February 18th issue.
Hey there, want to help make our blog better?
Join LogRocket’s Content Advisory Board. You’ll help inform the type of content we create and get access to exclusive meetups, social accreditation, and swag.
Sign up now
3 Replies to "Understanding routes and route nesting in Remix"
how can I add log rocket in remix?
The setup should be similar to Next.js; you need to init LogRocket on the client port. Hopefully you’ll find these docs helpful: https://docs.logrocket.com/docs/using-logrocket-with-server-side-rendering
Thanks for reading!
Thank you much. This article is much helpful