The Replay is a weekly newsletter for dev and engineering leaders.
Delivered once a week, it's your curated guide to the most important conversations around frontend dev, emerging AI tools, and the state of modern software.
You may have heard the phrase, “Everything is a widget in Flutter,” at one point or another. And, in fact, everything that shows on the top level — everything you see on the screen, in the UI — is a widget.

However, have you ever wondered what happens behind the scenes? How do the widgets form the various shapes, text, and images we see on the screen?
These questions are vital, and their answers will go a long way in helping you become a better Flutter developer. A proper understanding of the steps by which the Flutter widgets are transformed into the UI screens we see and interact with would further assist us in correctly using our available resources to meet special needs, like creating custom layouts, super custom painting, etc.
This article aims to take you step-by-step into the mysteries that reside beneath the surface (widgets) of Flutter.
Before we launch into the RenderObjects and their uses, power, and importance, let’s take a quick look at how rendering occurs in Flutter.
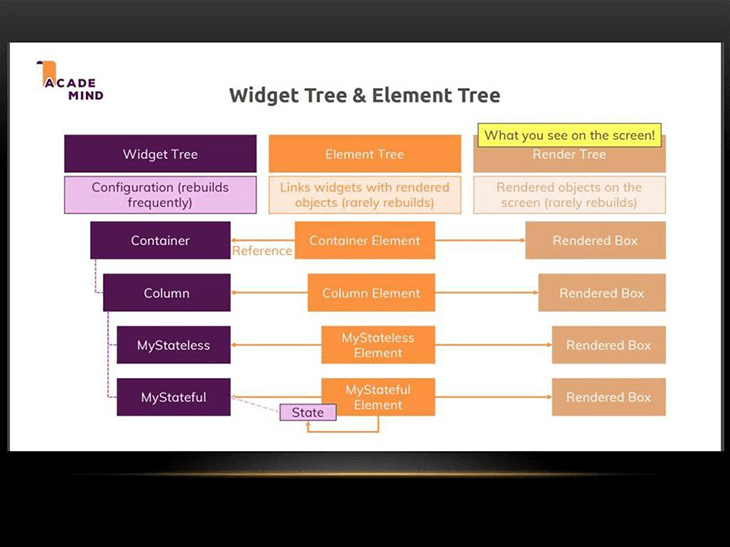
Flutter uses widgets that hold configuration information in the fields or parameters passed to the widget. The widget here serves as a “container” of sorts: it holds these configuration parameters but doesn’t use them. The widget instantiates and becomes inflated into an element.
This element is inserted into the element tree and represents the widget, and each element in the element tree has a RenderObject attached to it. These RenderObjects are responsible for controlling those configuration parameters like sizes, layouts, and painting of the widgets to the screen, forming the UI we see.

Looking at this flow from widgets to elements to RenderObjects, you might notice that the main work happens in the RenderObjects — things like adjusting the sizes, painting the widgets to the screens, and manipulating various parameters all occur inside the RenderObjects.
Understanding RenderObjects definitely would aid you in building quality mobile applications. So what exactly are these RenderObjects?
RenderObjects are those particular “Objects” responsible for controlling the sizes, layouts, and logic used for painting widgets to the screen and forming the UI for the application. You can say that the actual rendering happens in RenderObjects.
But they are rarely used because, in nine out of 10 instances, developers do not need to make use of them. Widgets handle most of developers’ needs sufficiently.
However, there are some specific instances where a super complex design needs precise implementation. It might not be entirely possible to use widgets or make a particular widget easier to use by building it from scratch with more spice. In instances like these, RenderObjects would be the right tool to use.
Let’s look at the Opacity widget to better understand the link from widget to element to RenderObject. The Opacity widget adjusts the transparency of its child.
Some key things to note about the type of RenderObject a widget would extend:
Since the Opacity widget we are studying accepts a child whose transparency it’s adjusting, it must extend the SingleChildRenderObjectWidget.
In turn, the SingleChildRenderObjectWidget extends RenderObjectWidget. Finally, the RenderObjectWidget extends the Widget class.
//Opacity extends SingleChildRenderObjectWidget
class Opacity extends SingleChildRenderObjectWidget {

// SingleChildRenderObjectWidget extends RenderObjectWidget
abstract class SingleChildRenderObjectWidget extends RenderObjectWidget {

// RenderObjectWidget extends Widget
abstract class RenderObjectWidget extends Widget {
So, why are we looking at who extends what? The SingleChildRenderObjectWidget class has a method that is responsible for creating the element. Recall that the element of a particular widget is its instantiation and points to its location on the element tree. It’s attached to the widget. This element is the SingleChildRenderObjectElement and is the instance of the Opacity widget on the tree.
abstract class SingleChildRenderObjectWidget extends RenderObjectWidget {
 const SingleChildRenderObjectWidget({Key? key, this.child}) : super(key: key);

 final Widget? child;

 @override
 SingleChildRenderObjectElement createElement() =>
   SingleChildRenderObjectElement(this);
}
Going back to the Opacity widget, it exposes two essential methods in creating and updating the RenderObject for this particular widget.
 @override
 RenderOpacity createRenderObject(BuildContext context) {
  return RenderOpacity(
   opacity: opacity,
   alwaysIncludeSemantics: alwaysIncludeSemantics,
  );
 }
 @override
 void updateRenderObject(BuildContext context, RenderOpacity renderObject) {
  renderObject
   ..opacity = opacity
   ..alwaysIncludeSemantics = alwaysIncludeSemantics;
 }
The createRenderObject method returns the RenderOpacity class. The RenderOpacity class takes in the configuration parameter, which is the opacity ranging between 0.0 and 1.0.
RenderOpacity extends the RenderProxyBox class, which provides methods for performing different operations on the child widget —most important of which is the paint() method.
 @override
 void paint(PaintingContext context, Offset offset) {
  if (child != null) {
   if (_alpha == 0) {
    layer = null;
    return;
   }
   if (_alpha == 255) {
    layer = null;
    context.paintChild(child!, offset);
    return;
   }
   assert(needsCompositing);
   layer = context.pushOpacity(offset, _alpha, super.paint, oldLayer: layer as OpacityLayer?);
  }
 }
The paint method performs necessary checks and assertions and then paints the child using the context.pushOpacity. That is where the primary operation happens, so even though we have the Opacity widget and its corresponding element, the painting occurs in the RenderObjects. They are super essential in the processes of things that occur beneath the surface of Flutter.
Now that we’ve learned about RenderObjects, let’s look at how we can create widgets with custom RenderObjects to suit our needs.
This section will look at the step-by-step process for creating a custom widget — we’ll create a Gap widget — and its RenderObject, which will be responsible for drawing the layout on the screen.
The Gap widget is a widget that creates a space, or a gap, between widgets in a tree. Unlike the SizedBox class, Gap does not require continually setting the size, but infers what size it should be. It does this by checking the layout of its parent and then creating the gap based on the layout.
The Gap widget accepts only one property, the mainAxisExtent, that is, the amount of space we need between our widgets.
The first thing we need to do is to create the RenderObject, which would perform the actual layout, _RenderGap. It extends RenderBox, which extends RenderObject. (Another kind is the RenderSliver, used when we need to have scrollable content.)
abstract class RenderBox extends RenderObject {
The _RenderGap accepts the passed value and sets it to the mainAxisExtent parameter; it also calls the markNeedsLayout() method, which tells Flutter that a particular value has changed and Flutter needs to run the performLayout() method again.
class _RenderGap extends RenderBox {
_RenderGap({
 double? mainAxisExtent,
 }) : _mainAxisExtent = mainAxisExtent!;
 double get mainAxisExtent => _mainAxisExtent;
 double _mainAxisExtent;
 set mainAxisExtent(double value) {
  if (_mainAxisExtent != value) {
   _mainAxisExtent = value;
   markNeedsLayout();
  }
 }
 @override
 void performLayout() {
  final AbstractNode flex = parent!;
  if (flex is RenderFlex) {
   if (flex.direction == Axis.horizontal) {
    size = constraints.constrain(Size(mainAxisExtent, 0));
   } else {
    size = constraints.constrain(Size(0, mainAxisExtent));
   }
  } else {
   throw FlutterError(
    'Gap widget is not inside a Flex Parent',
   );
  }
 }
}
The performLayout method does two crucial things:
We can then move on to creating the Gap widget, which would make use of this RenderObject.
class Gap extends LeafRenderObjectWidget {
 const Gap(
  this.mainAxisExtent, {
  Key? key,
 }) : assert(mainAxisExtent >= 0 && mainAxisExtent < double.infinity),
    super(key: key);
 final double mainAxisExtent;
}
Recall that we mentioned earlier on what widgets should extend based on the number of children; since the Gap widget accepts no child, it extends the LeafRenderObjectWidget, accepts the mainAxisExtent value and performs two checks on it:
double.infinity — we do not want a Gap space that goes on foreverThe Gap widget also exposes two methods responsible for creating and updating the RenderObject (_RenderGap for us):
createRenderObject method returns the RenderObject, which is _RenderGap, and passes the mainAxisExtent value we wantupdateRenderObject method takes in the _RenderGap and updates the value of the mainAxisExtent@override
RenderObject createRenderObject(BuildContext context) {
return _RenderGap(mainAxisExtent: mainAxisExtent);
}
@override
void updateRenderObject(BuildContext context, _RenderGap renderObject) {
renderObject.mainAxisExtent = mainAxisExtent;
}
We have successfully set up the Gap widget! Now, let’s build a simple UI to show it in practice.
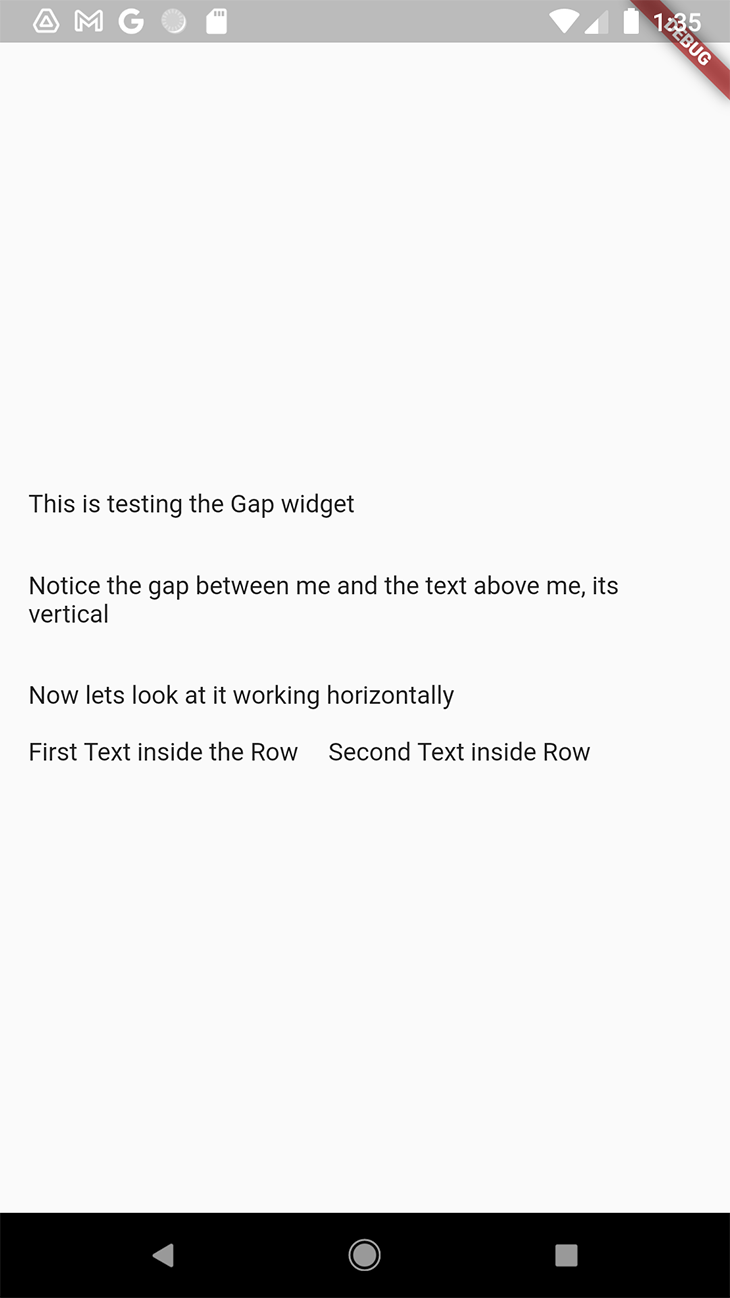
The Gap widget adds spacing to our UI using dimensions we specify For example, if we are currently in a Column widget, the Gap widget would infer that its parent (the Column widget) has a vertical orientation and therefore, during paint, it lays out itself in the vertical direction, meaning that it creates a vertical space. If the parent widget has an horizontal orientation, it lays out in the horizontal direction.
Let’s build a simple screen to show it in operation. Our screen will have both the Row and Column widgets, and we’ll have a Gap widget in each so we can see how it responds to both vertical and horizontal layouts.
import 'package:flutter/material.dart';
class HomePage extends StatelessWidget {
 /// Creates a [HomePage].
 const HomePage({
  Key? key,
 }) : super(key: key);
 @override
 Widget build(BuildContext context) {
  return Scaffold(
   body: SafeArea(
    child: Padding(
     padding: const EdgeInsets.all(16.0),
     child: Column(
      crossAxisAlignment: CrossAxisAlignment.start,
      mainAxisAlignment: MainAxisAlignment.center,
      mainAxisSize: MainAxisSize.max,
      children: <Widget>[
       const Text('This is testing the Gap widget'),
       const Gap(30),
       const Text(
         'Notice the gap between me and the text above me, its vertical'),
       const Gap(30),
       const Text('Now lets look at it working horizontally'),
       const Gap(16),
       Row(
        children: const [
         Text('First Text inside the Row'),
         Gap(16),
         Text(
          'Second Text inside Row',
          maxLines: 3,
         ),
        ],
       ),
      ],
     ),
    ),
   ),
  );
 }
}
We pass in the values we want for the spacing without specifying if it’s a horizontal or vertical space; the Gap widget should check the direction of the parent widget and render the gap space as either horizontal or vertical accordingly.
Save and run your application. You should see the gap and the impact it has on the layout of the app.

Check out the full code on my GitHub.
You can also download a package that will provide a Gap widget, if you don’t want to write one yourself. However, building one from scratch gives you better flexibility over the structure as you can adjust it to fit what you want. It also helps you better understand the entire process and how it comes together to form the widget.
Phew, we did it! We successfully created our RenderObject and used it to build a widget to fulfill our needs (well, it makes life easier — you’ll agree). Hopefully, you’ve successfully learned about the RenderObject in Flutter, what its uses are and how they help build widgets that offer us special features that we need in our apps.
Most importantly, you’ve learned what happens beneath the surface of Flutter apps, in the world of widgets. This article has equipped you with one more tool you need to be a world-class developer. Make use of it, and you will see the impact. Have a great day.
Install LogRocket via npm or script tag. LogRocket.init() must be called client-side, not
server-side
$ npm i --save logrocket

// Code:

import LogRocket from 'logrocket';
LogRocket.init('app/id');
// Add to your HTML:

<script src="https://cdn.lr-ingest.com/LogRocket.min.js"></script>
<script>window.LogRocket && window.LogRocket.init('app/id');</script>

React Server Components and the Next.js App Router enable streaming and smaller client bundles, but only when used correctly. This article explores six common mistakes that block streaming, bloat hydration, and create stale UI in production.

Gil Fink (SparXis CEO) joins PodRocket to break down today’s most common web rendering patterns: SSR, CSR, static rednering, and islands/resumability.

@container scroll-state: Replace JS scroll listeners nowCSS @container scroll-state lets you build sticky headers, snapping carousels, and scroll indicators without JavaScript. Here’s how to replace scroll listeners with clean, declarative state queries.

Explore 10 Web APIs that replace common JavaScript libraries and reduce npm dependencies, bundle size, and performance overhead.
Hey there, want to help make our blog better?
Join LogRocket’s Content Advisory Board. You’ll help inform the type of content we create and get access to exclusive meetups, social accreditation, and swag.
Sign up now
2 Replies to "Understanding RenderObjects in Flutter"
Great one
I’m reading this great article for the third time, the explanation couldn’t have been simpler than this. Thanks a lot for putting this up