In web development, there are several approaches to content distribution, but most developers simply employ static or dynamic content delivery without considering user accessibility. Putting accessibility first in web design is a must, because if an application’s content is inaccessible, many people will be unable to interact with the application, regardless of whether it is static or dynamic.

Many developers create PWAs (progressive web applications) to create accessible, native-like experiences for their users, but they do not understand what they are or why they are called “progressive.” The phrase “progressive enhancement,” which we will discuss later in this article, is inspired the “progressive” in PWA. As a developer, it’s important to know why progressive enhancement is a necessary piece of knowledge to have in your tool belt.
In this article, we’ll go over the basic principles of progressive enhancement, as well as the relevance and criticisms of using it in web development.
The Replay is a weekly newsletter for dev and engineering leaders.
Delivered once a week, it's your curated guide to the most important conversations around frontend dev, emerging AI tools, and the state of modern software.
Progressive enhancement is a web design methodology that ensures that the content of the web app reaches all users first, regardless of their digital advantage, before those with more advanced browser features and internet connection receive augmented content.
In “graceful degradation,” web content is designed for the best experience and delivered to users with the latest browser versions first, then degraded to work well with older browser versions. Progressive enhancement does the opposite.
The rule of “separation of presentation and content, separation of content and style, or separation of semantics and presentation” is also known as progressive enhancement in markup circles.
There are a number of guidelines that will help you stick to the progressive enhancement approach to web design. They are as follows:
First, all web browsers should be able to access basic content. There are a variety of web browsers available, each with its own set of features and capabilities. It may be hard to design a website that works with all of the different browsers available. However, there are global web standards that are accepted by all browsers.
Prior to implementing new features to explore specific browsers, websites should follow web standards to ensure that they are accessible to everyone.
Second, basic functions and standard events should be available in all web browsers. Before implementing custom events to handle advanced functionalities, it is vital to use all of the normal DOM events to manage user experience while constructing websites.
Third, all content should be contained in minimal, semantic markup. In web design, it is critical to focus on content delivery rather than aesthetics. The content of the website should be correctly structured, as allowed by standard semantic HTML. For example, instead of pictures of text, suitable typography HTML semantics can be used to show text. This enhances the website’s content accessibility for people who may not be able to view images.
Fourth, externally connected JavaScript should provide enhanced functionality. The usage of third-party JavaScript libraries to provide expanded functionality should come after the site has proven that it can provide basic functionality to users who do not have access to such third-party libraries. Even though certain web browsers do not enable JavaScript, users should still be able to access and interact with some information.
Fifth, CSS that is externally connected should provide improved layout. Users should be able to see the website without any CSS styling and it would still be presentable. The purpose of CSS styling is to improve the layout of a website and offer some additional designs that HTML cannot supply. The usage of CSS should not be misused to the detriment of the website’s accessibility. For experimental or nonstandard style attributes, CSS additionally supports vendor prefixes.
Lastly, end-user web browser preferences should be respected. Users should be able to use whichever browser they wish, and should not be compelled to use a certain browser in order to access website content.
Have you ever come across a website feature that is available when your computer is connected to the internet, but unavailable when your computer is disconnected from the internet? This is a regular occurrence in progressive web applications (PWAs), which are a perfect demonstration of progressive enhancement.
There are other examples, such as alternative content if JavaScript is not enabled in the client’s browser. In frameworks like Angular, Vue, or React, an error handler is required to show alternative content from the application if JavaScript is not enabled in the client’s browser. This is because the application will not operate properly if JavaScript is disabled, thus, rather than putting the user through the pain of accessing an application that isn’t entirely functioning, the developer provides alternate content.
It’s common practice in React to add a noscript tag with a message indicating that JavaScript is necessary for the app to execute. This tag may be found in the body tag of the index.html file in the public folder in apps produced with create-react-app. It appears as follows:
<body>
    <noscript>You need to enable JavaScript to run this app.</noscript>
    <div id="root"></div>
</body>
Web fonts are another example of progressive enhancement. When custom fonts are used to style a website, they may not be supported by all browsers, or may take a long time to load. If the custom font fails to load, the developer provides a fallback font.
Here’s an example of importing an alternate font, but using the default font:
@import url(https://fonts.googleapis.com/css?family=Open+Sans);

body{
   font-family: 'Open Sans', sans-serif;
}
Above, we imported Open Sans and set the body font-family to Open Sans, sans-serif. sans-serif, which was added to the font list, is a generic typeface that is supported by nearly all browsers. If the imported font (Open Sans) fails to load, the font-family will be changed to san-serif.
Our final example of progressive enhancement concerns HTML5. When using the HTML5 video element, you may define the text that will be displayed if the browser does not support videos or the file type. It’s often done by inserting text between the opening and closing tags, as shown below:
<video width="320" height="240" controls>
  <source src="movie.mp4" type="video/mp4">
  Your browser does not support the video tag.
</video>
If your browser does not support the video element, the words “Your browser does not support the video tag” will appear in the video’s section.
When it comes to online content delivery, there are a variety of challenges that might arise that can be caused by either the user or the developer. Progressive enhancement is a solution that was created to mitigate the consequences of these issues, or at the very least provide the end-user with some, if not all, information.
Other reasons to consider practicing progressive enhancement include:
The fundamentals of progressive enhancement in web design are to supply the user with the appropriate content they need if the upper layer of the web design is unavailable.
For example, say we have a site designed with JavaScript as the third layer, CSS as the second layer, and HTML as the first layer. The site design should work fine even if the JavaScript isn’t there, implying that JavaScript is only a supplement to what is already working properly.
Let’s have a look at how this works with a sample dropdown button.
This layer is a semantic markup that allows text-based, archaic browsers, screen readers, and user agents to correctly browse and access the website’s content.
For the dropdown button, here’s an example of semantic markup:
<!DOCTYPE html>
<html lang="en">
<head>
    <meta charset="UTF-8">
    <meta http-equiv="X-UA-Compatible" content="IE=edge">
    <meta name="viewport" content="width=device-width, initial-scale=1.0">
    <title>Dropdown</title>
</head>
<body>
    <button id="dropbtn">Navigation Menu</button>
    <ul id="ul">
        <li><a href="/home"></a>Home</li>
        <li><a href="/about"></a>About</li>
        <li><a href="/contact"></a>Contact</li>
        <li><a href="/signin"></a>Signin</li>
    </ul>
</body>
</html>
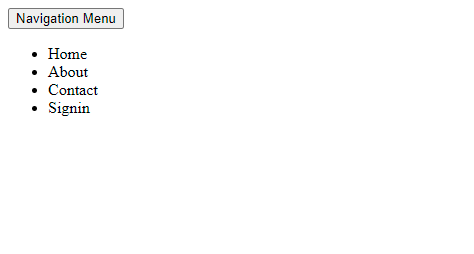
The dropdown menu is organized in an unordered list, and the button is currently not functional. As a result, the menu list will remain static, with no ability to collapse or expand it.
When you run the above code in your browser, you should see the following:

This is the initial layer of additional functionality. CSS may or may not bring functionality to a webpage; it is mostly used to organize and enhance the layout in order to give the website a more visually appealing appearance.
An example of a CSS enhancement is as follows:
<style>
    button {
        border-radius: 20px;
        border: none;
        padding: 10px 20px;
        cursor: pointer;
        background: #ccc;
        transition: all ease 0.2s;
    }
    button:hover {
        box-shadow: 2px 2px 4px rgb(90, 90, 90);
        filter: invert(1);
    }
    ul {
        list-style: none;
        padding: 0px;
        width: 250px;
    }
    .active {
        height: 0px;
        overflow-y: auto;
    }
    li {
        height: 25px;
        padding: 10px;
        background-color: #ccc;
    }
    li:hover {
        filter: invert(1);
    }
    li a {
        height: 100%;
        width: 100%;
        color: black;
        text-decoration: none;
    }
</style>
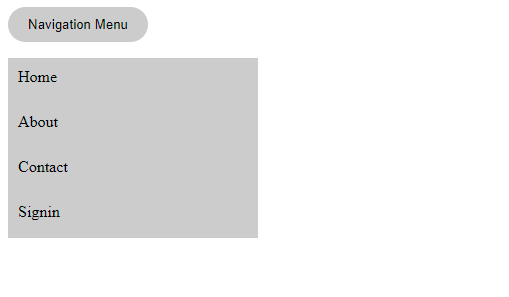
The dropdown should appear like this after adding the CSS styles between the head and body tags of the webpage:

This layer is the functionality layer; we may choose to manipulate the DOM in any way we want to generate new user experiences, but it’s not required.
Without this layer of JavaScript, our dropdown is still accessible. Let’s have a look at what it’ll look like once we’ve added additional functionality scripts.
Here’s an example of JavaScript functionality that our dropdown may have:
<script>
    window.addEventListener('load', () => {
        dropDownMenu = document.querySelector('#ul')
        btn = document.querySelector('#dropbtn')

        dropDownMenu.classList.add('closed')
        btn.addEventListener('click', (e) => {
            e.preventDefault()
            dropDownMenu.classList.toggle('closed')
        })
    })
</script>
In the code above, we listen to the window.onload event, then use querySelector to select the dropDownMenu and btn. We then add the default class closed to the dropDownMenu to collapse it. The closed class is then toggled whenever the btn is clicked.
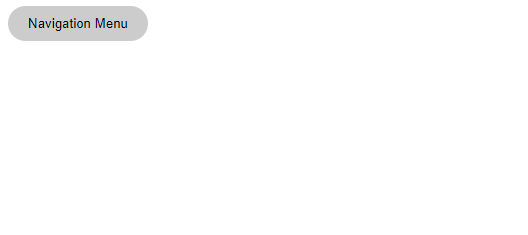
Having added this script just before the body closing tag of the webpage, the dropdown should look like this when the page load in the browser:

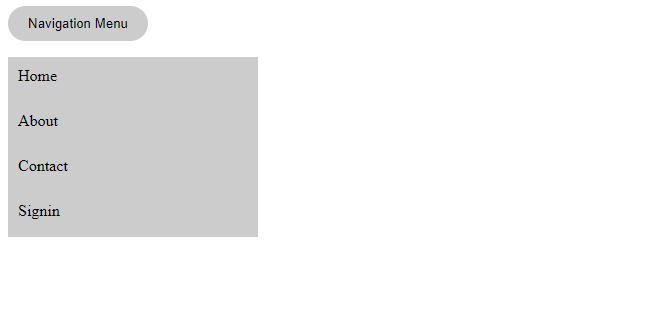
The menu list is collapsed; however, if you click the Navigation Menu button, the menu list should expand as follows:

We were still able to offer access to the menu list before adding each successive layer of enhancement, even though this is a very user-friendly experience.
As appealing as the concept may appear, there are still many opposing viewpoints on progressive enhancement.
Some individuals believe it is a waste of time, while others believe that users should upgrade their browsers to match the website’s standards. Progressive enhancement is also thought to be for users who disable JavaScript in their browser on purpose, which is incorrect. Regardless of whether JavaScript is disabled intentionally or not, the user should be able to view the website’s content.
Others believe that progressive enhancement is only available in outdated browsers. But users may use whichever browser they like, regardless of how old or new it is. It is the developers’ responsibility to ensure that the website is compatible with any browser that attempts to access the website’s contents.
Progressive enhancement is more concerned with a website’s long-term viability. It will be easier to expand and transition to better frameworks and technologies in the future if you use this methodology.
I hope that readers will understand the concept of progressive enhancement and start putting it into practice. To put your knowledge of progressive enhancement to the test, create a progressive web application (PWA) and evaluate if it fits the progressive enhancement standards discussed in this article.
Install LogRocket via npm or script tag. LogRocket.init() must be called client-side, not
server-side
$ npm i --save logrocket

// Code:

import LogRocket from 'logrocket';
LogRocket.init('app/id');
// Add to your HTML:

<script src="https://cdn.lr-ingest.com/LogRocket.min.js"></script>
<script>window.LogRocket && window.LogRocket.init('app/id');</script>

Explore how the Universal Commerce Protocol (UCP) allows AI agents to connect with merchants, handle checkout sessions, and securely process payments in real-world e-commerce flows.

React Server Components and the Next.js App Router enable streaming and smaller client bundles, but only when used correctly. This article explores six common mistakes that block streaming, bloat hydration, and create stale UI in production.

Gil Fink (SparXis CEO) joins PodRocket to break down today’s most common web rendering patterns: SSR, CSR, static rednering, and islands/resumability.

@container scroll-state: Replace JS scroll listeners nowCSS @container scroll-state lets you build sticky headers, snapping carousels, and scroll indicators without JavaScript. Here’s how to replace scroll listeners with clean, declarative state queries.
Would you be interested in joining LogRocket's developer community?
Join LogRocket’s Content Advisory Board. You’ll help inform the type of content we create and get access to exclusive meetups, social accreditation, and swag.
Sign up now