Flutter has become a popular toolkit for building cross-platform applications. It supports all major platforms, including Android, iOS, and the web.

Navigation is very important for any application. It provides a uniform abstraction over navigation APIs provided by various platforms. Flutter provides two types of APIs for navigation: imperative and declarative.
In this tutorial, we’ll cover the imperative approach to navigation used in Flutter 1.0 as well as the declarative approach now employed in Flutter 2.0.
We’ll go over the following:
Flutter 1.0 took an imperative approach to navigation.
In Flutter, navigation consists of a stack of widgets in which widgets are pushed on top and popped from the top as well.
Navigator classThe Navigator class provides all the navigation capabilities in a Flutter app.
Navigator provides methods to mutate the stack by a push to stack or by popping from the stack. The Navigator.push method is for navigating to a newer page and Navigator.pop is for going back from the current page.
Here is a basic example of pop and push: the push method takes BuildContext as the first argument and the second argument is a PageBuilder. This example uses MaterialPageRoute, which provides the transition animation and handles route changes:
import 'package:flutter/material.dart';

void main() {
  runApp(MaterialApp(
    title: 'My App',
    home: Main(),
  ));
}

class Main extends StatelessWidget {
  @override
  Widget build(BuildContext context) {
    return Scaffold(
      appBar: AppBar(
        title: Text('Main Route'),
      ),
      body: Center(
        child:RaisedButton(
          child: Text('Open route'),
          onPressed: () {
// pushing SecondRoute
            Navigator.push(
              context,
              MaterialPageRoute(builder: (context) => SecondRoute()),
            );
          },
        ),
      ),
    );
  }
}
The pop method only takes BuildContext and changes the current route.
class SecondRoute extends StatelessWidget {
  @override
  Widget build(BuildContext context) {
    return Scaffold(
      appBar: AppBar(
        title: Text("Second Route"),
      ),
      body: Center(
        child: RaisedButton(
          onPressed: () {
// Removing SecondRoute
            Navigator.pop(context);
          },
          child: Text('Go back!'),
        ),
      ),
    );
  }
}
Navigator provides more methods, including *pushReplacement*, that make arguments similar to push. It will replace the current route, so navigating back to the older route is not possible.
For example, upon successful login, you would want to use *pushReplacement* to prevent the user from returning to the login screen.
Named Routes allow you to change the path by using strings instead of providing component classes, which in turn enables you to reuse code.
Named routes are defined as a map on MaterialApp. These routes are usable from any part of the application.
The route is a map with string keys and values such as builders that are passed to the routes property on MaterialApp:
void main() {
  runApp(MaterialApp(
    title: 'My App',
    home: Main(),
// Routes defined here
    routes: {
      "second":(context)=>SecondRoute()
    },
  ));
}
Instead of push, pushNamed is used to change to a new route. Similarly, *pushReplacementNamed* is used instead of pushReplacement. The pop method is the same for all the routes.
class Main extends StatelessWidget {
  @override
  Widget build(BuildContext context) {
    return Scaffold(
      appBar: AppBar(
        title: Text('Main Route'),
      ),
      body: Center(
        child:RaisedButton(
          child: Text('Open route'),
          onPressed: () {
            Navigator.pushReplacementNamed(context, "second");
          },
        ),
      ),
    );
  }
}
Flutter 2.0 comes with revamped navigation thanks in large part to its support for a declarative approach. This makes routing a function of state — i.e., pages change upon state change.
Flutter 2.0 also has better support for navigation on the web.
This diagram, shared publicly by the Flutter team to announce Flutter Navigation 2.0 and Router, depicts the flow very well:
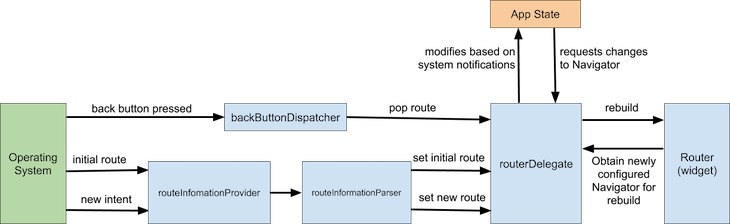
Navigator takes a list of pages and displays the last page. You can change its pages by adding or removing pages from the end of the list.
The example below demonstrates how to use the Navigator class with the new Flutter Navigator using page-based navigation.
The _page is state managed by this class. For navigation, this _page is manipulated in the setState call:
class _App extends State {
// Creating state for pages
  List<Page> _pages=[];
The _page is passed to the Navigator class. Navigator will change the current page based on the value of _page.
onPopPage is called when OS-based navigation is performed, such as pressing the back button on Android, etc.
   @override
  Widget build(BuildContext context) {
    return MaterialApp(
      home: Navigator(
        onPopPage: (route,result){
// check if route removed
          if(route.didPop(result)){
// remove the last page
            _pages.removeLast();
            return true;
          }
          return false;
        },
        pages: _pages,
      ),
    );
  }
}
The initial page can be set by adding a page in the initState lifecycle method:
  @override
  void initState() {
    super.initState();
// setting intial page
    _pages=[_buildMain()];
  }
To create a new material page, use the MaterialPage widget. MaterialPage takes a child and a key. The Navigator uses key to differentiate between pages and detect page change.
On the click button press, a new page is added to _page state. setState is called to trigger a rebuild of the widget and Navigator automatically handles the page change.
// This function creates a Page using MaterialPage
Page _buildMain(){
    return MaterialPage(child: Scaffold(
      body: Center(
        child: ElevatedButton(
          child: Text("click"),
          onPressed: (){
// When clicked add a new Page to _page list
            _pages.add(_buildSecondPage());
// call setState to trigger rebuild for Widget
            setState(() {
// create a copy of array
              _pages=_pages.toList();
            });
          },
        ),
      ),
// This helps Navigator to distigush between different pages
    ),key: ValueKey("home"));
  }
This page is built in the same way as _buildMain, but instead of adding a new page, it removes one and triggers rebuild.
// This function perform same task as _buildMain
Page _buildSecondPage(){
    return MaterialPage(child: Scaffold(
      body: Center(
        child: ElevatedButton(
          child: Text("back"),
          onPressed: (){
// This will take back to main
// remove the last page
            _pages.removeLast();
// call setState to trigger a rebuild
            setState(() {
// creating a copy of list
              _pages=_pages.toList();
            });
          },
        ),
      ),
    ),key: ValueKey("second"));
  }
In addition to using the _pages list as a state, you can use any other state to perform navigation. Here’s another example:
class _App extends State {
  String _selected="main";

  Page _buildMain(){
    return MaterialPage(child: Scaffold(
      appBar: AppBar(),
      body: Center(
        child: ElevatedButton(
          child: Text("click"),
          onPressed: (){
            setState(() {
// add a new page
              _selected="second";
            });
          },
        ),
      ),
    ),key: ValueKey("home"));
  }

  Page _buildSecondPage(){
    return MaterialPage(child: Scaffold(
      appBar: AppBar(),
      body: Center(
        child: ElevatedButton(
          child: Text("back"),
          onPressed: (){
            setState(() {
// change back state to main
             _selected="main";
            });
          },
        ),
      ),
    ),key: ValueKey("second"));
  }

  @override
  Widget build(BuildContext context) {
    return MaterialApp(
      home: Navigator(
        onPopPage: (route,result){
          if(route.didPop(result)){
            _selected="main";
            return true;
          }
          return false;
        },
        pages: [
           _buildMain(),
// only show select if state has second selected
          if (_selected=="second") _buildSecondPage()
        ],
      ),
    );
  }
}
RouterDelegateRouterDelegate is a core widget used by Router. It responds to the engine’s intent for route push and route pop. New navigation allows the creation of RouterDelegate for better control over navigation.
A RouterDelegate is created by extending the RouterDelegate<AppRouteState> class with PopNavigatorRouterDelegateMixin,ChangeNotifier mixins.
_selected tracks the current route. This is similar to the state used in the earlier example.
class AppRouter extends RouterDelegate<AppRouteState> with PopNavigatorRouterDelegateMixin,ChangeNotifier {
  String _selected="main";
This is used by the router to get the latest state of the router and change the URL in the address bar.
// get correct state of router
@override
  AppRouteState get currentConfiguration => AppRouteState(_selected);
The navigation key is used to support older navigation.
// This for older navigation support.
 final _navigation= GlobalKey<NavigatorState>();
  @override
  GlobalKey<NavigatorState> get navigatorKey => _navigation;
notifyListeners is used instead of setState to trigger a rebuild. _selected is changed to change the route.
  Page _buildMain(){
    return MaterialPage(child: Scaffold(
      appBar: AppBar(),
      body: Center(
        child: ElevatedButton(
          child: Text("click"),
          onPressed: (){
            _selected="second";
// notify route changes
           notifyListeners();
          },
        ),
      ),
    ),key: ValueKey("home"));
  }
This is similar to _buildMain:
  Page _buildSecondPage(){
    return MaterialPage(child: Scaffold(
      appBar: AppBar(),
      body: Center(
        child: ElevatedButton(
          child: Text("back"),
          onPressed: (){
              _selected="main";
// notify route changes
          notifyListeners();
          },
        ),
      ),
    ),key: ValueKey("second"));
  }
The build function returns the Navigator widget, which is used to lay out other pages. This function is similar to build from the previous function. Instead of setState, notifyListeners is used to trigger rebuild.
  @override
  Widget build(BuildContext context) {
    return MaterialApp(
      home: Navigator(
        key: _navigation,
        onPopPage: (route,result){
          if(!route.didPop(result)){
            return false;
          }
          _selected="main";
// notify route changes
          notifyListeners();
          return true;

        },
        pages: [
          _buildMain(),
// if Route is second show SecondPage
          if (_selected=="second") _buildSecondPage()
        ],
      ),
    );
  }
This function uses information passed by the router to change the route. This function is called to change the route when the engine passes the intent of route push or pop. The information passed here is parsed by a different class that we’ll discuss later.
  @override
  Future<void> setNewRoutePath(configuration) async {
// update page based on
    _selected=configuration.selected;
  }
}
RouteInformationParsersetNewRoutePath receives the configuration from the router. This configuration is parsed by RouteInformationParser.
For the parsing state passed by the OS, engine, etc., a class should extend RouteInformationParser. restoreRouteInformation takes the return value from currentConfiguration and converts it to RouteInformation.
parseRouteInformation returns the router state, which is passed to setNewRoutePath.
class AppRouteInformationParser extends RouteInformationParser<AppRouteState>{
  // This converts route state to route information.
  @override
  RouteInformation restoreRouteInformation(configuration) {
    if(configuration.selected=="main") {
      return RouteInformation(location:"/main");
    } else {
      return RouteInformation(location: "/second");
    }

  }

// This converts route info to router state
  @override
  Future<AppRouteState> parseRouteInformation(RouteInformation routeInformation)async{
    var url=Uri.parse(routeInformation.location);
    print(url.path);
    if (url.path == "/") return AppRouteState("main");
    return AppRouteState(url.path.replaceAll("/", ""));
  }

}
MaterialApp now has a newly named constructor, which implements a router that takes Delegate and InformationParser as arguments.
class _App extends State {
  @override
  Widget build(BuildContext context) {
    return MaterialApp.router(routeInformationParser: AppRouteInformationParser(), routerDelegate: AppRouter());
  }
}
In this Flutter navigation tutorial, we walked you through how to implement navigation in a Flutter app according to both the imperative approach used in Flutter 1.0 and the new declarative navigation introduced with Flutter 2.0.
Depending on the nature of your Flutter project, either type of navigation could be appropriate, but neither is a sliver bullet. You should always choose the approach that best suits your needs, even if that means employing a combination of both.
To get started with navigation in Flutter, I recommend checking out Fluro and Voyager packages.
Install LogRocket via npm or script tag. LogRocket.init() must be called client-side, not
server-side
$ npm i --save logrocket

// Code:

import LogRocket from 'logrocket';
LogRocket.init('app/id');
// Add to your HTML:

<script src="https://cdn.lr-ingest.com/LogRocket.min.js"></script>
<script>window.LogRocket && window.LogRocket.init('app/id');</script>

Learn how to set up Meilisearch, index documents, and build keyword, semantic, and hybrid search with AI-powered retrieval.

Compare pnpm and npm across security defaults, disk usage, dependency strictness, and workspace policy to decide which package manager fits your project.

I migrated 20 production-style components from Tailwind to StyleX. Here’s what the data showed about LOC, CSS bundle size, build time, and type safety.

A guide for using JWT authentication to prevent basic security issues while understanding the shortcomings of JWTs.
Hey there, want to help make our blog better?
Join LogRocket’s Content Advisory Board. You’ll help inform the type of content we create and get access to exclusive meetups, social accreditation, and swag.
Sign up now

