Editor’s note: This article was updated 27 September 2022 to include information about state patterns and anti-patterns in TypeScript, as well as to make general revisions to the article.

Design patterns are solutions to recurring problems in software application development. There are three fundamental types of design patterns, and within each one a number of unique patterns to choose from.
In this article, we’ll talk about the different design patterns in TypeScript and Node.js. We’ll go over the three types and what they mean, common design patterns within each category, anti-patterns, class complexities, and more.
Design patterns are best practices implemented by developers. They solve general problems that occurs during the software development phase. These design patterns are invented after several rounds of trial and error over a period of time.
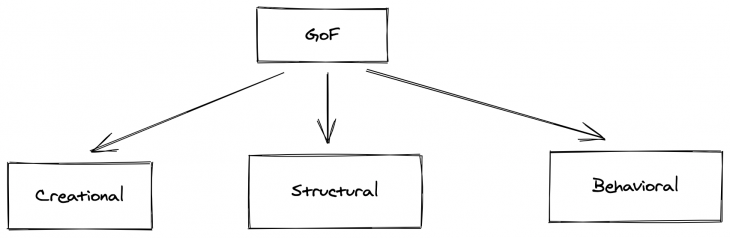
In 1994, four authors, Erich Gamma, Richard Helm, Ralph Johnson, and John Vlissides, published a book called “Design Patterns: Elements of Reusable Object-Oriented Software.” These authors are popularly known as the Gang of Four (GoF).
As you may or may not know, there are three types of design patterns. They are:
But, wait. what does that mean?
The creational pattern is concerned with the way we create objects in an object-oriented style. it applies patterns in the way we instantiate a class.
The structural pattern is concerned with how our classes and objects are composed to form a larger structure in our application.
Finally, the behavioral pattern is concerned about how the objects can interact efficiently without being tightly coupled.
This tutorial will explain to you some of the most common design patterns that you can use in your Node.js Application. we will be using TypeScript to make the implementation easier.
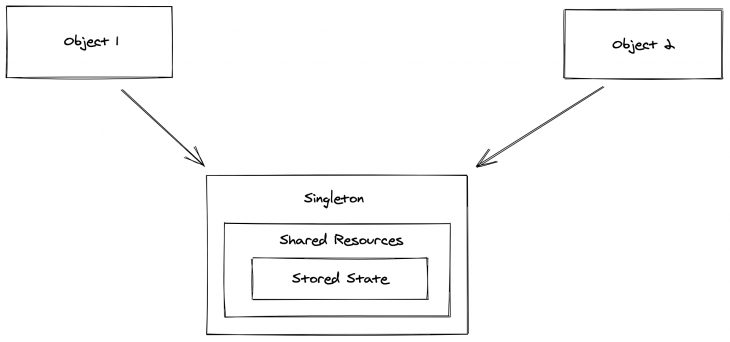
The singleton pattern implies that there should be only one instance for a class. In laymen’s terms, there should be only one president for a country at a time. By following this pattern, we can avoid having multiple instances for a particular class.
A good example of the singleton pattern is database connection in our application. Having multiple instances of a database in our application makes an application unstable. So, the singleton pattern provides a solution to this problem by managing a single instance across the application.
Let’s see how to implement the above example in Node.js with TypeScript:
import {MongoClient,Db} from 'mongodb'
class DBInstance {

    private static instance: Db

    private constructor(){}

    static getInstance() {
        if(!this.instance){
            const URL = "mongodb://localhost:27017"
            const dbName = "sample"
            MongoClient.connect(URL,(err,client) => {
                if (err) console.log("DB Error",err)
                const db = client.db(dbName);
                this.instance = db
            })

        }
        return this.instance
    }
}

export default DBInstance
Here, we have a class, DBInstance, with an attribute instance. In DBInstance, we have the static method getInstance where our main logic resides.
It checks if there is a database instance already. If there is, it will return that. Otherwise, it will create a database instance for us and return it.
Here’s an example of how we can use the singleton pattern inside our API routes:
import express,{  Application, Request, Response } from 'express'
import DBInstance from './helper/DB'
import bodyParser from 'body-parser'
const app = express()

async function start(){

    try{

        app.use(bodyParser.json())
        app.use(bodyParser.urlencoded({extended : true}))
        const db = await DBInstance.getInstance()

        app.get('/todos',async (req : Request,res : Response) => {
            try {
                const db = await DBInstance.getInstance()

                const todos = await db.collection('todo').find({}).toArray()
                res.status(200).json({success : true,data : todos})
            }
            catch(e){
                console.log("Error on fetching",e)
                res.status(500).json({ success : false,data : null })
            }

        })

        app.post('/todo',async (req : Request,res : Response) => {
            try {
                const db = await DBInstance.getInstance()

                const todo = req.body.todos
               const todoCollection =  await db.collection('todo').insertOne({ name : todo })

                res.status(200).json({ success : true,data : todoCollection })
            }
            catch(e){
                console.log("Error on Inserting",e)
                res.status(500).json({ success : false,data : null })
            }
        })

        app.listen(4000,() => {
            console.log("Server is running on PORT 4000")
        })
    }
    catch(e){
        console.log("Error while starting the server",e)
    }
}

start()
Before getting into the explanation of abstract factory, I want you to know what it means by factory pattern.
To make it simpler, let me give you an analogy. Let’s say that you are hungry and want some food. You can either cook for yourself or you can order from a restaurant. In that way, you don’t need to learn or know how to cook to eat some food.
Similarly, the factory pattern simply generates an object instance for a user without exposing any instantiation logic to the client.
Now that we know about the simple factory pattern, let’s come back to the abstract factory pattern.
Extending our simple factory example, let’s say you are hungry and you’ve decided to order food from a restaurant. Based on your preference, you might order a different cuisine. Then, you might need to select the best restaurant based on the cuisine.
As you can see, there is a dependency between your food and the restaurant. Different restaurants are better for different cuisine.
Let’s implement an abstract factory pattern inside our Node.js Application. Now, we are going to build a laptop store with different kinds of computers. A few of the main components are Storage and Processor.
Let’s build an interface for it:
export default interface IStorage {
     getStorageType(): string
}
import IStorage from './IStorage'
export default interface IProcessor {
    attachStorage(storage : IStorage) : string

    showSpecs() : string
}
Next, let’s implement the storage and processor interfaces in classes:
import IProcessor from '../../Interface/IProcessor'
import IStorage from '../../Interface/IStorage'

export default class MacbookProcessor implements IProcessor {

    storage: string | undefined

    MacbookProcessor() {
        console.log("Macbook is built using apple silicon chips")
    }

    attachStorage(storageAttached: IStorage) {
        this.storage = storageAttached.getStorageType()
        console.log("storageAttached",storageAttached.getStorageType())
        return this.storage+" Attached to Macbook"
    }
    showSpecs(): string {
        return this.toString()
    }

    toString() : string {
        return "AppleProcessor is created using Apple Silicon and "+this.storage;
    }

}
import IProcessor from '../../Interface/IProcessor'
import IStorage from '../../Interface/IStorage'

export default class MacbookStorage implements IStorage {

    storageSize: number

    constructor(storageSize : number) {
        this.storageSize = storageSize
        console.log(this.storageSize+" GB SSD is used")
    }

    getStorageType() {
        return  this.storageSize+"GB SSD"
    }

}
Now, we’ll create a factory interface, which has methods such as createProcessor and createStorage.
import IStorage from '../Interface/IStorage'
import IProcessor from '../Interface/IProcessor'

export default interface LaptopFactory {
    createProcessor() : IProcessor

    createStorage() : IStorage
}
Once the factory interface is created, implement it in the Laptop class. Here, it will be:
import LaptopFactory from '../../factory/LaptopFactory'
import MacbookProcessor from './MacbookProcessor'
import MacbookStorage from './MacbookStorage'

export class Macbook implements LaptopFactory {
    storageSize: number;

    constructor(storage : number) {
        this.storageSize = storage
    }

    createProcessor() : any{
        return new MacbookProcessor()
    }

    createStorage(): any {
        return new MacbookStorage(this.storageSize)
    }
}
Finally, create a function that calls factory methods:
import LaptopFactory from '../factory/LaptopFactory'
import IProcessor from '../Interface/IProcessor'

export const buildLaptop =  (laptopFactory : LaptopFactory) : IProcessor => {
    const processor = laptopFactory.createProcessor()

    const storage = laptopFactory.createStorage()

    processor.attachStorage(storage)

    return processor
}
The builder pattern allows you to create different flavors of an object without using a constructor in a class.
But why, can’t we just use a constructor?
Well, there is a problem with the constructor in certain scenarios. Let’s say that you have a User model and it has attributes such as:
export default class User {

    firstName: string
    lastName : string
    gender: string
    age: number
    address: string
    country: string
    isAdmin: boolean

    constructor(firstName,lastName,address,gender,age,country,isAdmin) {
        this.firstName = builder.firstName
        this.lastName = builder.lastName
        this.address = builder.address
        this.gender = builder.gender
        this.age = builder.age
        this.country = builder.country
        this.isAdmin = builder.isAdmin
    }

}
To use this, you may need to instantiate it like this:
const user = new User("","","","",22,"",false)
Here, we have a limited argument. However, it will be hard to maintain once the attributes increase. To solve this problem, we need the builder pattern.
Create a Builder class like this:
import User from './User'

export default class UserBuilder {

    firstName = ""
    lastName = ""
    gender = ""
    age = 0
    address = ""
    country = ""
    isAdmin = false

    constructor(){

    }

    setFirstName(firstName: string){
        this.firstName = firstName
    }

    setLastName(lastName : string){
        this.lastName = lastName
    }

    setGender(gender : string){
        this.gender = gender
    }

    setAge(age : number){
        this.age = age
    }

    setAddress(address : string){
        this.address = address
    }

    setCountry(country : string){
        this.country = country
    }

    setAdmin(isAdmin: boolean){
        this.isAdmin = isAdmin
    }

    build() : User {
        return new User(this)
    }

    getAllValues(){
        return this
    }
}
Here, we use getter and setter to manage the attributes in our Builder class. After that, use the Builder class inside our model:
import UserBuilder from './UserBuilder'

export default class User {

    firstName: string
    lastName : string
    gender: string
    age: number
    address: string
    country: string
    isAdmin: boolean

    constructor(builder : UserBuilder) {
        this.firstName = builder.firstName
        this.lastName = builder.lastName
        this.address = builder.address
        this.gender = builder.gender
        this.age = builder.age
        this.country = builder.country
        this.isAdmin = builder.isAdmin
    }

}
A classic example of an adapter pattern will be a differently shaped power socket. Sometimes, the socket and device plug doesn’t fit. To make sure it works, we will use an adapter. That’s exactly what we are going to do in the adapter pattern.
It is a process of wrapping the incompatible object in an adapter to make it compatible with another class.
So far we have seen an analogy to understand the adapter pattern. Let me give you a real use case where an adapter pattern can be a life saver.
Consider that we have a CustomerError class:
import IError from '../interface/IError'
export default class CustomError implements IError{

    message : string

    constructor(message : string){
        this.message = message
    }

    serialize() {
        return this.message
    }
}
Now, we are using this CustomError class across our application. After some time, we need to change the method in the class due to some reason.
New Custom Error class will be something like this:
export default class NewCustomError{

    message : string

    constructor(message : string){
        this.message = message
    }

    withInfo() {
        return { message : this.message }
    }
}
Our new change will crash the entire application since it changes the method. To solve this problem, the adapter pattern comes into play.
Let’s create an Adapter class and solve this problem:
import NewCustomError from './NewCustomError'
// import CustomError from './CustomError'
export default class ErrorAdapter {
    message : string;
    constructor(message : string) {
        this.message = message
    }

    serialize() {
              // In future replace this function
        const e = new NewCustomError(this.message).withInfo()
        return e
    }

}
The serialize method is what we use in our entire application. Our application doesn’t need to know which class we are using. The Adapter class handles it for us.
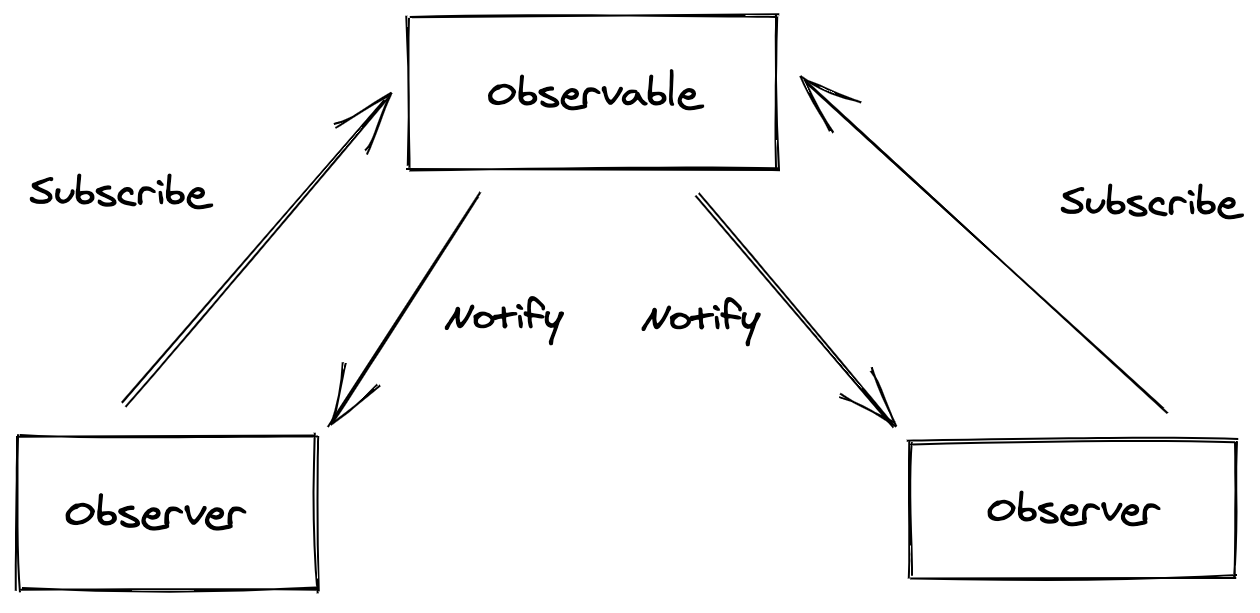
An observer pattern is a way to update the dependents when there is a state change in another object. it usually contains Observer and Observable. Observer subscribes to Observable and where there is a change, observable notifies the observers.
To understand this concept, let’s take a real use case for the observer pattern:
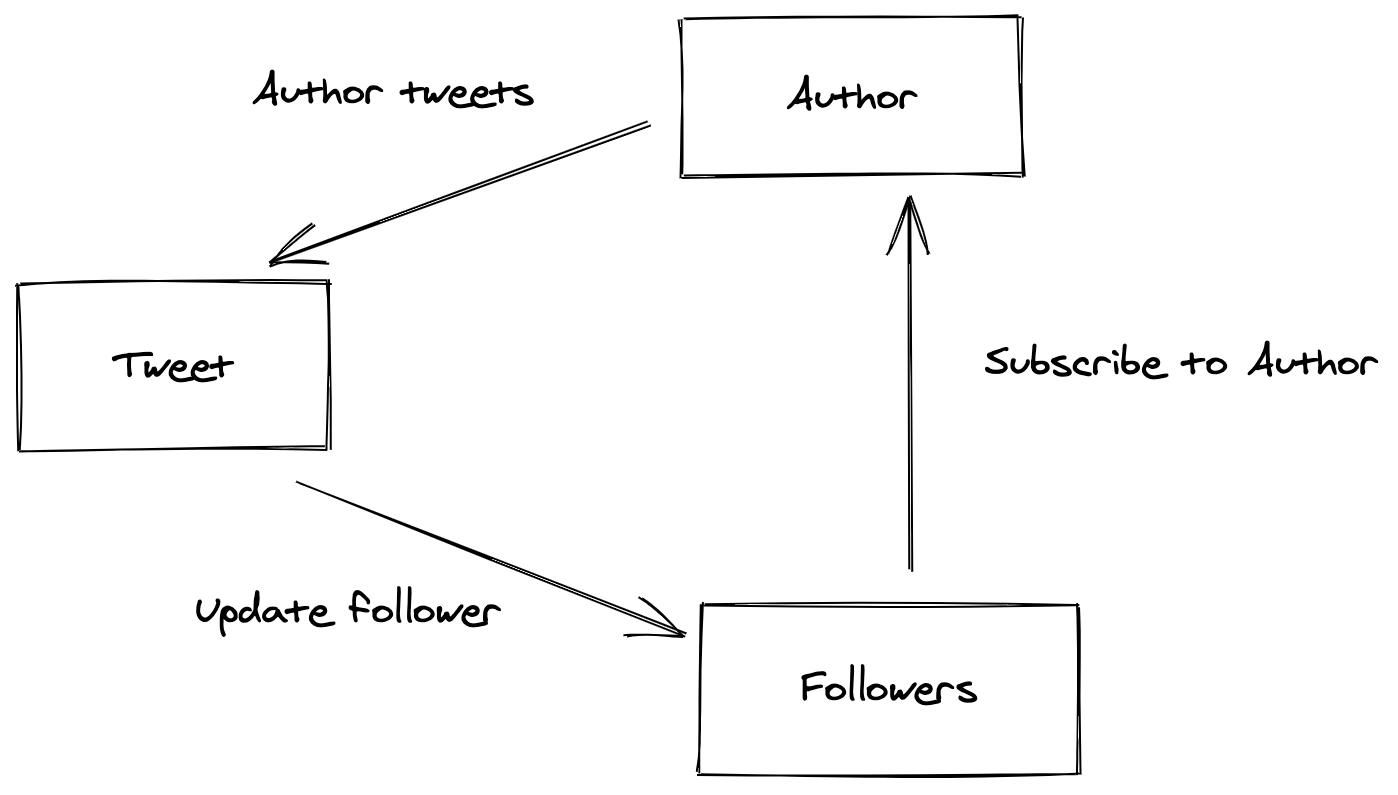
Here, we have Author, Tweet, and follower entities. Followers can subscribe to the Author . Whenever there’s a new Tweet, the follower is updated.
Let’s implement it in our Node.js application:
>import Tweet from "../module/Tweet";

export default interface IObserver {
    onTweet(tweet : Tweet): string
}
import Tweet from "../module/Tweet";

export default interface IObservable{

    sendTweet(tweet : Tweet): any
}
Here, we have the interface IObservable and IObserver, which has onTweet and sendTweet methods in it:
import IObservable from "../interface/IObservable";
import Tweet from "./Tweet";
import Follower from './Follower'
export default class Author implements IObservable {

    protected observers : Follower[] = []

    notify(tweet : Tweet){
        this.observers.forEach(observer => {
            observer.onTweet(tweet)
        })
    }

    subscribe(observer : Follower){
        this.observers.push(observer)
    }

    sendTweet(tweet : Tweet) {
        this.notify(tweet)
    }
}
Next, Follower.ts:
import IObserver from '../interface/IObserver' import Author from './Author' import Tweet from './Tweet' export default class Follower implements IObserver { name : string constructor(name: string){ this.name = name } onTweet(tweet: Tweet) { console.log( this.name+" you got tweet =>"+tweet.getMessage()) return this.name+" you got tweet =>"+tweet.getMessage() } }
And Tweet.ts:
export default class Tweet {

    message : string
    author: string

    constructor(message : string,author: string) {
        this.message = message
        this.author= author
    }

    getMessage() : string {
        return this.message+" Tweet from Author: "+this.author
    }
}
index.ts:
import express,{  Application, Request, Response } from 'express'
// import DBInstance from './helper/DB'
import bodyParser from 'body-parser'
import Follower from './module/Follower'
import Author from './module/Author'
import Tweet from './module/Tweet'

const app = express()

async function start(){

    try{

        app.use(bodyParser.json())
        app.use(bodyParser.urlencoded({extended : true}))
        // const db = await DBInstance.getInstance()

        app.post('/activate',async (req : Request,res : Response) => {
            try {

                const follower1 = new Follower("Ganesh")
                const follower2 = new Follower("Doe")

                const author = new Author()

                author.subscribe(follower1)
                author.subscribe(follower2)

                author.sendTweet(
                   new Tweet("Welcome","Bruce Lee")
                )

                res.status(200).json({ success : true,data:null })

            }
            catch(e){
                console.log(e)
                res.status(500).json({ success : false,data : null })
            }
        })

        app.listen(4000,() => {
            console.log("Server is running on PORT 4000")
        })
    }
    catch(e){
        console.log("Error while starting the server",e)
    }
}

start()
The strategy pattern allows you to select an algorithm or strategy at runtime. The real use case for this scenario would be switching file storage strategy based on the file size.
Consider that you want to handle file storage based on file size in your application:
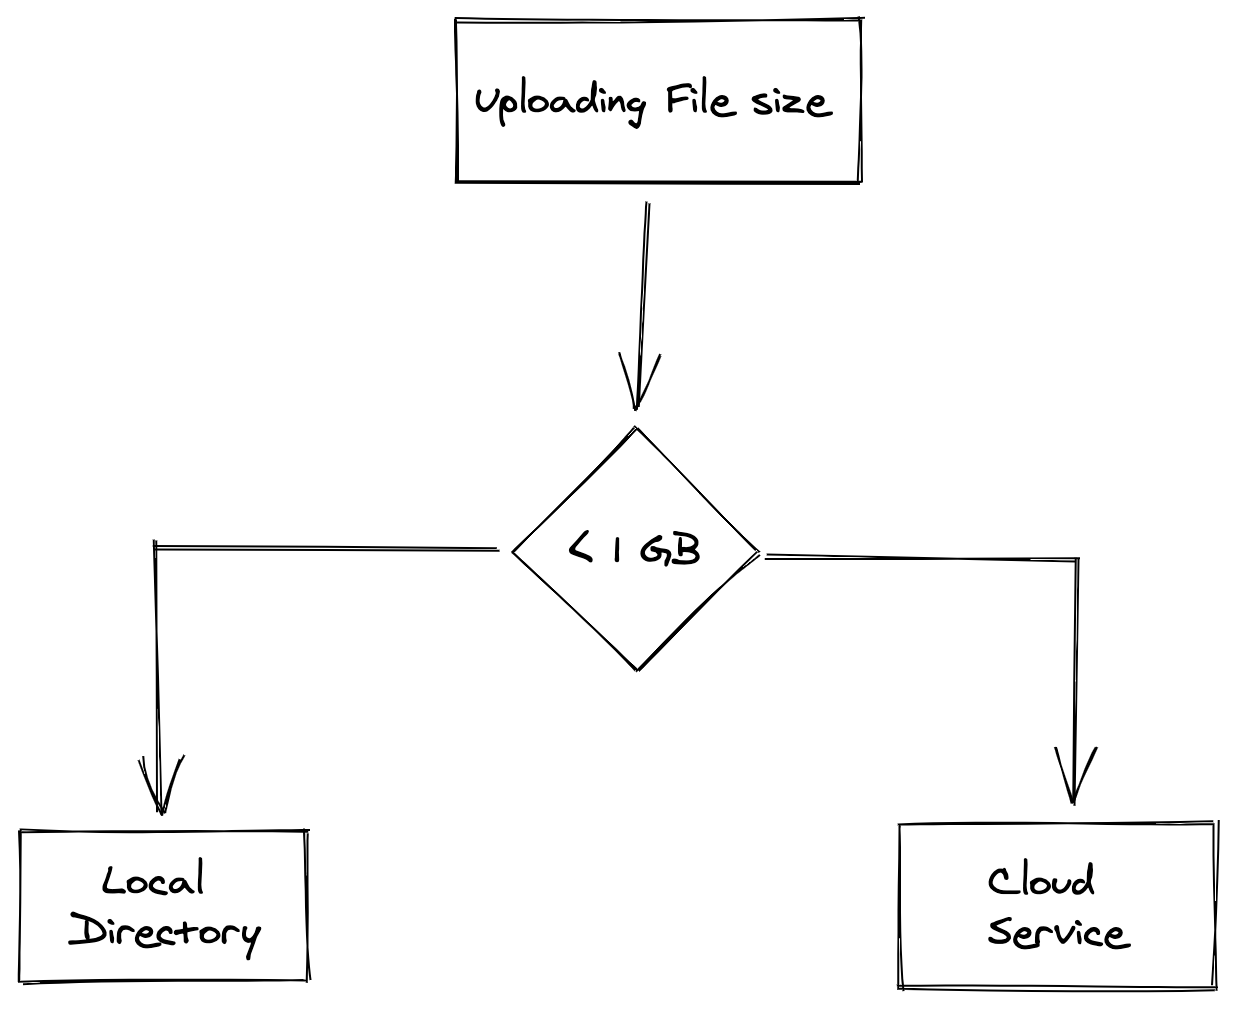
Here, we want to upload the file and decide the strategy based on the file size, which is a run time condition. Let’s implement this concept using a strategy pattern.
Create an interface that needs to be implemented by a Writer class:
export default interface IFileWriter {
    write(filepath: string | undefined) : boolean
}
After that, create a class to handle files if it’s larger in size:
import IFileWriter from '../interface/IFileWriter'

export default class AWSWriterWrapper implements IFileWriter {

    write() {
        console.log("Writing File to AWS S3")
        return true
    }
}
Then, create a class to handle files which are smaller in size:
import IFileWriter from '../interface/IFileWriter'

export default class DiskWriter implements IFileWriter {

    write(filepath : string) {
        console.log("Writing File to Disk",filepath)
        return true
    }
}
Once we have both of them, we need to create the client that can use any strategy in it:
import IFileWriter from '../interface/IFileWriter'

export default class Writer {

    protected writer
    constructor(writer: IFileWriter) {
        this.writer = writer
    }

    write(filepath : string) : boolean {
        return this.writer.write(filepath)
    }
}
Finally, we can use the strategy based on the condition that we have:
let size = 1000

                if(size < 1000){
                    const writer = new Writer(new DiskFileWriter())
                    writer.write("file path comes here")
                }
                else{
                    const writer = new Writer(new AWSFileWriter())
                    writer.write("writing the file to the cloud")
                }
The chain of responsibility allows an object to go through a chain of conditions or functionalities. Instead of managing all the functionalities and conditions in one place, it splits into chains of conditions that an object must pass through.
One of the best example for this pattern is express middleware:
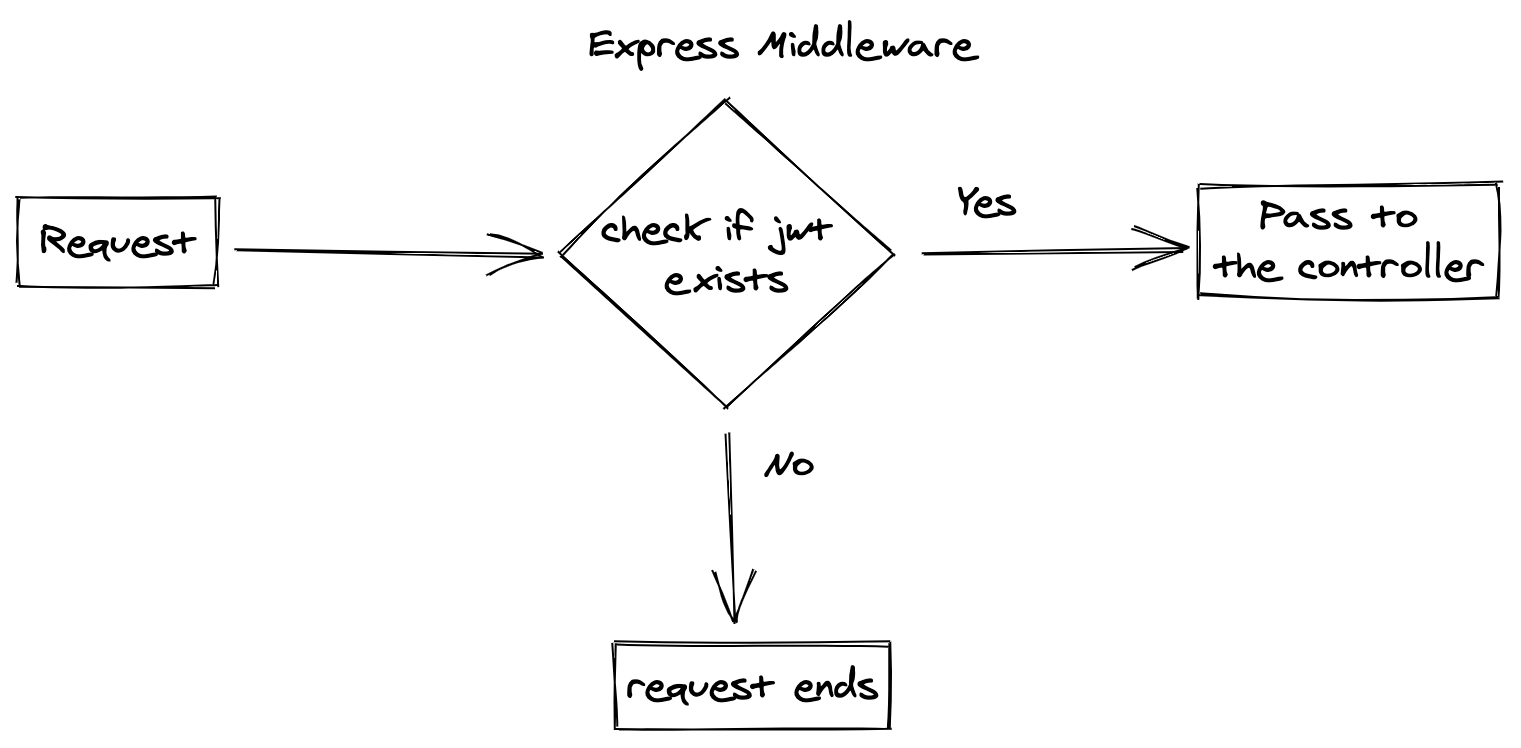
We build functions as a middleware that is tied up with each request in the express. Our request must pass the condition inside the middleware. It is the best example of a chain of responsibility:
The facade pattern allows us to wrap similar functions or modules inside a single interface. That way, the client doesn’t need to know anything about how it works internally.
A good example of this would be booting up your computer. You don’t need to know what happens inside the computer when you turn it on. You just need to press a button. In that way, the facade pattern helps us do high-level logic without the need to implement everything by the client.
Let’s take a user profile as an example where we have functionalities as follows:
Let’s use the facade pattern to implement this logic in our application:
import IUser from '../Interfaces/IUser'

export default class User {
    private firstName: string
    private lastName: string
    private bankDetails: string | null
    private age: number
    private role: string
    private isActive: boolean

    constructor({firstName,lastName,bankDetails,age,role,isActive} : IUser){
        this.firstName = firstName
        this.lastName = lastName
        this.bankDetails = bankDetails
        this.age = age
        this.role = role
        this.isActive = isActive
    }

    getBasicInfo() {
        return {
            firstName: this.firstName,
            lastName: this.lastName,
            age : this.age,
            role: this.role
        }
    }

    activateUser() {
        this.isActive = true
    }

    updateBankDetails(bankInfo: string | null) {
        this.bankDetails= bankInfo
    }

    getBankDetails(){
        return this.bankDetails
    }

    deactivateUser() {
        this.isActive = false
    }

    getAllDetails() {
        return this
    }
}
export default interface IUser {
    firstName: string
    lastName: string
    bankDetails: string
    age: number
    role: string
    isActive: boolean
}
Finally, our Facade class will be:
import User from '../module/User'

export default class UserFacade{

    protected user: User
    constructor(user : User){
        this.user = user
    }

    activateUserAccount(bankInfo : string){
        this.user.activateUser()
        this.user.updateBankDetails(bankInfo)

        return this.user.getAllDetails()
    }

    deactivateUserAccount(){
        this.user.deactivateUser()
        this.user.updateBankDetails(null)
    }

}
Here, we combine the methods that we need to call whenever a user account gets deactivated.
State patterns encapsulate the state of an object so that it can be changed and accessed independently. They let objects change its behavior when the state changes:
interface state {
  react(): string
}

class Happy implements State {
  react() {
    return 'I am Happy';
  }
}

class Sad implements State {
  react() {
    return 'I am Sad';
  }
}

class Person {
  state: State;

  constructor() {
    this.state = new Happy();
  }

  changeState(state) {
    this.state = state;
  }

  react() {
    return this.state.react();
  }
}

const person = new Person();
console.log(person.react());
person.changeState(new Sad());
console.log(person.react());
The complete source code can be found here.
So far, we’ve seen design patterns in TypeScript. At the same time, it is also important to learn about implementations for better code quality and code maintainability. Let’s look into anti-patterns in TypeScript.
any typeDefining the any type for variables and functions is one of the common mistakes in the TypeScript world. When you use the any type, it completely removes the purpose of type checking in the application.
As you know, TypeScript allows you to write code in both object-oriented (OOP) and functional programming (FP) paradigms. But, most developers who comes from Java and C# backgrounds tend to choose the OOP approach. Don’t get me wrong, each has its own strength and weakness.
But, when we need only single instance, wrapping it with class is not needed. It will bring complication into your application. Essentially, there are two concepts to consider while building your application with TypeScript: class instantiation and defining an object literal.
Once we define class and want to use the class inside the application, we need to call the constructor to get the instance of class. If the logic needs a single instance, it can bring additional complexity into the application. We also need to decide who creates the instance and when to do it. Even though it is not a huge problem, it still brings in some complexity.
To solve such problem and when an application needs only a single instance, we can define an object literal which removes the need for calling constructor.
Before we implement the object literal, let’s see how to achieve the functionality with a class-based approach:
 class HelloWorld {
  getNameById(id:string): string {
   return "Typescript Design Patterns";
  }
}

const hello = new HelloWorld()
hello.getNameById();
Let’s implement the same functionality using object literal:
const HelloWorld = {
  getNameById(id:string):string {
   return "Typescript Design Patterns";
  }
}

HelloWorld.getNameById();
Object literals avoid unnecessary complication in the code. You might not need the class if you only need a single instance. You can implement the same with object literal.
Function typeWhen you implement function callback in TypeScript, it is important to define type for functions that are passed as parameter inside callback functions.
Even though TypeScript allows us to use the Function type, it is not recommended. It is similar to defining the any type applied to a function. Instead of defining it as Function type, you can define it with input and response parameter types.
Instead of defining the Function type like this:
type IFunction = {
  handleFunction(callback: Function)
}
You can define a function with input and response parameter types:
type ICallbackFn = (value: string): string

type IFunction {
 handleFunction(callback: ICallbackFn)
}
We have seen only the design patterns that are commonly used in application development. There are lot of other design patterns available in software development. Feel free to comment your favorite design pattern and its use case.

LogRocket lets you replay user sessions, eliminating guesswork by showing exactly what users experienced. It captures console logs, errors, network requests, and pixel-perfect DOM recordings — compatible with all frameworks, and with plugins to log additional context from Redux, Vuex, and @ngrx/store.
With Galileo AI, you can instantly identify and explain user struggles with automated monitoring of your entire product experience.
Modernize how you understand your web and mobile apps — start monitoring for free.
 Monitor failed and slow network requests in production
Deploying a Node-based web app or website is the easy part. Making sure your Node instance continues to serve resources to your app is where things get tougher. If you’re interested in ensuring requests to the backend or third-party services are successful, try LogRocket.

LogRocket lets you replay user sessions, eliminating guesswork around why bugs happen by showing exactly what users experienced. It captures console logs, errors, network requests, and pixel-perfect DOM recordings — compatible with all frameworks.
LogRocket's Galileo AI watches sessions for you, instantly identifying and explaining user struggles with automated monitoring of your entire product experience.
LogRocket instruments your app to record baseline performance timings such as page load time, time to first byte, slow network requests, and also logs Redux, NgRx, and Vuex actions/state. Start monitoring for free.

Learn how to build smooth staggered animations in CSS using modern features like sibling-index(), complete with practical examples, fallbacks, and accessibility tips.

Compare the top AI development tools and models of July 2026. View updated rankings, feature breakdowns, and find the best fit for you.

Learn how to detect unused and ghost dependencies in JavaScript projects using Knip, a project-level linter that keeps your dependency graph accurate.

Learn how Storybook MCP enables AI agents to understand your component library, generate accurate UI, and validate code using documentation, stories, and automated tests.
Hey there, want to help make our blog better?
Join LogRocket’s Content Advisory Board. You’ll help inform the type of content we create and get access to exclusive meetups, social accreditation, and swag.
Sign up now

