axios.create
With more than 19.5 million weekly downloads, Axios is one of the most popular Javascript libraries one can use to make HTTP requests. It can be used in both the browser and with Node.js, which heightens its popularity.

With support for Promises and great features like request-response, transform, and interceptors, Axios is a great choice for making HTTP calls.
Axios.create is a handy feature within Axios used to create a new instance with a custom configuration. With axios.create, we can generate a client for any API and reuse the configuration for any calls using the same client, as we will see in the example below.
In this post, we will learn how to use axios.create with GitHub API examples so you can follow along.
The Replay is a weekly newsletter for dev and engineering leaders.
Delivered once a week, it's your curated guide to the most important conversations around frontend dev, emerging AI tools, and the state of modern software.
Axios is a simple Promise-based HTTP client for the browser and Node. It provides an easy-to-use library with a small footprint. It also has an extensible interface and great features like automatic transforms for JSON data, and client-side support for protecting against XSRF, to mention a few.
For the server side (Node), it relies upon the native Node.js HTTP module, whereas on the client side (the browser), it uses XMLHttpRequest. Being isomorphic, Axios is one of the few libraries that can be used without a sweat on both the browser and server side.
If we perform a regular require with Axios, we will receive the default instance. But what if we wanted to add a custom config, like a timeout of one second, that is not easily possible with const axios = require('axios')?
This is where Axios.create shines as compared to the usual “require” of Axios, even though both return an instance of Axios. With axios.create, we can set up a config like baseUrl, and all the calls made will simply require the URI for the HTTP calls, without the full URL.
Before we dive into the code, make sure you have the following in order to follow along with this tutorial:
I will be using a Unix-like system for this guide.
Next up, we will look at how to install Axios on a demo Node application.
If you want to run this demo Node project quickly on the browser, it can be tested on JSFiddle, too.
To set up a new project, we will run the following:
mkdir axios-create
cd axios-create
npm init -y
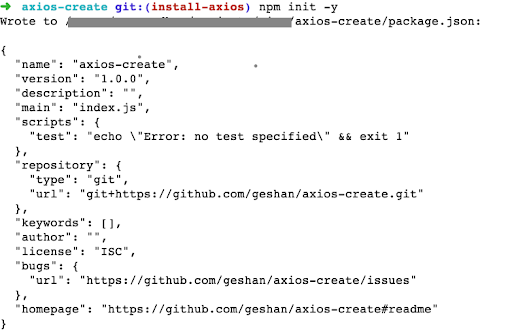
It will add the package.json file and give an output like the below:

Consequently, we will install the Axios npm package with:
npm i --save axios
It will render and output the following:

Great, now we have Axios installed in our demo Node project!
You can view the changes to this project up to this step in this pull request. Next up we’ll look at why you should use axios.create and how to install it in our demo app.
axios.create?axios.create is essentially a factory to create new instances of Axios. Let’s say you want two instances of Axios: one to call service A and another to call service B, where A can work with a timeout of 100ms and B needs a timeout of 500ms. This is easily possible with axios.create.
Axios can be used with just a regular require like const axios = require('axios'), but as there isn’t a way to pass in the configs, it takes another step to configure Axios properly.
It is more advantageous to use Axios with axios.create because it creates a new instance of Axios with a custom config. This allows us to reuse the provided configuration for all the calls made by that particular instance.
For example, if the API we’re calling only works with the accept header of application/vnd.api+json, it can be set once. Then, all the calls we make with that instance of Axios will include the header unless overridden. It merges the default and provides a custom config for the newly created Axios instance.
Similar to using Axios with require or import, the config order of precedence is respected even with an instance created by axios.create. Therefore, if the config has a custom header set on the request or call level, it will override the config values provided on the create call.
We’ll see this in the example below when we discuss how to use axios.create.
axios.createTo demonstrate how to use axios.create, we will build a simple GitHub API client that calls a couple endpoints. The aim here is to get the GitHub users that have the most followers and print the number of public repositories they have and their number of followers.
We’ll approach it like so:
Promise.allconsole.logThese steps are reflected in the following code, which is written in a file named GitHub.js :
const axios = require('axios');
const GitHubClient = axios.create({
  baseURL: 'https://api.GitHub.com/',
  timeout: 1000,
  headers: {
    'Accept': 'application/vnd.GitHub.v3+json',
    //'Authorization': 'token <your-token-here> -- https://docs.github.com/en/authentication/keeping-your-account-and-data-secure/creating-a-personal-access-token'
  }
});

async function getMostFollowedUsers() {
  const noOfFollowers = 35000;
  const perPage = 10;
  //ref: https://docs.github.com/en/github/searching-for-information-on-github/searching-on-github/searching-users
  const response = await GitHubClient.get(`search/users?q=followers:>${noOfFollowers}&per_page=${perPage}`, {timeout: 1500});
  return response.data.items;
}

async function getCounts(username) {
  const response = await GitHubClient.get(`users/${username}`);
  return {
    username,
    name: response.data.name,
    publicReposCount: response.data.public_repos,
    followersCount: response.data.followers
  };
}

(async () => {
  try {
    const mostFollowedUsers = await getMostFollowedUsers();
    const popularUsernames = mostFollowedUsers.map(user => user.login);
    const popularUsersWithPublicRepoCount = await Promise.all(popularUsernames.map(getCounts));
    console.table(popularUsersWithPublicRepoCount);

    console.log(`======== Another view ========`);
    popularUsersWithPublicRepoCount.forEach((userWithPublicRepos) => {
      console.log(`${userWithPublicRepos.name} with username ${userWithPublicRepos.username} has ${userWithPublicRepos.publicReposCount} public repos and ${userWithPublicRepos.followersCount} followers on GitHub`);
    });
  } catch(error) {
    console.log(`Error calling GitHub API: ${error.message}`, error);
  }
})();
Let’s break down the code above. First, we require Axios, which we already installed in the previous step. Then, we use axios.create to create a new instance of Axios with a custom config that has a base URL https://api.github.com/ and a timeout of 1s.
The config also has an Accept header with value application/vnd.GitHub.v3+json, as recommended in the GitHub API docs. I have commented on the Authorization header, which is optional.
We’ll need a GitHub Token if we send more than 60 requests/hour to the GitHub API from the same IP, per their rate limiting policy for unauthenticated users. The main thing to note here is that for all the API calls, these configs will be used unless overridden per call.
Following that, we have an async function named getMostFollowedUsers, which queries the search users GitHub API for users that have more than 35K followers. It only returns 10 of them since the per_page parameter is set to 10.
The interesting thing here is the timeout for this particular API call is set to 1500, or 1.5s, which is 0.5s more than the earlier set default timeout. This is because the search users API might be a bit slower than the get users API. It sends back the items array from the response.
Next, we have a getCounts async function that takes a username as a parameter and sends it to the GitHub “get users” API endpoint. From the response, it parses out the name of the user, count of public repos, and follower count, then returns it as an object.
At this point, it will use the default timeout of 1s as there is no config override. Similarly, it will also use the other configs like the Accept header value.
Finally, we have an unnamed async Immediately Invoked Function Expression (IIFE) which glues it all together. Within a try-catch block, it first gets the list of 10 most-followed users on GitHub from its API. Then it plucks out the usernames from these 10 user objects.
Then, it sends the usernames to the getCounts function concurrently with a handy Promise.all call. When the results are back as an array, it first prints them out as a table and then loops through the results with a forEach and prints a text view of the most followed users with their name, username, number of public repos, as well as the follower count.
If you want to view the output on a browser, please try it on JSFiddle, run it, and look at the console output.
We can also use the Interceptors feature of Axios for logging all requests and responses and use one of the popular Node logging libraries to format and show the logs in a better way.
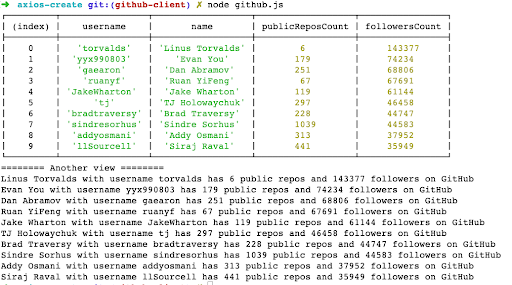
When the above code is run with node GitHub.js it will yield an output similar to the following:

From here, we know Linus Travolts is the most-followed user on GitHub with more than 143K followers and has only public repos. Addy Osmani, who works for Google, has almost 38K followers and has 313 public repos.
You can view the above code in the form of a pull request, too. Please be aware that it makes 11 requests each time the script is run, so if you run it multiple times you will get a 403 back from the GitHub API. To get over this, you will need to add an authentication token which will have a significantly higher rate limit of 5,000 requests per hour for authenticated users.
In this article, we learned how to use axios.create to make a client for GitHub API where the configs were reused for each subsequent call. We also learned how to override the configs per call when needed. In the process, we found out the most followed GitHub users with their number of followers and number of public repositories.
Along the same lines, axios.create can be utilized to create a functional client that can communicate with any REST API. If there is more than one REST API to be called, a new instance of Axios can be created with axios.create and used independently.
As the config for that particular instance will be reused across calls, it makes it very easy to do the subsequent HTTP calls using instances created by axios.create. These practical features make axios.create an ultra-useful tool that developers should employ to get the most out of calling HTTP APIs.
Install LogRocket via npm or script tag. LogRocket.init() must be called client-side, not
server-side
$ npm i --save logrocket

// Code:

import LogRocket from 'logrocket';
LogRocket.init('app/id');
// Add to your HTML:

<script src="https://cdn.lr-ingest.com/LogRocket.min.js"></script>
<script>window.LogRocket && window.LogRocket.init('app/id');</script>

@container scroll-state: Replace JS scroll listeners nowCSS @container scroll-state lets you build sticky headers, snapping carousels, and scroll indicators without JavaScript. Here’s how to replace scroll listeners with clean, declarative state queries.

Explore 10 Web APIs that replace common JavaScript libraries and reduce npm dependencies, bundle size, and performance overhead.

Russ Miles, a software development expert and educator, joins the show to unpack why “developer productivity” platforms so often disappoint.

Discover what’s new in The Replay, LogRocket’s newsletter for dev and engineering leaders, in the February 18th issue.
Hey there, want to help make our blog better?
Join LogRocket’s Content Advisory Board. You’ll help inform the type of content we create and get access to exclusive meetups, social accreditation, and swag.
Sign up now