React developers have spent years wrestling with state management complexity. Redux adds boilerplate, and useContext quickly gets messy as apps scale. TanStack DB flips this model: it’s a reactive, client-side database with local-first sync, offline support, and optimistic UX that updates instantly, no waiting for server responses.

Unlike TanStack Query (great for server state), Convex (which ties you to its backend), or traditional state management, TanStack DB lets you think in terms of data and queries. You get SQL-like syntax, reactive live queries, and automatic optimistic mutations, all with minimal code.
In this tutorial, we’ll build a task management app to show how TanStack DB delivers reactive state, optimistic updates, and offline-ready UX with surprising simplicity.
To follow along, you will need the following:
The Replay is a weekly newsletter for dev and engineering leaders.
Delivered once a week, it's your curated guide to the most important conversations around frontend dev, emerging AI tools, and the state of modern software.
Traditionally, managing reactive client state in React looked something like this:
import React, { useState, useEffect } from 'react';
function TaskList() {
  const [tasks, setTasks] = useState([]);
  const [loading, setLoading] = useState(true);
  const [error, setError] = useState(null);

  useEffect(() => {
    const fetchTasks = async () => {
      try {
        const response = await fetch('/api/tasks');
        if (!response.ok) {
          throw new Error('Failed to fetch tasks');
        }
        const data = await response.json();
        setTasks(data);
      } catch (e) {
        setError(e);
      } finally {
        setLoading(false);
      }
    };
    fetchTasks();
  }, []);

  const addTask = async (newTask) => {
    setLoading(true);
    try {
      const response = await fetch('/api/tasks', {
        method: 'POST',
        body: JSON.stringify(newTask),
      });
      const task = await response.json();
      setTasks(prev => [...prev, task]);
    } catch (e) {
      setError(e);
    } finally {
      setLoading(false);
    }
  };

  if (loading) return <div>Loading...</div>;
  if (error) return <div>Error: {error.message}</div>;

  return (
    <div>
      {tasks.map(task => (
        <div key={task.id}>{task.title}</div>
      ))}
    </div>
  );
}
This approach comes with serious drawbacks. It requires excessive boilerplate just to fetch data, with multiple state variables and manual loading flags scattered across your app. Error handling means repetitive try–catch blocks in every component. There are no optimistic updates, so users wait on the server before seeing changes. And without offline support, the app fails entirely when the network is unavailable.
Now let’s see how TanStack DB eliminates this complexity.
With TanStack DB, you don’t need to manually manage loading states, error handling, or data synchronization. The reactive queries handle everything automatically:
import { useLiveQuery } from '@tanstack/react-db';
import { taskCollection } from '@/lib/collections';

function TaskList() {
  const { data: tasks = [] } = useLiveQuery((q) =>
    q.from({ task: taskCollection }).select(({ task }) => task)
  );

  const addTask = (newTask) => {
    taskCollection.insert(newTask);
  };

  return (
    <div>
      {tasks.map(task => (
        <div key={task.id}>{task.title}</div>
      ))}
    </div>
  );
}
Did you notice the absence of useState, useEffect, and loading state management?
With TanStack DB, you can handle data fetching, mutations, and reactive updates declaratively.
Before we dive into building our app, let’s understand the key concepts that make TanStack DB so powerful. Once you understand these concepts, the code we’re about to write will make more sense.
Think of a collection as a normalized client-side cache that holds a typed set of objects. For example:
users collection holds user objects
A todos collection holds todo objects
A posts collection holds blog post objects
Each collection is like a table in your client-side database:
const taskCollection = createCollection(/* config */)
const userCollection = createCollection(/* config */)
Collections have four powerful characteristics. They are type-safe, enforcing schemas that prevent invalid data. They’re normalized, ensuring no duplicates since every object has a unique key. They’re reactive, triggering component re-renders whenever data changes. And they’re local-first, storing data in memory for instant access without network delays.
Live queries are the magic sauce of TanStack DB. They work like SQL queries but with real-time updates. This query automatically updates when tasks change:
const { data: tasks } = useLiveQuery((q) =>
  q
    .from({ task: taskCollection })                 // FROM tasks
    .where(({ task }) => task.status === 'pending') // WHERE status = 'pending'
    .orderBy(({ task }) => task.createdAt, 'desc')  // ORDER BY created_at DESC
    .select(({ task }) => task)                     // SELECT *
)
Live queries provide automatic updates where the query re-runs when underlying data changes, eliminating the need for manual subscriptions. They use SQL-like syntax with familiar .from(), .where(), and .select() methods. They support joins that can combine data from multiple collections, and they’re highly performant because they only re-run when relevant data actually changes, not on every render.
Traditional apps wait for server responses before updating the UI. TanStack DB updates the UI instantly (optimistic UI):
// Traditional approach: Wait for server response
const [loading, setLoading] = useState(false)
const updateTask = async () => {
  setLoading(true)
  await fetch('/api/tasks/1', { method: 'PUT', /* ... */ })
  setLoading(false)
  // Then update UI
}

// TanStack DB approach: Update UI instantly
const updateTask = () => {
  taskCollection.update(taskId, (draft) => {
    draft.status = 'completed'  // UI updates immediately
  })
}
Optimistic mutations improve UX with instant feedback, make apps feel native and responsive, and can roll back changes safely if a request fails. They also handle concurrent updates gracefully when multiple users or tabs modify the same data.
Under the hood, TanStack DB uses a sophisticated engine called differential dataflow (D2S). You don’t need to understand the internals, but here’s why it matters:
The D2S engine handles incremental updates by only re-computing what actually changed, rather than recalculating everything from scratch. It enables efficient queries through smart caching and memoization, delivers real-time reactivity with instant propagation of changes, and maintains memory efficiency even with large datasets.
Now that you understand these concepts, the code we’re about to write will make much more sense. Let’s build our task management app!
Let’s build a task management app that showcases TanStack DB’s reactive power.
Open your terminal and run:
npm create next-app@latest tanstack-db-demo --typescript --tailwind --app
cd tanstack-db-demo
Next, install TanStack DB and its dependencies:
npm install @tanstack/react-db @tanstack/react-query zod uuid
npm install --save-dev @types/uuid
We’ll use Zod for schema validation and UUID for generating IDs.
The task management app includes task creation with instant form submission and validation, live filtering that updates in real time as you switch between All, Pending, In Progress, and Completed, and optimistic status updates where changing a dropdown updates the UI immediately.
Now, let’s take a look at TanStack DB in action.
First, we need to define our data structure. In src/lib, create schema.ts and paste the code below:
import { z } from 'zod'

export const taskSchema = z.object({
  id: z.string(),
  title: z.string().min(1, 'Title is required'),
  description: z.string().optional(),
  status: z.enum(['pending', 'in-progress', 'completed']).default('pending'),
  priority: z.enum(['low', 'medium', 'high']).default('medium'),
  tags: z.array(z.string()).default([]),
  createdAt: z.date().default(() => new Date()),
  updatedAt: z.date().default(() => new Date()),
})

export type Task = z.infer<typeof taskSchema>
The taskSchema is for type safety and validation. Zod validates data at runtime, catches invalid data before it enters your app, and automatically generates TypeScript types, perfect for TanStack DB’s schema system.
Add a category schema for organizing tasks:
export const categorySchema = z.object({
  id: z.string(),
  name: z.string().min(1, 'Category name is required'),
  color: z.string().default('#3B82F6'),
  description: z.string().optional(),
  createdAt: z.date().default(() => new Date()),
  updatedAt: z.date().default(() => new Date()),
})

export type Category = z.infer<typeof categorySchema>
Now, let’s create our data collection. Create collections.ts in the same folder and add the following:
import { createCollection, localOnlyCollectionOptions } from '@tanstack/react-db'
import { taskSchema, type Task } from './schema'
createCollection creates a TanStack DB collection. localOnlyCollectionOptions configures a client-side only collection: in-memory storage for instant access, instant updates with no network delays, offline by default, and optimistic mutations without manual setup.
Next, add the collection configuration:
export const taskCollection = createCollection(localOnlyCollectionOptions({
  id: 'tasks',
  getKey: (item) => item.id,
  schema: taskSchema,
}))
This creates the task collection with local-only options. The getKey function tells TanStack DB how to identify each item. When you update or delete an item, TanStack DB uses this key to find the right record.
Now let’s add some initial data to work with:
const initialTasks: Task[] = [
  {
    id: '1',
    title: 'Learn TanStack DB',
    description: 'Build a demo app with reactive queries',
    status: 'in-progress',
    priority: 'high',
    tags: ['learning', 'react'],
    createdAt: new Date('2024-01-01'),
    updatedAt: new Date('2024-01-01'),
  },
  {
    id: '2',
    title: 'Write tutorial',
    description: 'Document the TanStack DB patterns',
    status: 'pending',
    priority: 'medium',
    tags: ['writing', 'documentation'],
    createdAt: new Date('2024-01-02'),
    updatedAt: new Date('2024-01-02'),
  },
]

// Insert initial data
initialTasks.forEach(task => {
  taskCollection.insert(task)
})
The insertion happens immediately — no async/await — because it’s local-only.
Next, we’ll create React components to display and interact with this data using live queries.
Now comes the magic: displaying our data with reactive queries. Create src/components/TaskList.tsx.
First, add the imports and basic setup:
'use client'
import { useLiveQuery } from '@tanstack/react-db'
import { taskCollection } from '@/lib/collections'
import { useState } from 'react'

export function TaskList() {
  const [filter, setFilter] =
    useState<'all' | 'pending' | 'in-progress' | 'completed'>('all')
}
useLiveQuery is the heart of TanStack DB’s reactivity. Unlike regular useQuery, this hook automatically re-runs whenever the underlying collection data changes.
Now let’s add the live query:
const { data: tasks = [], isLoading } = useLiveQuery((q) => {
  let query = q.from({ task: taskCollection })

  if (filter !== 'all') {
    query = query.where(({ task }) => task.status === filter)
  }

  return query.select(({ task }) => task)
})
q.from({ task: taskCollection }) starts a query from our task collection. The object alias lets you reference the collection as task. The hook returns { data, isLoading, error }.
const { data: categories = [] } = useLiveQuery(
  (q) => q
    .from({ category: categoryCollection })
    .select(({ category }) => ({
      id: category.id,
      name: category.name,
      color: category.color,
    }))
)
Next, let’s add the function to update task status:
const toggleStatus = (
  taskId: string,
  newStatus: 'pending' | 'in-progress' | 'completed'
) => {
  taskCollection.update(taskId, (draft) => {
    draft.status = newStatus
    draft.updatedAt = new Date()
  })
}
This updates an existing item using an Immer-style draft. When you call taskCollection.update(), the UI updates instantly. Any component using useLiveQuery that includes this task will re-render with the new data.
Next, add the function to filter tasks by status and priority:
const filteredTasks = tasks.filter(task => {
  const statusMatch = filter === 'all' || task.status === filter
  const priorityMatch = priorityFilter === 'all' || task.priority === priorityFilter
  return statusMatch && priorityMatch
})
Now let’s build the UI. First, the select filter:
return (
  <div className="space-y-4">
    {/* Filter selects */}
    <div className="flex justify-between items-center">
      <h2 className="text-2xl font-bold text-gray-900">Tasks</h2>
      <div className="flex gap-2">
        <select
          value={filter}
          onChange={(e) =>
            setFilter(e.target.value as 'all' | 'pending' | 'in-progress' | 'completed')
          }
          className="px-3 text-black py-2 border border-gray-300 rounded-md text-sm"
        >
          <option value="all">All Status</option>
          <option value="pending">Pending</option>
          <option value="in-progress">In Progress</option>
          <option value="completed">Completed</option>
        </select>

        <select
          value={priorityFilter}
          onChange={(e) =>
            setPriorityFilter(e.target.value as 'all' | 'low' | 'medium' | 'high')
          }
          className="px-3 text-black py-2 border border-gray-300 rounded-md text-sm"
        >
          <option value="all">All Priorities</option>
          <option value="low">Low</option>
          <option value="medium">Medium</option>
          <option value="high">High</option>
        </select>
      </div>
    </div>
The TypeScript assertion ensures the filter value is treated as a literal type, not just a string, for better type checking.
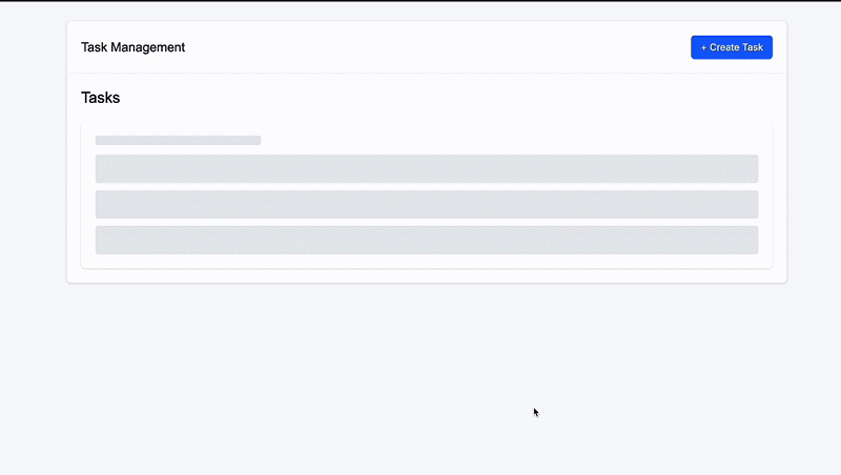
Loading UI:
{isLoading ? (
  <div className="bg-white shadow rounded-lg p-6">
    <div className="animate-pulse">
      <div className="h-4 bg-gray-200 rounded w-1/4 mb-4"></div>
      <div className="space-y-3">
        {[1, 2, 3].map((i) => (
          <div key={i} className="h-12 bg-gray-200 rounded"></div>
        ))}
      </div>
    </div>
  </div>
) :
Render the task list:
(
  <div className="bg-white shadow rounded-lg">
    <div className="px-6 py-4 border-b border-gray-200">
      <div className="flex justify-between items-center">
        <h3 className="text-lg font-medium text-gray-900">
          {filteredTasks.length} task{filteredTasks.length !== 1 ? 's' : ''}
        </h3>
        {filter === 'all' && (
          <button
            onClick={bulkCompleteTasks}
            className="px-4 py-2 bg-green-600 text-white rounded-md hover:bg-green-700 transition-colors"
          >
            Complete All Pending
          </button>
        )}
      </div>
    </div>

    {/* Task list */}
    <div className="divide-y divide-gray-200">
      {filteredTasks.length === 0 ? (
        <div className="px-6 py-8 text-center text-gray-500">
          No tasks found. Create your first task to get started!
        </div>
      ) : (
        filteredTasks.map((task) => (
          <div key={task.id} className="px-6 py-4 hover:bg-gray-50">
            <div className="flex items-center justify-between">
              <div className="flex-1">
                <div className="flex items-center gap-3">
                  <h4 className="text-lg font-medium text-gray-900">
                    {task.title}
                  </h4>
                  <span className={`px-2 py-1 text-xs font-medium rounded-full ${
                    task.priority === 'high' ? 'bg-red-100 text-red-800' :
                    task.priority === 'medium' ? 'bg-yellow-100 text-yellow-800' :
                    'bg-green-100 text-green-800'
                  }`}>
                    {task.priority}
                  </span>
                </div>

                {task.description && (
                  <p className="mt-1 text-sm text-gray-600">{task.description}</p>
                )}

                <div className="mt-2 flex items-center gap-4 text-sm text-gray-500">
                  <span>Created: {formatDate(task.createdAt)}</span>
                  {task.dueDate && (
                    <span>Due: {formatDate(task.dueDate)}</span>
                  )}
                </div>

                {/* Category and Tags */}
                <div className="mt-3 flex items-center gap-3">
                  {/* Category Badge */}
                  {(() => {
                    const category = categories.find(cat => cat.id === task.categoryId)
                    const categoryName = category?.name || 'Uncategorized'
                    const categoryColor = category?.color || '#6B7280'

                    return (
                      <span
                        className="px-2 py-1 text-xs font-medium rounded-full"
                        style={{
                          backgroundColor: `${categoryColor}20`,
                          color: categoryColor,
                          border: `1px solid ${categoryColor}40`
                        }}
                      >
                        📁 {categoryName}
                      </span>
                    )
                  })()}

                  {/* Tags */}
                  {task.tags && task.tags.length > 0 && (
                    <div className="flex items-center gap-1">
                      <span className="text-xs text-gray-500">🏷️</span>
                      {task.tags.map((tag, index) => (
                        <span
                          key={index}
                          className="px-2 py-1 text-xs bg-gray-100 text-gray-700 rounded-full border border-gray-200"
                        >
                          {tag}
                        </span>
                      ))}
                    </div>
                  )}
                </div>
              </div>

              <div className="flex items-center gap-2">
                <select
                  value={task.status}
                  onChange={(e) => toggleTaskStatus(
                    task.id,
                    e.target.value as 'pending' | 'in-progress' | 'completed'
                  )}
                  className="px-3 text-black py-1 text-sm border border-gray-300 rounded-md"
                >
                  <option value="pending">Pending</option>
                  <option value="in-progress">In Progress</option>
                  <option value="completed">Completed</option>
                </select>

                <button
                  onClick={() => deleteTask(task.id)}
                  className="px-3 py-1 text-sm text-red-600 hover:text-red-800 hover:bg-red-50 rounded-md transition-colors"
                >
                  Delete
                </button>
              </div>
            </div>
          </div>
        ))
      )}
    </div>
  </div>
)}
</div>
)
}
Since tasks come from our live query, this list automatically updates when tasks change.
Notice how you never manually update React state. You update the TanStack DB collection, and the UI updates automatically through the live query.
First, set up the providers to use your component. Update your app/page.tsx temporarily:
import { TaskList } from '@/components/TaskList'

export default function Home() {
  return (
    <div className="min-h-screen bg-gray-50">
      {/* Main Content */}
      <main className="max-w-7xl mx-auto px-4 sm:px-6 lg:px-8 py-8">
        <div className="bg-white rounded-lg shadow-sm border border-gray-200">
          <div className="p-6 border-b border-gray-200">
            <div className="flex justify-between items-center">
              <h2 className="text-xl font-semibold text-gray-900">Task Management</h2>
              <button
                onClick={handleCreateTask}
                className="bg-blue-600 text-white px-4 py-2 rounded-md hover:bg-blue-700 transition-colors"
              >
                + Create Task
              </button>
            </div>
          </div>
          <div className="p-6">
            <TaskList />
          </div>
        </div>
      </main>
    </div>
  )
}
We’ll add the providers to app/layout.tsx, then create and configure the query client:
import { QueryClient, QueryClientProvider } from '@tanstack/react-query'
import './globals.css'

const queryClient = new QueryClient({
  defaultOptions: {
    queries: {
      gcTime: 1000 * 60 * 10,
    },
  },
})

export default function RootLayout({ children }: { children: React.ReactNode }) {
  return (
    <html lang="en">
      <body>
        <QueryClientProvider client={queryClient}>
          {children}
        </QueryClientProvider>
      </body>
    </html>
  )
}
TanStack DB is built on top of TanStack Query. While you don’t directly use query functions, DB uses Query’s caching and synchronization mechanisms under the hood.
gcTime (garbage collection time) controls how long unused query results stay in memory before being cleaned up.
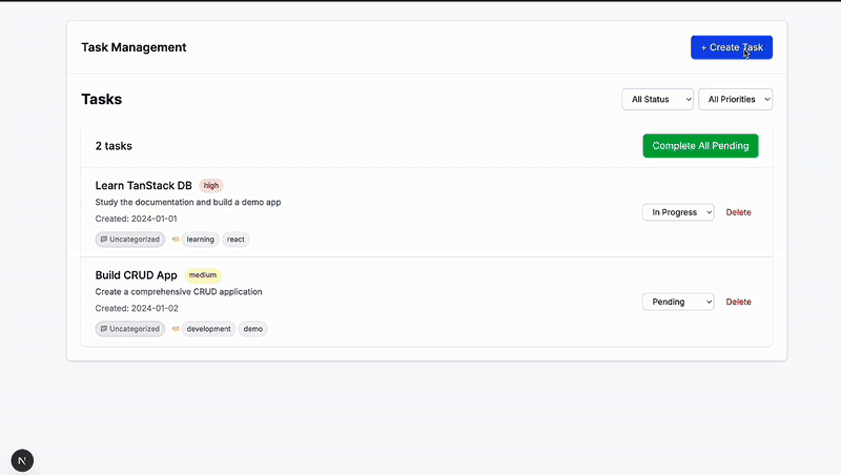
Run npm run dev and you should see the following:
Notice how the tasks filter instantly when you click “Pending”, “In Progress”, or “Completed”.
Performing a delete operation with TanStack DB is as simple as this:
const deleteTask = (taskId: string) => {
  taskCollection.delete(taskId)
}
Get all pending tasks and update them at once:
const completeAllPending = () => {
  const { data: pendingTasks } = useLiveQuery((q) =>
    q
      .from({ task: taskCollection })
      .where(({ task }) => task.status === 'pending')
      .select(({ task }) => task)
  )

  pendingTasks?.forEach((task) => {
    taskCollection.update(task.id, (draft) => {
      draft.status = 'completed'
      draft.updatedAt = new Date()
    })
  })
}
Filtering:
const { data: highPriorityTasks } = useLiveQuery((q) =>
  q
    .from({ task: taskCollection })
    .where(({ task }) => task.priority === 'high' && task.status !== 'completed')
    .orderBy(({ task }) => task.createdAt, 'desc')
    .select(({ task }) => task)
)
Joins:
const { data: tasksWithCategories } = useLiveQuery((q) =>
  q
    .from({ task: taskCollection })
    .leftJoin(
      { category: categoryCollection },
      ({ task, category }) => task.categoryId === category?.id
    )
    .where(({ task }) => task.status === 'in-progress')
    .select(({ task, category }) => ({
      ...task,
      categoryName: category?.name || 'Uncategorized',
      categoryColor: category?.color || '#6B7280'
    }))
)
This query joins tasks with their categories.
Let’s add the ability to create new tasks with instant UI feedback. Create TaskForm.tsx in the components folder.
Start with imports and state:
'use client'
import { useState } from 'react'
import { taskCollection } from '@/lib/collections'
import { v4 as uuidv4 } from 'uuid'

export function TaskForm() {
  const [title, setTitle] = useState('')
  const [description, setDescription] = useState('')
Since we’re working locally, we’ll create our own IDs with uuidv4 rather than relying on a server.
Form submission handler:
const handleSubmit = (e: React.FormEvent) => {
  e.preventDefault()

  if (!title.trim()) return

  const newTask = {
    id: uuidv4(),
    title: title.trim(),
    description: description.trim() || undefined,
    status: 'pending' as const,
    priority: 'medium' as const,
    tags: [],
    createdAt: new Date(),
    updatedAt: new Date(),
  }

  // Optimistic update - UI updates instantly
  taskCollection.insert(newTask)

  // Reset form
  setTitle('')
  setDescription('')
}
taskCollection.insert(newTask) immediately adds the task to the collection, and the UI reflects it instantly.
Form UI:
return (
  <form onSubmit={handleSubmit} className="space-y-4 mb-6">
    <div>
      <input
        type="text"
        value={title}
        onChange={(e) => setTitle(e.target.value)}
        placeholder="Task title..."
        className="w-full px-3 py-2 border rounded-lg"
        required
      />
    </div>

    <div>
      <textarea
        value={description}
        onChange={(e) => setDescription(e.target.value)}
        placeholder="Task description (optional)..."
        className="w-full px-3 py-2 border rounded-lg"
        rows={3}
      />
    </div>

    <button
      type="submit"
      className="px-4 py-2 bg-blue-600 text-white rounded-lg hover:bg-blue-700"
    >
      Add Task
    </button>
  </form>
)
When you submit, a new task is inserted into TanStack DB and the UI updates instantly — no extra loading state or manual syncing required. If you later wire this to a server, TanStack DB can roll back on failure; for local-only collections, inserts always succeed.
Update your app/page.tsx to include both components:
'use client'
import { useState } from 'react'
import { TaskList } from '@/components/TaskList'
import { TaskForm } from '@/components/TaskForm'

export default function Home() {
  const [showTaskForm, setShowTaskForm] = useState(false)

  const handleCreateTask = () => {
    setShowTaskForm(true)
  }

  const handleCloseTaskForm = () => {
    setShowTaskForm(false)
  }

  return (
    <div className="min-h-screen bg-gray-50">
      <main>...</main>

      {showTaskForm && (
        <TaskForm
          onClose={handleCloseTaskForm}
        />
      )}
    </div>
  )
}
You can find the code for the final build on GitHub.
In this tutorial, we explored TanStack DB by building a reactive, local-first task management app. TanStack DB shines in offline-friendly and low-latency apps where users expect instant feedback. If you’re building beyond simple forms or read-only content, and want a UX that feels as smooth as native desktop software, TanStack DB delivers that experience with remarkably little code.
If you encounter any issues while following this tutorial or need expert help with web/mobile development, don’t hesitate to reach out on LinkedIn. I’d love to connect and help out!
Install LogRocket via npm or script tag. LogRocket.init() must be called client-side, not
server-side
$ npm i --save logrocket

// Code:

import LogRocket from 'logrocket';
LogRocket.init('app/id');
// Add to your HTML:

<script src="https://cdn.lr-ingest.com/LogRocket.min.js"></script>
<script>window.LogRocket && window.LogRocket.init('app/id');</script>

Learn how inline props break React.memo, trigger unnecessary re-renders, and hurt React performance — plus how to fix them.

This article showcases a curated list of open source mobile applications for Flutter that will make your development learning journey faster.

Discover what’s new in The Replay, LogRocket’s newsletter for dev and engineering leaders, in the April 1st issue.

This post walks through a complete six-step image optimization strategy for React apps, demonstrating how the right combination of compression, CDN delivery, modern formats, and caching can slash LCP from 8.8 seconds to just 1.22 seconds.
Hey there, want to help make our blog better?
Join LogRocket’s Content Advisory Board. You’ll help inform the type of content we create and get access to exclusive meetups, social accreditation, and swag.
Sign up now

