Electron has become the premier technology for creating cross-platform desktop applications. It is used in platforms as well-known and popular as Atom, VS Code, Spotify, Slack, Discord, and many more.
JavaScript is a slow language, but in this tutorial, we’ll demonstrate how you can use Rust to speed up an Electron app for a better user experience. Rust is a low-level language with high-level ergonomics. It’s blazing fast with a very low memory footprint.
We’ll use electron-react-boilerplate to create a boilerplate for our demo application. Start by cloning the GitHub repo.
git clone --depth 1 --single-branch https://github.com/electron-react-boilerplate/electron-react-boilerplate.git md_notes
Install all the dependencies using npm or Yarn.
npm run dev
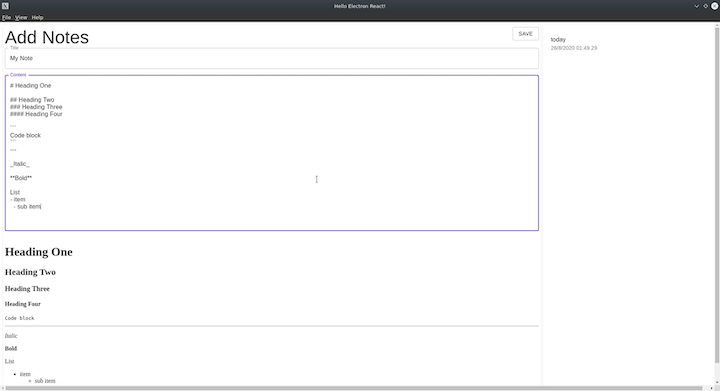
We’ll create a note-taking application with support for markdown. The markdown parser will be written in Rust. We’ll use a variety of methods to interface between Electron and Rust.
We’ll use Material-UI to get ready-made components for our application.
import React, { useState, useEffect } from 'react';
import { makeStyles, createStyles, Theme } from '@material-ui/core/styles';
import Grid from '@material-ui/core/Grid';
import Paper from '@material-ui/core/Paper';
import { TextField, Typography, ListItemText, Button } from '@material-ui/core';
import List from '@material-ui/core/List';
import ListItem from '@material-ui/core/ListItem';
import { remote } from 'electron';
// import fs and path nodejs core module for wrting and reading files
const fs = remote.require('fs');
const path = remote.require('path');
const useStyles = makeStyles((theme: Theme) =>
  createStyles({
    root: {
      flexGrow: 1,
      width: '100vw',
    },
    paper: {
      width: '100%',
      minHeight: '100vh',
      padding: '5px',
    },
    control: {
      padding: theme.spacing(2),
    },
    textArea: {
      width: '100%',
      height: '100%',
    },
    heading: {
      textAlign: 'center',
    },
  })
);
const NOTES_FOLDER = 'notes';
const save = (name: string, data: any) => {
  fs.writeFileSync(
    path.join('.', NOTES_FOLDER, `${name}${Date.now()}.json`).toString(),
    JSON.stringify(data)
  );
};
export default function SpacingGrid() {
  const [editorState, setEditorState] = useState('');
  const [previewState, setPreview] = useState('');
  const [notes, setNotes] = useState([]);
  useEffect(() => {
    // we need to add code to parse md and set it to preview
  }, [setPreview, editorState]);
  useEffect(() => {
    const note = fs
      .readdirSync(path.join('.', NOTES_FOLDER))
      .map((file: string) => {
        return JSON.parse(
          String(fs.readFileSync(path.join('.', NOTES_FOLDER, file)))
        );
      });
    setNotes(note);
  }, []);
  const [title, setTitle] = useState('');
  const classes = useStyles();
  return (
    <Grid container className={classes.root} spacing={2}>
      <Grid item xs={12}>
        <Grid container justify="center" spacing={2}>
          <Grid item xs={9}>
            <Paper className={classes.paper}>
              <Grid container justify="space-between">
                <Grid item>
                  <Typography variant="h3" align="center">
                    Add Notes
                  </Typography>
                </Grid>
                <Grid item>
                  <Button
                    variant="outlined"
                    onClick={() => {
                      save(title, {
                        title,
                        createdAt: Date.now(),
                        body: editorState,
                      });
                    }}
                  >
                    Save
                  </Button>
                </Grid>
              </Grid>
              <Grid
                container
                direction="column"
                justify="space-between"
                spacing={2}
              >
                <Grid item>
                  <TextField
                    label="Title"
                    value={title}
                    onChange={(e) => setTitle(e.target.value)}
                    variant="outlined"
                    className={classes.textArea}
                  />
                </Grid>
                <Grid item>
                  <TextField
                    multiline
                    label="Content"
                    value={editorState}
                    onChange={(e) => setEditorState(e.target.value)}
                    variant="outlined"
                    className={classes.textArea}
                    rows={20}
                  />
                </Grid>
                <Grid item>
                  <div dangerouslySetInnerHTML={{ __html: previewState }} />
                </Grid>
              </Grid>
            </Paper>
          </Grid>
          <Grid item xs={3}>
            <Paper className={classes.paper}>
              <List>
                {notes.map((note, i) => (
                  <ListItem
                    key={`key-${i}`}
                    onClick={() => {
                      setEditorState(note.body);
                      setTitle(note.title);
                    }}
                  >
                    <ListItemText
                      primary={note.title}
                      secondary={new Date(note.createdAt).toLocaleString('in')}
                    />
                  </ListItem>
                ))}
              </List>
            </Paper>
          </Grid>
        </Grid>
      </Grid>
    </Grid>
  );
}
This is boilerplate code for Electron applications. Now we’ll implement a parse function to convert markdown to HTML.
We’ll explore various methods of using Rust for parsing markdown, weighing the pros and cons of each. We’ll also examine use cases for each method.
At its core, an Electron app is just a Chrome browser and Node.js. We can leverage WebAssembly support in Chrome and Node.
WebAssembly is a binary instruction format that runs inside a browser or a stack-based virtual machine. We’ll compile our markdown parser written in Rust in WebAssembly.
Rust has first-class support for WebAssembly. It uses LLVM to compile for WebAssembly as a target. \wasm-pack\ is a tool the Rust community created to help developers write Node modules in Rust using WebAssembly.
wasm-pack is a tool for creating, building, and publishing Node modules written in WebAssembly.
curl https://rustwasm.github.io/wasm-pack/installer/init.sh -sSf | sh
wasm-pack provides an installer script for Linux and macOS. Once wasm-pack is installed on your system, you can create a boilerplate for the WebAssembly module using wasm-pack new.
This will create a new directory named md-parser with boilerplate.
wasm-pack new md_webassembly


├── Cargo.toml
├── LICENSE_APACHE
├── LICENSE_MIT
├── README.md
├── src
│   ├── lib.rs
│   └── utils.rs
└── tests
    └── web.rs
The lib.rs is the main file for the Wasm library. A close look at lib.rs reveals that it exports the greet function called by JavaScript.
// utils set a panic hook so it is console in js
mod utils;
use wasm_bindgen::prelude::*;
// When the `wee_alloc` feature is enabled, use `wee_alloc` as the global
// allocator.
#[cfg(feature = "wee_alloc")]
#[global_allocator]
static ALLOC: wee_alloc::WeeAlloc = wee_alloc::WeeAlloc::INIT;

// function defination for alert. It is dom api for generating a dialog
#[wasm_bindgen]
extern {
    fn alert(s: &str);
}

// wasm_bingen is a pro macro which transfor return type and arguments to the function
#[wasm_bindgen]
pub fn greet() {
// calling alert
    alert("Hello, md-webassembly!");
}
wasm-bidgen is a crate developed by the Rust community that makes it easier create Wasm modules. Wasm doesn’t support strings or array data type; it only supports integers and floats. So it needs the address of the string on the JavaScript heap to use access string. wasm-bindgen adds all that boilerplate code to our functions.
For markdown parsing, we’ll use the comrak crate, which supports GitHub-flavored markdown.
[package]
name = "md-webassembly"
version = "0.1.0"
authors = ["anshul <[email protected]>"]
edition = "2018"

# libtype must be cdylib so it can be dynamically linked by electron
[lib]
crate-type = ["cdylib", "rlib"]

[features]
default = ["console_error_panic_hook"]

[dependencies]
wasm-bindgen = "0.2.63"
comrak = "0.8.2"
console_error_panic_hook = { version = "0.1.6", optional = true }
wee_alloc = { version = "0.4.5", optional = true }

[dev-dependencies]
wasm-bindgen-test = "0.3.13"

[profile.release]
# Tell `rustc` to optimize for small code size.
opt-level = "s"

# avoid wasm-opt error while build
[package.metadata.wasm-pack.profile.release]
wasm-opt = false
comrak cratecomark provides markdown_to_html functionality, which parses markdown to HTML. We’ll create a parse function that takes a markdown string as an argument and then returns the HTML string.
mod utils;
use comrak::{markdown_to_html, ComrakOptions};
use wasm_bindgen::prelude::*;
#[cfg(feature = "wee_alloc")]
#[global_allocator]
static ALLOC: wee_alloc::WeeAlloc = wee_alloc::WeeAlloc::INIT;

// take md string return html string
#[wasm_bindgen]
pub fn parse(md: String) -> String {
    markdown_to_html(md.as_str(), &ComrakOptions::default())
}
We are all set to use our rust markdown parser. For compiling use wasm-pack build . build command will create a wasm module with typescript types.
We can use our Rust markdown parser in both browser-side and Node.js APIs in Electron.
Both Node and Chromium support WebAssembly out of the box. Moreover, the boilerplate used to bootstrap Electron also supports importing wasm modules by default. We can directly import Wasm code without adding any boilerplate.
  useEffect(() => {
    import('../../md-webassembly/pkg/md_webassembly').then((module) =>
      setPreview(module.parse(editorState))
    );
  }, [setPreview, editorState]);
You should use dynamic import so the UI rendering are not blocked while the Wasm module is instantiated. webpack will take care of rest. This method is also useful if you want to support a web app.
Napi is a C header that communicates with Node.js. This method is a bit difficult to implement.
We’ll use node-bindgen to create a Rust library that can be used in Node.js directly.
Install nj-cli using cargo.
cargo install nj-cli
We can now create a boilerplate for the Node module, then import it into an Electron application.
Let’s start by creating a simple Rust project.
cargo new md_napi --lib
Now we need to configure cargo to compile it in a dynamic library that can be used by Node.js. You should use this method when the application requires a thread, SIMD, or processor-specific code.
[package]
name = "md_napi"
version = "0.1.0"
authors = ["anshul <[email protected]>"]
edition = "2018"

[lib]
# compile to .so or .dl file based on OS
crate-type = ["cdylib"]

[dependencies]
# Node.js NAPI helper library
node-bindgen = { version = "2.1.1" }
# Parse MarkDown
comrak = "0.8.2"

[build-dependencies]
node-bindgen = { version = "2.1.1", features = ["build"] }
We can export a function in the lib.rs file.
use node_bindgen::derive::node_bindgen;
use comrak::{markdown_to_html, ComrakOptions};

#[node_bindgen]
fn parse(md: String) -> String {
  markdown_to_html(md.as_str(), &ComrakOptions::default())
}
Now we can build the library using the nj-cli build command. It will create a dist directory with index.node. This file is directly required in Electron.
import { remote } from 'electron';
const mdModule = remote.require('../md_napi/dist/index.node');

console.log((mdModule.parse('# Heading'))
In the Electron app, we’ll simply replace the WebAssembly module imports.
 useEffect(() => {
    setPreview(mdModule.parse(editorState));
  }, [setPreview, editorState]);
There are a few additional libraries you can use to create add-ons. The libraries listed below use V8 APIs or NAPIs.
Both of the methods described above have pros and cons. The right choice for a particular project depends on the use case and requirements. Use the chart below as a quick reference guide to help you select the most appropriate approach.
| Feature | NAPI/add-on | WebAssebmly |
| Threads | Libuv threads | Web workers |
| SIMD | Full support | Partial support |
| Web browser | Unsupported | Supported |
| C FFI | Supported | Unsupported |
| External Crates | Full support | May or may not support |
JavaScript is a slow language. Therefore, Electron apps tend to be slow. The trick is to offload CPU-intensive tasks to other, faster languages. Whereas JavaScript is well-suited to UI control, Rust is better equipped to handle those complex calculations. If you’ve completed this tutorial, you now have a pair of tried-and-true methods for using Rust to speed up Electron apps under your belt.
Debugging Rust applications can be difficult, especially when users experience issues that are hard to reproduce. If you’re interested in monitoring and tracking the performance of your Rust apps, automatically surfacing errors, and tracking slow network requests and load time, try LogRocket.
LogRocket lets you replay user sessions, eliminating guesswork around why bugs happen by showing exactly what users experienced. It captures console logs, errors, network requests, and pixel-perfect DOM recordings — compatible with all frameworks.
LogRocket's Galileo AI watches sessions for you, instantly identifying and explaining user struggles with automated monitoring of your entire product experience.

Modernize how you debug your Rust apps — start monitoring for free.

Discover how React Fiber works under the hood. Learn how React builds the DOM, handles concurrent rendering, and works alongside React 19 features and the new React Compiler.

Learn how to use Skybridge, an open-source React framework, to build and deploy cross-platform AI apps and interactive UI widgets for ChatGPT, Claude, and MCP clients from a single codebase.

Learn how to set up Meilisearch, index documents, and build keyword, semantic, and hybrid search with AI-powered retrieval.

Compare pnpm and npm across security defaults, disk usage, dependency strictness, and workspace policy to decide which package manager fits your project.
Hey there, want to help make our blog better?
Join LogRocket’s Content Advisory Board. You’ll help inform the type of content we create and get access to exclusive meetups, social accreditation, and swag.
Sign up now

