
When working on a Flutter app, you might encounter the need to split a large UI component into several smaller ones to improve the readability of the code. With multiple components, it’s crucial to implement effective communication between them. All UI components should be aware of the state of the app at all times. This is called state management.

In Flutter, you can manage the state of your app just by using setState. But while setState can be your best friend, it’s not a good idea to depend on it solely. There are many other factors you should also consider while developing a Flutter app, such as architecture, scalability, readability, complexity, etc. Staying on top of everything requires an effective state management technique.
There are myriad state management solutions available for Flutter, including Provider, InheritedWidget and InheritedModel, Redux, BLoC, GetIt, MobX, Riverpod, etc. In this tutorial, we’ll focus on using the BLoC design pattern for state management in Flutter. We’ll explain what BLoC means and demonstrate how to implement any feature in BLoC.
The Replay is a weekly newsletter for dev and engineering leaders.
Delivered once a week, it's your curated guide to the most important conversations around frontend dev, emerging AI tools, and the state of modern software.
Business logic components (BLoC) allow you to separate the business logic from the UI. Writing code in BLoC makes it easier to write and reuse tests.
In simple terms, BLoC accepts a stream of events, processes the data based on events, and produces the output as states. Take the simple example below:
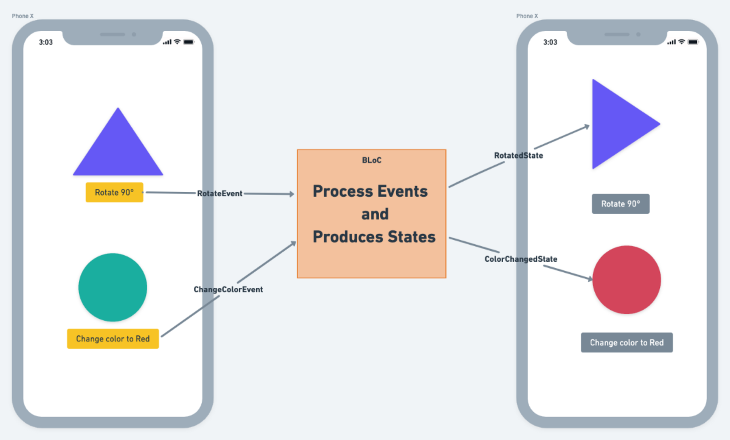
As soon as the Rotate 90° button is clicked, the RotateEvent is dispatched to BLoC and the state representing the rotation, i.e. RotatedState, is emitted. The triangle widget rotates itself upon receiving the RotatedState from the BLoC. Similarly, the circle widget changes its color when the Change color to Red button is clicked.
Since the BLoC handles the rotation and changing color operation, both operations can be performed on any widget. This facilitates the reusability of the code.
Before we dive in, let’s review some basic BLoC concepts and terms so we’re all on the same page.
Events tell BLoC to do something. An event can be fired from anywhere, such as from a UI widget. External events, such as changes in network connectivity, changes in sensor readings, etc., look like this:
class RotateEvent {
  final double angle;

  const RotateEvent(this.angle);

  @override
  List<Object> get props => [angle];
}
BLoC is a man in the middle. All the business logic sits inside the BLoC file. It simply accepts events, performs the logic, and outputs the states. Here’s how it looks:
class TransformationBloc
    extends Bloc<TransformationEvent, TransformationState> {
  TransformationBloc() : super(RotatedState(angle: 0);

  @override
  Stream<TransformationState> mapEventToState(
      TransformationEvent event) async* {
    if (event is RotateEvent) {
      yield RotatedState(angle: event.angle);
    }
  }
}
States represent the information to be processed by any widget. A widget changes itself based on the state.
class RotatedState {
  final double angle;

  const RotatedState({@required this.angle});

  @override
  List<Object> get props => [angle];
}
Cubit is a simpler version of the BLoC pattern. It eliminates the need to write events.
Cubit exposes direct functions, which can result in appropriate states. Writing a Cubit instead of BLoC also reduces boilerplate code, making the code easier to read.
Here’s a simple example:
class TransformCubit extends Cubit<TransformState> {
  TransformCubit() : super(RotatedState(angle: 0));

  void rotate(double angle) {
    emit(RotatedState(angle: angle));
  }

}
setState (no BLoC)Before we highlight the benefits of managing state in Flutter with BLoC, let’s walk through the process of using setState for state management instead.
Our example Flutter app will show a list of available products. A product can be added or removed from the cart by clicking the icon beside the product name. The number of items in the cart is updated accordingly:
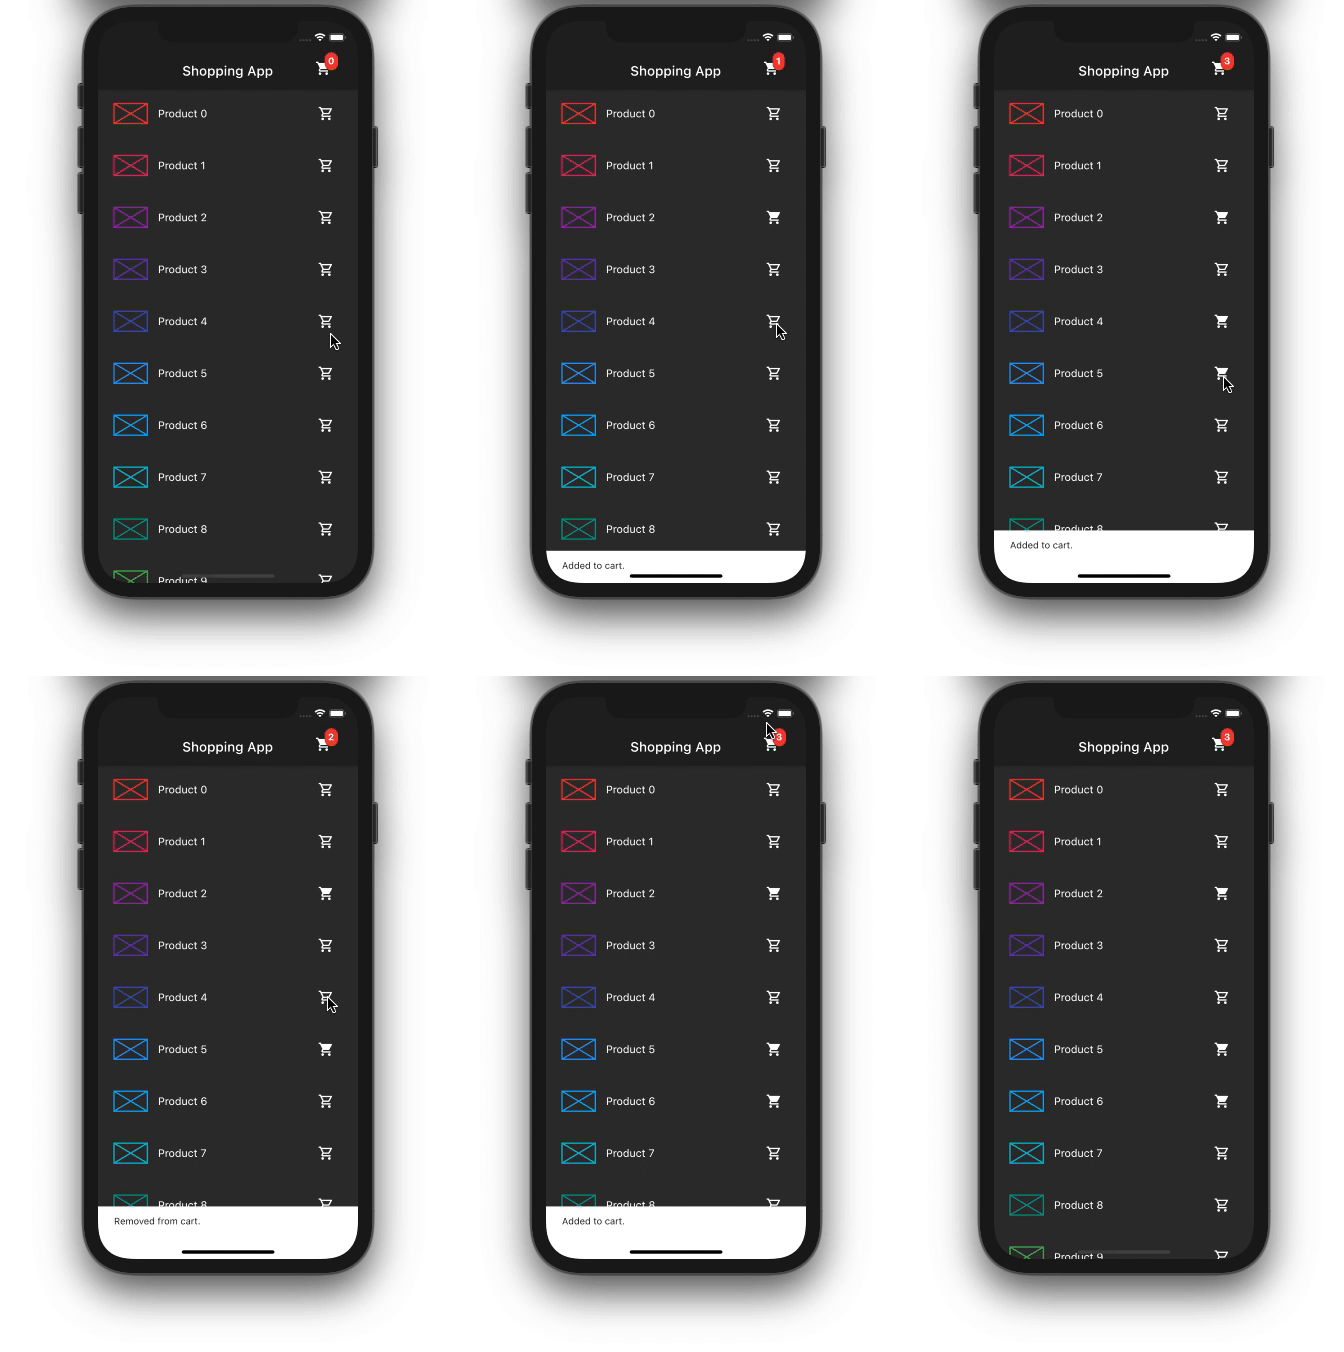
With setState, the entire UI is broken down into three classes:
home.dart is the main file holding the scaffold and AppBar. AppBar contains the cart icon widgetproduct_list.dart shows the list of productsproduct_tile.dart shows the individual product item.Here’s how it looks:
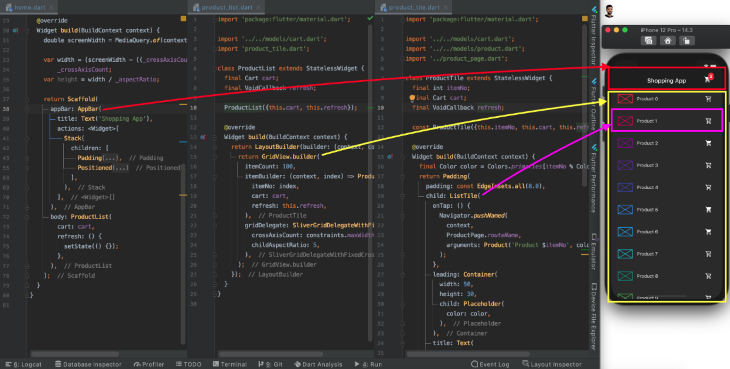
The list of items in the cart is passed all the way from the Home (top) to the ProductTile (bottom) widget to check whether a given item exits in the cart or not. If it does, the cart icon will be highlighted.
![]()
Clicking on the cart icon beside the product name adds the item to the cart. The callback to refresh the cart icon on the AppBar is made from ProductTile (bottom) to Home (top).
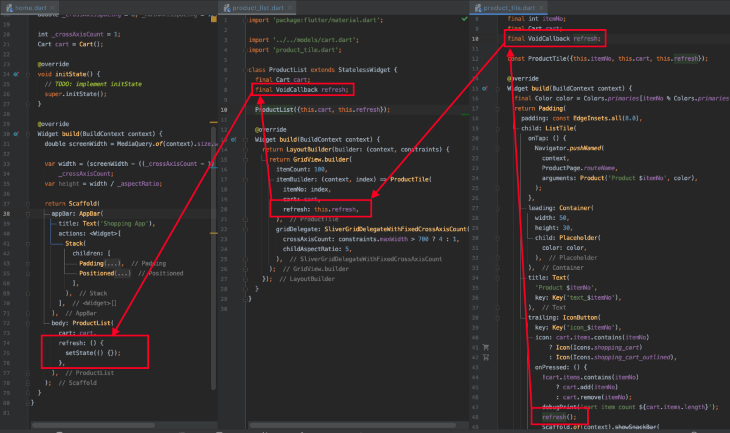
setStateThe setState approach to state management in Flutter works well for simple apps with just a few components. But for more complex, real-world Flutter apps with deep widget trees, using setState can lead to the following issues:
setState to a parent widget with a deep hierarchyNow let’s implement the same feature with BLoC.
First, add the BLoC library:
dependencies:
  flutter:
    sdk: flutter
  cupertino_icons: ^1.0.2
  flutter_bloc: ^7.0.0
Next, create and add a BLoC observer. This helps you determine the sequence of events and states that have occurred, which is great for debugging the app.
void main() {
  Bloc.observer = SimpleBlocObserver();
  runApp(MyApp());
}
import 'package:flutter_bloc/flutter_bloc.dart';

/// Custom [BlocObserver] which observes all bloc and cubit instances.
class SimpleBlocObserver extends BlocObserver {
  @override
  void onEvent(Bloc bloc, Object event) {
    super.onEvent(bloc, event);
    print(event);
  }

  @override
  void onTransition(Bloc bloc, Transition transition) {
    super.onTransition(bloc, transition);
    print(transition);
  }

  @override
  void onError(BlocBase bloc, Object error, StackTrace stackTrace) {
    print(error);
    super.onError(bloc, error, stackTrace);
  }
}
Create events to add and remove products from the list of cart items:
import 'package:equatable/equatable.dart';

abstract class CartEvent extends Equatable {
  const CartEvent();

  @override
  List<Object> get props => [];
}

class AddProduct extends CartEvent {
  final int productIndex;
  const AddProduct(this.productIndex);
  @override
  List<Object> get props => [productIndex];
  @override
  String toString() => 'AddProduct { index: $productIndex }';
}
Now, create states to represent a product being added and removed:
import 'package:flutter/material.dart';

abstract class CartState {
  final List<int> cartItem;
  const CartState({@required this.cartItem});

  @override
  List<Object> get props => [];
}

class ProductAdded extends CartState {
  final List<int> cartItem;
  const ProductAdded({@required this.cartItem}) : super(cartItem: cartItem);

  @override
  List<Object> get props => [cartItem];
  @override
  String toString() => 'ProductAdded { todos: $cartItem }';
}
Write business logic to add and remove products into the cartItems and emit the respective state. The actual list of items in the cart is maintained at the BLoC level.
class CartBloc extends Bloc<CartEvent, CartState> {
  CartBloc() : super(ProductAdded(cartItem: []));

  final List<int> _cartItems = [];
  List<int> get items => _cartItems;

  @override
  Stream<CartState> mapEventToState(CartEvent event) async* {
    if (event is AddProduct) {
      _cartItems.add(event.productIndex);
      yield ProductAdded(cartItem: _cartItems);
    } else if (event is RemoveProduct) {
      _cartItems.remove(event.productIndex);
      yield ProductRemoved(cartItem: _cartItems);
    }
  }
}
Next, wrap the scaffold widget inside BlocProvider.
BlocProvider is a Flutter widget that makes any BLoC available to the entire widget tree below it. In our case, any widget in between Home (top) and ProductTile (bottom) can have access to the cart, so no need to pass the cart data from the top of the widget tree to the bottom.
BlocProvider(
    create: (_) => CartBloc(),
    child: Scaffold(
      appBar: CartCounter(),
      body: ProductList(),
    ));
Wrap the cart icon and product list inside the BlocBuilder. BlocBuilder simply rebuilds the widget inside it upon receiving the new states from the BLoC.
// Cart icon
BlocBuilder<CartBloc, CartState>(builder: (_, cartState) {
  List<int> cartItem = cartState.cartItem;
  return Positioned(
    left: 30,
    child: Container(
      padding: EdgeInsets.all(5),
      decoration: BoxDecoration(
          borderRadius: BorderRadius.circular(10),
          color: Colors.red),
      child: Text(
        '${cartItem.length}',
        style: TextStyle(fontWeight: FontWeight.bold),
      ),
    ),
  );
}),
//Product list
 BlocBuilder<CartBloc, CartState>(builder: (_, cartState) {
  List<int> cart = cartState.cartItem;
  return LayoutBuilder(builder: (context, constraints) {
    return GridView.builder(
      itemCount: 100,
      itemBuilder: (context, index) => ProductTile(
        itemNo: index,
        cart: cart,
      ),
      gridDelegate: SliverGridDelegateWithFixedCrossAxisCount(
        crossAxisCount: constraints.maxWidth > 700 ? 4 : 1,
        childAspectRatio: 5,
      ),
    );
  });
});
Note: The BlocBuilder for CartBloc is added only in two places because we only want these two widgets to rebuild when something happen at CartBloc. This approach of only refreshing widgets that are required significantly reduces the number of unnecessary redraws.
The next step is to shoot events to CartBloc for adding and removing items in the cart. BlocProvider.of<CartBloc>(context) finds the nearest instance of CartBloc in the widget tree and adds the events to it:
IconButton(
  key: Key('icon_$itemNo'),
  icon: cart.contains(itemNo)
      ? Icon(Icons.shopping_cart)
      : Icon(Icons.shopping_cart_outlined),
  onPressed: () {
    !cart.contains(itemNo)
        ? BlocProvider.of<CartBloc>(context).add(AddProduct(itemNo))
        : BlocProvider.of<CartBloc>(context).add(RemoveProduct(itemNo));
  },
)
Now replace BlocBuilder with BlocConsumer. BlocConsumer allows us to rebuild the widget and react to the states. It should be only used when you want to rebuild the widget and also perform some action.
For our example, we want to refresh the list and show a snackbar whenever a product is added or removed from the cart:
BlocConsumer<CartBloc, CartState>(
listener: (context, state) {
  Scaffold.of(context).showSnackBar(
    SnackBar(
      content: Text(
          state is ProductAdded ? 'Added to cart.' : 'Removed from cart.'),
      duration: Duration(seconds: 1),
    ),
  );
},
builder: (_, cartState) {
  List<int> cart = cartState.cartItem;
  return LayoutBuilder(builder: (context, constraints) {
    return GridView.builder();
  });
});
Optionally, if you want to reduce some boilerplate code and the sequence of the states doesn’t matter to you, try Cubit. Here is what CartCubit would look like:
class CartCubit extends Cubit<CartState> {
  CartCubit() : super(ProductAdded(cartItem: []));

  final List<int> _cartItems = [];
  List<int> get items => _cartItems;

  void add(int productIndex) {
    _cartItems.add(productIndex);
    emit (ProductAdded(cartItem: _cartItems));
  }

  void remove(int productIndex) {
    _cartItems.remove(productIndex);
    emit (ProductRemoved(cartItem: _cartItems));
  }
}
Note: Replace CartBloc with CartCubit throughout the code and fire the events as shown below:
onPressed: () {
  !cart.contains(itemNo)
      ? BlocProvider.of<CartCubit>(context).add(itemNo)
      : BlocProvider.of<CartCubit>(context).remove(itemNo);
},
The output is the same but with improved state management:

Having a solid BLoC architecture in place leads to a good separation of concerns. Although using the BLoC pattern requires more code than using setState, it makes the code more readable, scalable, and testable.
In this tutorial, we covered the basics of using the BLoC pattern in Flutter and walked through a practical example to highlight the benefits of using BLoC for state management in Flutter over the setState approach.
You can find the complete source code for this example on GitHub.
Install LogRocket via npm or script tag. LogRocket.init() must be called client-side, not
server-side
$ npm i --save logrocket

// Code:

import LogRocket from 'logrocket';
LogRocket.init('app/id');
// Add to your HTML:

<script src="https://cdn.lr-ingest.com/LogRocket.min.js"></script>
<script>window.LogRocket && window.LogRocket.init('app/id');</script>

@container scroll-state: Replace JS scroll listeners nowCSS @container scroll-state lets you build sticky headers, snapping carousels, and scroll indicators without JavaScript. Here’s how to replace scroll listeners with clean, declarative state queries.

Explore 10 Web APIs that replace common JavaScript libraries and reduce npm dependencies, bundle size, and performance overhead.

Russ Miles, a software development expert and educator, joins the show to unpack why “developer productivity” platforms so often disappoint.

Discover what’s new in The Replay, LogRocket’s newsletter for dev and engineering leaders, in the February 18th issue.
Hey there, want to help make our blog better?
Join LogRocket’s Content Advisory Board. You’ll help inform the type of content we create and get access to exclusive meetups, social accreditation, and swag.
Sign up now
3 Replies to "State management in Flutter using the BLoC design pattern"
I always find the best and most updated info on your blog. You are great people. Thanks !
Very easy to undertsand and to the point blog 🙂
how can i return to the previous bloc state in flutter bloc pattern