Automating your deployment process helps you deliver your product faster and allows your team to focus on building and collecting valuable feedback from customers.

Continuous deployment (CD), not to be confused with continuous delivery, is a software engineering approach in which software functionalities are delivered frequently through automated deployments. Continuous delivery, by contrast, needs final approval before a manual deployment is triggered.
Firebase is a web and mobile development platform by Google that includes offerings such as hosting, realtime database, and cloud storage. This tutorial will focus on the hosting product.
Setting up continuous delivery is sometimes a chore because you often have to use different tools and platforms to set up, build, test, and deploy — which brings us to GitHub Actions.
Launched in November 2019, GitHub Actions are individual tasks that you can combine to create jobs and customize your workflow. Most importantly, it enables you to set up tasks to build, test, and deploy your code from GitHub to Firebase.
In this guide, we’ll show you how to set up a workflow that builds, tests, and deploys a sample React project to Firebase.
To follow along with this tutorial, you should be familiar with the following.
We’ll use Create React App to get our React app up and running. Run the following commands in your terminal to set up a sample React app.
npx create-react-app react-cd-sample
cd react-cd-sample
npm start
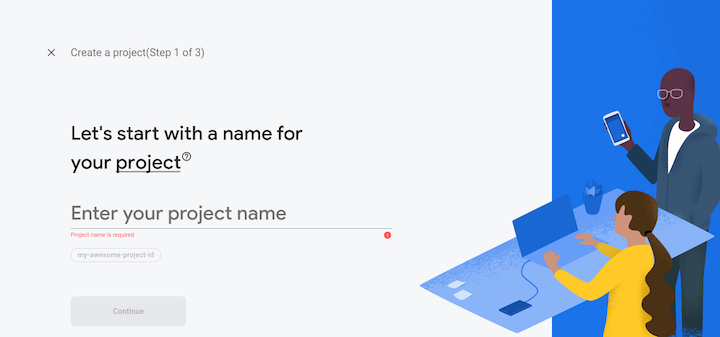
To set up a firebase account, go to Firebase Console, click on “Create a project,” and fill in the details.
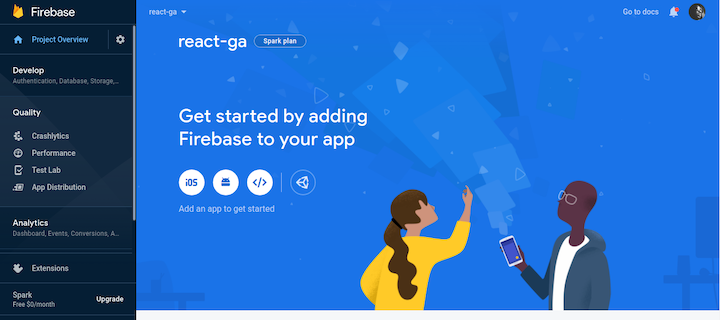
After setting up the project, you should see a dashboard similar to the screenshot below. Add a web app on the dashboard and fill in the details.
Once you’re done, launch your terminal and run the command below to install the firebase-cli globally.
npm install -g firebase-tools
Firebase CLI is a tool for managing, viewing, and deploying Firebase projects.
The next step is to initialize Firebase in the React project you created. Navigate to the root of your project on your terminal and run the command to log in to Firebase.
firebase login:ci
The above command will launch your browser and open a Google authentication page. After a successful authentication, a token will display on your terminal. Copy it and keep in a safe place because you’ll need it when it comes time to create a workflow.
After successful authentication, run the following.
firebase init
This initializes firebase and allows you to choose the products you want to integrate into your React project. As noted earlier, for this tutorial we’ll focus on hosting.
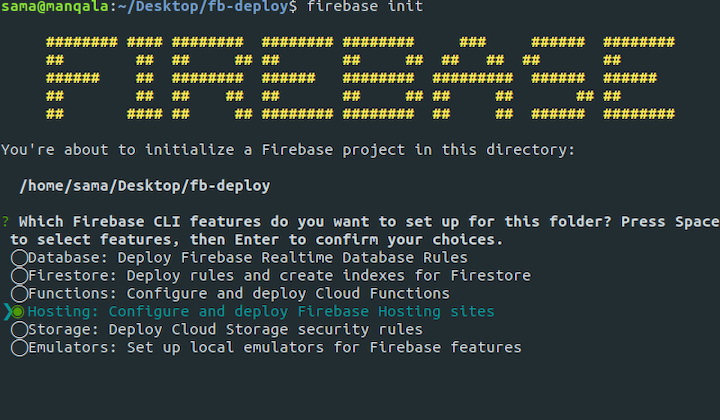
After choosing hosting, you’ll be prompted to configure the hosting options.
build as the public directory since that’s the default directory React serves after building a projectNo on the configure as a single-page app prompt to allow React to control that behavior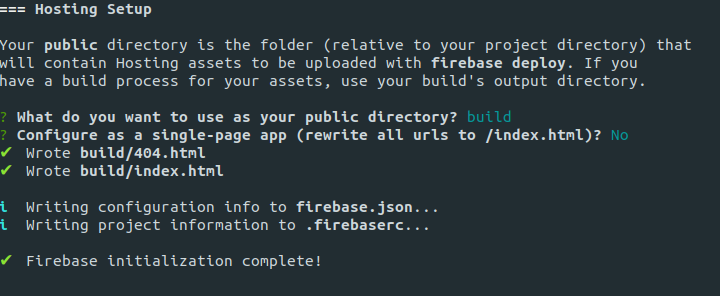
If it prompts you to overwrite any files, input no since you don’t want it to rewrite files generated by React. After the process is complete, two files are generated: firebase.json and .firebaserc.
The firebase.json file contains information on the location of files, assets, and settings related to the project. The .firebaserc file stores project aliases, which can be used to set different hosting options for the same application — one for staging and the other for production.
We’ll use a GitHub action created by Jeremy Shore called GitHub Action for Firebase, which wraps the firebase-cli to enable common commands.
To get started, you’ll need a GitHub repository to house your project, so head over to GitHub and create one. Add the repository to the project, commit the changes, and push the project to GitHub.
Next, go to your settings in the repository and click on Secrets, then Add a new secret. Input FIREBASE_TOKEN as the name and the token you copied earlier as the value. After doing that, click Add secret to save the environment variable.
To create a workflow, the workflow file must be stored in a .github/workflows directory located in the root directory of your project. Go to the root of your project directory and run the following.
mkdir .github
cd .github
mkdir workflows
cd workflows
touch main.yml
Open main.yml in a text editor and input the following.
name: Firebase Deploy
on:
  push:
    branches:
      - master
jobs:
  build:
    name: Build
    runs-on: ubuntu-latest
    steps:
      - name: Checkout Repo
        uses: actions/[email protected]
      - name: Install Dependencies
        run: npm install
      - name: Run Tests
        env:
          CI: true
        run: npm test
      - name: Build
        run: npm run build
      - name: Archive Production Artifact
        uses: actions/upload-artifact@v2
        with:
          name: build
          path: build
  deploy:
    name: Deploy
    needs: build
    runs-on: ubuntu-latest
    steps:
      - name: Checkout Repo
        uses: actions/[email protected]
      - name: Download Artifact
        uses: actions/download-artifact@v2
        with:
          name: build
          path: build
      - name: Deploy to Firebase
        uses: w9jds/firebase-action@master
        with:
          args: deploy --only hosting
        env:
          FIREBASE_TOKEN: ${{ secrets.FIREBASE_TOKEN }}
The workflow is divided into two main parts: on and jobs. The on section defines what triggers the workflow — in this case, whenever you push to the master branch. The jobs section defines what the workflow is expected to run, which is build and deploy. Build installs the dependencies, runs test, and builds the project. Deploy is dependent on build; after the build job runs successfully, deploy is responsible for deploying the project to firebase.
After saving the file, commit and push your changes to GitHub. Click on the Actions tab on the repository and watch the actions as it runs. Once it successfully executes, the project is deployed to Firebase. Visit your .firebaseapp.com to view your project.
Setting up continuous deployment doesn’t have to be expensive or cumbersome. You can integrate the processes described in this tutorial into your projects with ease, and it’ll help ensure you deploy projects with fewer bugs to production more quickly than ever before.
To learn more, check out the following resources.
Install LogRocket via npm or script tag. LogRocket.init() must be called client-side, not
server-side
$ npm i --save logrocket

// Code:

import LogRocket from 'logrocket';
LogRocket.init('app/id');
// Add to your HTML:

<script src="https://cdn.lr-ingest.com/LogRocket.min.js"></script>
<script>window.LogRocket && window.LogRocket.init('app/id');</script>
Hey there, want to help make our blog better?
Join LogRocket’s Content Advisory Board. You’ll help inform the type of content we create and get access to exclusive meetups, social accreditation, and swag.
Sign up now
Not sure if low-code is right for your next project? This guide breaks down when to use it, when to avoid it, and how to make the right call.

Compare Firebase Studio, Lovable, and Replit for AI-powered app building. Find the best tool for your project needs.

Discover how to use Gemini CLI, Google’s new open-source AI agent that brings Gemini directly to your terminal.

This article explores several proven patterns for writing safer, cleaner, and more readable code in React and TypeScript.


9 Replies to "Setting up continuous deployment with React, Firebase, and GitHub Actions"
Hi! Thanks for the article! But due to a breaking change in actions/download-artifact@master this won’t work unless you add path : build to the Download Artifact step. See this issue: https://github.com/w9jds/firebase-action/issues/38
Hello, thanks for this. I’ll update the article as soon as possible.
It has been updated. Thanks once again.
Nice article! Is it possible to deploy cloud functions too?
Yes you can, all you have to do is modify the flag in `args` of the deploy job to `–only functions,hosting`
Looks like it needs an update again, these repos renamed master to main.
dude you forgot to cd in to workflows
Input FIREBASE_TOKEN as the name and the token you copied earlier as the value. After doing that, click Add secret to save the environment variable.
what is the copied value? is it Firebase-Api-Key or something else. I didn’t get it
Thanks a lot for that! For those people who are a bit confused
Ensure the branch is “master” or “main”
repoToken: ‘${{ secrets.GITHUB_TOKEN }}’
firebaseServiceAccount: ‘${{ secrets.FIREBASE_SERVICE_ACCOUNT_[your project name] }}’
that’s how it worked for me