Editor’s Note: This blog post was updated with relevant information in June 2021.

The Replay is a weekly newsletter for dev and engineering leaders.
Delivered once a week, it's your curated guide to the most important conversations around frontend dev, emerging AI tools, and the state of modern software.
In plain terms, server-side rendering (SSR) is a technique where we process web pages on a server by pre-fetching and amalgamating the data, after which we then pass the fully rendered HTML page to the browser (client-side).
For context, let’s take a step back to dissect the evolution of the web, specifically on the frontend. Before the increasing popularity of single-page applications, a web page typically received an HTML (in most cases, accompanied with some images, style sheet, and JavaScript) response after making a request to the server, which is then rendered on the browser.
This worked quite well for a while because most web pages then were mainly just for displaying static images and text and had little interactivity. Today, however, this is no longer the case, as many websites have morphed into full-fledged applications often requiring interactive user interfaces.
With this requirement came the need to manipulate the DOM using JavaScript, which could be tedious and fraught with many inefficiencies, often leading to poor performance and slow user interfaces.
JavaScript frameworks such as React, Angular, and Vue were introduced, which made it quicker and more efficient to build user interfaces. These frameworks introduced the concept of virtual DOM where a representation of the user interface is kept in memory and synced with the real DOM.
Also, instead of getting all of the content from the HTML document itself, you receive a bare-bones HTML document with a JavaScript file that will make requests to the server, get a response (most likely JSON), and generate the appropriate HTML. This is called client-side rendering (CSR).
When using a JavaScript framework such as Vue, the source file will look like this:
<!DOCTYPE html>
<html>
<head>
  <meta charset="utf-8">
  <title>Hello World</title>
</head>
<body>
  <div id="root">
    <app></app>
  </div>
  <script src="https://vuejs.org"type="text/javascript"></script>
</body>
</html>
As you can see, instead of having all content inside HTML tags, you have a container div with an id of root. In this container, we have a special tag app, which will contain content parsed by Vue. The server is now only responsible for loading the bare minimum of the website or application. Everything else is handled by a client-side JavaScript library/framework, in this case, Vue.
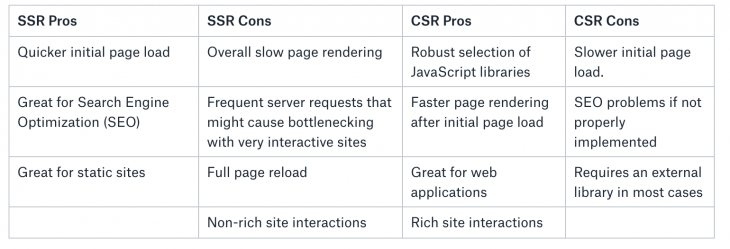
The advantages and disadvantages of each method can be summarized as follows:

One of the problems with CSR or a typical single-page application is SEO, as many search engines cannot crawl your application as intended. Though in recent years there has been an update in Google’s algorithm to better handle these situations, it’s not quite perfect yet.
How do we bring in the advantages of SSR in a single-page application? Nuxt.js is a framework built on Vue that allows us to have the best of both SSR and CSR features while avoiding their cons, through something called universal rendering.
In Nuxt, when a browser sends the initial request, it will hit the Node.js internal server, which pulls all data from APIs where necessary. The server will then generate the full HTML and send it back to the browser (the SSR part of our application). The HTML content is displayed but un-interactive and typically looks like this:
<!DOCTYPE html>
  <HTML>
   <head>
    <meta charset="utf-8">
    <title>Hello World</title>
  </head>
  <body>
   <h1>My Website</h1>
   <p>Welcome to my new website</p>
   <p>This is some more content</p>
  </body>
</html>
We also get back our JavaScript bundles from the server, which triggers Vue.js hydration on the browser, making it reactive. After this process, the page is interactive as a CSR application. The advantages Nuxt brings include:
You can find a visual explanation of this entire concept here.
Note: Moving forward, I’ll assume that we have a basic understanding of Vue. This article is targeted at those that are already familiar with Vue.js and its concept. For those without knowledge of Vue.js, consider starting from the official Vue documentation or Maximilian’s course.
To see Nuxt in action, first, make sure you have a dependency manager such as Yarn installed. On Windows, this can be easily installed by downloading and running the executable file from the Yarn installation page. Alternatively, you could use NPM.
Let’s scaffold a new project called nuxt-tutorial-app by running the following command: yarn create nuxt-tutorial-app
Or with NPM: npx create-nuxt-app nuxt-tutorial-app
After a few installations, you will see a series of prompts. As this is just an introductory article on Nuxt, we would select the most minimal options to keep things simple:

Next, go into the nuxt-tutorial-app directory with: cd nuxt-tutorial-app
Then, we’ll launch our server with the following command: npm run dev
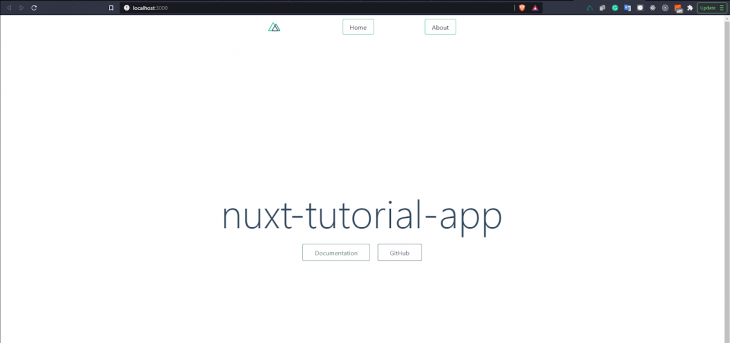
Open http:\\localhost:3000 on your browser, you should see something like this:

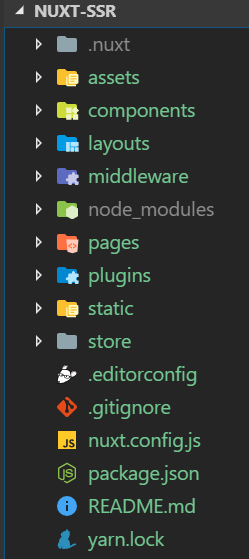
Let’s take a look at the directory structure of a typical Nuxt application. Open the nuxt-tutorial-app directory and you should see a structure like this:

The directories that contain .vue files are components, layouts, and pages. The components directory contains our reusable Vue components, and the layouts directory, as its name implies, contains layout components. In this directory, you will find a default.vue file (similar to Vue’s App.vue file), this file is a component that wraps all nuxt components. Everything in this file is shared among all other pages while each page content replaces the nuxt component.
The pages directory contains the top-level views and routes are automatically generated for any .vue file in this directory.
In the .store directory, we store our Vuex files for state management, the static directory contains files that we want to serve exactly as they are for example robots.txt or favicon.
The assets directory contains our un-compiled assets-things that need to be compiled when you deploy to production for example stylus, SASS, images, and fonts. In the pluginsdirectory, we put external JavaScript plugins to load before starting the Vue application.
In the middleware directory, we put in custom functions to run before rendering a layout or page such as navigation guards. Then, we have the nuxt.config.js file, which is used to modify the default Nuxt configuration.
export default {
  mode: 'universal',
  // Global page headers: https://go.nuxtjs.dev/config-head
  head: {
    title: 'nuxt-tutorial-app',
    htmlAttrs: {
      lang: 'en'
    },
    meta: [
      { charset: 'utf-8' },
      { name: 'viewport', content: 'width=device-width, initial-scale=1' },
      { hid: 'description', name: 'description', content: '' }
    ],
    link: [
      { rel: 'icon', type: 'image/x-icon', href: '/favicon.ico' }
    ]
  },
  // Global CSS: https://go.nuxtjs.dev/config-css
  css: [
    "~/assets/styles/main.css"
  ],
  // Plugins to run before rendering page: https://go.nuxtjs.dev/config-plugins
  plugins: [
  ],
  // Auto import components: https://go.nuxtjs.dev/config-components
  components: true,
  // Modules for dev and build (recommended): https://go.nuxtjs.dev/config-modules
  buildModules: [
  ],
  // Modules: https://go.nuxtjs.dev/config-modules
  modules: [
    // https://go.nuxtjs.dev/axios
    '@nuxtjs/axios',
  ],
  // Axios module configuration: https://go.nuxtjs.dev/config-axios
  axios: {},
  // Build Configuration: https://go.nuxtjs.dev/config-build
  build: {
  }
}
Let’s create a simple navigation component that will be visible on all our pages. In the layouts directory create a folder called partials. In this folder, create a file called nav.vue and enter the following code:
<template>
  <header>
    <nuxt-link to="/" class="logo">Nuxt-SSR</nuxt-link>
    <nav>
      <ul>
          <li><nuxt-link to="/">Home</nuxt-link></li>
          <li><nuxt-link to="about">About</nuxt-link></li>
          <li><nuxt-link to="services">Services</nuxt-link></li>
          <li><nuxt-link to="contact">Contact</nuxt-link></li>
      </ul>
    </nav>
  </header>
</template>
<script>
export default {
}
</script>
<style>
  header {
      background: rgb(0, 000, 000);
      display: grid;
      grid-template-columns: repeat(2,auto);
  }
  .logo, li a {
      padding: 1em 2em;
      display: block;
      text-transform: uppercase;
      text-decoration: none;
      font-weight: bold;
      color: white;
      font-size: .9em;
  }
  nav {
      justify-self: right;
  }
  ul {
      list-style-type: none;
  }
  li {
      display: inline;
  }
  li a {
      padding: 1em 2em;
      display: inline-block;
      background: rgba(0,0,0,0.1);
  }
</style>
Let’s break this code down further.
Mode: The type of application; either universal or spa. By selecting universal, you’re telling Nuxt that you want your app to be able to run on both the server-side and the client-side. By default, your Nuxt app is in universal mode, meaning that even if it’s missing from your config file, your app is in universal mode. For example, we used @nuxtjs/axios in this config file.
Head: As the name suggests, it contains all the default meta tags properties and favicon link found inside the head tag in your application. This is here because Nuxt.js doesn’t have a default index.html file, unlike Vue.js.
CSS: You’re expected to enter the link to all your global CSS files so your application can take it into account when mounting the application. We’re going to add the link to our CSS file to this and restart our application.
 /*
   ** Global CSS
   */
  css: ["~/assets/styles/main.css"]
Modules: Modules are Nuxt.js extensions that can extend the framework’s core functionality and add endless integrations. Once you have installed the modules, you can then add them to your nuxt.config.js file under the modules property.
Plugins: This is where you integrate all the plugins in your plugins folder into the application. It accepts an object with properties such as src and mode. The src accepts the file path to the plugin, and mode configures how your application treats such plugin; either as a server-side or a client-side plugin. For example, if we’re using the vue-js-modal library in our project, after installation, we initialize it inside a vue-js-modal.js within the plugins folder.
import Vue from 'vue'
import VModal from 'vue-js-modal/dist/ssr.index'
import 'vue-js-modal/dist/styles.css';
Vue.use(VModal, {
  dialog: true,
  dynamic: true,
  injectModalsContainer: true,
  dynamicDefaults: {
    foo: 'foo'
  }
})
After which, it is imported into our config file, with mode showing it’s a server plugin.
{src: '~plugins/vue-js-modal.js', mode: 'server'},
Note: It is important to select the mode correctly, especially if your plugin requires a client-side resource that is not available on the server-side and vice-versa.
Component: When it is true, it enables automatic routing, and vice versa when it is false.
Using components within other components or pages has never been easier, as you don’t even need to import it manually like you do in Vue. All you need to do is to get the exact name of the component you want to import and use it within the parent component as if it’s “automatically imported” already. For example, consider we want to import a Logo.vue component into our navBar.vue component:
<template>
  <svg class="NuxtLogo" width="245" height="180" viewBox="0 0 452 342" xmlns="http://www.w3.org/2000/svg">
    <path
      d="M139 330l-1-2c-2-4-2-8-1-13H29L189 31l67 121 22-16-67-121c-1-2-9-14-22-14-6 0-15 2-22 15L5 303c-1 3-8 16-2 27 4 6 10 12 24 12h136c-14 0-21-6-24-12z"
      fill="#00C58E"
    />
    <path
      d="M447 304L317 70c-2-2-9-15-22-15-6 0-15 3-22 15l-17 28v54l39-67 129 230h-49a23 23 0 0 1-2 14l-1 1c-6 11-21 12-23 12h76c3 0 17-1 24-12 3-5 5-14-2-26z"
      fill="#108775"
    />
    <path
      d="M376 330v-1l1-2c1-4 2-8 1-12l-4-12-102-178-15-27h-1l-15 27-102 178-4 12a24 24 0 0 0 2 15c4 6 10 12 24 12h190c3 0 18-1 25-12zM256 152l93 163H163l93-163z"
      fill="#2F495E"
    />
  </svg>
</template>
<style>
.NuxtLogo {
  animation: 1s appear;
  margin: auto;
}
@keyframes appear {
  0% {
    opacity: 0;
  }
}
</style>

Logo.vue

<template>
  <header class="header">
    <div class="logo">
      <nuxt-link to="/">
        <Logo />
      </nuxt-link>
    </div>
    <nav class="nav">
      <div class="nav__link">
        <nuxt-link to="/">Home</nuxt-link>
      </div>
      <div class="nav__link">
        <nuxt-link to="/About">About</nuxt-link>
      </div>
    </nav>
  </header>
</template>
<script>
export default {
  name: "navBar",
};
navBar.vue
As long as Logo.vue is inside the components folder, we can safely add the </Logo> to our navBar component. In fact, any component inside the components folder can be imported as such, plus, components can also be imported into .vue files inside the pages folders. If for whatever reason you still want to import components manually like you’ll do with Vue, that will still work.
Before we start, let’s look at Vue’s router tag and its equivalent in Nuxt.
To create routes in Nuxt, all we need to do is create a new .vue file within our pages folder and its subfolders. Just like that, the route is created automatically with the file’s name.
pages
--| index.vue
--| about.vue
--| dashboard.vue
--| dashboard/
 -----| user.vue
 -----| settings.vue
 -----| index.vue
You can go on to create a link that can lead to another page by using <nuxt-link/>. Just like the code below:
<nav class="nav">
  <div class="nav__link">
    <nuxt-link to="/">Home</nuxt-link>
  </div>
  <div class="nav__link">
    <nuxt-link to="/about">about</nuxt-link>
  </div>
  <div class="nav__link">
    <nuxt-link to="/dashboard">Dashboard</nuxt-link>
  </div>
  <div>
    <nuxt-link to="/dashboard/user">User's dashboard</nuxt-link>
  </div>
  <div>
    <nuxt-link to="/dashboard/settings">Dashboard settings</nuxt-link>
  </div>
</nav>
For nested routes, we follow the same principle and add /, which tells Nuxt that we’re describing a subfolder. In /dashboard, we can route to /dashboard/user and /dashboard/settings as a child component using <NuxtChild/>.
 <template>
    <div>
    <h1>I am the dashboard</h1>
    <nav>
      <ul>
        <li>
          <NuxtLink to="/dashboard/user">User's dashboard</NuxtLink>
        </li>
        <li>
          <NuxtLink to="/dashboard/settings">Dashboard settings</NuxtLink>
        </li>
      </ul>
    </nav>
    <NuxtChild  />
  </div>
</template>
Find the code here.
Let’s imagine we have a folder like this:
pages
--| carDashboard.vue
--| cars/
 -----| _id.vue
Going by our previous explanation on routing, carDashboard.vue is considered a page on its own. Below, we have our carDashboard.vue that contains an array of cars. We then loop through this array and display each car individually within the component.
<template>
  <section class="home">
    <h1 class="home__heading">Dynamic route example</h1>
    <div>
      <div v-for="car in cars" :key="car.capacity">
        <p>
          <nuxt-link
            :to="{path: `/cars/${car.type}`}"
          >{{ car.name }}</nuxt-link>
        </p>
      </div>
    </div>
  </section>
</template>
<script>
export default {
  name: "dynamicRoute",
  data() {
    return {
      cars : [
        {
          "color": "purple",
          "name": "minivan",
          "type": "minivan.jpg",
          "registration": new Date('2017-01-03'),
          "capacity": 7
        },
        {
          "color": "red",
          "name": "moving truck",
          "type": "movingtruck.jpg",
          "registration": new Date('2018-03-03'),
          "capacity": 5
        },
        {
          "color": "red",
          "name": "station wagon",
          "type": "stationwagon.jpg",
          "registration": new Date('2018-03-03'),
          "capacity": 4
        },
        {
          "color": "red",
          "name": "lambogini",
          "type": "lambogini.jpg",
          "registration": new Date('2018-03-03'),
          "capacity": 2
        },
        {
          "color": "red",
          "name": "truck",
          "type": "truck.jpg",
          "registration": new Date('2018-03-03'),
          "capacity": 11
        }
      ]
    }
  }
}
</script>
We use <nuxt-link/> to navigate to the individual pages by using JavaScript template literals to specify our route. We are adding car.type to our route path to show that we’re referring to the dynamic _id.vue page, plus, we’re also passing the car.type into the page through the route params so we can make use of it.

Now to the fun part! We need to display individual information about each car when we click on it so that when we click on a car’s name, it opens a new page (_id.vue) displaying that specific car alone with an image.
<template>
  <section class="cars">
    <h1 class="cars__name">{{ carName }}</h1>
    <img class="vehicle" :src="require(`../../assets/images/${carName}`)"/>
  </section>
</template>
<style>
.vehicle {
  height: 45rem;
}
</style>
<script>
export default {
  data() {
    return {
      carName: this.$route.params.id,
    }
  }
};
</script>
Now, within our data, we’ll collect the information we passed earlier. It’s received from this.$route.params.id and then assigned to carName. Then, we use it within our component by displaying it as text and use it as the :src to display the car’s image. Here’s the thing: we already have images within our project that have the same name as carName. So for every carName, there’s a corresponding image with the same name in our assets/images folder, which then displays our car image.

The example above can be achieved in a much more scalable manner using Vuex because Vuex’s state can be accessed by all components. Plus, you’ll most likely be using Vuex if you’re working on an actual real-life application.
First, let’s set up our store and add the cars array to our state. We will then create a new getter (getCarById) that accepts a parameter and loops through our cars arrays to find the one that matches the parameter.
export const state = () => ({
  cars : [
    {
      "color": "purple",
      "name": "minivan",
      "type": "minivan.jpg",
      "link": "",
      "registration": new Date('2017-01-03'),
      "capacity": 7
    },
    {
      "color": "red",
      "name": "moving truck",
      "type": "movingtruck.jpg",
      "registration": new Date('2018-03-03'),
      "capacity": 5
    },
    {
      "color": "red",
      "name": "station wagon",
      "type": "stationwagon.jpg",
      "registration": new Date('2018-03-03'),
      "capacity": 4
    },
    {
      "color": "red",
      "name": "lambogini",
      "type": "lambogini.jpg",
      "registration": new Date('2018-03-03'),
      "capacity": 2
    },
    {
      "color": "red",
      "name": "truck",
      "type": "truck.jpg",
      "registration": new Date('2018-03-03'),
      "capacity": 11
    }
  ]
})

export const getters = {
    getCarById: (state) => (id) => {
        return state.cars.find(car => car.type == id)
    }
}
We can also add actions and mutations in a similar manner. We’ll be using new components to demonstrate this:
pages
--| vuexCarDashboard.vue
--| vuexcars/
 -----| _id.vue
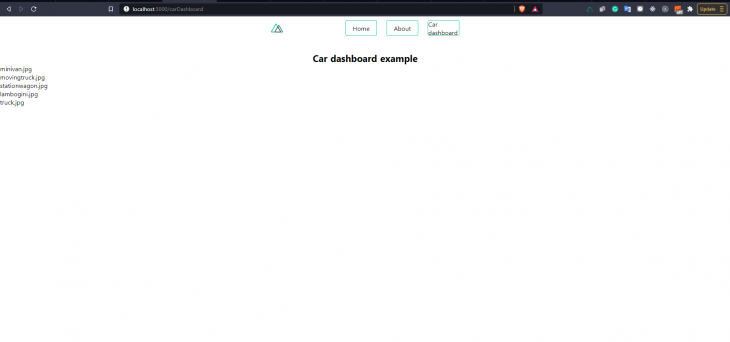
In the vuexCarDashboard.vue, we create the page and get the cars array from our state instead of the component’s data function that we made use of previously. After which, we loop through the data, display it within our component, and use it while routing — the exact way it was handled before, just that now we’re using the state.
 <template>
  <section class="home">
    <h1 class="home__heading">Car dashboard example</h1>
    <div>
      <div v-for="car in cars" :key="car.capacity">
        <p>
          <nuxt-link :to="{ path: `/vuexcars/${car.type}` }">{{
            car.name
          }}</nuxt-link>
        </p>
      </div>
    </div>
  </section>
</template>
<script>
export default {
  name: "carDashboard",
  data() {
    return {
      cars: this.$store.state.cars
    }
}
};
</script>
In our _id.vue component, we will make use of our getter (getCarById) in the store to pull the correct data from the state, while using this.$route.params.id as an argument for it. Within our component, we use the data that is returned to display the name and the image of the car.
<template>
  <section v-if="carName" class="cars">
    <h1 class="cars__name">{{ carName.name }}</h1>
    <img class="vehicle" :src="require(`../../assets/images/${carName.type}`)"/>
  </section>
  <section v-else>
    <h1 class="cars__name">PAGE NOT FOUND</h1>
  </section>
</template>
<style>
.vehicle {
  height: 45rem;
}
</style>
<script>
//import { mapGetters } from "vuex";
export default {
  computed: {
    carName() {
      return this.$store.getters.getCarById(this.$route.params.id);
    }
  },
};
</script>
For better UX, we will add one more thing. We will use v-if and v-else to display a 404 page if the carName doesn’t exist.


Now that our nuxt-tutorial-app app is complete, let’s deploy our new app to production. We’ll be deploying our Nuxt.js app to Heroku using GitHub for easy deployment. So, you’ll have to push your code to a GitHub repo.
First, log in to Heroku and create a new app. Choose a name and connect it to GitHub using the repo created. You should also choose to have automatic deploys enabled for your app. Now, open your settings, you should see something similar to this:

Now, add the following config variables.
NPM_CONFIG_PRODUCTION=false
HOST=0.0.0.0
NODE_ENV=production
The next thing we have to do is to create a Procfile in our web app. Specifically in the root folder of our app, on the same level as nuxt.config.js, and add this line of code:
web: nuxt start
This will run the Nuxt start command and inform Heroku to receive external HTTP traffic from Heroku’s routers. After adding Procfile to your app, commit and push your changes to your GitHub repo. Your app should now be live and accessible from its URL.
This article has done a good job introducing us to Nuxt. We went over structure, syntax, including using Vue-router, and Vuex. Here is the repo and live demo. Although, when building real-life applications, you’ll need some other critical functionalities like handling authentication and communicating with external APIs using fetch or Axios (directly in the component or using Vuex) or even handling authentication.
Debugging Vue.js applications can be difficult, especially when users experience issues that are difficult to reproduce. If you’re interested in monitoring and tracking Vue mutations and actions for all of your users in production, try LogRocket.

LogRocket lets you replay user sessions, eliminating guesswork by showing exactly what users experienced. It captures console logs, errors, network requests, and pixel-perfect DOM recordings — compatible with all frameworks.
With Galileo AI, you can instantly identify and explain user struggles with automated monitoring of your entire product experience.
Modernize how you debug your Vue apps — start monitoring for free.

@container scroll-state: Replace JS scroll listeners nowCSS @container scroll-state lets you build sticky headers, snapping carousels, and scroll indicators without JavaScript. Here’s how to replace scroll listeners with clean, declarative state queries.

Explore 10 Web APIs that replace common JavaScript libraries and reduce npm dependencies, bundle size, and performance overhead.

Russ Miles, a software development expert and educator, joins the show to unpack why “developer productivity” platforms so often disappoint.

Discover what’s new in The Replay, LogRocket’s newsletter for dev and engineering leaders, in the February 18th issue.
Hey there, want to help make our blog better?
Join LogRocket’s Content Advisory Board. You’ll help inform the type of content we create and get access to exclusive meetups, social accreditation, and swag.
Sign up now
2 Replies to "Server-side rendering with Vue and Nuxt.js"
Full page reload and non-rich site interaction as SSR cons – that’s not true.
Full page reload isn’t needed. After page is intially server-side rendered everything can work on client side.
SSR is important only for SEO, not for user.
I have a doubt if I use client-only into a component that means that component would not be part of SEO ?