Application state management is a key factor in structuring applications for better scalability and maintainability. In this article, we will learn different ways to structure different sized applications using Vuex and Nuxt.js.

The Replay is a weekly newsletter for dev and engineering leaders.
Delivered once a week, it's your curated guide to the most important conversations around frontend dev, emerging AI tools, and the state of modern software.
Nuxt is a high-level framework built on top of Vue to help you build production-ready Vue applications.
Nuxt.js can help improve development work in Vue in several ways. First, right out of the box, Nuxt.js gives you a great structure for your code, which is also flexible and configurable in the next.config.js file. Nuxt.js optimizes your code and facilitates proper indexing of your application by search engines.
Nuxt.js also comes packed with awesome packages like Vue-router, Vuex, Webpack, Babel, and PostCSS, as well as cool features like auto importing components and seamlessly setting up routing by just creating names of files in the pages directory.
Nuxt.js also provides server-side rendering (SSR) capabilities which enable faster first meaningful paint.

According to its documentation, Vuex is Vue’s state management pattern and library. So, what does that mean? Simply put, Vuex is a library for managing the data that your components depend on.
Vuex was designed based on Flux (developed by Facebook for managing state) and provides a store that serves as the single source of truth for your Vue application as well as mutations and actions for predictable manipulation of the data in the store.
Before we continue, here are a few important Vuex terminologies to keep in mind:
data hook, but if you want the data to be accessible by any component, it is recommended that you store it in the stateState management in an application with many components can be a real pain. The more components you have, the more you’ll need to pass the data up the component tree with the use of events (until you reach a parent component), and then down to the component that needs the data with the use of props.
With fewer components, this relatively is simple:

With more, however, things become complicated, like in this example component structure:

If component A has the data needed by component G, then you’ll need to move the data through B and E, if component G has data needed by component C, you’ll need to move the data through E, B, and A by emitting events, and then to C through props. As you can imagine, this can become a huge mess as the number of components and nesting grows.
If you can easily move data between components, then you probably don’t need a state management tool like Vuex. But, as Dan Abramov, the author of Redux said, “Flux libraries are like glasses: you’ll know when you need them.” I’d say the same for any state management library.
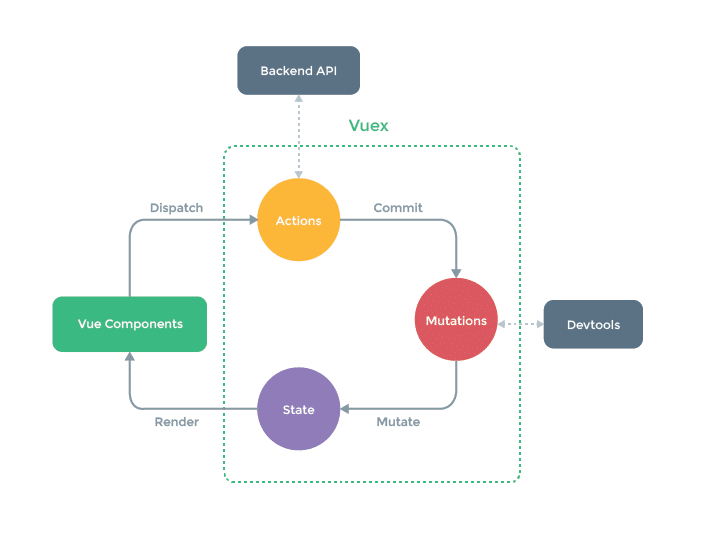
With Vuex, you can access application-level data and functions from all the components, easily and predictably. You can begin to see what I mean in the diagram below.

Vuex automatically enables a Vuex store instance when it notices a file that isn’t hidden in the store directory (located in the root directory of the project). Nuxt automatically converts every file (except actions, mutations, and state files) in the store directory to a namespaced module, this means that the actions or mutations of these modules can have the same names and be run independently. Nuxt then scopes the action or mutation to that module.
Nuxt stores can be created in two modes, classic mode, and modules mode.
Classic mode is set to be deprecated in Vuex 3. In this mode, store/index.js returns a method that creates a store instance like this:
import Vuex from "vuex";
import state from './state';
import actions from './actions';
import mutations from './mutations;
import moduleOne from './moduleOne;
const createStore = () => {
    return new Vuex.Store({
       state,
       actions,
       mutations,
        modules: {
            moduleOne
        },
    });
};
export default createStore;
In modules mode, every .js file in the store directory is automatically converted into a namespaced module (index.js). This is the root module that will export an object like this:
import Vuex from "vuex";
import state from './state';
import actions from './actions';
import mutations from './mutations;
export default {
       state,
       actions,
       mutations,
};
There is no need to import the modules because Nuxt will do that for you.
A typical small-scale application includes around five state properties, one action, and five mutations. When you put the state, mutation, action, and getters in the same file, it will not be complex to manage and the file won’t be overly code-heavy.
For this kind of app, simply create a store directory in the root directory of your project, and create an index.js file within it.
Index.js
export const state = () => ({
  counter: 0
})

export const mutations = {
  increment(state) {
    state.counter++
  },
  decrement(state) {
    state.counter--
  }
}
When creating a module, the state value must always be a function, while your mutations and actions can be objects. For the store to be created, your store, mutations, and actions must be exported. The store that will be created by Vuex for the above file will be:
new Vuex.Store({
  state: () => ({
    counter: 0
  }),
  mutations: {
    increment(state) {
      state.counter++
    }
  }
})
That is pretty much as simple as a root module can look in Nuxt.
As the number of state properties, actions, and mutations grow to about 20 each, the index.js file begins to look less presentable, maintainable, and manageable. Hence the need to break the store down.
Here are two approaches to structuring your state in a medium and large scale application
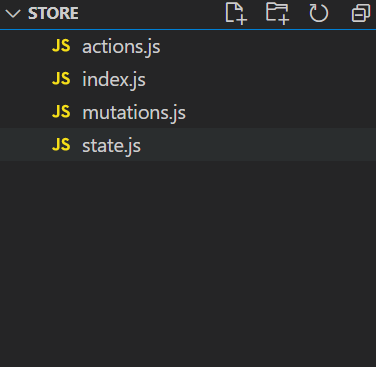
like-logic together, that is, you have different files for your actions, mutations, and stateFollowing the first approach means your store directory will look like this:

While this will better accommodate a growing store, I think that each file can get bogus and messy. Imagine there are 30 actions, mutations, and state properties, navigation through the code becomes more hectic and then we may start using comments and spacing to demarcate actions related to different models.
If we follow the second approach, we’ll have to divide our store into modules.

There are different opinions on what should make up a module, some think modules should represent features in the application, some think modules should represent data models from API endpoints. From experience and reading on the subject, I’d recommend the latter for medium-scale applications.
Therefore if we have some endpoints serving these models:
| URL | Method | Description |
| /product | POST | Adds a product to the DB |
| /product/:id | GET | Gets info of a product |
| /product/id | PUT | Edits the info of a product |
| /product/:id | DELETE | Deletes a product from the DB |
| /products | GET | Gets all the products in the DB |
| /user | GET | Gets a user’s info |
| /user | POST | Add a user |
| /user | PUT | Edit information of a user |
Representing data models with modules will make the directory look something like this:

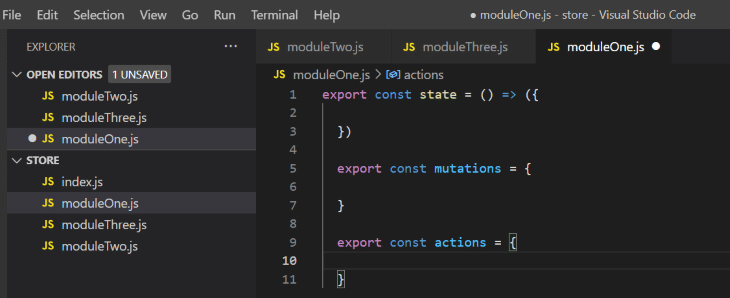
Each module will then have its state (exported as a function), mutations, and actions (exported as objects) either in the module’s index.js file or in their respective files.
Following the modular approach, and representing each data model from the API as modules, we can scale our large application easily. Imagine our app has grown to the point that we are dealing with over 60 state properties, actions, and mutations, neither the approach we used in the small scale or medium scale application will yield an easily manageable store structure.
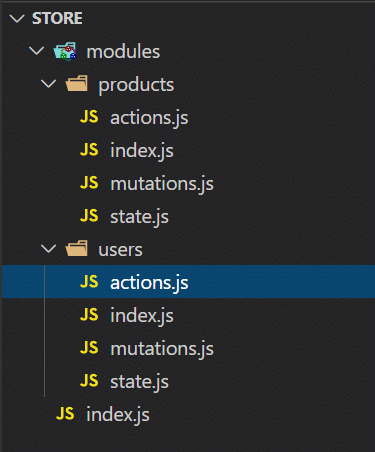
Instead of creating just a file for our module like we did in the medium-scale application, Nuxt allows us to work with subdirectories in the state, these subdirectories should be inside a modules directory. Each subdirectory in the modules directory will be a module, the name of the subdirectory will be the name of the module.
In this subdirectory, we can create a state.js for the state, actions.js for the actions, mutation.js file for the mutations, and an index.js file that will import these files and export them as an object. Nuxt will take this object as a module and include it in the store (no need for us to import it manually in the root index.js file).
In this article, we have looked at what Nuxt is, some advantages of using Nuxt, what Vuex is, and how it communicates with Nuxt.
We also went through how you can structure your store in a small scale, medium scale, and large scale Nuxt application. Their documentation is also a great resource for understanding these concepts.
Debugging Vue.js applications can be difficult, especially when users experience issues that are difficult to reproduce. If you’re interested in monitoring and tracking Vue mutations and actions for all of your users in production, try LogRocket.

LogRocket lets you replay user sessions, eliminating guesswork by showing exactly what users experienced. It captures console logs, errors, network requests, and pixel-perfect DOM recordings — compatible with all frameworks.
With Galileo AI, you can instantly identify and explain user struggles with automated monitoring of your entire product experience.
Modernize how you debug your Vue apps — start monitoring for free.

@container scroll-state: Replace JS scroll listeners nowCSS @container scroll-state lets you build sticky headers, snapping carousels, and scroll indicators without JavaScript. Here’s how to replace scroll listeners with clean, declarative state queries.

Explore 10 Web APIs that replace common JavaScript libraries and reduce npm dependencies, bundle size, and performance overhead.

Russ Miles, a software development expert and educator, joins the show to unpack why “developer productivity” platforms so often disappoint.

Discover what’s new in The Replay, LogRocket’s newsletter for dev and engineering leaders, in the February 18th issue.
Would you be interested in joining LogRocket's developer community?
Join LogRocket’s Content Advisory Board. You’ll help inform the type of content we create and get access to exclusive meetups, social accreditation, and swag.
Sign up now