Background processing is an important part of mobile application development, particularly when you want to poll a server or periodically send data to a server. Usually, an app is in the background if no activities are visible to the user.

In React Native, performing a task in the background might seem daunting at first. It is not as simple as writing a function in JavaScript, where the function is executed even after the activity is killed. Instead, React Native uses Headless JS to execute JavaScript code in the background.
In this article, we’ll learn to execute background operations in React Native using Native APIs and Headless JS. Headless JS is available only for Android, therefore, we’ll focus only on Android development in this article. First, let’s go over some fundamental tools that we’ll use.
Headless JS is a way to run JavaScript tasks in the background. Obviously, we can’t touch the UI in these tasks, but we can register a HeadlessTask like we would a React application in AppRegistry:
AppRegistry.registerHeadlessTask('DemoTask', () => require('DemoTask'));
Native Modules allow us to execute native code from within JavaScript. You can think of it as setting up a bridge between the JavaScript layer and the native layer.
WorkManager is the recommended way to perform background tasks in Android. WorkManager can schedule one-time or periodic tasks in a simple, reliable way.
Let’s build a toy application that would perform a periodic task using Headless JS. Setup for our application has three steps:
build.gradle as follows:implementation 'androidx.work:work-runtime:workmanagerversion'
Optionally, you can set up a simple Node.js Echo server and connect your device to the same network as your development machine. I prefer testing on a real device, so for instance, I’d connect my device to the development server over Wi-Fi, then I’d be able to make real requests to the Node server running on the same machine.
We’ll start by creating our background worker. The BackgroundWorker class extends the Worker class, which provides a doWork method where all the background tasks will occur:
public class BackgroundWorker extends Worker {
    private final Context context;

    public BackgroundWorker(@NonNull Context context, @NonNull WorkerParameters workerParams) {
        super(context, workerParams);
        this.context = context;
    }
    @NonNull
    @Override
    public Result doWork() {

        // background work will take place here
        Log.w("bg", "Worker do work");
        return Result.success();

    }
}
Result.success() tells WorkManager that the work finished successfully. We’ll start our Headless service at doWork.
WorkRequest tells WorkManager how and when our background task should execute. In our example, we want a periodic task, so we’ll use PeriodicWorkRequest. For a one-time work task, you’d use OneTimeWorkRequest:
workRequest = new PeriodicWorkRequest.Builder(BackgroundWorker.class, 20, TimeUnit.MINUTES).build();
Next, we’ll create a Native Module that provides a way to create and enqueue a work request at the click of a button. Our work request causes WorkManager to execute our work periodically.
Our event handlers will be written in JavaScript, so we need a way to call the native methods using JavaScript:
// BackgroundModule.java
public class BackgroundModule extends ReactContextBaseJavaModule {
    private static final String MODULE_NAME = "BackgroundWorkManager";

    private Context mContext;
    private PeriodicWorkRequest workRequest;

    BackgroundModule(@Nonnull ReactApplicationContext reactContext) {
        super(reactContext);
        mContext = reactContext;
        workRequest = new PeriodicWorkRequest.Builder(BackgroundWorker.class, 20, TimeUnit.MINUTES).build();
    }

    @ReactMethod
    public void startBackgroundWork() {
        WorkManager.getInstance(mContext).enqueueUniquePeriodicWork("testWork", ExistingPeriodicWorkPolicy.KEEP,workRequest);
    }

    @ReactMethod
    public void stopBackgroundWork() {
        WorkManager.getInstance(mContext).cancelUniqueWork("testWork");
    }

    @Nonnull
    @Override
    public String getName() {
        return MODULE_NAME;
    }
}
The getName method should return the name of the module, so we can get this module in our JavaScript code as follows:
const { BackgroundWorkManager } = ReactNative.NativeModules;
Then, methods marked with @ReactMethod can be accessed using:
BackgroundWorkManager.method_name()
Finally, for our Native Module to work, we need to create a ReactPackage and add it to the list returned by getPackages() in MainApplication.java:
// BackgroundPackage.java
public class BackgroundPackage implements ReactPackage {
    @Nonnull
    @Override
    public List<NativeModule> createNativeModules(@Nonnull ReactApplicationContext reactContext) {
        List<NativeModule> modules = new ArrayList<>();
        modules.add(new BackgroundModule(reactContext));
        return modules;
    }

    @Nonnull
    @Override
    public List<ViewManager> createViewManagers(@Nonnull ReactApplicationContext reactContext) {
        return Collections.emptyList();
    }
}
In MainApplication.java, add the following:
protected List<ReactPackage> getPackages() {
  @SuppressWarnings("UnnecessaryLocalVariable")
  List<ReactPackage> packages = new PackageList(this).getPackages();
  // Packages that cannot be autolinked yet can be added manually here, for example:
  // packages.add(new MyReactNativePackage());
    packages.add(new BackgroundPackage());
  return
With our Native Module taken care of, let’s go ahead and add the Headless Task Service, which is the most important piece of the puzzle we’re trying to solve:
// BackgroundHeadlessTaskService.java
public class BackgroundHeadlessTaskService extends HeadlessJsTaskService {
    @Override
    protected @Nullable
    HeadlessJsTaskConfig getTaskConfig(Intent intent) {

        Bundle extras = intent.getExtras();
        if (extras != null) {
            return new HeadlessJsTaskConfig(
                    "BackgroundHeadlessTask",
                    Arguments.fromBundle(extras),
                    5000, // timeout for the task
                    true // optional: defines whether or not  the task is allowed in foreground. Default is false
            );
        }
        return null;
    }
}
The taskKey BackgroundHeadlessTask is the name of our Headless Task that we’ll register in the AppRegistry in React Native.
The optional property allowedInForeground is set to true, allowing us to run the task even when the app is in the foreground. Normally, this is not recommended because it could slow the UI down. However, we won’t perform any heavy tasks in our example application.
Now that our service is ready, we’ll add it to AndroidManifest.xml as follows:
<service android:name="com.package_name.BackgroundHeadlessTaskService" />
Now that the foundation of our application is ready, we only need to let WorkManager start our Headless service periodically. We’ll add the code to start our service in the doWork method of our BackgroundWorker:
public Result doWork() {

    Log.w("bg", "Worker do work");

    Bundle extras = bundleExtras();
    Intent service = new Intent(this.context, BackgroundHeadlessTaskService.class);
    service.putExtras(extras);

    if (Build.VERSION.SDK_INT >= Build.VERSION_CODES.O) {
        createChannel();
        this.context.startForegroundService(service);
    } else {
        this.context.startService(service);
    }
    return Result.success();
}
If the Android version is O or greater, we start a foreground service, which is because of the background restrictions introduced since Android v8.0.
startForegroundService expects that startForeground will be called within five seconds after the service has been started. Therefore, we have to make a small change in our BackgroundHeadlessTaskService:
@Override
protected @Nullable
HeadlessJsTaskConfig getTaskConfig(Intent intent) {
    if (Build.VERSION.SDK_INT >= Build.VERSION_CODES.O) {
        createChannel();
        Notification notification = new NotificationCompat.Builder(getApplicationContext(), "demo")
                .setContentTitle("Headless Work")
                .setTicker("runn")
                .setSmallIcon(R.mipmap.ic_launcher)
                .setOngoing(true)
                .build();
        startForeground(1, notification);
    }

    Bundle extras = intent.getExtras();
    if (extras != null) {
        return new HeadlessJsTaskConfig(
                "BackgroundHeadlessTask",
                Arguments.fromBundle(extras),
                5000,
                true
        );
    }
    return null;
}
@RequiresApi(Build.VERSION_CODES.O)
private void createChannel() {
    String description = "test channel";
    int importance = NotificationManager.IMPORTANCE_DEFAULT;
    NotificationChannel channel = new NotificationChannel("demo", "test", importance);
    channel.setDescription(description);
    NotificationManager notificationManager =
            (NotificationManager) getApplicationContext().getSystemService(NOTIFICATION_SERVICE);

    notificationManager.createNotificationChannel(channel);

}
Starting from Oreo, Android poses restrictions on background services. So, our WorkManager cannot start a background service. However, Android does allow us to start a foreground service from the background. For a service to be called foreground, we have to add a notification that informs the user of work going on in the background.
Now, we need to create the task itself. Head over to your JavaScript code and create a file called BackgroundHeadlessTask.js:
// BackgroundHeadlessTask.js
module.exports = async (taskData) => {
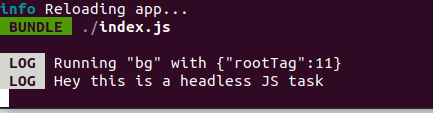
console.log("Hey this is a headless JS task");
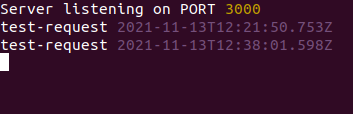
await fetch(`http://192.168.1.7:3000/test-request`);
return;
};
If you have a Node.js server running on your development machine, you can create a fetch call and wait for it to complete like I did.
Now, when a button is pressed, we can call the methods we created in our Native Module as follows:
onStartBtnPress = async () => {
    NativeModules.BackgroundWorkManager.startBackgroundWork();
  };
onCancelBtnPress = async () => {
    NativeModules.BackgroundWorkManager.stopBackgroundWork();
  };
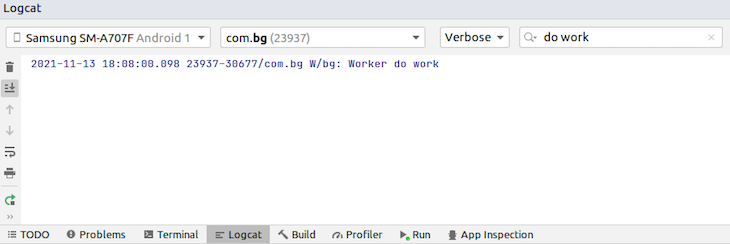
The code above will enqueue the work request and run the task periodically for us until the cancel button is pressed. You can check Logcat to verify if the background task is running periodically at all:
If you set up a local Echo server, you should be able to see the logs when the GET request in your Headless task succeeds:
With the help of Headless JS, Native Modules, and WorkManager, it is fairly easy to create and run JavaScript tasks in React Native. In this article, we covered from beginning to end setting up and running Headless JS in React Native Android, allowing us to run tasks in the background of our application. I hope you enjoyed this tutorial!

LogRocket's Galileo AI watches sessions for you and and surfaces the technical and usability issues holding back your React Native apps.
LogRocket also helps you increase conversion rates and product usage by showing you exactly how users are interacting with your app. LogRocket's product analytics features surface the reasons why users don't complete a particular flow or don't adopt a new feature.
Start proactively monitoring your React Native apps — try LogRocket for free.

Learn how to use Fallow to analyze AI-generated code, detect dead code, duplicate logic, and complexity issues, and integrate automated code quality checks into your AI-assisted development workflow.

Learn how to protect full-stack projects from NPM supply chain attacks with a practical security checklist.

Explore 15 essential MCP servers for web developers to enhance AI workflows with tools, data, and automation.

Learn how contrast-color() automatically picks accessible text colors using native CSS, without JavaScript.
Hey there, want to help make our blog better?
Join LogRocket’s Content Advisory Board. You’ll help inform the type of content we create and get access to exclusive meetups, social accreditation, and swag.
Sign up now

