We use video to enrich our web experiences in various ways, but what if I told you that you can now use the web to create videos? This article introduces Remotion, a suite of libraries building a fundament for creating videos programmatically using React.

Remotion allows you to create visual effects with canvas, CSS, SVG, and WebGL and compose them into video. You can even do so programmatically using familiar concepts like variables, functions, math, and so on. With Remotion, you can also use JavaScript code to generate video and eventually render it into an MP4 file if you wish.
Remotion has two core dependencies that we need to install before we can get started: FFmpeg and Node.js . Below are links to information and installation guides for both on various platforms:
To get a better understanding of how Remotion works, we will go through the demo video that is created when you initialize Remotion.
Once you have FFmpeg and Node, you are ready to get started with Remotion. You can initialize a React app and a demo video using some boilerplate by running:
yarn create video
or
npm init video
Linux users will need to install some additional packages to get Chrome/Puppeteer working:
apt install -y gconf-service libasound2 libatk1.0-0 libc6 libcairo2 libcups2 libdbus-1-3 libexpat1 libfontconfig1 libgcc1 libgconf-2-4 libgdk-pixbuf2.0-0 libglib2.0-0 libgtk-3-0 libnspr4 libpango-1.0-0 libpangocairo-1.0-0 libstdc++6 libx11-6 libx11-xcb1 libxcb1 libxcomposite1 libxcursor1 libxdamage1 libxext6 libxfixes3 libxi6 libxrandr2 libxrender1 libxss1 libxtst6 ca-certificates fonts-liberation libappindicator1 libnss3 lsb-release xdg-utils wget libgbm-dev
These commands will generate a JavaScript application running on an express server that contains the following:
server.tsx file that contains the logic used to render your videoremotion.config.ts file where you can configure various Remotion settings. You can read more on settings you can configure heresrc directory containing the React components used to create your videoThe script also installs any npm dependencies you need to get started. Once this is done, you can run the video with yarn start or npm run start. Remotion’s video player will run localhost:3000 with the components placed on a timeline, similar to what you would see in video editors like Adobe Premiere Pro.
The basic idea behind Remotion is that you get a frame number and a blank canvas to render anything you want by using various web technologies like SVG and WebGL.
Inside the src directory, you will find one HelloWorld folder containing components used to generate our final clip and files that compile these into the final video. In this section, we will look at how all these pieces come together to make a web-generated video.
Inside the HelloWorld folder are the files that the example code uses to generate our video: a rotating React logo (the atom) and some animated text. Before we can dive into these files, let’s look at a few hooks and functions from Remotion that we will use.
useVideoConfig allows the component to retrieve information about the context of the video. It returns an object containing the video properties, allowing them to be reused across components. There are four properties:
width: the width in pixelsheight: the height in pixelsfps: the frame rate in frames per secondsdurationInFrames the total number of frames to be generateduseCurrentFrame returns an integer identifying the current frame that is being viewed. You can then use this frame to animate various properties on the page, from states to styles.
spring allows the developer to leverage spring animation primitives which put things into natural motion on the web. These work similarly to React Spring.
interpolate is a helper function that allows you to map a value to another using a concise syntax, making the animations more readable. It takes four arguments:
Sequence is a higher order component that allows one to time-shift parts of the animation and make them more reusable by taking the following props:
from : A required integer that indicates what frame the sequence starts from. When the sequence is at frame, its children are at 0`durationInFrames : The length of the sequence in frames. Any components exceding this value willl not be displayed. If you wish to have the sequence run for an unlimited duration, you can pass Infinity because this prop is requiredname: An optional label used purely for identificationlayout: An optional prop that can be either "absolute-fill" (default) or "none". When set to "absolute-fill", the components act as layers and are placed on top of each other. You can pass "none" if you wish to customize this behaviorComposition is a component that registers a video to make it renderable and makes it show up in the sidebar of the Remotion player. The props it takes are the same as those contained in the object returned by useVideoConfig along with two additional ones:
id: ID of the composition that is shown in the sidebar and also a unique identifier of the composition. You must specify this and include only letters, numbers, and - if you want to render itcomponent or lazyComponent: This is either the React component with the animation or a function that returns a dynamic import. You can only pass one of these two as passing neither or both of the props is an errorLastly, we have the registerRoot function. This is the root component of the Remotion project that should return one or more compositions wrapped in a React fragment.
These are the fundamental building blocks that you need to create a video. Now let’s see them in action.
Inside the src folder, we have Arc.tsx, Atom.tsx, and Logo.tsx that are used to generate the React logo. We also have config.ts, which contains color constants, and Title.tsx and Subtitle.tsx, which create animated text for video.
Let’s look at Arc.tsx, which uses SVG to create the arcs in the React logo. This file has the following code:
import {useVideoConfig} from 'remotion';
import {COLOR_1, COLOR_2} from './config';
export const Arc: React.FC<{
    progress: number;
    rotation: number;
    rotateProgress: number;
}> = ({progress, rotation, rotateProgress}) => {
    const config = useVideoConfig();
    const cx = config.width / 2;
    const cy = config.height / 2;
    const rx = config.height / 8;
    const ry = rx * 2.2;
    const arcLength = Math.PI * 2 * Math.sqrt((rx * rx + ry * ry) / 2);
    const strokeWidth = arcLength / 60;
    return (
        <svg
            viewBox={`0 0 ${config.width} ${config.height}`}
            style={{
                position: 'absolute',
                transform: `rotate(${rotation * rotateProgress}deg)`,
            }}
        >
            <defs>
                <linearGradient id="gradient" x1="0%" y1="0%" x2="0%" y2="100%">
                    <stop offset="0%" stopColor={COLOR_1} />
                    <stop offset="100%" stopColor={COLOR_2} />
                </linearGradient>
            </defs>
            <ellipse
                cx={cx}
                cy={cy}
                rx={rx}
                ry={ry}
                fill="none"
                stroke="url(#gradient)"
                strokeDasharray={arcLength}
                strokeDashoffset={arcLength - arcLength * progress}
                strokeLinecap="round"
                strokeWidth={strokeWidth}
            />
        </svg>
    );
};
In the Arc component, we feed three numbers that rotate the arc with CSS and fetch the config object from useVideoConfig. We then use the config object to get the length and width that we will use to generate the arc’s dimensions with SVG and some math formulae.
The Atom.tsx component takes a scale number and creates the circle at the centre of the logo, using it as the scale of the transform.
import {useVideoConfig} from 'remotion';
import {COLOR_1, COLOR_2} from './config';
export const Atom: React.FC<{
    scale: number;
}> = ({scale}) => {
    const config = useVideoConfig();
    return (
        <svg
            viewBox={`0 0 ${config.width} ${config.height}`}
            style={{
                position: 'absolute',
                transform: `scale(${scale})`,
            }}
        >
            <defs>
                <linearGradient id="gradient2" x1="0%" y1="0%" x2="100%" y2="0%">
                    <stop offset="0%" stopColor={COLOR_1} />
                    <stop offset="100%" stopColor={COLOR_2} />
                </linearGradient>
            </defs>
            <circle
                r={70}
                cx={config.width / 2}
                cy={config.height / 2}
                fill="url(#gradient2)"
            />
        </svg>
    );
};
Logo.tsx joins these two components to create the final spinning logo. It takes a transitionStart number value that is used with frame, interpolate, and spring to animate the arcs and with the atom to create the animation. Logo contains the following code:
import {interpolate, spring, useCurrentFrame, useVideoConfig} from 'remotion';
import {Arc} from './Arc';
import {Atom} from './Atom';
export const Logo: React.FC<{
    transitionStart: number;
}> = ({transitionStart}) => {
    const videoConfig = useVideoConfig();
    const frame = useCurrentFrame();
    const development = spring({
        config: {
            damping: 100,
            mass: 0.5,
        },
        fps: videoConfig.fps,
        frame,
    });
    const rotationDevelopment = spring({
        config: {
            damping: 100,
            mass: 0.5,
        },
        fps: videoConfig.fps,
        frame,
    });
    const scaleIn = spring({
        frame,
        config: {
            mass: 0.5,
        },
        fps: videoConfig.fps,
    });
    const translation = interpolate(
        spring({
            frame: frame - transitionStart,
            fps: videoConfig.fps,
            config: {
                damping: 100,
                mass: 0.5,
            },
        }),
        [0, 1],
        [0, -150]
    );
    const scale = frame < 50 ? scaleIn : 1;
    const logoRotation = interpolate(
        frame,
        [0, videoConfig.durationInFrames],
        [0, 360]
    );
    return (
        <div
            style={{
                position: 'absolute',
                width: videoConfig.width,
                height: videoConfig.height,
                transform: `scale(${scale}) translateY(${translation}px) rotate(${logoRotation}deg)`,
            }}
        >
            <Arc
                rotateProgress={rotationDevelopment}
                progress={development}
                rotation={30}
            />
            <Arc
                rotateProgress={rotationDevelopment}
                rotation={90}
                progress={development}
            />
            <Arc
                rotateProgress={rotationDevelopment}
                rotation={-30}
                progress={development}
            />
            <Atom scale={rotationDevelopment} />
        </div>
    );
};
The Logo component has a number of spring functions that are utilized to create the final animation: development, rotationDevelopment, scaleIn, and translation. These utilize the spring parameters defined here along with the interpolate helper in some cases like translation and logoRotation to describe the animation properties.
To define the transform of the logo, the scale property utilizes the frame of the video that is fetched from the useCurrent hook and the translation and logoRotation properties that are defined with spring.
We have three Arc components in the Logo component that are rotated 60 degrees away from each other to create the final appearance of mimicking electrons circling the center of the atom.
Title.tsx contains the title text, “Welcome to Remotion” that appears after the logo. It takes in the titleText then splits it and renders in the words one by one:
import {spring, useCurrentFrame, useVideoConfig} from 'remotion';
export const Title: React.FC<{
    titleText: string;
    titleColor: string;
}> = ({titleText, titleColor}) => {
    const videoConfig = useVideoConfig();
    const frame = useCurrentFrame();
    const text = titleText.split(' ').map((t) => ` ${t} `);
    return (
        <h1
            style={{
                fontFamily: 'SF Pro Text, Helvetica, Arial',
                fontWeight: 'bold',
                fontSize: 100,
                textAlign: 'center',
                position: 'absolute',
                bottom: 160,
                width: '100%',
            }}
        >
            {text.map((t, i) => {
                return (
                    <span
                        key={t}
                        style={{
                            color: titleColor,
                            marginLeft: 10,
                            marginRight: 10,
                            transform: `scale(${spring({
                                fps: videoConfig.fps,
                                frame: frame - i * 5,
                                config: {
                                    damping: 100,
                                    stiffness: 200,
                                    mass: 0.5,
                                },
                            })})`,
                            display: 'inline-block',
                        }}
                    >
                        {t}
                    </span>
                );
            })}
        </h1>
    );
};
The Title component takes in two props: titleText and textColor. The text function maps the words in titleText onto an array. We then use this array to render the words in following order in a spring animation applied to the style object of the span with the text.map function.
Similar to Title, the Subtitle component also animates some text, but in this case, it is a single unit of smaller text animated together with the interpolate function.
import {interpolate, useCurrentFrame} from 'remotion';
import {COLOR_1} from './config';
export const Subtitle: React.FC = () => {
    const frame = useCurrentFrame();
    const opacity = interpolate(frame, [0, 30], [0, 1]);
    return (
        <div
            style={{
                fontFamily: 'Helvetica, Arial',
                fontSize: 40,
                textAlign: 'center',
                position: 'absolute',
                bottom: 140,
                width: '100%',
                opacity,
            }}
        >
            Edit{' '}
            <code
                style={{
                    color: COLOR_1,
                }}
            >
                src/Video.tsx
            </code>{' '}
            and save to reload.
        </div>
    );
};
Now that we have our base components set up, we need to make use of them in sequences and compositions to create our final video. Sequences, as mentioned above, allow us to time-shift components and lay them out in a sort of timeline to create a final video. You can see this in action inside HelloWorld.tsx where the three components above are each placed in a sequence to create a final clip with all three animating at different times.
import {interpolate, Sequence, useCurrentFrame, useVideoConfig} from 'remotion';
import {Logo} from './HelloWorld/Logo';
import {Subtitle} from './HelloWorld/Subtitle';
import {Title} from './HelloWorld/Title';
export const HelloWorld: React.FC<{
    titleText: string;
    titleColor: string;
}> = ({titleText, titleColor}) => {
    const frame = useCurrentFrame();
    const videoConfig = useVideoConfig();
    const opacity = interpolate(
        frame,
        [videoConfig.durationInFrames - 25, videoConfig.durationInFrames - 15],
        [1, 0],
        {
            extrapolateLeft: 'clamp',
            extrapolateRight: 'clamp',
        }
    );
    const transitionStart = 25;
    return (
        <div style={{flex: 1, backgroundColor: 'white'}}>
            <div style={{opacity}}>
                <Sequence from={0} durationInFrames={videoConfig.durationInFrames}>
                    <Logo transitionStart={transitionStart} />
                </Sequence>
                <Sequence from={transitionStart + 10} durationInFrames={Infinity}>
                    <Title titleText={titleText} titleColor={titleColor} />
                </Sequence>
                <Sequence from={transitionStart + 50} durationInFrames={Infinity}>
                    <Subtitle />
                </Sequence>
            </div>
        </div>
    );
};
You can see each Sequence wraps around a component, and the sequences each have a different from value. This depicts the offset on the timeline of the combined clip, which will be comprised of all three animated components. So, while it is possible to individually create videos from each of the components, HelloWorld makes use of sequences to bring them together into a single clip.
The next step is to use the Composition to make our clips available for Remotion to view in the player and render into .mp4 files. This is done in the Video.tsx file as follows:
Composition component under the component propimport {Composition} from 'remotion';
import {HelloWorld} from './HelloWorld';
import {Logo} from './HelloWorld/Logo';
import {Subtitle} from './HelloWorld/Subtitle';
export const RemotionVideo: React.FC = () => {
return (
<>
<Composition
id="HelloWorld"
component={HelloWorld}
durationInFrames={150}
fps={30}
width={1920}
height={1080}
defaultProps={{
titleText: 'Welcome to Remotion',
titleColor: 'black',
}}
/>
<Composition
id="Logo"
component={Logo}
durationInFrames={200}
fps={30}
width={1920}
height={1080}
/>
<Composition
id="Title"
component={Subtitle}
durationInFrames={100}
fps={30}
width={1920}
height={1080}
/>
</>
);
};
With all the compositions and sequences ready, we now have to register them in the root component to finalize our setup. This step is covered inside the index.tsx file in just three lines:
import {registerRoot} from 'remotion';
import {RemotionVideo} from './Video';

registerRoot(RemotionVideo);
We simply import the fragment component we created in Video.tsx into the file and pass it into the registerRoot component. Everything is good to go!
When you run the application, you will see a video player in your browser that is just like the screenshot below where the various compositions are listed and playable individually.
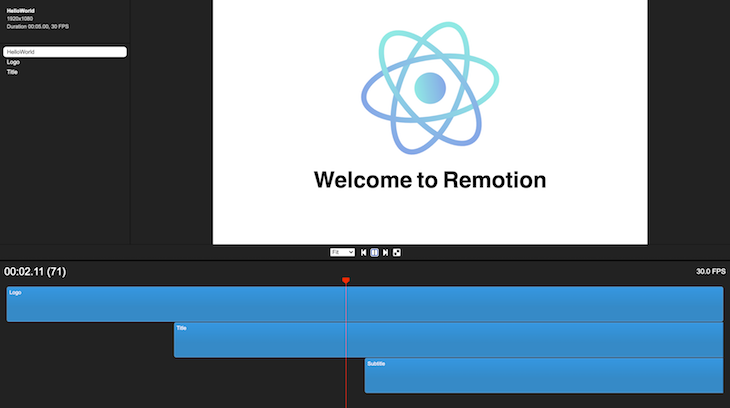
In the Remotion player, you can play and pause your videos and view where each animation fits in the timeline. You can also adjust the fit of the video view to your liking.
If you are satisfied with your final video, render and export it into a video file for external use by running:
npm run build
or
yarn build
This runs the underlying Remotion CLI command as specified in package.json:
npx remotion render src/index.tsx HelloWorld out.mp4
This command has a number of options that can be used to add to the specified configuration of the video, like codecs and formats. You can read more about those options in the CLI reference.
While still fairly new, Remotion provides an interesting and programmatic way to create video. Developers can integrate Remotion into React applications to add inputs that dynamically influence the video output. More great things are on the horizon for Remotion, like proper audio support, which I deliberately left out for now as it is still under development. You can find more information about Remotion’s audio API under the audio section of the docs.
Remotion is open source, so the creator Jonny Burger has created an opportunity for the dev community to contribute towards improving what is already an exciting package. The licensing around Remotion makes it a great choice for many personal or small scale projects. It is free to use for individuals as well as non-profit and for-profit organizations with three or fewer employees. There are also various company plans you can read about here if you wish to make use of Remotion in an organization that is ineligible for the free license.
Install LogRocket via npm or script tag. LogRocket.init() must be called client-side, not
server-side
$ npm i --save logrocket

// Code:

import LogRocket from 'logrocket';
LogRocket.init('app/id');
// Add to your HTML:

<script src="https://cdn.lr-ingest.com/LogRocket.min.js"></script>
<script>window.LogRocket && window.LogRocket.init('app/id');</script>

Learn how to protect full-stack projects from NPM supply chain attacks with a practical security checklist.

Explore 15 essential MCP servers for web developers to enhance AI workflows with tools, data, and automation.

Learn how contrast-color() automatically picks accessible text colors using native CSS, without JavaScript.

Learn how to build a harness-style AI workflow using Claude Code with specialized Dev, QE, and Ops subagents, gated handoffs, MCP telemetry, and LEARNING.md.
Would you be interested in joining LogRocket's developer community?
Join LogRocket’s Content Advisory Board. You’ll help inform the type of content we create and get access to exclusive meetups, social accreditation, and swag.
Sign up now

