Recoil was released just a few months ago, but with nearly 9K stars on GitHub already, the new state management library is soaring high.

In this article, I’ll discuss how to refactor a Redux app to Recoil. My goal isn’t to refactor a huge Redux app to Recoil, but to refactor three small apps to Recoil. Let me share why.
A very good strategy for learning is going from known to unknown — in this case, from Redux to Recoil. This is an efficient learning strategy, especially if you’ve got decent experience with Redux already.
I believe you’ll be placed in a better position to understand the difference (at least in API implementation) between both libraries and understand why Recoil stands out. It’s also possible that you’ll find yourself in a situation where you have to refactor a Redux app to Recoil. This article will give you the foundation for doing that.
If you’re completely new to Recoil, check out my quick introductory article, as I’ll assume you understand what atoms and selectors in Recoil are from here on out.
Let’s get started.
Many programming tutorials start with a hello world program. We mostly don’t do this for UI development, but I propose we do.
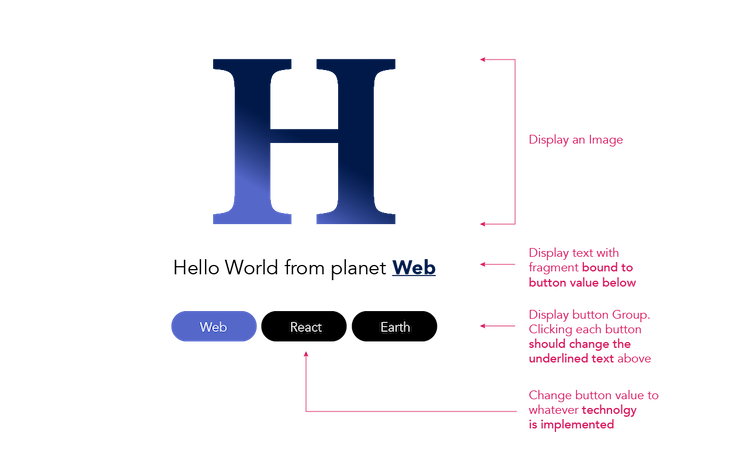
Consider HelloUI, the hello world application for UI development.
Feel free to check the motivation and approach HelloUI takes in its official readme.
What we’re going to do first is refactor a hello world Redux app to Recoil. After that, we’ll go ahead and refactor more complex Redux applications.


The hello world app has been bootstrapped with create-react-app, with React bindings for Redux provided via react-redux.

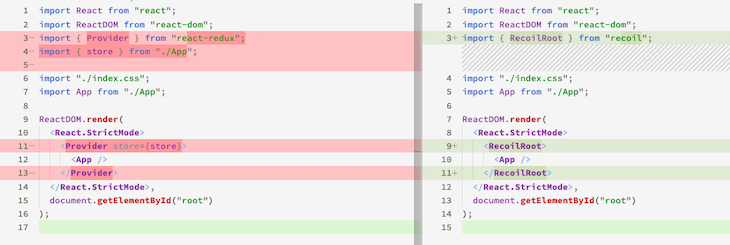
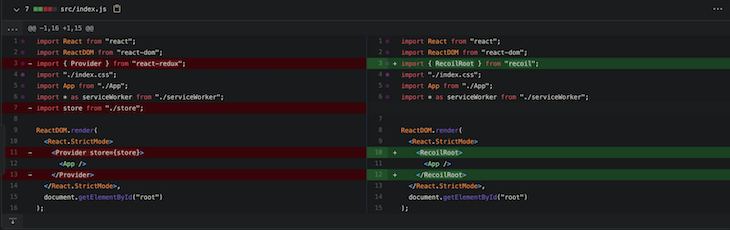
The first place to begin the refactor is in the root file. With react-redux, you’ve got to wrap your entry component in a Provider component with a store prop passed.
import { Provider } from "react-redux";
import { store } from "./App";

...

<Provider store={store}>
      <App />
</Provider>
...
With Recoil, you need to wrap your root component in a “provider” component, too. However, there’s no need for a store prop; that’s a concept alien to Recoil.
Here’s what the changes should look like:
import { RecoilRoot } from "recoil";

...
<RecoilRoot>
   <App />
</RecoilRoot>
...
Components that need Recoil state must have the RecoilRoot component in the parent tree.
Internally, the RecoilRoot component implements a Context Provider and renders the children components. For more advanced readers, you’ll notice that unlike react-redux, the Provider keeps track of the state values internally so you don’t have to pass a store or state prop to the RecoilRoot component.
The first bit of the refactoring is done. Here’s what comes next: creating and updating the global state. Let’s take a look at how the React app works.
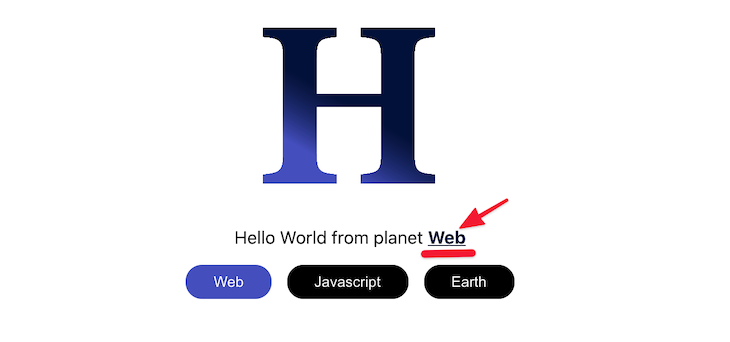
The changing planet text that defaults to “Web” is managed by Redux. This is called activePlanet.
<p>
 Hello World from planet <span className="planet">{activePlanet}</span>
</p>
To create a state value in the Redux store, you’ve got to have passed a reducer to the store.
import { createStore } from "redux";

const store = createStore(planetsReducer);
Where planetsReducer refers to the app reducer defined below:
const planetsReducer = (state = "Web", action) => {
  const { type, payload } = action;
  return  type === "SET_PLANET" ? payload : state;
}
Since Redux state updates rely on an action being dispatched, every action of type "SET_PLANET returns a new state value represented by the action’s payload. But how’s the action dispatched?
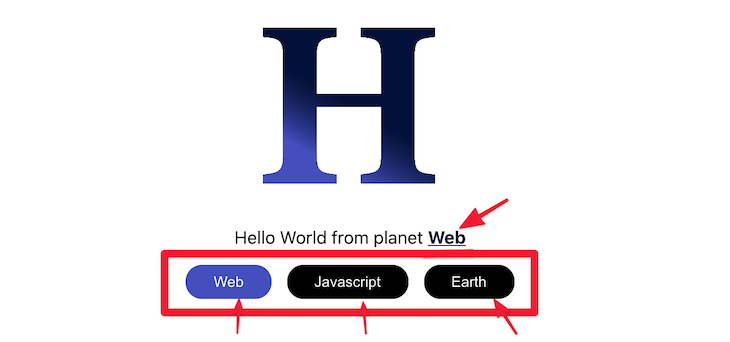
Clicking any of the planet buttons dispatches an action, which, in turn, updates the state value.
const handlePlanetUpdate = (event) => {
    dispatch({ type: "SET_PLANET", payload: event.target.textContent });
  };
Here, handlePlanetUpdate is the click handler passed to the button elements.
...
<button onClick={handlePlanetUpdate} />
...
Now that you understand how the Redux hello world app works, what do you think changes when we refactor to Recoil?
First, we’ve got to create a state value. With Redux, we used the store and reducer to get this done, but Recoil does this with something called an atom. Atoms are pieces of state. I mentioned this in the introductory article.
Here’s how to create an atom for the activePlanets state value.
import { atom } from "recoil";

const activePlanetAtom = atom({
  key: "activePlanet",
  default: "Web",
});
You call the atom function from Recoil with an object with key and default properties.
Note:
keymust be a unique string — unique to other atoms (and selectors) you have within the app.
Creating the state value was simple, but how do you read this value from your UI components? With Redux, we use selectors:
import {useSelector } from "react-redux";

const activePlanet = useSelector((v) => v);
Reading state values from Recoil state is much easier. It works very similar to useState, but with a different Hook — this one from Recoil.
...
import { atom, useRecoilState } from "recoil";
...

//within UI component
const [activePlanet, setActivePlanet] = useRecoilState(activePlanetAtom);
Just as you’d get a state value and updater from invoking useState, Recoil mimics a similar API.
You invoke the useRecoilState Hook from recoil but pass it the related atom as an argument, as seen above. Pretty simple.
To update the state object upon clicking the planet buttons, you don’t have to dispatch actions, as with Redux. You just invoke the returned state updater from invoking useRecoilState as seen below:
// redux
const handlePlanetUpdate = (event) => {
    dispatch({ type: "SET_PLANET", payload: event.target.textContent });
};

// recoil
const handlePlanetUpdate = (event) => {
    setActivePlanet(event.target.textContent);
};
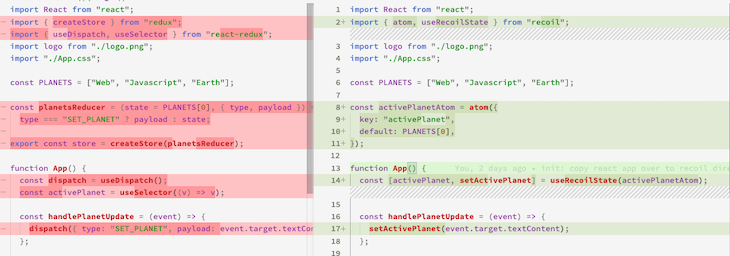
Compare both solutions, and one of Recoil’s strong suits becomes readily apparent: simplicity! Using Recoil feels very close to the default React mental model, and the API is really simple to grasp.
Let’s move on to refactoring a more interesting app.
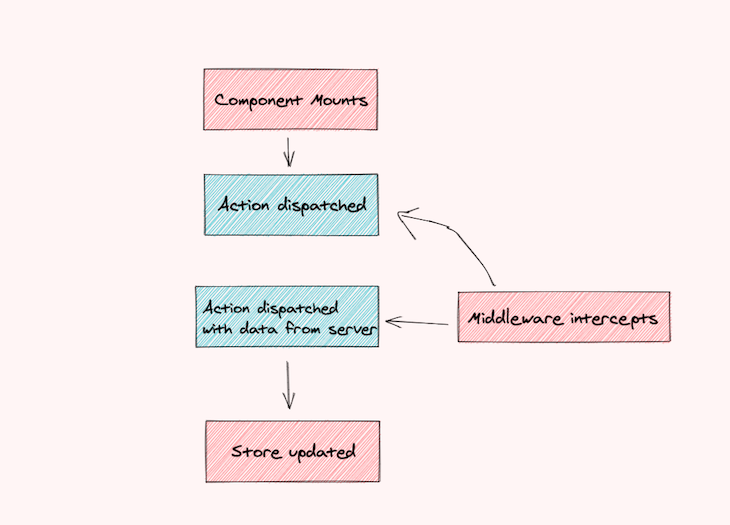
Most applications need to fetch data from a remote server. With Redux apps, there are many options. Let’s take a look at one with redux-thunk.

In the application above, a user profile detail is fetched from a remote server. As you may have assumed, the flow here is similar to every Redux app. As soon as the main App component is mounted, an action is dispatched to fetch the user’s profile details.
useEffect(() => {
    dispatch(fetchUserProfile());
}, []);
The fetchUserProfile function contains async logic that is intercepted by the redux-thunk middleware.
export function fetchUserProfile() {
  return (dispatch, getState) => {
    fetch(URL)
      .then((res) => res.json())
      .then((data) => dispatch(setUserProfile(data)));
  };
}
Here, URL represents the server endpoint to return the user’s profile details.
On fetching the data, the setUserProfile action is dispatched to save the profile details to the store.
Pretty conventional setup. You’ll find the full source code here on GitHub.
Now, with Recoil, what exactly is different? The most obvious is the flow of state in a Recoil app.
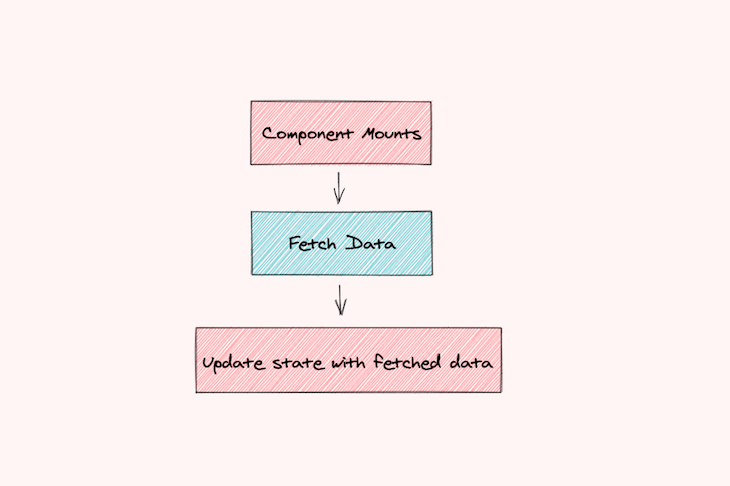
The flow feels nearly identical to a typical React application using local state via the useState Hook.
First, we create a Recoil atom to hold the data to be fetched from the server:
const userProfileState = atom({
  key: "userProfile",
  default: {},
});
Remember that atoms represent a piece of state.
Within the main App component, we read the contents of the atom by using the useRecoilState Hook from Recoil.
const [userProfile, setUserProfile] = useRecoilState(userProfileState);
Invoking useRecoilState returns the state value and an updater function to set the state value.
We have the global state set up; now, let’s trigger the actual data fetch.
As soon as the component mounts, the async function fetchUserProfile is invoked and the received data set to the global state by invoking the state update: setUserProfile.
useEffect(() => {
    fetchUserProfile().then((data) =>
      setUserProfile({ ...data, isLoading: false })
    );
}, []);
Where setUserProfile represents the state updater function. Take a look at the code diff from Redux to Recoil below:
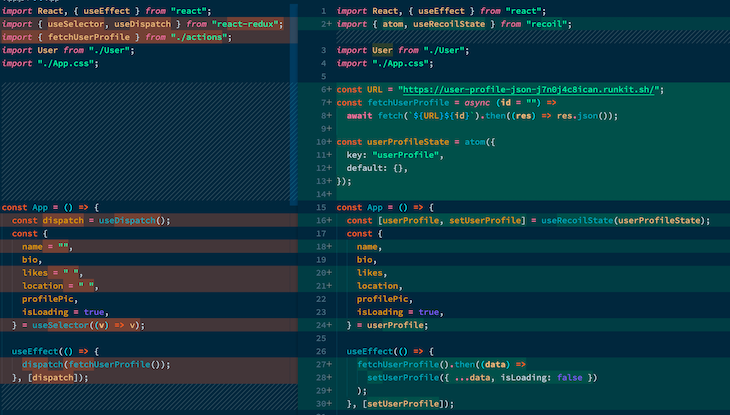
The refactor to Recoil is a lot simpler. No store or reducer setup, and no thunks — just an atom and flow similar to a typical React application. Talk about simplicity!
It is worth mentioning that the refactor to Recoil isn’t complete without wrapping the parent tree component in the RecoilRoot component.
RecoilRoot provides a Context provider to interact with your global state.
You’ll find a full diff of the changes on GitHub, i.e., comparing the Redux and Recoil refactor.
The app we just refactored is more interesting than a simple hello world app, but let’s consider an even more interesting app that showcases a particular strength of Recoil. Consider the app below:

Upon visiting the app, a user’s profile details are fetched, along with a list of friends.
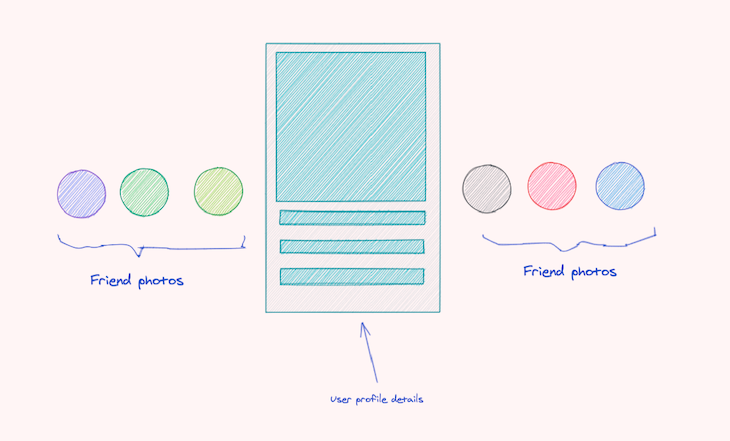
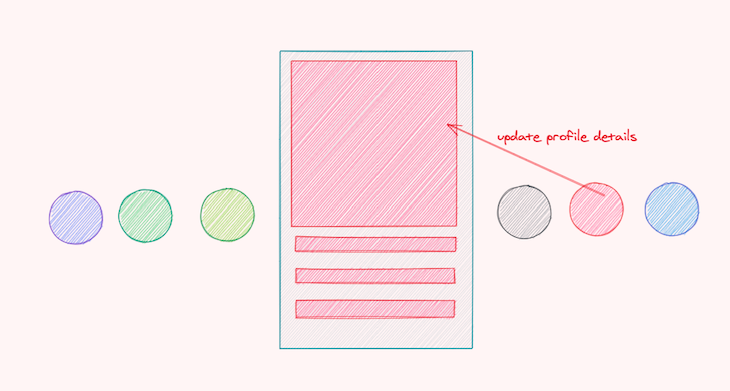
Also, upon clicking each friend’s image, we fetch their profile details (including their friends):
Essentially, there’s always one active user whose profile and friend list are displayed. With a Redux app, the flow here isn’t much different from the previous application.
Like before, as soon as the main App component mounts, we dispatch an action to fetch the default user profile (with friends).
const App = () => {
  ...
 useEffect(() => {
    dispatch(fetchUserProfile());
  }, []);
 ...
}
And when a friend’s image is clicked, we pull off their userId, attached to the rendered element via a dataset object, and fire off the same action with the userId as an argument.
const App = () => {
  ...
  const handleUserClick = (evt) => {
    const userId = evt.currentTarget.dataset.id;
    dispatch(fetchUserProfile(userId));
  };
  ...
  return (
     ...
     <UserPhoto
            onClick={handleUserClick}
          />
  )
}
The same Thunk middleware picks this action and initiates the network request; the only difference is the userId passed to the endpoint URL to fetch a different user profile.

Pretty easy. Let’s consider how this would be solved with Recoil.
You may be surprised to see the direction the Recoil app takes. While Redux focuses on a flow of state from actions to reducers to the store, Recoil focuses on the flow of state via a data-flow graph.
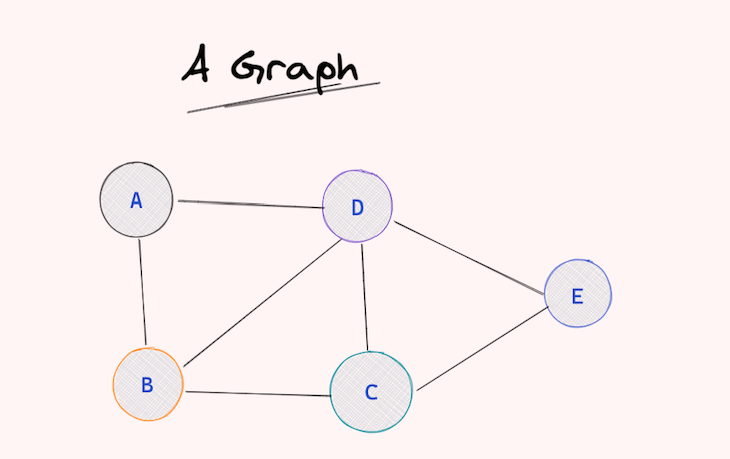
I could spend another 10 minutes discussing the data-flow graph, but here’s the crux: think of the data-flow graph as a graph data structure where Recoil provides and manages the relationship between different state entities.
Like all graph structures, these state objects are connected. They can be dependent on many other pieces of state and other entities like themselves.
What’s more important is that Recoil will manage every state dependency, i.e., the flow of state through this graph, and efficiently recompute values and re-render components subscribed to these state values.
Of concern to us now is that selectors (one of the state entities provided by Recoil) can also contain asynchronous code, and Recoil will still efficiently handle the flow of state through the graph. This knowledge changes how we approach the refactor from Redux to Recoil.
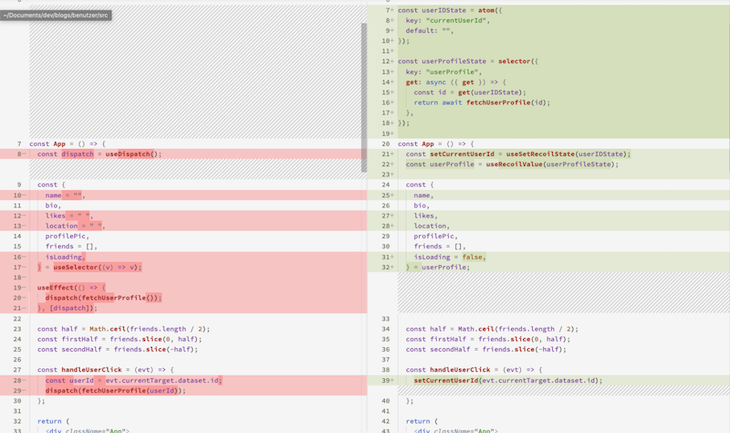
The first step is to create an atom that holds the current user ID (again, remember that atoms represent a piece of state in Recoil).
import { atom } from "recoil";

const userIDState = atom({
  key: "currentUserId",
  default: "",
});
Here’s the fun bit. We’ll go ahead and create an async selector that is dependent on the userIDState atom.
import { atom, selector } from "recoil";

...
const userProfileState = selector({
  key: "userProfile",
  get: async ({ get }) => {
    const id = get(userIDState);
    return await fetchUserProfile(id);
  },
});
Now, whenever useIDState changes, the selector will fetch a new user data based on the id and return the profile data.
Here’s how we use this state value within the UI:
const App = () => {
  // useSetRecoilState returns just the funtion updater e.g. imagine if there was a useSetState hook in React.
  // useState returns [value, setState]
  // useSetState returns only setState
  const setCurrentUserId = useSetRecoilState(userIDState);

  // useRecoilValue returns just the state value instead of an array of value and state updater
  const userProfile = useRecoilValue(userProfileState);

  ...
  const handleUserClick = (evt) => {
    setCurrentUserId(evt.currentTarget.dataset.id);
  };

 return (
  ...
   <UserPhoto
            onClick={handleUserClick}
          />
 )
}
Every time a user photo is clicked, the current user ID state is updated. Recoil efficiently recomputes the current user data by making a network request (if need be).
Recoil selectors are treated as pure functions. So, for the same user ID, a cached version of the profile data is returned without the need for another data fetch!
Curious where to find the full source code? For this app, here are the Redux and Recoil branches.
Recoil is still a young library, but it’s definitely very promising! There’s so much more Recoil is capable of, and I’ll be sharing more of those in future articles. Stay in touch!
Install LogRocket via npm or script tag. LogRocket.init() must be called client-side, not
server-side
$ npm i --save logrocket

// Code:

import LogRocket from 'logrocket';
LogRocket.init('app/id');
// Add to your HTML:

<script src="https://cdn.lr-ingest.com/LogRocket.min.js"></script>
<script>window.LogRocket && window.LogRocket.init('app/id');</script>
Would you be interested in joining LogRocket's developer community?
Join LogRocket’s Content Advisory Board. You’ll help inform the type of content we create and get access to exclusive meetups, social accreditation, and swag.
Sign up now
This guide walks you through creating a web UI for an AI agent that browses, clicks, and extracts info from websites powered by Stagehand and Gemini.

This guide explores how to use Anthropic’s Claude 4 models, including Opus 4 and Sonnet 4, to build AI-powered applications.

Which AI frontend dev tool reigns supreme in July 2025? Check out our power rankings and use our interactive comparison tool to find out.

Learn how OpenAPI can automate API client generation to save time, reduce bugs, and streamline how your frontend app talks to backend APIs.


