First of all, a big warning: what I’m going to write about can already be used, but should not be used yet.

These are experimental features and they will change somewhat. What will remain is a bit (all?) of the inner workings and the consequences outlined here.
If you like experimental stuff and reading about the future of React, you came to the right place. Otherwise, it may be better to wait a bit until the dust has settled and this feature is out there for good.
The React team describes concurrent mode to be:
[…] a set of new features that help React apps stay responsive and gracefully adjust to the user’s device capabilities and network speed.
Sounds awesome, right? There are a couple of features that fall into this category:
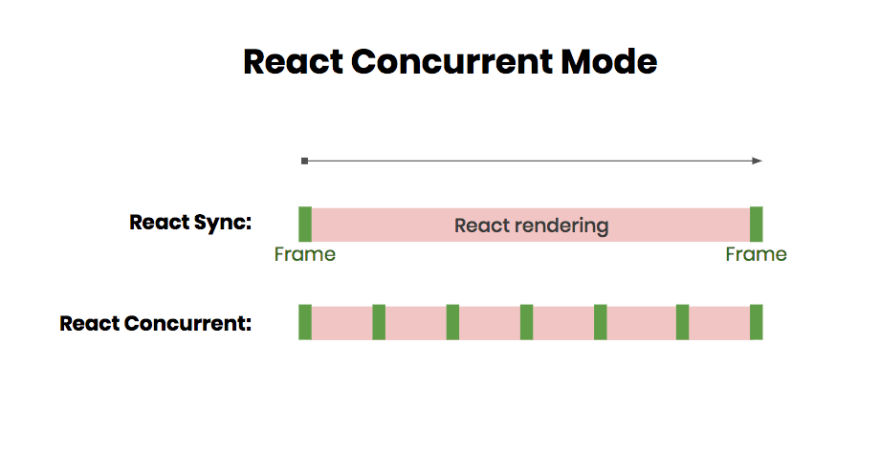
In concurrent mode, rendering is interruptible and may happen in multiple phases.
The following graphic explains this a bit more visually:

There are a couple of nasty consequences that should not bite us if we always follow best practices. Needless to say, most real-world applications will violate this at least on a single spot, so let’s explore how to catch issues and what we can do about such problems.
For actually using concurrent mode, we’ll need a preview version of React and React DOM. After all, this is still experimental and not part of any production build.
npm install react@experimental react-dom@experimental
Suppose your app’s index.jsx looked so far like the following code:
import * as React from 'react';
import { render } from 'react-dom';

render(<App />, document.getElementById('root'));
The new approach (which enables concurrent mode) would change the render call to be split into two parts:
The code thus changes to:
import * as React from 'react';
import { createRoot } from 'react-dom';

createRoot(document.getElementById('root')).render(<App />);
Couldn’t the old way just stay? Actually, it will still be there — for backwards compatibility.
At the moment, three different modes are planned:
For the blocking mode, we would replace createRoot with createBlockingRoot. This one gets a subset of the features of concurrent mode and should be much easier to follow.
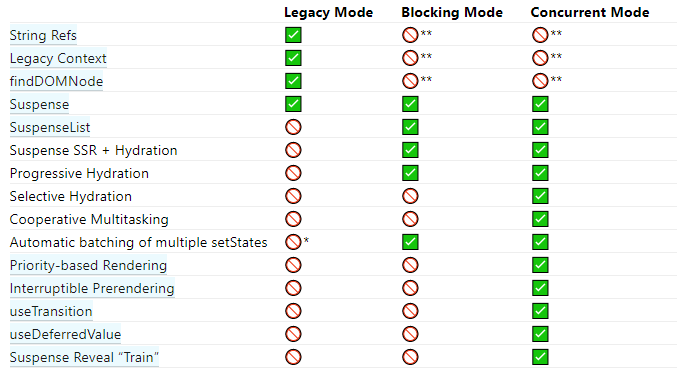
The React documentation lists the features of each of the three modes in comparison.

As we can see, the three dropped features from the legacy mode should have been avoided anyway for quite some time. The problem — especially for recent apps — may not even lie in our code, but rather in dependencies that still utilize these features.
Personally, I think that the listing has been ordered somewhat by number of occurrence. I suspect that string refs will be seen more than usage of the legacy context. I think the lack of findDOMNode will not be a problem in most cases.
I am quite sure that in the long run a set of tools and helpers will be made available to properly diagnose and guide a migration to React concurrent mode.
The following points should be sufficient to check if a migration makes sense and is possible.
Furthermore, it can also help us to actually perform the migration.
The key question is: Could my app suffer from performance loss? If we deal with large lists or a lot of elements, then it could definitely make sense. Furthermore, if our app is highly dynamic and likely to obtain even more asynchronous functionality in the future, then migration also makes sense.
To check if a migration is feasible, we must know what API surface of React we are using so far.
If we are fully on Hooks and functions, then great — there will be (almost) no problem whatsoever.
If we are on classes (let alone React.createClass with a potential shim), then there is a high chance we use deprecated lifecycle methods. Even worse, there is the potential to misuse these lifecycle methods.
My recommendation is to migrate to the new lifecycle methods and maybe even Hooks before thinking about using React’s concurrent mode.
One reason for this is certainly that the old (unsafe) lifecycle names have been deprecated and already exist with an alias name.
Here we have:
componentWillMount, which is also available as UNSAFE_componentWillMountcomponentWillReceiveProps, which is also available as UNSAFE_componentWillReceivePropscomponentWillUpdate, which is also available as UNSAFE_componentWillUpdateIn general, the simplest way to check if everything is aligned with the current model is to just activate strict mode.
import * as React from 'react';
import { render } from 'react-dom';

render(
  <React.StrictMode>
    <App />
  </React.StrictMode>,
  document.getElementById('root')
);
In strict mode, some functions are run twice to check if there are any side-effects. Furthermore, using the deprecated lifecycle functions will be noted specifically in the console. There are other useful warnings, too.
Coming back to our migration: after we’ve done our homework on the code, we can just try it out.
I would start with the full concurrent mode first. Most likely, it will just work. If not, the chance that blocking mode will work, in my experience, is slim. Nevertheless, giving it a try cannot hurt.
Importantly, while the change towards concurrent mode should be reverted for a production release, all the other changes so far are totally worth it and should be brought to production if possible.
Alright, so let’s have a look at how React concurrent looks in practice.
We start with a simple app that uses standard rendering. It obtains a list of posts from a server and also uses lazy loading of the list component from another bundle.
The code is similar to the one below:
// index.jsx
import * as React from 'react';
import { render } from 'react-dom';
import { App } from './App';

render(
  <React.StrictMode>
    <App />
  </React.StrictMode>,
  document.querySelector('#app')
);

// App.jsx
import * as React from 'react';

const List = React.lazy(() => import('./List'));

export default () => (
  <div>
    <h1>My Sample App</h1>
    <p>Some content here to digest...</p>
    <React.Suspense fallback={<b>Loading ...</b>}>
      <List />
    </React.Suspense>
  </div>
);
The list we define is as follows:
import * as React from 'react';

export default () => {
  const [photos, setPhotos] = React.useState([]);

  React.useEffect(() => {
    fetch('https://jsonplaceholder.typicode.com/photos')
      .then((res) => res.json())
      .then((photos) => setPhotos(photos));
    return () => {
      // usually should prevent the operation from finishing / setting the state
    };
  }, []);

  return (
    <div>
      {photos.map((photo) => (
        <div key={photo.id}>
          <a href={photo.url} title={photo.title} target="_blank">
            <img src={photo.thumbnailUrl} />
          </a>
        </div>
      ))}
    </div>
  );
};
Now (except of the missing implementation for the effect disposer), this looks quite nice.
However, the effect is not very nice:

First of all, we are loading 5000 entries in this. Even worse, our rendering tree is quite heavily loaded.
So let’s try to use React’s concurrent mode. We start by using an improved version of the API loading.
Let’s put the photo loading in its own module:
function fetchPhotos() {
  return fetch('https://jsonplaceholder.typicode.com/photos')
    .then((res) => res.json());
}

export function createPhotosResource() {
  let status = 'pending';
  let result = undefined;

  const suspender = fetchPhotos().then(
    (photos) => {
      status = 'success';
      result = photos;
    },
    (error) => {
      status = 'error';
      result = error;
    },
  );

  return {
    read() {
      switch (status) {
        case 'pending':
          throw suspender;
        case 'error':
          throw result;
        case 'success':
          return result;
      }
    },
  };
}
This is a preliminary API for defining an asynchronous resource. It will for sure change — either via some abstraction or in other details.
The whole lifecycle of the backend API access is now in a dedicated module without any UI at all. That’s quite nice. How can we use it?
We just need to change the list:
import * as React from 'react';

export default ({ resource }) => {
  const photos = resource.read();

  return (
    <div>
      {photos.map((photo) => (
        <div key={photo.id}>
          <a href={photo.url} title={photo.title} target="_blank">
            <img src={photo.thumbnailUrl} />
          </a>
        </div>
      ))}
    </div>
  );
};
In this case, we pass in the resource as a prop called resource.
At this point, the code is nicer (and more robust), but the performance is still the same.
Let’s add a transition to be prepared for a long running API request. The transition allows delaying the loading indicator.
Finally, our App module looks as follows:
import * as React from 'react';
import { createPhotosResource } from './photos';

const List = React.lazy(() => import('./List'));

export default () => {
  const [photosResource, setPhotosResource] = React.useState();
  const [startTransition, isPending] = React.useTransition(500);

  React.useEffect(() => {
    const tid = setTimeout(() => {
      startTransition(() => {
        setPhotosResource(createPhotosResource());
      });
    }, 100);

    return () => clearTimeout(tid);
  }, []);

  return (
    <div>
      <h1>My Sample App</h1>
      <p>Some content here to digest...</p>
      <React.Suspense fallback={<b>Loading ...</b>}>
        <List resource={photosResource} pending={isPending} />
      </React.Suspense>
    </div>
  );
};
Okay — so far so good. But did that help us yet with the rendering? Not so much. But wait…we didn’t activate concurrent mode yet!
The entry module now changed to be:
import * as React from 'react';
import { createRoot } from 'react-dom';
import App from './App';

createRoot(document.querySelector('#app')).render(
  <React.StrictMode>
    <App />
  </React.StrictMode>,
);
And — consequently — the rendering feels smooth to the end-user. Let’s have a look:

The full code for the demo can be found on GitHub.
React concurrent mode offers a great way to leverage modern capabilities to truly enable an amazing user experience.
Right now a lot of fine-tuning and experimentation is required to scale React code really well. With concurrent mode, this should be improved significantly once and for all.
The path to enabling concurrent mode is given by following best practices and avoiding deprecated APIs.
React’s simple tooling can be very helpful here.
Where can you see benefits and obstacles of using React’s new concurrent mode? Do you think it will be the next big thing? We’d love to hear your opinion in the comments!
Install LogRocket via npm or script tag. LogRocket.init() must be called client-side, not
server-side
$ npm i --save logrocket

// Code:

import LogRocket from 'logrocket';
LogRocket.init('app/id');
// Add to your HTML:

<script src="https://cdn.lr-ingest.com/LogRocket.min.js"></script>
<script>window.LogRocket && window.LogRocket.init('app/id');</script>
Would you be interested in joining LogRocket's developer community?
Join LogRocket’s Content Advisory Board. You’ll help inform the type of content we create and get access to exclusive meetups, social accreditation, and swag.
Sign up now
Get to know RxJS features, benefits, and more to help you understand what it is, how it works, and why you should use it.

Explore how to effectively break down a monolithic application into microservices using feature flags and Flagsmith.

Native dialog and popover elements have their own well-defined roles in modern-day frontend web development. Dialog elements are known to […]

LlamaIndex provides tools for ingesting, processing, and implementing complex query workflows that combine data access with LLM prompting.