Any seasoned product manager knows that the product discovery process is messy.

This messiness often reduces transparency, making the whole process hard to inspect and adapt, and allowing details to slip through the cracks.
For these reasons, figuring out how to organize and streamline the discovery process is essential for building a healthy product organization.
After various experiments, trials, and errors, I found my silver bullet — a discovery Kanban.
In this article, you will learn how to create a discovery Kanban, as well as read about real world examples of how other product managers have used them.
Kanban is one of the oldest frameworks in agile development. Its purpose is to visualize work and work status to create transparency between development teams and the rest of the organization. The goal is to visualize capacity, ongoing work, and priorities in real time to cue the next action and keep work flowing.
Despite being in use for many years, Kanban is still one of the most widely-used frameworks in many organizations and is often used as the founding framework while adapting to agile ways of working.
Before we jump into the solution itself, let’s take a closer look at the main problems surrounding product discovery.
Most product teams need help with similar issues.
First, product teams often work on numerous ideas and problems simultaneously, which makes it hard to keep track of things.
This lack of trackability makes it difficult to inspect your work to determine bottlenecks and progress. Without that inspection, improving the discovery process is difficult.
Also, it’s often challenging to fit discovery work into the sprint cadence many software development teams use. Doing so tends to result in either force-fitting design and discovery work into sprints or ignoring proper planning, tracking, and review.
To solve the problems I just mentioned, you need a process.
Although you should treat design work as part of sprints, in my case, it never fully clicked.
When I tried using a Kanban for discovery, everything changed:

With a Kanban, you can track the entire discovery process in one centralized place with the relevant statuses clearly displayed.
Instead of going through the theory, let’s jump straight into examples.
There are various ways to implement a Kanban into your process. I personally differentiate between “high-level” and “low-level” approaches:
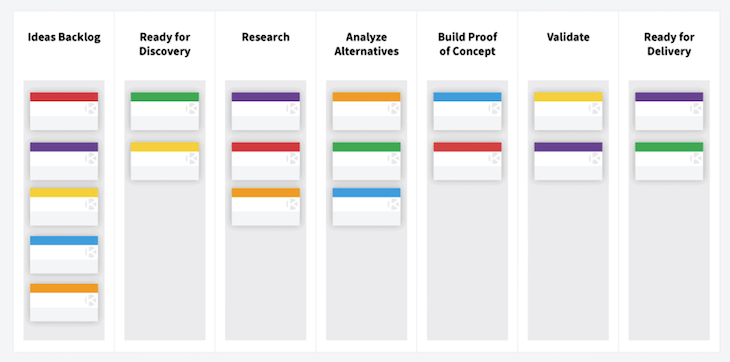
A high-level discovery Kanban provides you with a way to map your discovery process into main, generic chunks of work.
The goal here is to build a big-picture view of:

In my case, I differentiate between seven main steps:
Any idea passes the gut-feeling test if it seems:
This ensures that there’s always something to choose from (choosing one out of ten ideas increases the chances that you’ll work on something impactful than if you had just one topic in the pipeline) and that promising ideas don’t slip through the cracks.
The next step is to do some initial validation. This usually means that I work with data, analyzing the potential impact, and assessing the reach and metrics.
If it turns out the idea isn’t promising, I just kill it.
Ideas that pass both the gut-feeling check and initial validation land in the discovery backlog.
These topics are usually ready to be picked up for more serious research, and initial validation helps in prioritizing and assigning the right themes to them, so it’s easier to choose.
Once you commit to exploring the topic further, you can pursue:
The information you gather from these helps you to clearly communicate what the product designers need to focus on, how many topics are on their plate, and if they are related.
After the discovery phase, you create a wireframe ready for proper polishments.
In most cases, topics move directly from “in discovery” to “designing.” However, sometimes it might turn out after the discovery that although the topic is relevant, it’s not worth prioritizing at the very moment.
This step includes UI polishments and, if applicable, also prototyping, usability testing, and preparing files for the handoff.
After the design phase is completed, the topic is ready for actual development.
Ideally, the development should start immediately to avoid the situation when designs become irrelevant.
But once again — real life is often more unpredictable than the ideal process described in the books, and sometimes topics are dropped.
You should also track topics that are in the development phase. This allows the dev team to receive some extra support and clarification along the way, and also indicates the designer’s capacity.
You can use a high-level discovery Kanban for:
The discovery kanban enables transparency and helps everyone understand what the team is currently exploring.
This often encourages additional insights or feedback. If you publicly share what you are working on, there’s a higher chance that someone who worked on the topic before will lend you an insight or two.
Having a discovery Kanban shows how many topics you’re working on and what topics are waiting in the backlog.
It provides you with an assessment of how much you can plan in the upcoming weeks and guides what time investment you can afford.
For example, if, for some reason, your “ready for discovery” status is filled with low-impact topics, then you know you can afford to invest more time in polishing current high-impact initiatives.
On the other hand, if there are ten high-impact initiatives in your pipeline, it’s a signal that it’s worth it to speed up the work on the current mid-impact initiative in progress.
Working on three topics at once isn’t necessarily a bad thing. However, working on three completely different topics at once is problematic.
A discovery Kanban helps you see what themes you’re currently working on so that you can choose the right topics to either continue with the theme or start transitioning it.
Another way to use the discovery kanban is to split the process into smaller, more detailed steps.
You can use it more on a team level for our internal process improvement and tracking rather than a company-wide, public board.
For better readability, I replicated our workflow with sticky notes:

I use the following ten different categories here to keep my boards organized:
This step represents the “ready for discovery” status in a high-level discovery kanban and tells you what’s coming next.
You start the discovery process by ensuring you understand the challenge you want to tackle.
Sometimes this step is just about reading interview transcripts to see what sparked the idea. However, sometimes it’s a more extensive workshop when you unpack why you’re starting the initiative.
You should invest up to two days for initial research. This includes:
The goal is better to understand the challenge from the user’s perspective and gather relevant insights.
For smaller initiatives, you can just do initial research. For bigger ones, you should also invest in deep-dive discovery.
This step includes planning more robust qualitative research, such as:
Once you’re satisfied with your research, you can jump into the ideation stage.
Depending on the case, this might include an hour-long UX workshop or a longer, more robust process.
The next step is to choose the solution you want to build.
You might include user tests with low-fidelity prototypes and validation interviews for bigger initiatives or ICE scoring for smaller topics.
As the name suggests, here you jump into designing high-fidelity designs and, if relevant, preparing a prototype.
You should decide upfront whether you’re going to do user tests with the prototype or just launch it on production. It usually depends on:
If you did usability tests and received relevant feedback, you moved the topic to “improvements” to adjust the designs.
The last step is to prepare the design for handoffs, which includes creating components and writing design documentation.
You can use a low-level Kanban to:
The discovery kanban is your guardrail to complete all of the mandatory steps required for a design process.
However, it doesn’t mean you need to follow a robust process even for the tiniest initiatives. Sometimes it’s okay to spend as little as thirty minutes on the problem-understanding phase.
Without this workflow, there’s a good chance you could unintentionally skip some steps and pay the price down the road.
At first, the “problem understanding” stage wasn’t on my board.
I added it after a few design retrospectives when I looked at the challenges we faced, then at our Kanban, and realized where our process was lacking.
Visual representation of how you work helps you continuously improve.
Having various initiatives mapped at specific statuses helps plan tangible goals for the day and the week.
This helps teams stay productive and focused as they don’t have to constantly think about what to do next.
At first glance, the discovery kanban might just look like an anti-pattern waterfall.
You define an initiative, move it step-by-step through the workflow, handoff to the team, and forget.
But in practice, topics don’t move linearly. For example, if you learn during the solution ideation phase that you’re missing some details, you move the topic back to deep-dive research.
The fact that a topic is “in development” also doesn’t prohibit you from doing ad-hoc usability tests and design fixes along the way. In these cases, you often create extra “tickets” in the Kanban to maintain transparency.
The goal of the discovery Kanban is not so much to eliminate the messiness, but to give it a structure. This structure helps you navigate the complexity of the process and continuously improve.
Implementing discovery Kanban in my daily processes massively changed my discovery process’s quality. It was one of our best process decisions so far.
If you are still trying to figure out how to manage your discovery process, I encourage you to try it. If you are scared by how robust the examples were, remember that it took me months to get there.
You can start with a simple structure. Then, as you notice various challenges and problems in your discovery work, you can add new steps to address these challenges.
Although I can’t promise that the discovery Kanban will work as a silver bullet in your context, it definitely works as one in mine.
Featured image source: IconScout
LogRocket identifies friction points in the user experience so you can make informed decisions about product and design changes that must happen to hit your goals.
With LogRocket, you can understand the scope of the issues affecting your product and prioritize the changes that need to be made. LogRocket simplifies workflows by allowing Engineering, Product, UX, and Design teams to work from the same data as you, eliminating any confusion about what needs to be done.
Get your teams on the same page — try LogRocket today.

Guard your focus, not just your time. Learn tactics to protect attention, cut noise, and do deep work that actually moves the roadmap.

Rumana Hafesjee talks about the evolving role of the product executive in today’s “great hesitation,” explores reinventing yourself as a leader, the benefits of fractional leadership, and more.

Trey Courtney talks about his process for evaluating partnerships or acquisitions and how he successfully implements these initiatives.

Asma Syeda shares the importance of responsible AI and best practices for companies to ensure their AI technology remains ethical.