Editor’s note: This post was updated on 20 October 2021 to update information and provide additional, post-release context for new features in Prisma 2.

The Replay is a weekly newsletter for dev and engineering leaders.
Delivered once a week, it's your curated guide to the most important conversations around frontend dev, emerging AI tools, and the state of modern software.
Prisma 2 provides an abstraction that allows us to write database queries using JavaScript and TypeScript, as well as providing early access support for and Go. Prisma 2 then maps the queries written in our chosen language into the database of our choice, which makes it easier for developers because we don’t have to write queries in the database language itself.
Currently, it supports MySQL, SQLite, PostgreSQL, SQL Server, and MongoDB.
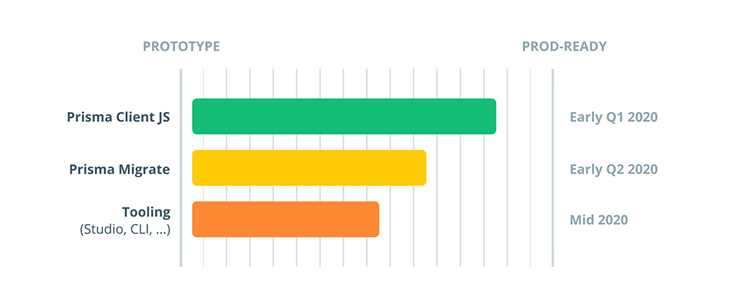
Prisma 2 consists of three major tools:
Prisma Client JS is a type-safe database client that replaces traditional ORMs like Sequelize, Bookshelf, and Mongoose.
It allows us to access the database through plain JavaScript methods and objects without having to write the query in the database language itself. This is the part that acts as an abstraction in front of the database so it’s easier to write CRUD (create, read, update, and delete) applications.
Prisma Migrate is a powerful database schema migration tool. It uses a declarative data modeling syntax to describe our database schema.
Prisma Migrate stores our entire migration history and easily lets us revert and replay migrations. It also allows us to run before-and-after hooks to execute scripts while migrating so we can populate the database with required values during a migration.
Currently, Prisma Migrate doesn’t support the MongoDB connector.
Prisma Studio allows us to visualize data via an Admin UI.
Here, we can perform CRUD operations on our data. This is the easiest way to visualize data from our database as well as manipulate it.
The latest stable version of Prisma is v3.4.0, and it is ready to use in production.
MongoDB support is still in preview mode, and though support is being extended, it is not recommended to use it in production. The latest stable version of Prisma also supports PostgreSQL 14.

The latest status of Prisma 2 General Availability can be checked at isprisma2ready.com. Prisma 2 is currently ready for production, and isprisma2ready now provides some documentation about migrating from Prisma 1 to Prisma 2. isprisma2ready.com also features other important documentation about Prisma.
This tutorial is going to show you the following things:
And because of this, it is important that you’ve some basic knowledge about Node.js and npm. Prisma can also be implemented using Typescript or Go, but you’ll see how to implement using these languages in a later tutorial.
To make sure we’re on the same page, these are the versions used in this tutorial:
First, we need to install prisma as a dev dependency. Previously, we used to install prisma as a global dependency, but that is not recommended anymore.
After initializing the project directory with npm, install prisma as a developer dependency by typing the following command into the terminal:
npm install -D prisma
Go ahead and type the following in the terminal to initialize a prisma project in the directory:
npx prisma init
It should now print the following in your terminal:
✔ Your Prisma schema was created at prisma/schema.prisma You can now open it in your favorite editor. Next steps: 1. Set the DATABASE_URL in the .env file to point to your existing database. If your database has no tables yet, read https://pris.ly/d/getting-started 2. Set the provider of the datasource block in schema.prisma to match your database: postgresql, mysql, sqlite, sqlserver or mongodb (Preview). 3. Run prisma db pull to turn your database schema into a Prisma schema. 4. Run prisma generate to generate the Prisma Client. You can then start querying your database. More information in our documentation:Get started with Prisma
Build data-driven applications with ease using Prisma ORM, add connection pooling or global caching with Prisma Accelerate or subscribe to database changes in real-time with Prisma Pulse.
By typing npx prisma init, a new schema.prisma file is created inside the prisma directory.
Now, you should see a folder named prisma/ created in the parent directory and inside the prisma directory, you’ll find a file called schema.prisma.
Go ahead and open it. It should have the following contents:
// This is your Prisma schema file,
// learn more about it in the docs: https://pris.ly/d/prisma-schema
generator client {
  provider = "prisma-client-js"
}
datasource db {
  provider = "postgresql"
  url      = env("DATABASE_URL")
}
Go ahead and remove all of these comments and change the contents of the schema.prisma file to the following:
// 1
datasource db {
  provider = "sqlite"
  url      = "file:./dev.db"
}

// 2
generator client {
  provider = "prisma-client-js"
}

// 3
model User {
  id    String @id @default(cuid())
  fname String
  lname String
  todos Todo[]
}

// 4
model Todo {
  id        String  @default(cuid()) @id
  text      String
  completed Boolean @default(false)
}
The schema.prisma file contains the data model as well as the configuration options. Let’s break it down:
datasource blockThe datasource block is used to specify the connection to the database. We set the provider field to sqlite. SQLite is an embedded database software that can be used anywhere from low-powered devices to devices with lower memory. It allows us to create a local database without having to install anything.
The url field contains the connection string to our database. Here, whatever we type after file: is the name with which the database gets created. In our case, the database will be created in the prisma/ folder with the name dev.db.
generator blockBy adding the generator block, we specify that we want to generate Prisma’s database client.
The client is generated by running the prisma generate command and will be located in node_modules/@prisma. It can be imported in our code as import { PrismaClient } from '@prisma/client'.
model blockHere, we define the User data model using the model block. Models represent the entities of our application domain. On a technical level, a model maps to the underlying structures of the data source.
For example, in relational databases — such as SQL, SQLite, and PostgreSQL — a model maps to a table, whereas in non-relational databases — like MongoDB — it would map to a collection. We have three attributes inside our User model, namely, id, name, and todos.
id field is a primary key of type String with a default value of cuid(). To determine which field of a model is the ID field, we can annotate it with the @id attribute
SQL, SQLite, and PostgreSQL, a unique ID corresponds to a column with a primary key constraintfname and lname field is of type Stringtodos field is of type Todo, which contains a type modifier [] that makes the field a list so we can store a list of todos in our User data modelTodo data modelFinally, we define the Todo data model. The Todo data model contains three fields:
id: this is, again, a primary key of type String with a default value of cuid()text: this is a type of Stringcompleted: this a type of Boolean with a default value of falseNow add Prisma Client to the project by installing @prisma/client using npm as follows:
npm install @prisma/client
Go ahead and generate Prisma Client by typing the following command:
npx prisma generate
The generated client will be located in node_modules/@prisma, thus allowing us to import Prisma Client into our code as import { PrismaClient } from '@prisma/client'.
Now let’s migrate our database to create empty tables. The following command will create and apply migrations.
npx prisma migrate dev
Running this command will ask you to name the migration. Giving the migration a name will generate the SQLite database.
$ npx prisma migrate dev
Environment variables loaded from .env
Prisma schema loaded from prisma\schema.prisma
Datasource "db": SQLite database "dev.db" at "sqlite:./dev.db"

SQLite database dev.db created at sqlite:./dev.db

√ Enter a name for the new migration: ... first-migration
Applying migration `20211104134108_first_migration`

The following migration(s) have been created and applied from new schema changes:

migrations/
  └─ 20211104134108_first_migration/
    └─ migration.sql

Your database is now in sync with your schema.

✔ Generated Prisma Client (3.4.0) to .\node_modules\@prisma\client in 74ms
The above commands will create a dev.db file with empty tables.
Go ahead and create a file named seed.js inside of a prisma/ folder:
$ touch prisma/seed.js
Now, open up a seed.js file and start by importing Prisma Client:
const { PrismaClient } = require("@prisma/client")

const prisma = new PrismaClient()

const main = async () => {

}

main()
  .catch(e => console.error(e))
  .finally(async () => {
    await prisma.$disconnect()
  })
First, we’ve imported PrismaClient from the @prisma/client package, which was generated from our schema.prisma file when we ran npx prisma generate. Next, we create a constant called prisma, which is an instance of PrismaClient.
We have an async function called main. When calling the main function, if any error occurs, the catch block will catch the errors and will display them with the console.error, and whether an error happens or not after running the main function, the code block inside the finally will run.
The finally() function itself contains an async callback, which disconnects from the Prisma database so as to not keep it running as we are just seeding the database.
Now open up main() function and paste the following:
  const john = await prisma.user.create({
    data: {
      fname: 'John',
      lname: 'Doe',
    },
  });
  console.log(john);
If you type the above code, you will find autocompletion support thanks to TypeScript. The above code will create a user with a first name John and a last name Doe.
We can access each function via the respective model property on our generated PrismaClient instance, e.g. users for the User model. The name users is auto-generated using the Pluralize package. It is therefore recommended to name our models singularly, i.e., User and not Users.
The simplest way to create a user is by just giving it a name field.
Go ahead and run the seed.js file by typing the following in the terminal:
$ node prisma/seed
The console should output this:
{ id: 'ckvos4qr00000c8vndplgz0zl', fname: 'John', lname: 'Doe' }
Now, below that, let’s create another user, johnny, while simultaneously setting the todos:
  const johnny = await prisma.user.create({
    data: {
      fname: 'Johnny',
      lname: 'Doe',
      todos: {
        create: [
          {
            text: 'Do dishes',
          },
          {
            text: 'Walk the dog',
          },
        ],
      },
    },
  })
Here, we create a user with the name Johnny. The difference is that we also create a list of todos.
The todos field is an object that takes in create, which is an array of objects. The objects are the actual todo items containing the fields id, text, and completed from the Todo data model.
Prisma has great autocompletion, so we don’t need to remember the data model or the create object. It will be provided in the autocomplete suggestion list so we can write code faster, which provides a great developer experience.
As a reminder, we’ve shown an example of creating a user with todos. Again, run the seed.js file and you should see the console output the following:
{ id: 'ckvosauk10000f4vnxvk4lsxq', fname: 'Johnny', lname: 'Doe' }
You’ll notice that it doesn’t return todos, but it definitely adds them to the database. We will see it when we query our database.
Let’s create a todo without a user by typing the following below that in the seed.js file:
const run = await prisma.todo.create({
  data: {
    text: "Run a full marathon"
  }
})

console.log(run)
The above code will simply create a todo without assigning a user to it. Run the seed.js file to see the output as follows:
{
  id: 'ck60v6k5t000444v5gc1vv3cs',
  text: 'Run a full marathon',
  completed: false
}
Let’s create a todo with a user by typing the following below that:
  const grocery = await prisma.todo.create({
    data: {
      text: 'Buy groceries for the week',
      User: {
        create: {
          fname: 'Amelia',
          lname: 'Dane',
        },
      },
    },
  });
  console.log(grocery);
The above code will create a todo while assigning it to the user named Amelia. Run the seed.js file to see the console output the following:
{
  id: 'ckvlx7m8x0000wgvnqduu86re',
  text: 'Buy groceries for the week',
  completed: false,
  userId: 'ckvlx7m8x0001wgvn0ikwj774'
}
This time, you’ll see that it doesn’t return the user, but it definitely adds them to the database. We will see it when we query our database.
The entire seed.js file should now look like this:
const { PrismaClient } = require('@prisma/client');
const prisma = new PrismaClient();
const main = async () => {
  const john = await prisma.user.create({
    data: {
      fname: 'John',
      lname: 'Doe',
    },
  });
  console.log(john);
  const johnny = await prisma.user.create({
    data: {
      fname: 'Johnny',
      lname: 'Doe',
      todos: {
        create: [
          {
            text: 'Do dishes',
          },
          {
            text: 'Walk the dog',
          },
        ],
      },
    },
  });
  const run = await prisma.todo.create({
    data: {
      text: 'Run a full marathon',
    },
  });
  console.log(run);
  const grocery = await prisma.todo.create({
    data: {
      text: 'Buy groceries for the week',
      User: {
        create: {
          fname: 'Amelia',
          lname: 'Dane',
        },
      },
    },
  });
  console.log(grocery);
};
main()
  .catch((e) => console.error(e))
  .finally(async () => {
    await prisma.$disconnect();
  });
Go ahead and create an index.js file in the root folder using the following command:
touch index.js
Let’s start by importing Prisma Client:
const { PrismaClient } = require("@prisma/client")

const prisma = new PrismaClient()

const main = async () => {

}

main()
  .catch(e => console.error(e))
  .finally(async () => {
    await prisma.$disconnect()
  })
This is a demo project, which is why we are closing the connection to the database. In real world applications, the server keeps running, so technically we’d only call main() function without the finally() block.
Let’s start by adding the following code inside the main() function:
const users = await prisma.user.findMany()

console.log(users)
The above code will find all users as no condition is specified inside findMany(). To run the index.js file, type the following in the terminal:
node index
The output should be as follows:
[
  { id: 'ckvos4qr00000c8vndplgz0zl', fname: 'John', lname: 'Doe' },
  { id: 'ckvosauk10000f4vnxvk4lsxq', fname: 'Johnny', lname: 'Doe' },
  { id: 'ckvosdm6d000144vn1regc1l4', fname: 'Amelia', lname: 'Dane' }
]
Below that, add the following block of code:
const usersWithTodos = await prisma.user.findMany({
    include: {
      todos: true
    }
  })

console.log(JSON.stringify(usersWithTodos, null, 2))
The above code returns all the users, but it also includes todos the user has created.
The JSON.stringify() method specified above allows us to pretty-print JSON with the spacing level of 2. Go ahead and run the index.js file to see the output as follows:
[
  {
    "id": "ck60v6k5c000044v5a0eqc0yg",
    "name": "Sasha",
    "todos": []
  },
  {
    "id": "ck60v6k5o000144v5jgn4t583",
    "name": "Johnny",
    "todos": [
      {
        "id": "ck60v6k5o000244v5kzryzqgx",
        "text": "Do dishes",
        "completed": false
      },
      {
        "id": "ck60v6k5o000344v5ngbt91qd",
        "text": "Walk the dog",
        "completed": false
      }
    ]
  },
  {
    "id": "ck60v6k5x000644v5f4opbbv5",
    "name": "Amelia",
    "todos": [
      {
        "id": "ck60v6k5x000544v5y5oig1qq",
        "text": "Buy groceries for the week",
        "completed": false
      }
    ]
  }
]
Now add the following chunk of code below that to find all the todos in the database:
const todos = await prisma.todo.findMany()

console.log(todos)
You’ll notice it’s similar to the first users query. Now, run the index.js file to see the output:
[
  {
    id: 'ckvosauk10001f4vnezedy9k2',
    text: 'Do dishes',
    completed: false,
    userId: 'ckvosauk10000f4vnxvk4lsxq'
  },
  {
    id: 'ckvosauk10002f4vna3knwti8',
    text: 'Walk the dog',
    completed: false,
    userId: 'ckvosauk10000f4vnxvk4lsxq'
  },
  {
    id: 'ckvosdm6d000044vnzw9kwb7g',
    text: 'Buy groceries for the week',
    completed: false,
    userId: 'ckvosdm6d000144vn1regc1l4'
  }
]
Below that, add the following code:
const todosWithUsers = await prisma.todo.findMany({
  include: {
    User: true
  }
})

console.log(JSON.stringify(todosWithUsers, null, 2))
Similar to the second users query, it will find all todos with the user related to that todo. Again, run the index.js file to see the output that will be pretty-printed with the following contents:
[
  {
    "id": "ckvosauk10001f4vnezedy9k2",
    "text": "Do dishes",
    "completed": false,
    "userId": "ckvosauk10000f4vnxvk4lsxq",
    "User": {
      "id": "ckvosauk10000f4vnxvk4lsxq",
      "fname": "Johnny",
      "lname": "Doe"
    }
  },
  {
    "id": "ckvosauk10002f4vna3knwti8",
    "text": "Walk the dog",
    "completed": false,
    "userId": "ckvosauk10000f4vnxvk4lsxq",
    "User": {
      "id": "ckvosauk10000f4vnxvk4lsxq",
      "fname": "Johnny",
      "lname": "Doe"
    }
  },
  {
    "id": "ckvosdm6d000044vnzw9kwb7g",
    "text": "Buy groceries for the week",
    "completed": false,
    "userId": "ckvosdm6d000144vn1regc1l4",
    "User": {
      "id": "ckvosdm6d000144vn1regc1l4",
      "fname": "Amelia",
      "lname": "Dane"
    }
  }
]
Notice: when we created the todo Run a full marathon, we didn’t specify a user, which is the reason it is null.
The entire index.js file should now look like this:
const { PrismaClient } = require('@prisma/client');
const prisma = new PrismaClient();
async function main() {
  const users = await prisma.user.findMany();
  console.log(users);
  const usersWithTodos = await prisma.user.findMany({
    include: {
      todos: true,
    },
  });
  console.log(JSON.stringify(usersWithTodos, null, 2));
  const todos = await prisma.todo.findMany();
  console.log(todos);
  const todosWithUsers = await prisma.todo.findMany({
    include: {
      User: true,
    },
  });
  console.log(JSON.stringify(todosWithUsers, null, 2));
}
main()
  .catch((e) => console.error(e))
  .finally(async () => {
    await prisma.$disconnect();
  });
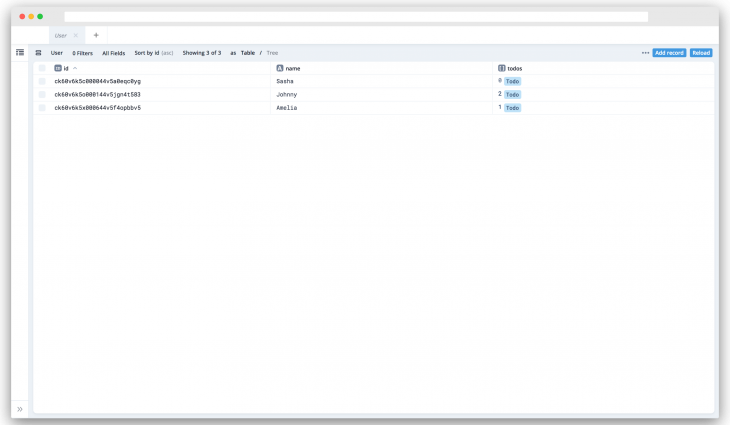
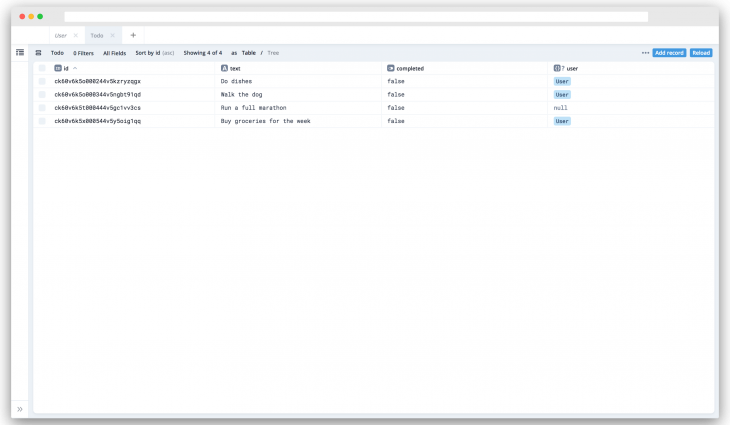
Prisma Studio allows us to visualize data using a beautiful Admin UI. It also allows us to perform CRUD operations on our data. To open up Prisma Studio, type the following in the terminal:
npx prisma studio
Prisma studio will open on http://localhost:5555 and you’ll be able to see the Admin UI.
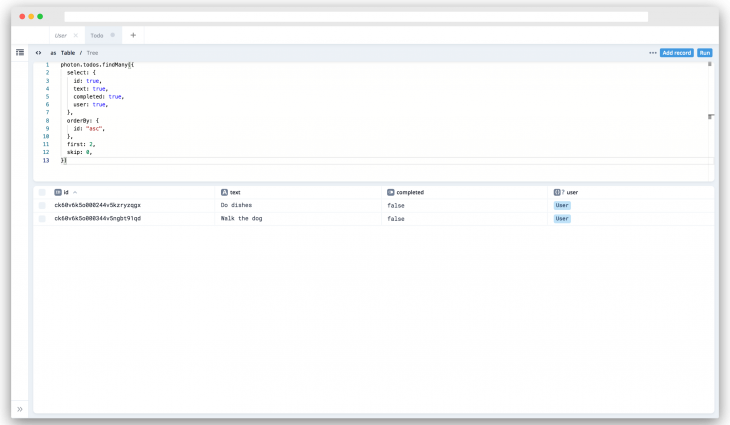
Using Admin UI, we can quickly sort the data, filter it, and even perform queries without having to write them in our script file.
The following are some screenshots of the Admin UI:


You can find the entire source code used in this tutorial on GitHub.
In this article, we learned the basics of Prisma 2. It has three major tools, namely: Prisma Client, Prisma Migrate, and Prisma Studio.
We used Prisma Client to seed values into our database and query data from it. We also used Prisma Migrate to create the initial migrations. Finally, we used Prisma Studio to visualize our data using a beautiful Admin UI.
 Monitor failed and slow network requests in production
Deploying a Node-based web app or website is the easy part. Making sure your Node instance continues to serve resources to your app is where things get tougher. If you’re interested in ensuring requests to the backend or third-party services are successful, try LogRocket.

LogRocket lets you replay user sessions, eliminating guesswork around why bugs happen by showing exactly what users experienced. It captures console logs, errors, network requests, and pixel-perfect DOM recordings — compatible with all frameworks.
LogRocket's Galileo AI watches sessions for you, instantly identifying and explaining user struggles with automated monitoring of your entire product experience.
LogRocket instruments your app to record baseline performance timings such as page load time, time to first byte, slow network requests, and also logs Redux, NgRx, and Vuex actions/state. Start monitoring for free.
Install LogRocket via npm or script tag. LogRocket.init() must be called client-side, not
server-side
$ npm i --save logrocket

// Code:

import LogRocket from 'logrocket';
LogRocket.init('app/id');
// Add to your HTML:

<script src="https://cdn.lr-ingest.com/LogRocket.min.js"></script>
<script>window.LogRocket && window.LogRocket.init('app/id');</script>

Claude Code is deceptively capable. Point it at a codebase, describe what you need, and it’ll autonomously navigate files, write […]

Compare the top AI development tools and models of February 2026. View updated rankings, feature breakdowns, and find the best fit for you.

Broken npm packages often fail due to small packaging mistakes. This guide shows how to use Publint to validate exports, entry points, and module formats before publishing.

Discover what’s new in The Replay, LogRocket’s newsletter for dev and engineering leaders, in the February 11th issue.
Would you be interested in joining LogRocket's developer community?
Join LogRocket’s Content Advisory Board. You’ll help inform the type of content we create and get access to exclusive meetups, social accreditation, and swag.
Sign up now
3 Replies to "An introduction to Prisma 2"
Hi! Does Prisma 2 work fine with MongoDB? Because there is nothing about it in the official docs, neither examples.
Here is a link I found yesterday in the new Prisma docs…
https://www.prisma.io/docs/guides/upgrade-from-prisma-1/should-you-upgrade#feature-parity
“MongoDB support: Prisma 2.0 doesn’t yet support MongoDB. If you’re using Prisma 1 with MongoDB and want to upgrade to Prisma 2.0, you either need to migrate your data into a relational database first or wait until MongoDB is supported.”
This seeder function did not work for me at all.
First :
.finally(async () => {
await prisma.disconnect()
})
throws an error, in the current Prisma version. To solve this, run “await prisma.$disconnect()”
Second, and that is more of my own use case, if you’re creating tables in your db in a loop, don’t use forEach but for .. of loop. My use case:
for (const entity of entities) {
await prisma.tableName.create({
data: entity
})
}
Every row has to be created asynchronously.