
Editor’s note: This blog post was updated 15 August 2022 to verify code accuracy.

Refactoring your existing application or components to use React Hooks comes with its own unique set of challenges. In this article, we’ll cover some generic issues with refactoring that apply to a wide variety of application types, starting with the basic concerns before moving on to more advanced use cases.
We’ll cover the following:
useEffect object values
useEffectTo follow along with this article, you should have some familiarity with how React Hooks work. Let’s get started!
The Replay is a weekly newsletter for dev and engineering leaders.
Delivered once a week, it's your curated guide to the most important conversations around frontend dev, emerging AI tools, and the state of modern software.
When you set out to refactor your application to use React Hooks, the first problem you’ll face happens to be the root issue from which other challenges stem: how do you refactor your class components to function components without breaking any functionalities?
Let’s take a look at some of the most common use cases you’ll encounter, starting with the easiest.
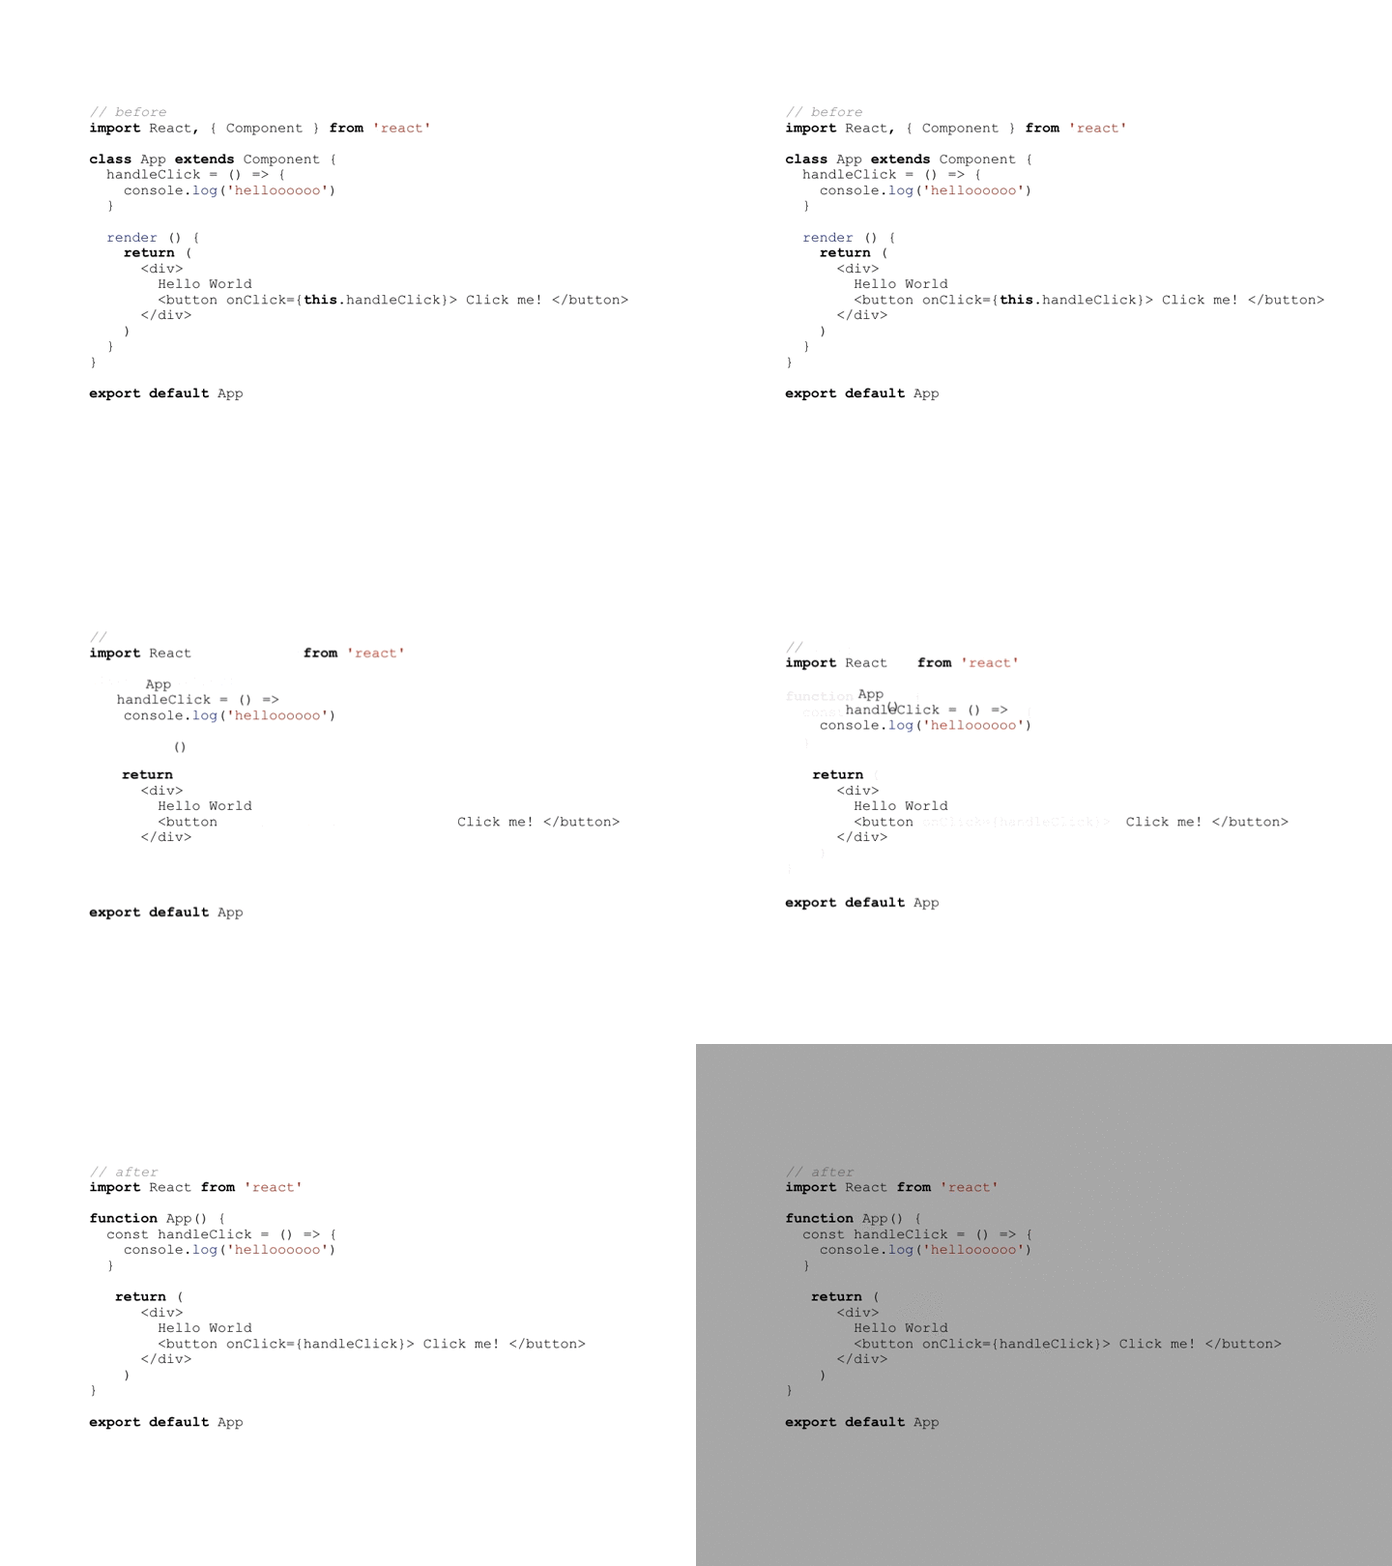
For advanced developers, the gif above may provide enough context to spot the difference in refactoring from class to function components. Let’s explore it in detail; the code below shows the most basic use case you’ll have, a class component that just renders some JSX:
// before
import React, {Component} from 'react';

class App extends Component {
  handleClick = () => {
    console.log("helloooooo")
  }

  render() {
    return (
      <div>
        Hello World
        <button onClick={this.handleClick}>
          Click me!
        </button>
      </div>
    )
  }
}

export default App
Refactoring this component is pretty straightforward:
// after
import React from 'react'

function App() {
  const handleClick = () => {
    console.log("helloooooo")
  }

  return (
    <div>
      Hello World
      <button onClick={handleClick}> Click me! </button>
    </div>
  )
}

export default App
In the code above, we replaced the class keyword with a JavaScript function. Instead of using a render() function, we directly returned through the parent App() function, which is a component. Finally, in our function component, we don’t use this. Instead, we replace it with a JavaScript value in the function scope.
propType declarations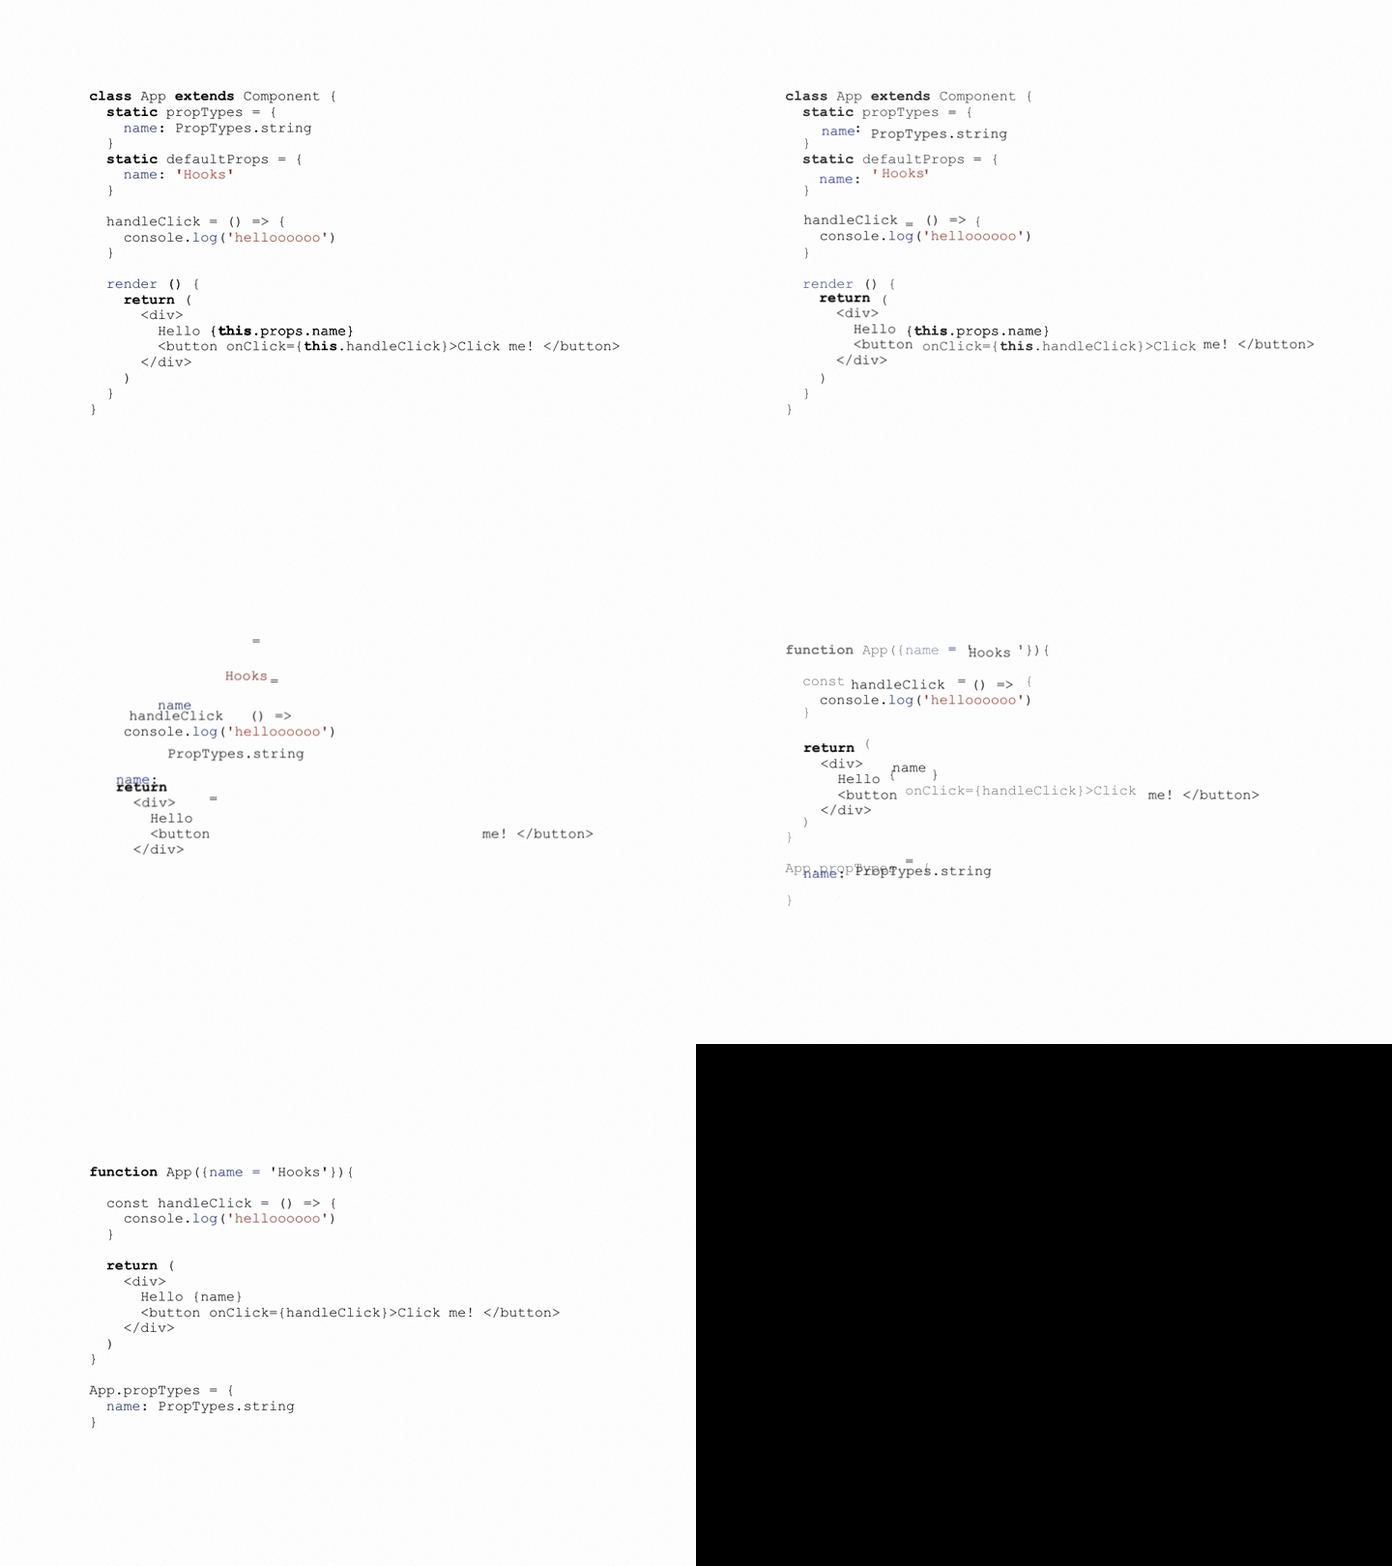
A class component is another simple use case where there isn’t a lot of overhead:
// before
class App extends Component {
  static propTypes = {
    name: PropTypes.string
  }
  static defaultProps = {
    name: "Hooks"
  }

  handleClick = () => {
    console.log("helloooooo")
  }

  render() {
    return <div>
      Hello {this.props.name}
      <button onClick={this.handleClick}> Click me! </button>
    </div>
  }
}
Upon refactoring, we have the following code:
function App({name = "Hooks"}) {
  const handleClick = () => {
    console.log("helloooooo")
  }

  return <div>
      Hello {name}
      <button onClick={handleClick}>Click me! </button>
    </div>
}

App.propTypes = {
  name: PropTypes.number
}
As you can see, the component looks much simpler as a functional component. The props become function parameters of the component function, default props are handled via the ES6 default parameter syntax, and static propTypes is replaced with App.propTypes.
The scenario gets a lot more interesting when you have a class component with an actual state object. Many of your class components will fall into this category or a slightly more complex version of this category.
Consider the following class component:
class App extends Component {
  state = {
    age: 19
  }

  handleClick = () => {
    this.setState((prevState) => ({age: prevState.age + 1}))
  }

  render() {
    return <div>
      Today I am {this.state.age} Years of Age
      <div>
        <button onClick={this.handleClick}>Get older! </button>
      </div>
    </div>
  }
}
The component only keeps track of a single property in the state object. Easy enough!
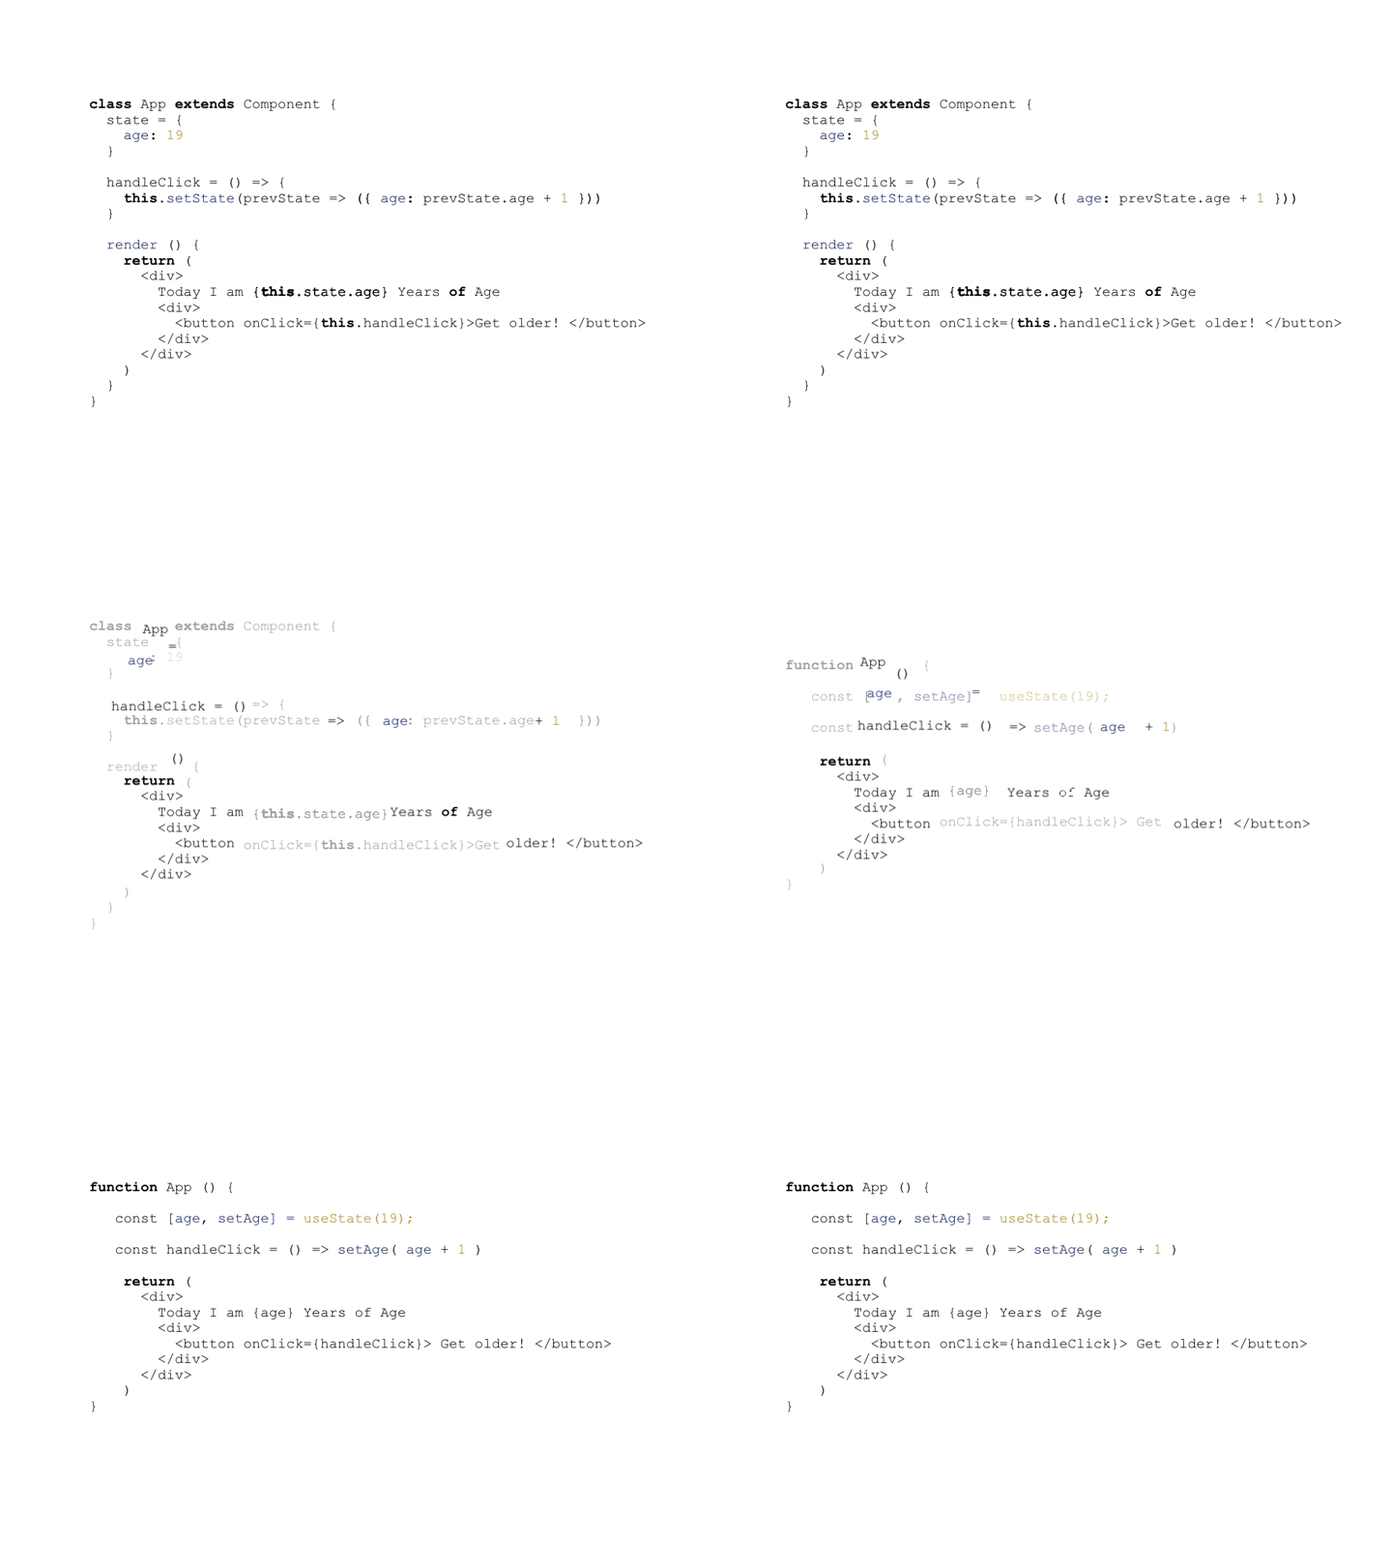
We can refactor this code to use the useState Hook, which is used to manage state in React, as shown below. Note how we pass in the default value of state as a parameter of useState():
function App() {
  const [age, setAge] = useState(19);
  const handleClick = () => setAge(age + 1)

  return <div>
      Today I am {age} Years of Age
      <div>
        <button onClick={handleClick}>Get older! </button>
      </div>
   </div>
}
That looks a lot simpler!
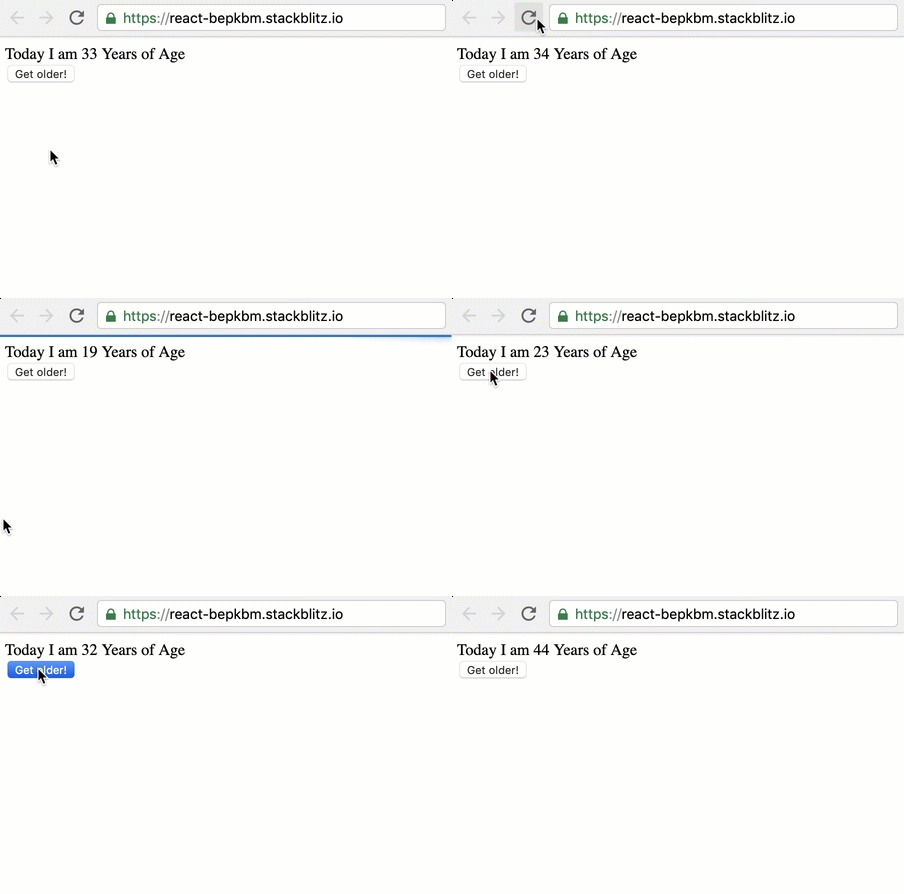
If this component had more state object properties, you could use multiple useState calls, as shown below:
function App() {
  const [age, setAge] = useState(19);
  const [status, setStatus] = useState('married')
  const [siblings, setSiblings] = useState(10)


  const handleClick = () => setAge(age + 1)

  return (
   <div>
      Today I am {age} Years of Age
      <div>
        <button onClick={handleClick}>Get older! </button>
      </div>
   </div>
  )
}
You can create an object in useState(), however, managing that state will be rather difficult, causing all the fields to re-render on the screen. Although this example is fairly simple, I recommend checking out this guide for more examples.
While it sounds great to rewrite your applications and components to use Hooks, it does come at a cost, with time and manpower being the forerunners.
If you’re working on a large codebase, you may need to make some trade-offs in the earlier stages of adopting Hooks. As an example scenario, let’s consider the following component:
const API_URL = "https://api.myjson.com/bins/19enqe";

class App extends Component {
  state = {
    data: null,
    error: null,
    loaded: false,
    fetching: false,
  }

  async componentDidMount() {
    const response = await fetch(API_URL)
    const { data, status } = {
      data: await response.json(),
      status: response.status
    }

    // error?
    if (status !== 200) {
      return this.setState({
        data,
        error: true,
        loaded: true,
        fetching: false,
      })
    }

    // no error
    this.setState({
      data,
      error: null,
      loaded: true,
      fetching: false,
    })
  }

  render() {
    const { error, data } = this.state;

    return error ? <div> "Sorry, an error occurred :(" </div> :
      <pre>{JSON.stringify(data, null, ' ')}</pre>
  }
}
The component above makes a request to a remote server to fetch some data when it is mounted, then it sets state based on the results. Instead of paying attention to the async logic, you should focus on the setState calls:
class App extends Component {
 ...

  async componentDidMount() {
    ...

    if (status !== 200) {
      this.setState({
        data,
        error: true,
        loaded: true,
        fetching: false,
      })
    }


    this.setState({
      data,
      error: null,
      loaded: true,
      fetching: false,
    })
  }

  render() {
    ...
  }
}
The setState calls take in an object with four properties. While this is a just an example, the generic case would be that your component makes setState calls with a lot of object properties.
With React Hooks, you’d likely go ahead and split each object value into separate useState calls. You could use an object with useState, but these properties are unrelated, and using an object here might make it more difficult to break the code into independent custom Hooks later on.
Therefore, a refactor may look like the code below:
...
  const [data, setData] = useState(null);
  const [error, setError] = useState(null);
  const [loaded, setLoading] = useState(false);
  const [fetching, setFetching] = useState(false);
...
You’ll also have to change the this.setState calls to look like the following:
// no more this.setState calls - use updater functions.
 setData(data);
  setError(null);
  setLoading(true);
  fetching(false);
While this works, if you have a lot of setState calls within the component, then you’ll end up writing this multiple times or grouping them in another custom Hook.
What if you wanted to implement an incremental adoption of Hooks in your codebase with fewer code changes and a slightly similar setState signature? In this case, you do have to make a trade-off; here, we’ll introduce the useReducer Hook. useReducer has the following signature:
const [state, dispatch] = useReducer(reducer)
reducer is a function that takes a state and action and returns a newState:
const [state, dispatch] = useReducer((state, action) => newState)
The newState returned from the reducer is then consumed by the component via the state variable.
If you’ve used Redux before, then you know that your action must be an object with a certain type property. However, this is not the case with useReducer. Instead, the reducer function takes in state and some action, then returns a new state object. We can take advantage of this for a less painful refactoring, as shown below:
...
function AppHooks() {
  ...
 const [state, setState] = useReducer((state, newState) => (
{...state, ...newState}
  ));

 setState({
    data,
    error: null,
    loaded: true,
    fetching: false,
  })
}
Instead of changing most of the this.setState calls everywhere in the component, we’ve chosen to take a simpler, incremental approach that doesn’t involve a lot of code changes.
Instead of using this.setState({data, error: null, loaded: null,fetching: false}), with Hooks, you can just remove this., and the setState call will still work. The code below makes this possible:
const [state, setState] = useReducer((state, newState) => (
{ ...state, ...newState }
));
When you attempt to update state, whatever is passed into setState, which is typically called dispatch, is passed to the reducer as the second argument. We call this newState.
Instead of implementing a complex switch statement, like in Redux, we just return a new state object that overrides the previous state with the new values passed in. This is similar to how setState works, updating state properties instead of replacing the entire object.
With this solution, it’s easier to embrace an incremental Hooks adoption in your codebase, one without a lot of code changes and with a similar setState signature. Below is the full refactored code with fewer code changes:
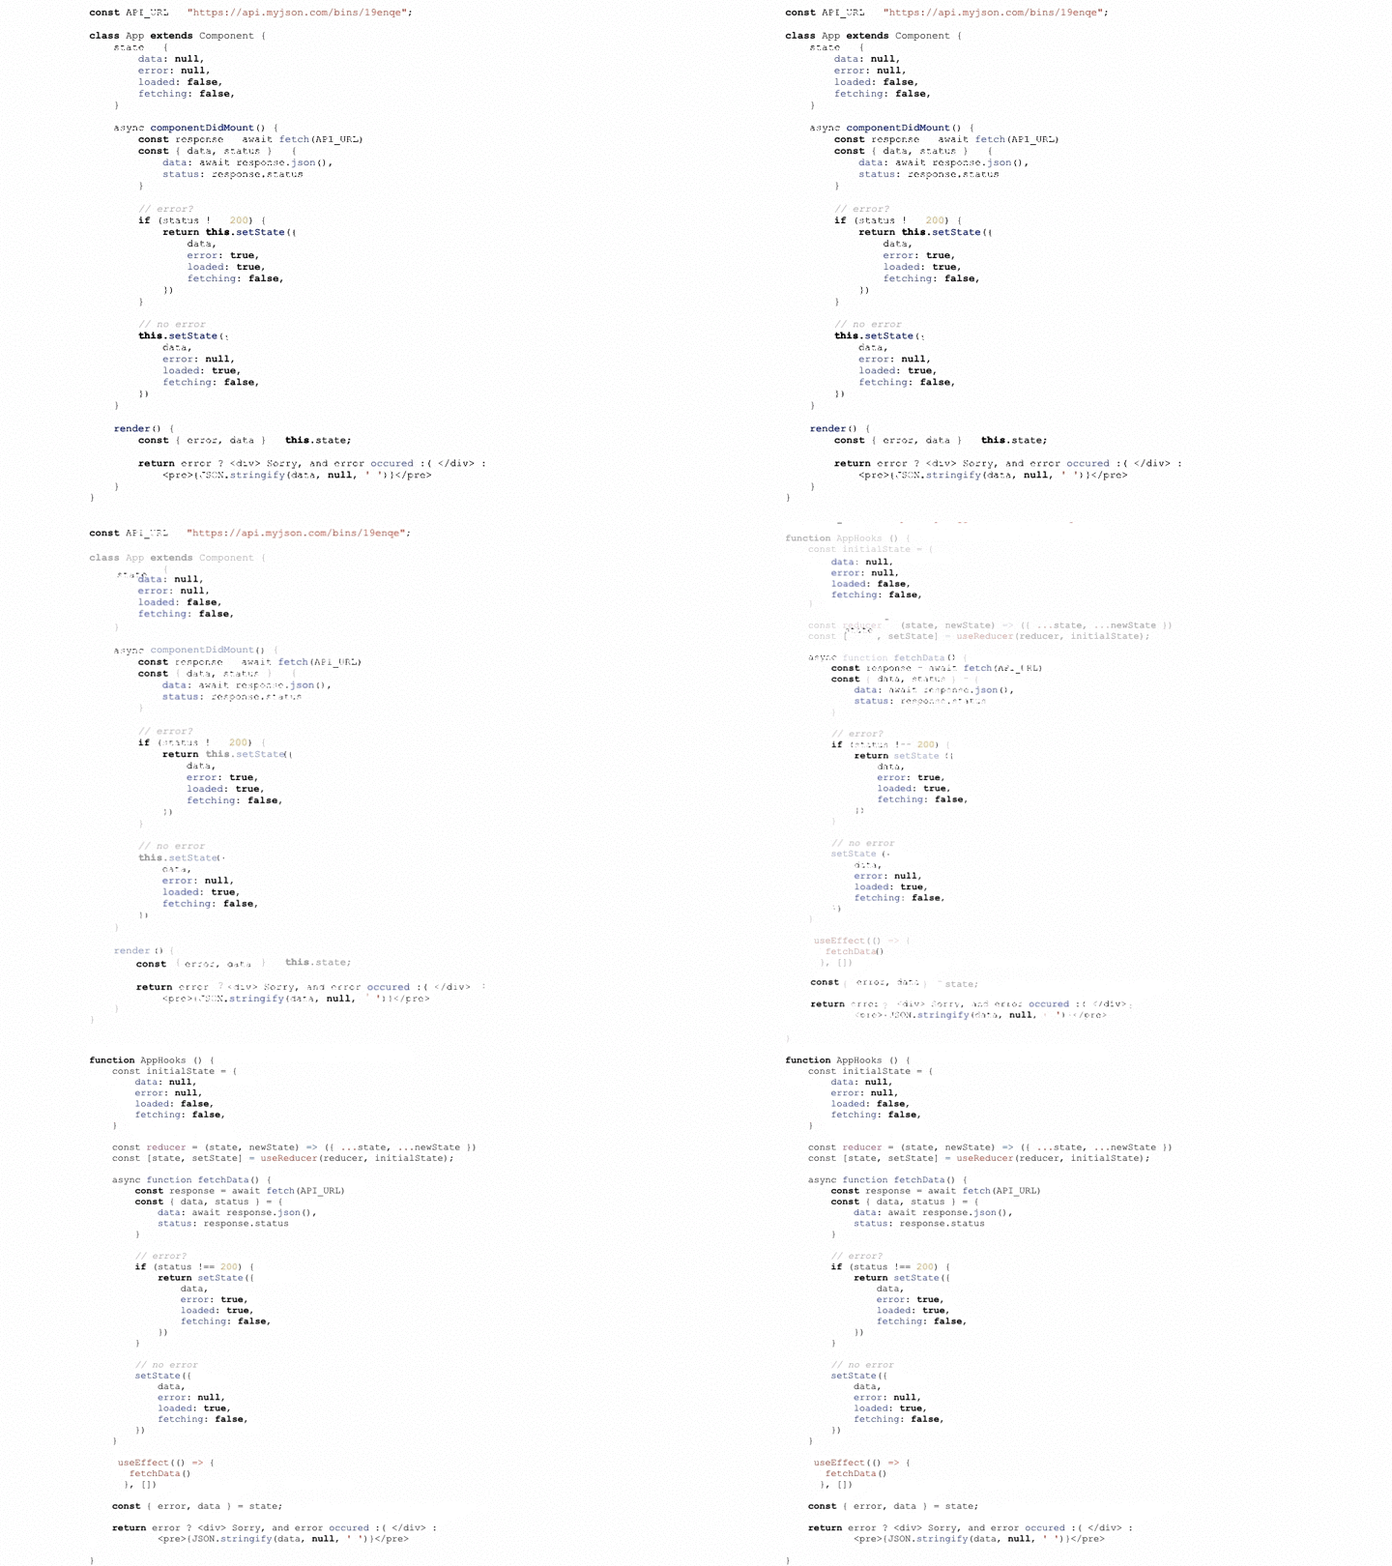
function AppHooks() {
  const initialState = {
    data: null,
    error: null,
    loaded: false,
    fetching: false,
  }
  const reducer = (state, newState) => ({ ...state, ...newState })
  const [state, setState] = useReducer(reducer, initialState);

  async function fetchData() {
    const response = await fetch(API_URL);
    const { data, status } = {
      data: await response.json(),
      status: response.status
    }

    // error?
    if (status !== 200) {
      setState({
        data,
        error: true,
        loaded: true,
        fetching: false,
      })
    }

    // no error
    setState({
      data,
      error: null,
      loaded: true,
      fetching: false,
    })
  }

  useEffect(() => {
    fetchData()
  }, [])


  const { error, data } = state
  return error ?  Sorry, and error occured :(  :
    <pre>{JSON.stringify(data, null, ' ')}</pre>
}
Another common challenge you’ll face will be refactoring the logic in your component’s componentDidMount, componentWillUnmount, and componentDidUpdate lifecycle methods.
The useEffect Hook is the perfect place to extract this logic. By default, the effect function within useEffect will run after every render. If you’re familiar with Hooks, this is common knowledge:
import { useEffect } from 'react'
useEffect(() => {
   // your logic goes here
   // optional: return a function for canceling subscriptions
   return () => {}
})
An interesting feature of the useEffect Hook is the second argument you could pass in, the dependency array. Consider the following example:
import { useEffect } from 'react'
useEffect(() => {

}, []) //
 array argument
Passing an empty array here will run the effect function only when the component mounts and clean it when it unmounts. This is ideal for cases when you want to track or fetch some data when the component mounts.
Below is an example where you pass a value to the dependency array:
import { useEffect } from 'react'
useEffect(() => {

}, [name]) //
 array argument with a value
The implication here is that the effect function will be invoked when the component mounts and again any time the value of the name variable changes.
useEffect object valuesThe useEffect Hook takes in a function argument that could possibly perform some side effects:
useEffect(doSomething)
The useEffect Hook also takes in a second argument, an array of values that the effect in the function depends on. For example:
useEffect(doSomething, [name])
In the code above, the doSomething function will only be run when the name value changes. This feature is very useful since you may not want the effect to run after every single render, which is the default behavior.
However, this poses another concern. For useEffect to call the doSomething function only when name has changed, it compares the previous name value to its current value, i.e., prevName === name.
While this works great for primitive JavaScript value types, what if name was an object? In JavaScript, objects are compared by reference. Technically, if name was an object, it would always be different on every render. Therefore, the prevName === name check will always be false.
By implication, the doSomething function will be run after every single render, which could be a performance concern depending on your application type. Let’s review a solution to this. Consider the trivial component below:
function RandomNumberGenerator () {
  const name = 'name'

  useEffect(
    () => {
      console.log('Effect has been run!')
    },
    [name]
  )

  const [randomNumber, setRandomNumber] = useState(0)

  return (
    <div>
      <h1>{randomNumber}</h1>
      <button
        onClick={() => {
          setRandomNumber(Math.random())
        }}
      >
        Generate random number!
      </button>
    </div>
  )
}
This component renders a button and a random number. Upon clicking the button, a new random number is generated:
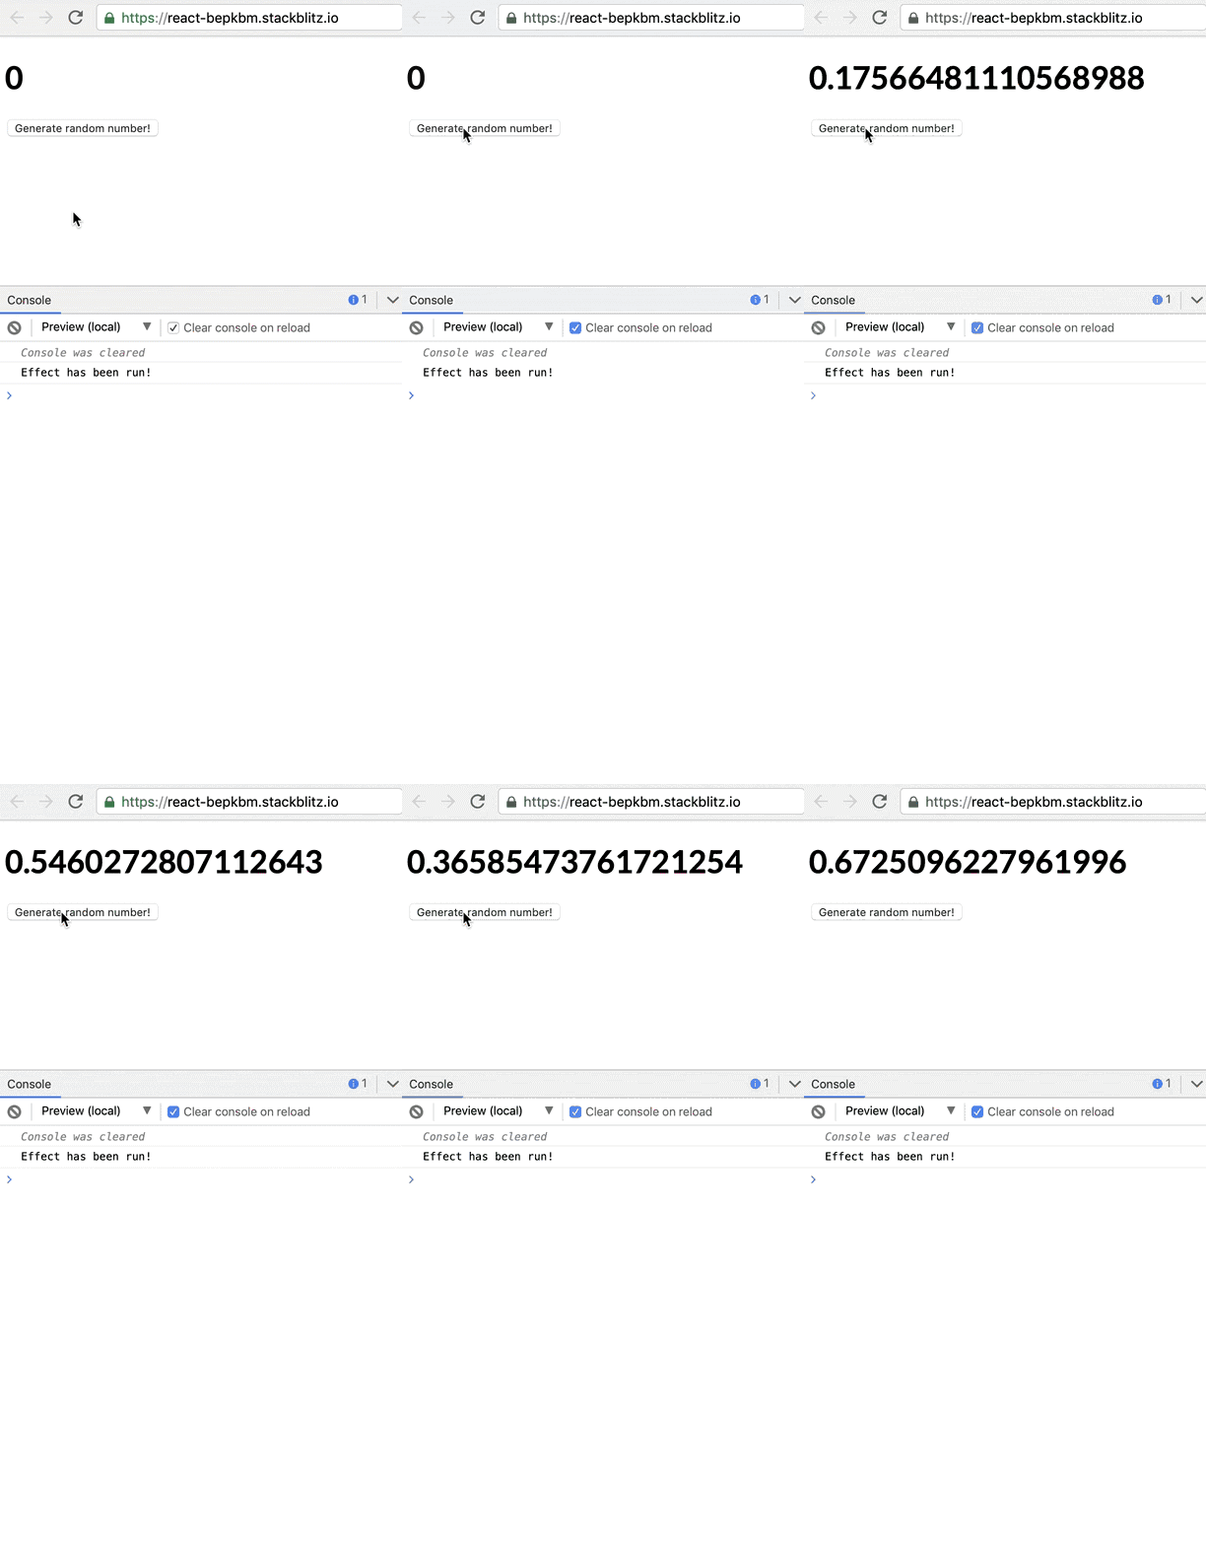
Note that the useEffect Hook’s effect is dependent on the name variable:
useEffect(() => {
    console.log("Effect has been run!")
  }, [name])
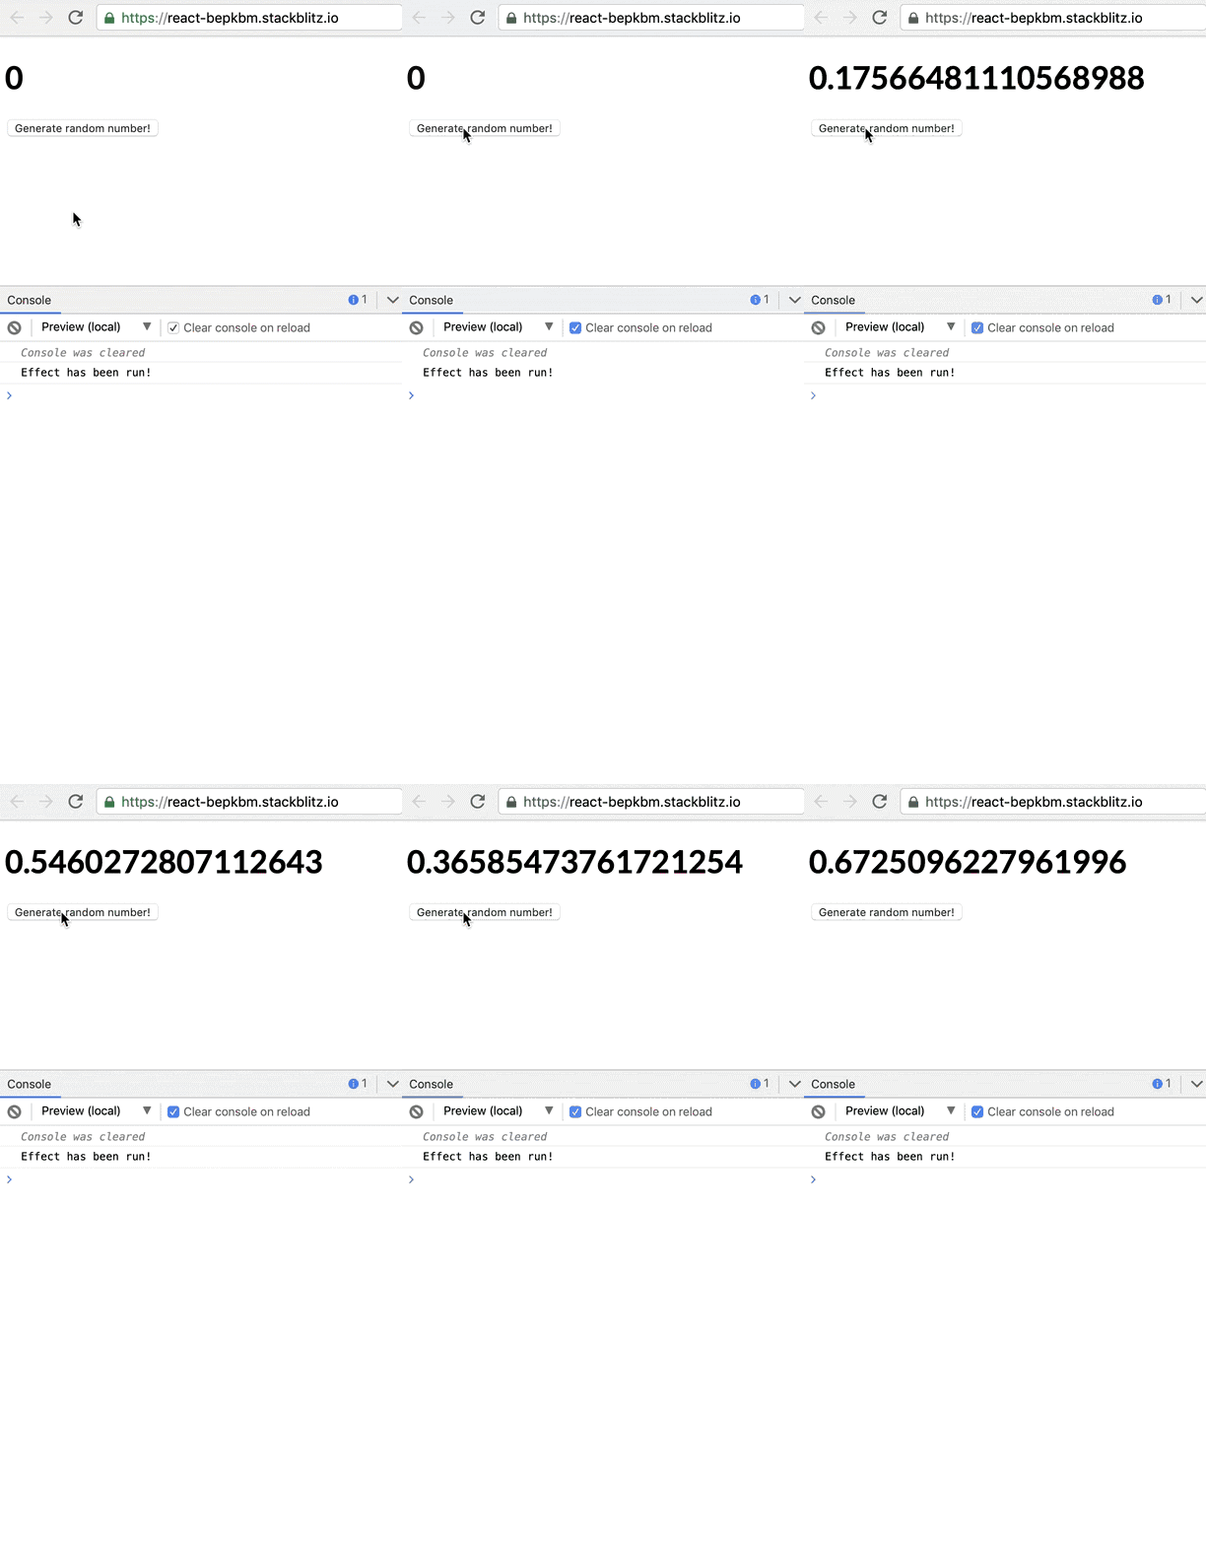
In this example, the name variable is a simple string. The effect will run when the component mounts. Therefore, console.log("Effect has been run!") will be invoked.
On subsequent renders, a shallow comparison will be made, for example, prevName === name, where prevName represents the previous value of the name before a new render.
Strings are compared by value, so "name" === "name" is always true. Therefore, the effect won’t be run. Consequently, you get the log output Effect has been run! only once:
Now, change the name variable to an object:
function RandomNumberGenerator() {
  // look here
  const name = {firstName: "name"}

  useEffect(() => {
    console.log("Effect has been run!")
  }, [name])

  const [randomNumber, setRandomNumber] = useState(0);

  return (
    <div>
      <h1>{randomNumber}</h1>
      <button onClick={()=> setRandomNumber(Math.random())}>Generate random number!</button>
    </div>
  );
}
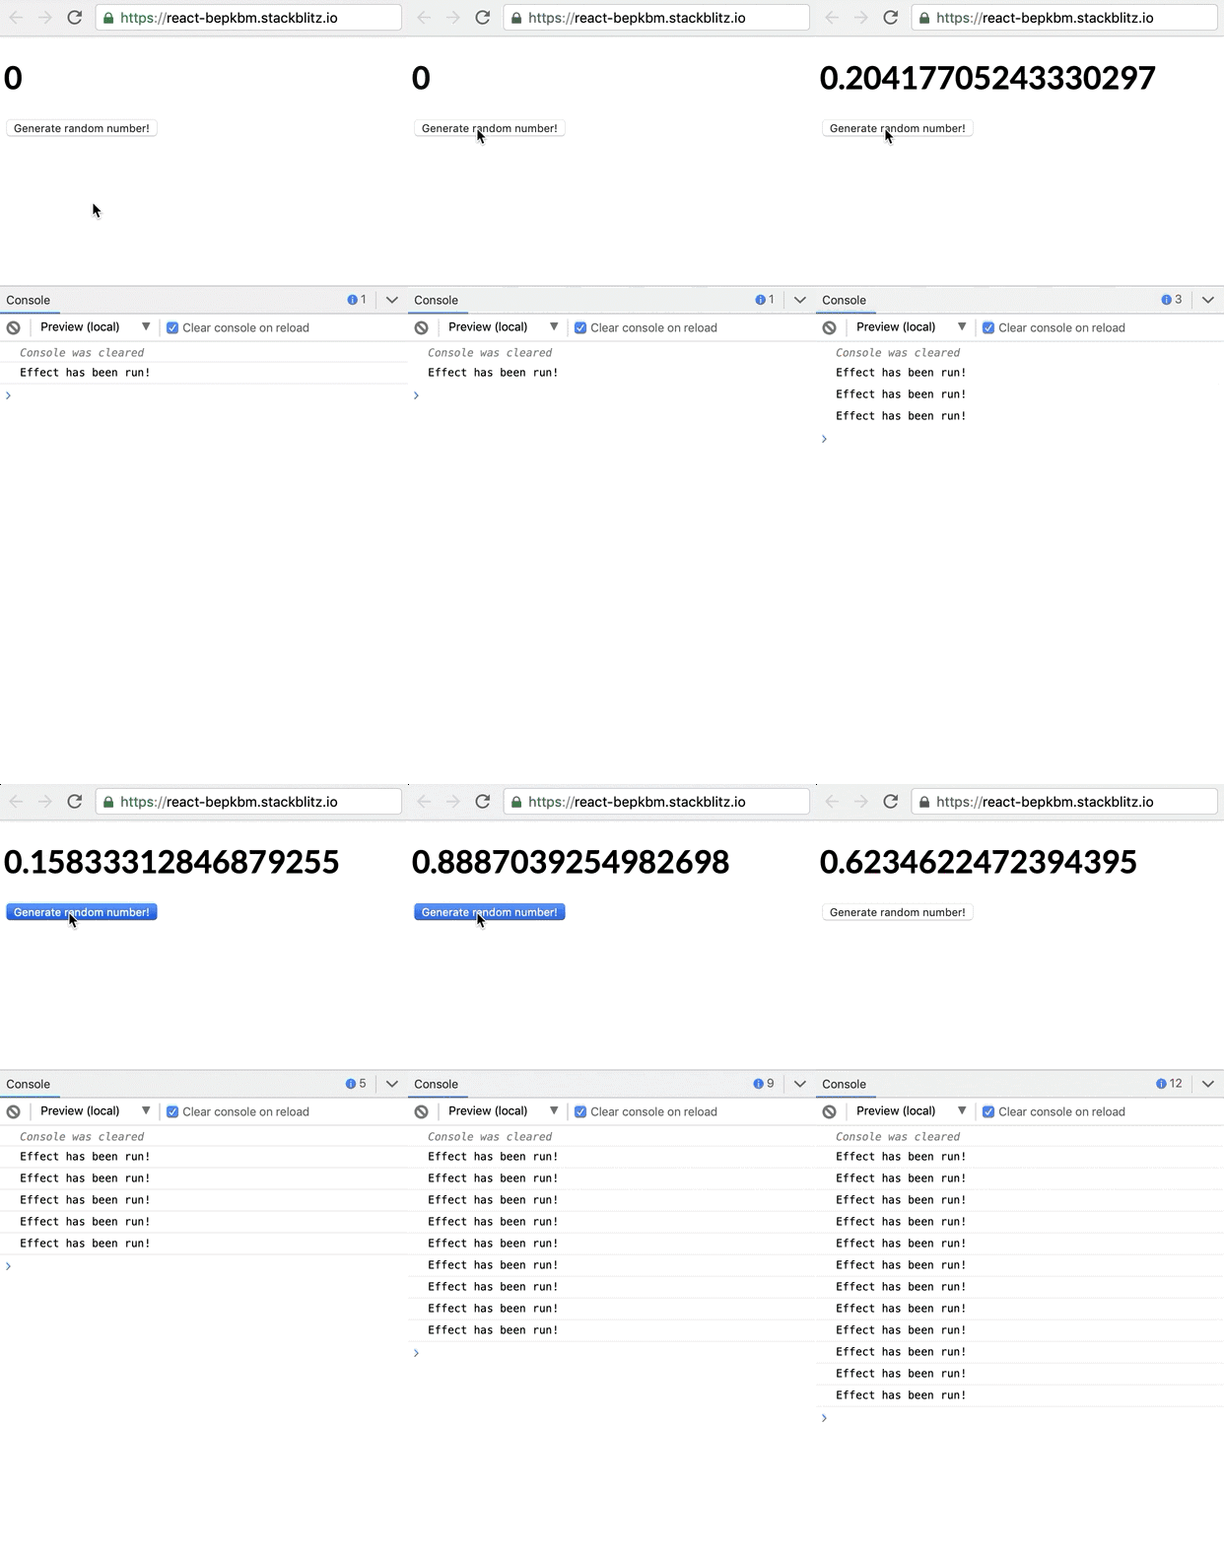
In this case, the shallow check is carried out again after the first render. However, since objects are compared by reference, not by value, the comparison fails. For example, the following expression returns false:
{firstName: "name"} === {firstName: "name"}
Consequently, the effect is run after every render, and you’ll get a lot of logs:
JSON.stringifyTo stop this from happening, run the code below:
...useEffect(() => {
    console.log("Effect has been run!")
}, [JSON.stringify(name)])
By using JSON.stringify(name), the value being compared is now a string and will be compared by value. Although this works, you should proceed with caution. You should only use JSON.stringify on objects with simple values and easily serializable data types.
Using a manual conditional check involves keeping track of the previous value, in this case, name, and doing a deep comparison check on its current value. However, you’ll notice it involves a little more code:
// the isEqual function can come from anywhere
// - as long as you perform a deep check.
// This example uses a utility function from Lodash
import {isEqual} from 'lodash'

function RandomNumberGenerator() {
  const name = {firstName: "name"}

  useEffect(() => {
    if(!isEqual(prevName.current, name)) {
      console.log("Effect has been run!")
    }
  })

  const prevName = useRef;
  useEffect(() => {
    prevName.current = name
  })

  const [randomNumber, setRandomNumber] = useState(0);

  return <div>
    <h1> {randomNumber} </h1>
    <button onClick={() => { setRandomNumber(Math.random()) }}>
       Generate random number!
    </button>
  </div>
}
Next, before running the effect, we’ll check if the values aren’t equal:
!isEqual(prevName.current, name)
What’s prevName.current? With Hooks, you can use the useRef Hook to keep track of values. In the example above, the code segment below is responsible for that:
const prevName = useRef;
useEffect(() => {
    prevName.current = name
})
The command above keeps track of the previous name used in the earlier useEffect Hook. I know this can be confusing to understand, so I’ve included a well-annotated version of the full code below:
/**
 * To read the annotations correctly, read all turtle comments first

 // - from top to bottom.
 * Then come back to read all unicorns
 - from top to bottom.
 */


function RandomNumberGenerator() {
  //
 1. The very first time this component is mounted,
  // the value of the name variable is set below
  const name = {firstName: "name"}

  //
 2. This hook is NOT run. useEffect only runs sometime after render
  //
 6. After Render this hook is now run.
  useEffect(() => {

  //
 7. When the comparison happens, the hoisted value
  // of prevName.current is "undefined".
  // Hence, "isEqual(prevName.current, name)" returns "false"
  // as {firstName: "name"} is NOT equal to undefined.
    if(!isEqual(prevName.current, name)) {

  //
 8. "Effect has been run!" is logged to the console.
  //console.log("Effect has been run!")
    }
  })

  //
 3. The prevName constant is created to hold some ref.
  const prevName = useRef;

  //
 4. This hook is NOT run
  //
 9. The order of your hooks matter! After the first useEffect is run,
  // this will be invoked too.
  useEffect(() => {
    //
 10. Now "prevName.current" will be set to "name".
    prevName.current = name;
   //
 11. In subsequent renders, the prevName.current will now hold the same
    // object value - {firstName: "name"} which is alsways equal to the current
    // value in the first useEffect hook. So, nothing is logged to the console.
  //
 12. The reason this effect holds the "previous" value is because
    // it'll always be run later than the first hook.
   })

  const [randomNumber, setRandomNumber] = useState(0)

  //
 5. Render is RUN now - note that here, name is equal to the object,
  // {firstName: "name"} while the ref prevName.current holds no value.
  return
{randomNumber}
{ setRandomNumber(Math.random()) }}> Generate random number! }
useMemo HookThe useMemo Hook provides a pretty elegant solution in my opinion:
function RandomNumberGenerator() {
  // look here

  const name = useMemo(() => ({
    firstName: "name"
  }), [])

  useEffect(() => {
      console.log("Effect has been run!")
  }, [name])

  const [randomNumber, setRandomNumber] = useState(0)
  return (
    <div>
      <h1>{randomNumber}</h1>
      <button onClick={()=> setRandomNumber(Math.random()) }> Generate random number! </button>
    </div>
  )
}
The useEffect Hook still depends on the name value, but here, the name value is memoized, provided by useMemo:
const name = useMemo(() => ({
    firstName: "name"
}), [])
useMemo takes in a function that returns a certain value. In this case, the object {firstName: "name"}. The second argument to useMemo is an array of dependencies that works just like those in useEffect. If no array is passed, then the value is recomputed on every render.
Passing an empty array computes the value on mounting the component without recomputing the value across renders. This keeps the name value the same by reference across renders.
The useEffect Hook should now work as expected without calling the effect multiple times, even though name is an object. name is now a memoized object with the same reference across renders:
...useEffect(() => {
      console.log("Effect has been run!")
}, [name]) //
 name is memoized!
useEffectOne of the more disturbing issues you may face when refactoring your app or components to use Hooks is that some of your older tests may now fail for seemingly no reason.
If you find yourself in this position, understand that there is indeed a reason for the failed tests, sadly. With useEffect, it’s important to note that the effect callback isn’t run synchronously; it runs at a later time after render. Therefore, useEffect isn’t quite the same as componentDidMount with componentDidUpdate and componentWillUnmount.
Owing to this async behavior, some, if not all, of your older tests may now fail when you introduce useEffect.
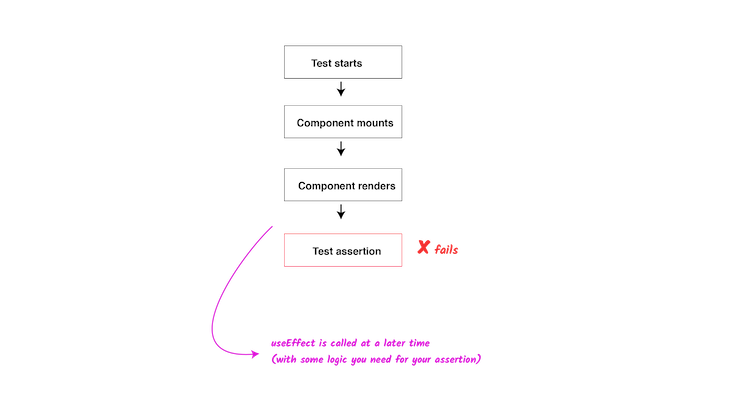
As a solution, using the act() utility from ReactTestUtils helps a lot in this cases. If you use React Testing Library for your tests, then it integrates pretty well under the hood with act(). With React Testing Library, you still need to wrap manual updates like state updates or firing events within your test into act():
act(() => {
    /* fire events that update state */
});
/* assert on the output */
I recommend checking out the example in this discussion on GitHub, as well as this discussion on making async calls within act(). Finally, you’ll find amazing examples of how act() works in this GitHub repo.
If you use a testing library like Enzyme and have a couple of implementation details in your tests, like calling methods like instance() and state(), you’ll run into another issue related to failing tests. In these cases, your tests may fail just by refactoring your components to functional components.
I tend to use the render props API all over the place. Thankfully, refactoring a component that uses the render props API to use a Hooks-based implementation is no big deal. However, there’s one small catch. Consider the following component that exposes a render prop API:
class TrivialRenderProps extends Component {
  state = {
    loading: false,
    data: []
  }
  render() {
    return this.props.children(this.state)
  }
}
Although this is a contrived example, it’s good enough! Below is an example of how we’ll use this component:
function ConsumeTrivialRenderProps() {
  return <TrivialRenderProps>
    {({loading, data}) => {
      return <pre>
        {`loading: ${loading}`} <br />
        {`data: [${data}]`}
      </pre>
    }}
  </TrivialRenderProps>
}
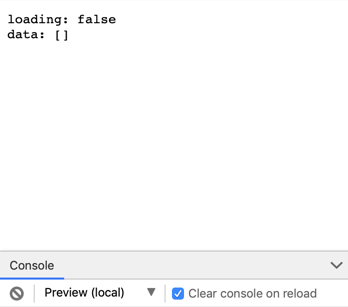
Rendering the ConsumeTrivialRenderProps component just displays the value of the loading and data values as received from the render props API:
So far, so good! The problem with render props is that it can make your code look more nested than you’d like. Thankfully, as mentioned earlier, refactoring the TrivialRenderProps component to a Hooks implementation isn’t a big deal.
To do so, you just wrap the component implementation within a custom Hook and return the same data as before. When done right, the refactored Hooks API will be consumed as follows:
function ConsumeTrivialRenderProps() {
  const { loading, setLoading, data } = useTrivialRenderProps()
  return <pre>
    {`loading: ${loading}`} <br />
    {`data: [${data}]`}
  </pre>
}
This looks a lot neater! Below is our custom useTrivialRenderProps Hook:
function useTrivialRenderProps() {
  const [data, setData] = useState([])
  const [loading, setLoading] = useState(false)
 return {
    data,
    loading,
  }
}
And that’s it!
// before
class TrivialRenderProps extends Component {
  state = {
    loading: false,
    data: []
  }
  render() {
    return this.props.children(this.state)
  }
}

// after
function useTrivialRenderProps() {
  const [data, setData] = useState([])
  const [loading, setLoading] = useState(false)

  return {
    data,
    loading,
  }
}
When working on a large codebase, you may have a certain render prop API consumed in many different places. Changing the implementation of the component to use Hooks means you have to change how the component is consumed in many different places.
Is there some trade-off we can make here? Absolutely! You could refactor the component to use Hooks, but also expose a render props API. By doing so, you can incrementally adopt Hooks across your codebase instead of having to change a lot of code all at once. Below is an example:
// hooks implementation
function useTrivialRenderProps() {
  const [data, setData] = useState([])
  const [loading, setLoading] = useState(false)
  return {
    data,
    loading,
  }
}
// render props implementation
const TrivialRenderProps = ({children, ...props}) => children(useTrivialRenderProps(props));
// export both
export { useTrivialRenderProps };
export default TrivialRenderProps;
By exporting both implementations, you can incrementally adopt Hooks in your entire codebase. Both the former render props consumers and the newer Hook consumers will work perfectly:
// this will work

function ConsumeTrivialRenderProps() {
  return <TrivialRenderProps>
    {({loading, data}) => {
      return <pre>
        {`loading: ${loading}`} <br />
        {`data: [${data}]`}
      </pre>
    }}
  </TrivialRenderProps>
}
// so will this

function ConsumeTrivialRenderProps() {
  const { loading, setLoading, data } = useTrivialRenderProps()
  return <pre>
    {`loading: ${loading}`} <br />
    {`data: [${data}]`}
  </pre>
}
Interestingly, the new render props implementation uses Hooks under the Hooks as well:
// render props implementation
const TrivialRenderProps = ({children, ...props}) => children(useTrivialRenderProps(props));
It’s not uncommon to have class components where certain state properties are initialized based off of some computation. Below is a basic example:
class MyComponent extends Component {
  constructor(props) {
    super(props)
    this.state = { token: null }
    if (this.props.token) {
      this.state.token = this.props.token
    } else {
      token = window.localStorage.getItem('app-token');
      if (token) {
        this.state.token = token
      }
    }
  }
}
While our example is simple, it shows a generic problem. It’s possible that as soon as your component mounts, you set some initial state in the constructor based on some computations.
In this example, we check if a token prop is passed in or if there’s an app-token key in local storage, and we then set state based off that. Upon refactoring to Hooks, how do you handle such logic to set initial state?
Perhaps a lesser-known feature of the useState Hook is that the initialState parameter you pass to the useState Hook, useState(initialState), may also be a function!
Whatever you return from this function is then used as the initialState. The code below shows what the component looks like after it’s been refactored to use Hooks:
function MyComponent(props) {
   const [token, setToken] = useState(() => {
     if(props.token) {
       return props.token
     } else {
       tokenLocal = window.localStorage.getItem('app-token');
       if (tokenLocal) {
         return tokenLocal
       }
     }
   })
}
Technically, the logic stays almost the same. What’s important here is that you can use a function in useState if you need to initialize state based off of some logic.
Refactoring your application to use Hooks isn’t something you have to do. You should weigh the different options for yourself and your team. You can choose to keep your class-based components because they can still work along with functional-based components. However, if you choose to refactor your components to use the Hooks API, then I hope you’ve found some great tips in this article. Be sure to leave a comment below if you have any questions, and happy coding!
Install LogRocket via npm or script tag. LogRocket.init() must be called client-side, not
server-side
$ npm i --save logrocket

// Code:

import LogRocket from 'logrocket';
LogRocket.init('app/id');
// Add to your HTML:

<script src="https://cdn.lr-ingest.com/LogRocket.min.js"></script>
<script>window.LogRocket && window.LogRocket.init('app/id');</script>

Compare the top AI development tools and models of February 2026. View updated rankings, feature breakdowns, and find the best fit for you.

Broken npm packages often fail due to small packaging mistakes. This guide shows how to use Publint to validate exports, entry points, and module formats before publishing.

Discover what’s new in The Replay, LogRocket’s newsletter for dev and engineering leaders, in the February 11th issue.

Cut React LCP from 28s to ~1s with a four-phase framework covering bundle analysis, React optimizations, SSR, and asset/image tuning.
Would you be interested in joining LogRocket's developer community?
Join LogRocket’s Content Advisory Board. You’ll help inform the type of content we create and get access to exclusive meetups, social accreditation, and swag.
Sign up now
4 Replies to "How to refactor React components to use Hooks"
This is the best article that explains well the different react hooks for me. Thanks a lot for this! Btw, do you recommend to omit react-redux over react hooks? Sorry about my grammar.
Not a single word about useCallback?
very trivial in most components
Hello, thank you for this thorough article. I do have a question about the second example involving the class component with proptypes. I was wondering how/why the refactored code resulted in this:
App.propTypes = {
name: PropTypes.number
}
Particularly, it is the “PropTypes.number” part of it I don’t understand. Because it first appears as:
static propTypes = {
name: PropTypes.string
}
Any clarification would be greatly appreciated. Thank you.
useEffects should be useEffect in a few places